Laresar L6 Pro Bedienungsanleitung
Vorschau ausblenden
Andere Handbücher für L6 Pro:
- Montageanleitung (16 Seiten) ,
- Benutzerhandbuch (32 Seiten) ,
- Bedienungsanleitung
Inhaltsverzeichnis
Verfügbare Sprachen
Verfügbare Sprachen
Inhaltsverzeichnis
Fehlerbehebung

Verwandte Anleitungen für Laresar L6 Pro


Inhaltszusammenfassung für Laresar L6 Pro
- Seite 2 LANGUAGE Deutsch ------------------------------------ ------------------------------------ English...
-
Seite 3: Inhaltsverzeichnis
If you have any questions, please email to support09@laresar.us INHALT -------------------------------------------- WICHTIGER SICHERHEITSHINWEIS ------------------------------------------------------------------------------- PACKLISTE ------------------------------------------------------------ PRODUKTINFORMATION -------------------------------------------------------------------- INSTANDHALTUNG ----------------------------------------------------------------------- 4.1 Ersetzen Sie den Staubbeutel ----------------------------------------------------------------- 4.2 Reinigen Sie den Staubdurchgang ------------------- 4.3 Reinigen Sie den Infrarotlinsen-/Lade- und Staubsammelsensorkopf ----------------------------------------------------------- 4.4 Reinigen Sie das Filtersieb des Lüfters... -
Seite 4: Wichtiger Sicherheitshinweis
1. WICHTIGER SICHERHEITSHINWEIS ACHTUNG: Bevor Sie dieses Gerät verwenden, lesen Sie bitte alle Anweisun- gen im Handbuch und die Warnhinweise auf dem Gerät sorgfältig durch. Dieses Benutzerhandbuch enthält Informationen zu den behördlichen Modellen: Laresar L6 Pro Roboterstaubsauger und Laresar LS-03 Staubsammelladestation. Anwendungsbereich Dieses Gerät ist nur für den Innenbereich bestimmt. -
Seite 5: Packliste
If you have any questions, please email to support09@laresar.us Hinweise zum Aufladen Dieses Gerät darf nur mit dem mitgelieferten Netzteil (LS-03) betrieben werden. Der Akku muss aus diesem Gerät entfernt werden, bevor dieses Gerät entsorgt wird. Dieses Produkt wird mit einem für die Region zugelassenen Netzkabel geliefert und ist nur für den Anschluss an eine haushaltsübliche Netzsteckdose vorgesehen. - Seite 6 If you have any questions, please email to support09@laresar.us Zwei-in-Eins-Wasser- Im Inneren des Saugrobot- tank Im Inneren des Saugrobot- Unterstützung für Wischtuch 1 Stück auf dem Saugroboter, Wischtuch 1 Stück ist ein Geschenk im Paket Geschenke, im Paket Einweg-Mopptuch 1 Stück auf der Ladestation für Staubbeutel die Staubsammlung, 4 Stück...
-
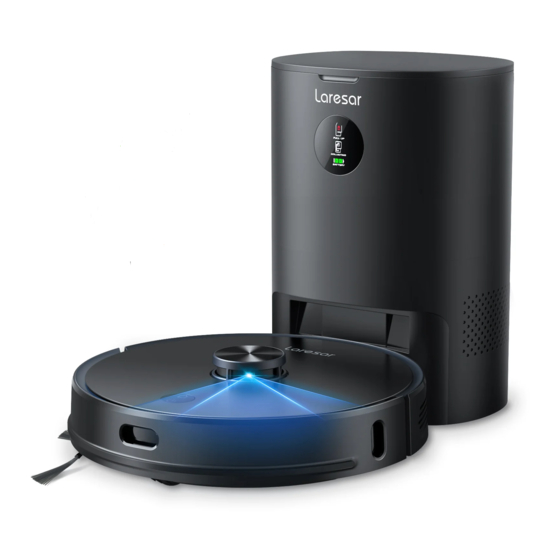
Seite 7: Produktinformation
If you have any questions, please email to support09@laresar.us 3. PRODUKTINFORMATION Roboter-Staubsauger Infrarotsensor Stoßstange Lidar Ladetaste / -anzeiger Einmal kurz drücken zum Antikollisionsstreifen Aufladen Power-Taste/Anzeige Zum Ein- oder Ausschalten 3 Sekunden Infrarotsensor lang drücken Einmal kurz drücken, um die Reinigung zu... - Seite 8 If you have any questions, please email to support09@laresar.us *IIndikatorstatusdefinition: Atmung: In 4 Sekunden allmählich ein- und ausschalten Langsam blinken: Ein für 0,7 Sekunden, aus für 0,8 Sekunden Schnelleres Blitzen: Ein für 0,1 Sekunden, aus für 0,2 Sekunden Mopp-Tuch-Montage Hauptbürstenabdeckung Hauptbürste...
-
Seite 9: Ladestation Für Staubsammlung
If you have any questions, please email to support09@laresar.us Ladestation für Staubsammlung Obere Abdeckung Bildschirm Staubbeutel ist voll: Das Licht ist hell Staubbeutel ist nicht richtig installiert: Das Licht blinkt Während der Staubsammlung: Staubbeutelkammer Die Lampe ist hell und blinkt Volle Leistung: Grünes langes... -
Seite 10: Reinigen Sie Den Staubdurchgang
If you have any questions, please email to support09@laresar.us Öffnen Sie die obere Wirf den gebrauchten Ziehen Sie den Hebegriff Abdeckung Staub weg des Staubbeutels hoch und nehmen Sie den Staubbeutel heraus Schließen Sie die obere Installieren Sie einen Abdeckung neuen Staubbeutel 4.2 Reinigen Sie den Staubdurchgang... -
Seite 11: Reinigen Sie Den Infrarotlinsen-/Lade- Und Staubsammelsensorkopf
If you have any questions, please email to support09@laresar.us Transparente Abdeckung des Staubdurchgangs Staubpassage 4.3 Reinigen Sie den Infrarotlinsen-/Lade- und Staubsammelsensorkopf Wischen Sie sie vorsichtig mit einem sauberen, weichen, trockenen Tuch ab. Es wird empfohlen, sie einmal im Monat zu reinigen. -
Seite 12: Reinigen Sie Die Hauptbürste
If you have any questions, please email to support09@laresar.us 4.5 Reinigen Sie die Hauptbürste Die Hauptbürste ist Verbrauchsmaterial und sollte mindestens einmal pro Woche gereinigt werden. Es wird empfohlen, die Hauptbürste alle 6-12 Monate auszutauschen, um die Reinigungswirkung zu gewährleisten. -
Seite 13: Batteriewartung
If you have any questions, please email to support09@laresar.us Sensor des Saugroboters Senor der Ladestation Klippensensor ×4 Infrarotlinse ×2 Infrarotsensor ×3 Lade- und Staubsammelsensorkopf ×2 Ladeelektrodenspitze ×2 Wandfolgender TOF-empfindlicher Detektor x1 Infrarotsensor Wandfolgender TOF-empfindlicher Detektor Infrarotlinse Klippensensor Infrarotsensor Lade- und Staubsam-... - Seite 14 If you have any questions, please email to support09@laresar.us ③ Entfernen Sie den Filtersiebclip. ④ Nehmen Sie das Filtersieb heraus. ⑤ Entfernen Sie den Schmutz auf ⑥ Drehen Sie den Wasserhahn auf, dem Filtersieb und Siebclip mit einer um den Staubbehälter zu reinigen.
-
Seite 15: Spezifikation
If you have any questions, please email to support09@laresar.us ⑧ Bitte entfernen Sie die Wassertankarmaturen gemäß der Abbildung von der Maschine und drehen Sie sie um, entfernen Sie den Mopp oder ersetzen Sie ihn. ! Tipps: Wenn der Mopp zu schmutzig ist, wird die Wirkung des Wischens beeinträchtigt, bitte reinigen Sie ihn rechtzeitig. -
Seite 16: Fehlerbehebung
If you have any questions, please email to support09@laresar.us 6. FEHLERBEHEBUNG Wenn das Gerät nicht normal läuft, blinkt die Betriebsanzeige orange und das Gerät gibt eine Sprachansage aus, wenn einige Fehler auftreten. Eine Lösung finden Sie in der Tabelle unten. - Seite 17 If you have any questions, please email to support09@laresar.us Das Lidar ist gedrückt oder Der Lidardeckel ist gedrückt Die Lidar-Abdeckung steckt klemmt. Bitte verschieben Sie fest es an eine andere Position, um zu beginnen Die Batterietemperatur ist zu hoch oder zu niedrig. Bitte Der Akku weist während des...
- Seite 18 If you have any questions, please email to support09@laresar.us Auf der Hauptbürste/Seiten- Während der Reinigung sind Bitte schalten Sie das Gerät bürste oder dem Hauptrad ungewöhnliche Geräusche zur Reinigung aus aufgewickelte Fremdkörper zu hören Bitte reinigen Sie den Der Staubbehälter ist voll oder Die Reinigungsleistung wird Staubbehälter, das Filtersieb...
-
Seite 19: Garantie
Verwendung von Teilen, die nicht der Laresar Betriebsanleitung entsprechen. Verwendung von Teilen und Zubehör, die nicht von Laresar hergestellt oder empfohlen wurden. Externe Faktoren, die nichts mit Produktqualität und -verwendung zu tun haben, wie zum Beispiel versehen- tlicher Wasserschaden. -
Seite 20: Verfügung
Handbuchs noch Fragen haben, können Sie sich gerne an uns wenden. E-Mail an unseren Kundenservice: Supportde@laresar.us Laresar ist hier, um zu helfen und wir freuen uns, Ihnen zu dienen. 8. VERFÜGUNG Dieses Produkt darf nicht über den Hausmüll entsorgt werden. Entsorgen Sie das Gerät an einer autorisierten Sammelstelle für das Recycling von Elektrogeräten.