Herunterladen Inhalt Inhalt Diese Seite drucken

Werbung

Verfügbare Sprachen

Verfügbare Sprachen

Avision Network Box
Quick Setup Guide
Microsoft is a registered trademark and the Internet Explorer is a trademark of Microsoft Corporation.
TM
Google Play and Android
are registered trademarks of Google Inc, registered in the U.S. and other countries.
®
Wi-Fi
is a registered trademark of the Wi-Fi Alliance.
iOS is a trademark or registered trademark of Cisco in the United States.
Other brands and product names herein are trademarks or registered trademarks of their respective holders.
Regulatory Model Number: UNICORN
European Union Regulatory Notice
Introduction
By connecting the Network Box to your scanner, your scanner* can be converted into a
wireless or wired device to let other Android
(smartphone/tablet), wireless or wired computers scan a document and receive a scanned
image in the LAN.
* Only available for selected Avision scanner models. Check with Avision's web site
(www.avision.com) for complete supported models.
Products bearing the CE marking comply with the following EU Directives:
Low Voltage Directive 2014/35/EC
EMC Directive 2014/30/EC
Restriction of the use of certain hazardous substances (RoHS) Directive 2011/65/EU
R&TTE Directive 1999/5/EC
TM
-based or iOS-based mobile devices
1

Werbung

Inhaltsverzeichnis
loading

Inhaltszusammenfassung für Avision Network Box MB01W

  • Seite 1 Android -based or iOS-based mobile devices (smartphone/tablet), wireless or wired computers scan a document and receive a scanned image in the LAN. * Only available for selected Avision scanner models. Check with Avision’s web site (www.avision.com) for complete supported models.
  • Seite 2 Ports and LED     “24VDC OUT” Port: Used to connect the power cable (included) to the scanner.  USB Port: Used to connect the USB cable (included) to the scanner.  Power LED: Turns green when the box is powered on. Status LED: The color of the LED indicates the connection type and status.
  • Seite 3       “LAN” Port: Used to connect the LAN cable to the Network Box for wired network connection.  “5VDC 1.5A” Port: For scanner without a 24VDC power jack, use this port to connect the box to a USB power adapter via a Micro USB cable. ...
  • Seite 4: Cable Connection

    Cable Connection a: The supplied power cable b: The supplied USB cable c: The power adapter that comes with the scanner Plug one end of the supplied power cable (a) to the power jack of the scanner and the other end to the port marked “24VDC OUT” of the Network Box. Connect the square end of the supplied USB cable (b) to the USB port of the scanner and the rectangle end to the USB port of the Network Box.
  • Seite 5: Wired Network

    Choose Your Connection Type 1 Wired Network In wired network mode, your computer is connected to Network Box through Ethernet cables. Plug one end of the network cable (d) to the available port of the switching hub of your LAN. Plug the other end to the LAN port of your wireless computer.
  • Seite 6 3 Wireless Network – Internet (Client) Mode In Client mode, your mobile devices and Network Box are connected wirelessly through an additional AP (Access Point). To connect your mobile devices and Network Box in Client mode, Connect Network Box to your specified Access Point: Connect Network Box first to your wireless computer, smartphone, or tablet, and then open your browser (i.e.
  • Seite 7 Operation Before You Begin! To use the network scanner, please first download and install the Network Tool – [Virtual Scanner Link] from Avision’s web site (www.avision.com) to search and connect the scanner. Scan from A Wired Computer Start [Virtual Scanner Link] by choosing Start>All Programs>Avision Virtual Scanner>Virtual Scanner Link.
  • Seite 8 Important: When using the bundled software Avision Capture Tool to scan, you may be prompted with the message “Can not find scanner”. Please wait a while and try again as the scanner may be warming up or communicating with Network Box.
  • Seite 9 Scan from A Wireless Computer in Internet (Client) Mode Connect Network Box to an AP (Access Point) via Network Box’s web page On your wireless computer, click the [Wi-Fi Network] icon in the taskbar and select the network ID -MB-xxxx (xxxx is where the last four digits of the Mac address on the label of the Network Box).
  • Seite 10 Scan from a Wireless Computer On your wireless computer, click the [Wi-Fi Network] icon in the taskbar and select your specified [Network Name] (SSID). Wait a few seconds for the connected status confirmation. (Important! The same network name (SSID) has to be selected so that Network Box and your wireless computer are in the same wireless LAN.
  • Seite 11 The Wi-Fi enabled scanner can be connected to several users at a time. However, only one user is allowed to scan at a time. * To ensure quality support and service, please register the product from Avision’s web site on www.avision.com. * * For more detailed information about using Network Box, please refer to the user’s guide of...
  • Seite 13: Avision Network Box Schnelleinrichtungsanleitun

    Mobilgeräten (Smartphones/Tablets) sowie kabellosen oder kabelgebundenen Computern das Scannen eines Dokuments und das Empfangen eines gescannten Bildes in einem LAN ermöglicht. * Nur bei ausgewählten Scannermodellen von Avision verfügbar. Eine vollständige Auflistung der unterstützten Modelle finden Sie auf der Avision-Webseite (www.avision.com).
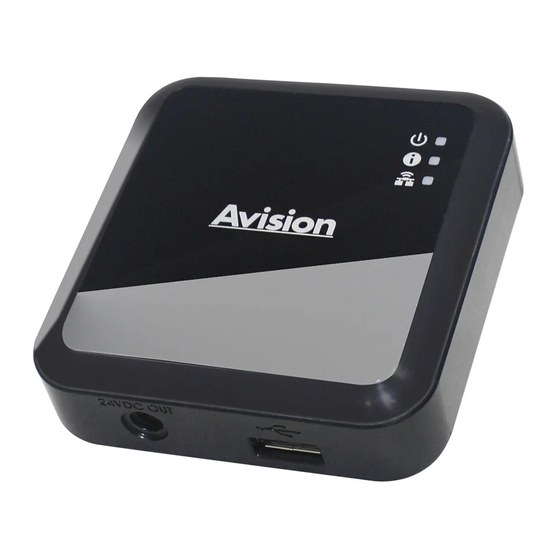
  • Seite 14: Anschlüsse Und Leds

    Anschlüsse und LEDs    „24VDC OUT“-Anschluss: Hier schließen Sie das Netzkabel (mitgeliefert) am Scanner an.  USB-Port: Hier schließen Sie das USB-Kabel (mitgeliefert) am Scanner an.   Betriebs-LED: Leuchtet grün, wenn das Gerät eingeschaltet ist. Status-LED: Die Farbe der LED zeigt Verbindungsart und -status an. LED-Farbe Status Beschreibung...
  • Seite 15       „LAN“-Port: Hier schließen Sie das LAN-Kabel zum herstellen einer kabelgebundenen Netzwerkverbindung an der Network Box an.  „5VDC 1.5A“-Anschluss: Bei einem Scanner ohne 24-V-Gleichspannungsanschluss dient dieser Port dem Anschluss des Gerätes an einem USB-Netzteil via Micro-USB-Kabel. ...
  • Seite 16: Kabelanschluss

    Kabelanschluss a: Das mitgelieferte Netzkabel b: Das mitgelieferte USB-Kabel c: Das mit dem Scanner gelieferte Netzteil Schließen Sie ein Ende des mitgelieferten Netzkabels (a) am Netzanschluss des Scanners und das andere Ende an dem mit „24VDC OUT“ gekennzeichneten Anschluss der Network Box an. Verbinden Sie das quadratische Ende des mitgelieferten USB-Kabels (b) mit dem USB-Port des Scanners und das rechteckige Ende mit dem USB-Port der Network Box.
  • Seite 17: Ihren Anschlusstyp Wählen

    Ihren Anschlusstyp wählen 1 Kabelgebundenes Netzwerk Im kabelgebundenen Netzwerkmodus ist Ihr Computer über Netzwerkkabel mit der Network Box verbunden. Schließen Sie ein Ende des Netzwerkkabels (d) an einem freien Anschluss des Switching-Hub Ihres LAN an. Schließen Sie das andere Ende am LAN-Port Ihres kabellosen Computers an.
  • Seite 18 3 Drahtlosnetzwerk – Internet-Modus (Client) Im Client-Modus werden Ihre Mobilgeräte und die Network Box kabellos über einen zusätzlichen Zugangspunkt verbunden. Um Ihren mobilen Geräten und Network Box in Client-Modus verbinden: Network Box mit Ihrem angegebenen Zugangspunkt verbinden: Verbinden Sie die Network Box zunächst mit Ihrem kabellosen Computer, Smartphone oder Tablet, öffnen Sie dann Ihren Browser (IE 10 oder aktueller) an Ihren Mobilgeräten.
  • Seite 19: Bedienung

    Starten Sie Ihre TWAIN-konforme Bildbearbeitungssoftware, wie z. B. Avision Capture Tool, durch Auswahl von Start > All Programs (Programme) > Avision xxx Scanner > Avision Capture Tool (xxx zeigt Ihr Scannermodell). Ein [Select Scanner Model (Scannermodell wählen)]-Dialogfenster erscheint. Wählen Sie Ihr Scannermodell und klicken auf [OK].
  • Seite 20: Von Einem Kabellosen Computer Im Direktfreigabemodus (Zugangspunkt) Scannen

    Das Hauptfenster von Avision Capture Tool erscheint. Klicken Sie zum Starten des Scans auf [Scan]. Nach einer Sekunde erscheint ein gescanntes Bild. Wichtig: Stellen Sie sicher, dass die LAN-Kabel richtig an Ihrem Switching-Hub angeschlossen sind, BEVOR Sie die Network Box an die Stromversorgung anschließen. Andernfalls können andere Computer im Netzwerk eine IP-Adresse von der Network Box beziehen und stellen daher möglicherweise keine Verbindung zum Internet her.
  • Seite 21: Von Einem Kabellosen Computer Im Internetmodus (Client) Scannen

    Von einem kabellosen Computer im Internetmodus (Client) scannen Network Box über die Network Box-Webseite mit einem Zugangspunkt verbinden Klicken Sie an Ihrem kabellosen Computer auf das Wi-Fi Network (WLAN-Netzwerk)-Symbol in der Taskleiste und wählen den Netzwerknamen –MB-xxxx (xxxx sind die letzten vier Stellen der MAC-Adresse auf dem Etikett an der Network Box). (Beachten Sie, dass standardmäßig kein Netzwerkkennwort erforderlich ist.
  • Seite 22: Von Einem Mobilgerät Scannen

    Nach erfolgreicher WLAN-Verbindung prüfen Sie durch Auswahl von [STATUS], ob der ausgewählte [Network Name (Netzwerkname)] (SSID) verbunden wurde. Von einem kabellosen Computer scannen Klicken Sie an Ihrem kabellosen Computer auf das [Wi-Fi Network (WLAN-Netzwerk)]-Symbol in der Taskleiste und wählen Ihren angegebenen Namen bei [Network Name (Netzwerkname)] (SSID).
  • Seite 23 Allerdings kann immer nur ein Nutzer auf einmal scannen. * Zur Gewährleistung eines hochwertigen Supports und Service registrieren Sie das Produkt bitte auf der Avision-Webseite unter www.avision.com. * * Detailliertere Informationen zur Nutzung der Network Box entnehmen Sie bitte der Bedienungsanleitung der Network Box auf der Avision-Webseite. *...
  • Seite 25 Avision Network Box 快速安裝手冊 中 文 繁 Microsoft 和 Internet Explorer 是是微軟公司的註冊商標或商標。 體 Google Play 和 Android 是註冊 Google Inc. 在美國和其他國家的註冊商標。 ® Wi-Fi 是 Wi-Fi Alliance 的註冊商標。 iOS 是Cisco在美國的商標或註冊商標。 本文中其他廠牌和產品名稱皆為各相關廠商的商標或註冊商標。 Regulatory Model Number: UNICORN 依據 低功率電波輻射性電機管理辦法 第十二條 經型式認證合格之低功率射頻電機,非經許可,公司、商號或使用者均不得擅自變更頻率、加大功率或變更原設計之特性及功能。 第十四條 低功率射頻電機之使用不得影響飛航安全及干擾合法通信;經發現有干擾現象時,應立即停用,並改善至無干擾時方得繼續使用。...
  • Seite 26 連接埠和指示燈     “24VDC OUT”埠:透過此埠將隨機附的電源線與掃瞄器連接起來。  USB 埠:透過此埠將隨機附的 USB 線與掃瞄器連接起來。  電源指示燈:當 Network Box 與電源連接時,電源指示燈即呈綠色。 狀態指示燈: 狀態指示燈的顏色表示連線的類型和 Network Box 的狀態。 表示有線的網路模式 (掃瞄器與 Network Box 已連接) 橘燈 恆亮 表示無線網路(用戶端)模式 (掃瞄器與 Network Box 已連接) 快閃爍 表示無線網路(存取點)模式 (掃瞄器與 Network Box 已連接) 慢閃爍...
  • Seite 27       "LAN"埠:透過此埠將乙太網路(Ethernet)線與掃瞄器連接起來。  “5VDC 1.5A”埠:針對沒有具備[24VDC]電源插孔的掃瞄器,使用本連接埠可 以將 Network Box 透過 Micro USB 線連接到 USB 電源供應器。  “24VDC IN”埠:透過此埠將掃瞄器的變壓器連接到 Network Box。  “WPS”按鈕:按下此鈕使用 WPS (Wi-Fi Protected Setup 安全性模式) 的 方式與支援 WPS 的無線存取點連線。先按下存取點的 WPS 按鈕,再持續 按住 Network Box 的 WPS 按鈕約 5 秒鐘直到狀態指示燈成紅色快閃狀態, 即表示...
  • Seite 28 連接線 a: 隨機附贈的電源線 b: 隨機附贈的 USB 線 c: 掃瞄器附贈的變壓器 請將隨機附贈的電源線(a),一端插至掃瞄器的電源插孔內,另一端插至 Network Box 標有“24VDC OUT”的電源埠。 將 USB 線(b)的正方形端插進掃瞄器的 USB 埠內,然後將長方形端插進 Network Box 的 USB 埠內。 把掃瞄器電源線(c)的小頭端插至標有“24VDC IN"的 Network Box 電源埠內,然後 把另一端插入電源插座內。...
  • Seite 29 選擇您的連線類型 1 有線網路模式 在有線網路模式下,你的電腦是透過乙太(Ethernet)網路線連接到 Network Box。 請將網路線(d)一端連接到公司的網路中 , 將 另一端插到你無線電腦的 LAN 連接埠內。 將另一條網路線(e)一端插至公司的網路 中,將另一端插到 Network Box 的 LAN 連 接埠內。 d/e: 乙太網電纜線 2 無線網路 – 存取點 (Access Point) 模式 在[存取點(Access Point)] 模式下,不需要透過額外的無 線網路存取點, 你的行動裝置與 Network Box 可以用無線 的方式連接起來,因為此時 Network Box 本身就是一個無 線網路存取點(請參考右圖)。...
  • Seite 30 3 無線網路 – 用戶端 (Client) 模式 在[用戶端]模式下,你的行動裝置與 Network Box 可以透過額外的無線網路存取點,用無線的方式 連接起來。 [用戶端]模式的連接: 將 Network Box 連接到一個無線網路存取點: 首先將你的無線電腦、智慧型手機、或平板電腦與 Network Box 連接起來,然後從你的裝置中開啟瀏覽器 (如 i.e. 版本 10 以上) 。 在網址欄位上,輸入 Network Box 的 IP 位址 (10.10.10.254),然後透過 Network Box 的網頁來連接 到你所指定的無線網路。(當認證畫面會先出現時,請 先輸入預設的使用者名稱及密碼 - admin。你可以稍 後在...
  • Seite 31 會自動搜尋在網路中的掃瞄器。幾秒鐘之後, 搜尋的結果會顯示出來,如下圖。 選擇你要連接的掃瞄器,然後再按 [連接/Connect]按鍵。如果連接成功,一個連接的圖示 會顯示出來如下圖。 IP 位址 掃瞄器連接成功之後,開啟與 TWAIN 相容的影像編輯軟體(例如 Avision Capture Tool)。點 選 開始>所有程式 > Avision xxx Scanner > Avision Capture Tool 來開啟 Avision Capture Tool 軟體。(xxx 表示你的掃瞄器型號)。 一個[Select Scanner Model]對話方塊會出現。選擇您的掃瞄器型號,然後按一下[確認]鍵。 如果網路上有兩個以上的掃瞄器,一個[Network Scanner]對話方塊會出現。選擇你所指定 的掃瞄器並按一下[確認] 鍵。 Avision Capture Tool 的主畫面會出現。按 [Scan] 開始掃瞄。掃瞄的影像會顯示在主畫...
  • Seite 32 使用網際網路。 從無線網路的電腦(存取點)的模式下,掃瞄你的文件 在你具有無線網路的電腦上,按一下工作列中的[無線網路連線]圖示並選擇網路名稱– MB-xxxx (xxxx 是 Mac 位址中最後的 4 位數字 , Mac 位址標籤貼在 Network Box 的外殼上) 。 (請注意出廠預設設定不需要輸入密碼。如需加密,你可以透過 Network Box 內建的網頁 來設定) 。 請參考前一個章節[從有線網路的電腦掃瞄你的文件]所描述的步驟 1 ~ 步驟 5 來完成文件的 掃瞄。 重要須知: 使用 Avision Capture Tool 來掃瞄文件時,電腦的視窗可能會出現[無法找到掃瞄器]的訊息。此 時掃瞄器可能正在暖機或正與 Network Box 連線中,請稍等一會,再試一次。...
  • Seite 33 從無線網路的電腦(用戶端)的模式下,掃瞄你的文件 將 Network Box 連接到一個 Access Point (無線網路存取點) 在你具有無線網路功能的電腦上 , 按一下工作列中的[無線網路連線]圖示並選擇網路 SSID– MB-xxxx (xxxx 是 Mac 位址中最後的 4 位數字 , Mac 位址標籤貼在 Network Box 的外殼上) 。 (請注意出廠預設設定不需要輸入密碼。) 開啟你的瀏覽器 (確定 [Proxy 伺服器] 設定沒有被勾選 , 因為 Network Box 並不支援 proxy 伺服器) 在網址欄位上,輸入[10.10.10.254]。Network Box 內建的網頁即會顯示出來。(第一次連接 到...
  • Seite 34 MB-xxxx (xxxx 是 Mac 位址中最後 4 位數字,Mac 位址標籤貼在 Network Box 的外殼上)。 或 在無線網路(用戶端)模式下,在你的行動裝置上點選 設定>Wi-Fi,並選擇你所需要的網路 名稱(SSID)。[請注意你的行動裝置與 Network Box 必須在同一個無線區域網路內 (即選擇 同一個無線網路名稱(SSID)。] 在你的行動裝置上,點選 [MB] APP ( )行動應用程式。MB APP 主畫面會顯示出來,然後 MB APP 會自動尋找在網路上的掃瞄器。 把文件放在掃瞄器上,然後點選主畫面的 [Start Scan] 按鈕開始進 行掃瞄。掃瞄完成後,掃瞄影像的縮圖會顯示在主畫面。點選其中一 個影像縮圖即可瀏覽完整的影像。 重要須知! 請注意具有無線網路(Wi-Fi)功能的掃瞄器可以同時連接數個使用者(行動裝置)。不過,同一個時間 內,只有一個使用者可以執行掃瞄的工作。 *為了確保高品質的技術支援和售後服務,請在虹光公司的網站(www.avision.com)上註冊本產品。 *更多關於使用 Network Box 的資訊,請參考虹光公司網站內 Network Box 的使用手冊 *...

Diese Anleitung auch für:

Network box mb02w

Inhaltsverzeichnis