HARTING Han Montageanleitung
Pneumatik doppelmodul metall
Vorschau ausblenden
Andere Handbücher für Han:
- Technische daten und montageanleitung (20 Seiten) ,
- Montageanleitung (2 Seiten)
Werbung
Verfügbare Sprachen
Verfügbare Sprachen
Quicklinks
Han
Pneumatic Double Module Metal
®
Assembly instructions
EN
Han
Pneumatic Double Module Metal
®
(09 14 002 3501 – m / 09 14 002 3502 – f)
HARTING reserves the right to modifications at any time and without giving the relevant reasons
①
②
③
All specifications represent the state of the art at the time of the publication ·
General note
The assembly is shown using the example of the Han
tic Double Module Metal and two pneumatic OD contacts.
Pneumatic ID contacts must be assembled in the same way.
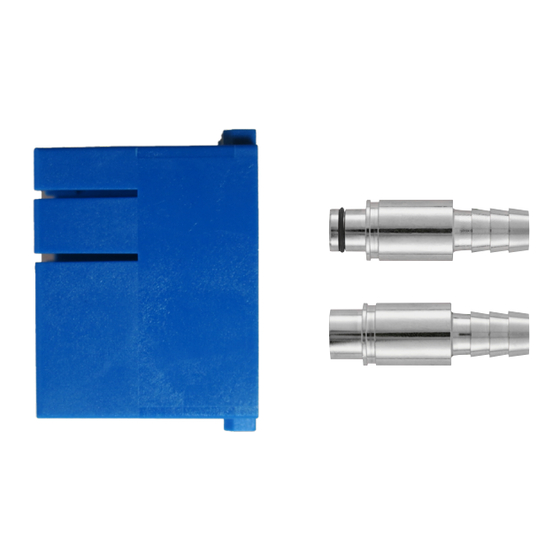
Pack contents
The Han
Pneumatic Double Module Metal provides space for 2
®
contacts with connections for:
• tubes with inner diameter (ID) = 8.0 (09 14 000 6308 / 6 408*) or
10.0 mm (09 14 000 6310 / 6 410*)
• tubes with outer diameter (OD) = 8.0 (09 14 000 6358 / 6 458*) or
10.0 mm (09 14 000 6350 / 6 450*)
* Female contacts without shut-off function; the following contacts are also
available in versions with shut-off function:
• female + valve ID 10 mm:
• female + valve OD 10 mm:
• female + valve ID 8 mm:
• female + valve OD 8 mm:
At least two modules are required for each plug-in connection,
and in addition:
• Han
Pneumatic male contact for ID = 8.0 or 10.0 mm /
®
OD = 8.0 or 10.0 mm (10 pieces per pack)
• Han
Pneumatic female contact for ID = 8.0 or 10.0 mm /
®
OD = 8.0 or 10.0 mm (10 pieces per pack)
Note: The connecting profile of the contacts used in the Han
Pneumatic Double Module are either designed for the
hose inner or outer diameter.
Assembly steps
1. Insert the pneumatic contact from the connection side into
the Han
Pneumatic Double Module until you feel some re-
®
sistance. Then press the contact forcefully until it snaps into
the module.
▶ You will hear a click when the pneumatic contact is fully inser-
ted into the module.
▶ The assembly of the pneumatic ID contacts is similar to the
assembly of the pneumatic OD contacts.
2. Connect the pneumatic hose with the pneumatic contact.
When using the Push-In termination, insert the hose all the
way into the termination side of the contact.
▶ Pull gently on the hose to make sure it is securely attached.
3. Connect the pneumatic hose with the pneumatic contact.
When using the ID termination technique, push the hose onto
the contact.
▶ Make sure that the end of the hose is protruding beyond the
upper profile ring.
▶ Pull gently on the hose to make sure it is securely attached.
=> p. 3
DE
Pneuma-
®
09 14 000 6 410
09 14 000 6 460
09 14 000 6 418
09 14 000 6 468
®
2021 - 09 - 07
Werbung

Verwandte Anleitungen für HARTING Han


Inhaltszusammenfassung für HARTING Han
- Seite 1 ▶ Pull gently on the hose to make sure it is securely attached. All specifications represent the state of the art at the time of the publication · HARTING reserves the right to modifications at any time and without giving the relevant reasons 2021 - 09 - 07...
- Seite 2 ▶ Make sure that the hoses are properly guided through the cable gland. Use the four fixing screws to mount the hinged frame in the housing. HARTING Electric Stiftung & Co. KG, 32339 Espelkamp, Germany · Country specific contact data and local languages refer to www.HARTING.com...
- Seite 3 ▶ Ziehen Sie vorsichtig am Schlauch, um sicherzustellen, dass er sicher befestigt ist Alle Angaben entsprechen dem Stand der Technik zum Zeitpunkt der Veröffentlichung · HARTING behält sich das Recht vor, jederzeit ohne Angabe von Gründen Änderungen vorzunehmen 2021 - 09 - 07...
- Seite 4 ▶ Achten Sie darauf, dass die Schläuche richtig durch die Kabel- verschraubung geführt werden. Befestigen Sie den Gelenkrahmen nun mithilfe der vier Befes- tigungsschrauben im Gehäuse. HARTING Electric Stiftung & Co KG, 32339 Espelkamp, Deutschland · Länderspezifische Kontaktdaten und andere Sprachversionen unter www.HARTING.com...