Herunterladen Inhalt Inhalt Diese Seite drucken
auna Linie 200A Bedienungsanleitung

auna Linie 200A Bedienungsanleitung

Aktiver pa-lautsprecher

Werbung

Verfügbare Sprachen
  • DE

Verfügbare Sprachen

  • DEUTSCH, seite 1

Werbung

Inhaltsverzeichnis
loading

Inhaltszusammenfassung für auna Linie 200A

  • Seite 3: Inhaltsverzeichnis

    Sehr geehrter Kunde, wir gratulieren Ihnen zum Erwerb Ihres Geräts. Lesen Sie die folgenden Hinweise sorgfältig durch und befolgen Sie diese, um möglichen Schäden vorzubeugen. Für Schäden, die durch Missachtung der Hinweise und unsachgemäßen Gebrauch entstehen, übernehmen wir keine Haftung. Scannen Sie den QR-Code, um Zugriff auf die aktuellste Bedienungsanleitung und weitere Informationen rund um das Produkt zu erhalten.
  • Seite 4 WARNUNG VORSICHT: DAS GEHÄUSE NICHT ÖFFNEN, UM EINEN STROMSCHLAG UND ERNSTE PERSONENVERLETZUNGEN ZU VERMEIDEN. IM INNEREN KEINE VOM KUNDEN ZU WARTENDEN KOMPONENTEN. WENDEN SIE SICH AUSSCHLIESSLICH AN QUALIFIZIERTE FACHLEUTE. WARNUNG. UM DIE GEFAHR EINES BRANDS ODER EINES STROMSCHLAGS ZU VERRINGERN, DAS GERÄT NICHT IN WASSER, REGEN ODER FEUCHTIGKEIT AUSZUSETZEN.
  • Seite 5: Sicherheitshinweise

    SICHERHEITSHINWEISE Allgemeine Hinweise • Blitzschlag - Wenn Sie das Gerät länger nicht benutzen oder es ein Gewitter gibt, ziehen Sie den Stecker aus der Steckdose oder trennen Sie das Gerät vom Antennenanschluss. Dadurch werden Schäden am Gerät durch Blitzschlag und Überspannung vermieden. •...
  • Seite 6 Besondere Hinweise zur Bedienung • Kinder ab 8 Jahren, psychisch, sensorisch und körperlich eingeschränkte Menschen dürfen das Gerät nur benutzen, wenn sie vorher von einer für sie verantwortlichen Aufsichtsperson ausführlich mit den Funktionen und den Sicherheitsvorkehrungen vertraut gemacht wurden und die damit verbundenen Risiken verstehen.
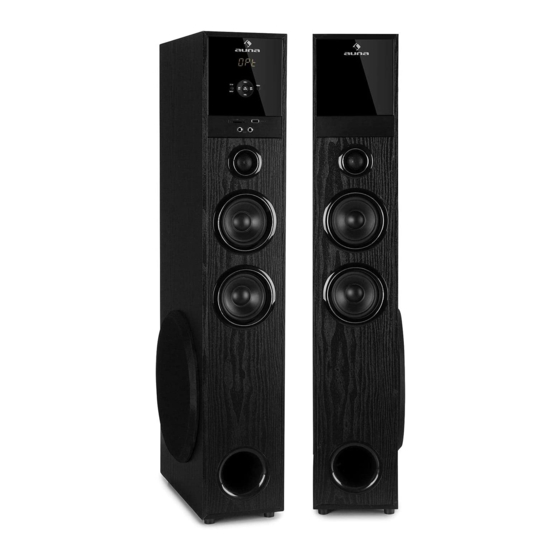
  • Seite 7: Lieferumfang

    LIEFERUMFANG • Turmlautsprecher • Fernbedienung • Stereo-Cinch-Kabel • Bedienungsanleitung • optisches Kabel...
  • Seite 8: Anschlussdiagramm

    ANSCHLUSSDIAGRAMM optischer Eingang Hinweise • Stecken Sie die Stecker vollständig in die Buchsen. Lose Verbindungen können ein Brummen oder andere Störgeräusche erzeugen. • Schließen Sie die Lautsprecher und alle anderen externen Quellen an und schließen Sie schließlich das Netzkabel an...
  • Seite 9: Bedienung

    BEDIENUNG Front mit Bedienelementen ST.BY Standby-Funktion: 3 Sekunden gedrückt halten (in einem beliebigen Modus) INPUT Modus (AUX,USB/SD) VOL- Lautstärke verringern VOL+ Lautstärke erhöhen  Voriger Titel (im USB/SD-Modus) ⏯ Wiedergabe/Pause (im USB/SD-Modus)  Nächster Titel (im USB/SD-Modus) MENU Menüfunktionstaste U DISK USB-Anschluss SD/MMC CARD SD/MMC-Kartenschacht...
  • Seite 10: Fernbedienung

    Fernbedienung...
  • Seite 11 Ein/Standby-Schalter INPUT Wahl der Quelle Equalizer-Optionen DISP LED-Anhzeige-Helligkeit MUTE Audio stummschalten MIC VOL+/- Mikrofonlautstärke regeln SLEEP -/+ Schlaftimer einstellen ⏯ Wiedergabe/Pause (im USB/SD-Modus) voriger Titel (im USB/SD-Modus)   schneller Rücklauf nächster Titel (im USB/SD-Modus)  schneller Vorlauf  SW-/+ Bass regeln TRE -/+ Höhen regeln...
  • Seite 12: Bedienung

    BEDIENUNG 1. Schließen Sie das eine Ende des rechten Tower-Kabels an den rechten Ausgang auf der Rückseite des linken Towers an. 2. Vergewissern Sie sich, dass alle Kabel richtig angeschlossen sind, und schließen Sie dann das Netzkabel an die Stromversorgung an. 3.
  • Seite 13: Spezielle Entsorgungshinweise Für Verbraucher In Deutschland

    SPEZIELLE ENTSORGUNGSHINWEISE FÜR VERBRAUCHER IN DEUTSCHLAND Entsorgen Sie Ihre Altgeräte fachgerecht. Dadurch wird gewährleistet, dass die Altgeräte umweltgerecht verwertet und negative Auswirkungen auf die Umwelt und menschliche Gesundheit vermieden werden. Bei der Entsorgung sind folgende Regeln zu beachten: • Jeder Verbraucher ist gesetzlich verpflichtet, Elektro- und Elektronikaltgeräte (Altgeräte) sowie Batterien und Akkus getrennt vom Hausmüll zu entsorgen.
  • Seite 14 • Bei einem Vertrieb unter Verwendung von Fernkommunikationsmitteln ist die unentgeltliche Abholung am Ort der Abgabe auf Elektro- und Elektronikgeräte der Kategorien 1, 2 und 4 gemäß § 2 Abs. 1 ElektroG, nämlich „Wärmeüberträger“, „Bildschirmgeräte“ (Oberfläche von mehr als 100 cm²) oder „Großgeräte“ (letztere mit mindestens einer äußeren Abmessung über 50 Zentimeter) beschränkt.
  • Seite 15: Hinweise Zur Entsorgung

    Berlin Brands Group UK Ltd PO Box 1145 Oxford, OX1 9UW United Kingdom Hiermit erklärt Chal-Tec GmbH, dass der Funkanlagentyp Linie 200A der Richtlinie 2014/53/ EU entspricht. Der vollständige Text der EU- Konformitätserklärung ist unter der folgenden Internetadresse verfügbar: use.berlin/10036137...
  • Seite 17: Contents

    Dear Customer, Congratulations on purchasing this equipment. Please read this manual carefully and take care of the following hints to avoid damages. Any failure caused by ignoring the items and cautions men- tioned in the instruction manual are not covered by our warranty and any liability.
  • Seite 18 WARNING Triangle with lightning plus explanation as follows: DANGEROUS VOLTAGE: The lightning flash with arrowhead symbol within the equilateral triangle is intended to alert the user to the presence of uninsulated dangerous voltage within the product’s enclosure that may be of sufficient magnitude to constitute a risk of electric shock to persons.
  • Seite 19: Safety Instructions

    SAFETY INSTRUCTIONS General instructions • Lightning - If you are not going to use the unit for a longer period of time or if there is a thunderstorm, pull the plug out of the socket or disconnect the unit from the antenna connection. This will prevent damage to the unit due to lightning and overvoltage.
  • Seite 20 Special notes on operation • Children from the age of 8, mentally, sensory and physically impaired persons may only use the appliance if they have been familiarised in detail with the functions and safety precautions by a supervisor responsible for them beforehand and understand the risks involved. •...
  • Seite 21: Scope Of Supply

    SCOPE OF SUPPLY • Tower speaker • Remote control • Stereo to RCA cable • User manual • Optical cable...
  • Seite 22: System Connection Diagram

    SYSTEM CONNECTION DIAGRAM Notes • Insert the plugs fully into jacks. Loose connections may produce a humming sound or other noise interference. • Connect the speakers and all other external sources and finally connect the AC power cord.
  • Seite 23: Unit Controls

    UNIT CONTROLS Front panel ST.BY Stand by function by pressing 3 sees in AUX/USB/SD mode. INPUT Input function key VOL- Turn down the volume VOL+ Turn up the volume  Previous track in USB/SD mode ⏯ Play/Pause in USB/SD mode ...
  • Seite 24 Remote control...
  • Seite 25 POWER switch button switch On or off for standby.. INPUT To select the Input source Equalizer options DISP LED+ display brightness adjustment MUTE Mute the audio MIC VOL+/- Turn up the volume SLEEP -/+ Set up the sleep time ⏯ Play &...
  • Seite 26: Utility Description

    UTILITY DESCRIPTION: 1. Connect the one end of the right tower cable to the right output port on the back panel of the left tower. 2. Make sure all the cables above are connected correctly, then connect the power cord to AC power. 3.
  • Seite 27: Disposal Considerations

    For Great Britain: Hereby, Chal-Tec GmbH declares that the radio equipment type Linie 200A is in compliance with the relevant statutory requirements. The full text of the declaration of conformity is available at the following...
  • Seite 29: Sommaire

    Cher client, Toutes nos félicitations pour l’acquisition de ce nouvel appareil. Veuillez lire attentivement les instructions suivantes de branchement et d’utilisation afin d’éviter d’éventuels dommages. Le fabricant ne saurait être tenu pour responsable des dommages dus au non-respect des consignes de sécurité...
  • Seite 30 MISE EN GARDE ATTENTION : POUR RÉDUIRE LES RISQUES DE CHOCS ÉLECTRIQUES, NE DÉMONTEZ AUCUN CACHE. L‘APPAREIL NE CONTIENT AUCUNE PIÈCE À ENTRETENIR. ADRESSEZ- VOUS UNIQUEMENT À DES PERSONNELS QUALIFIÉS POUR LA MAINTENANCE. MISE EN GARDE : POUR RÉDUIRE LE RISQUE D‘INCENDIE ET DE CHOC ÉLECTRIQUE, NE PLONGEZ PAS L‘APPAREIL DANS L‘EAU ET NE L‘EXPOSEZ PAS À...
  • Seite 31: Consignes De Sécurité

    CONSIGNES DE SÉCURITÉ Consignes générales • Foudre - Si vous n‘utilisez pas l‘appareil pendant une longue période ou s‘il y a de l‘orage, débranchez la fiche de la prise et débranchez l‘antenne de l‘appareil. Cela évite d‘endommager le produit à cause de la foudre et des surtensions.
  • Seite 32 Consignes particulières d'utilisation • Les enfants à partir de 8 ans, les personnes ayant un handicap mental, sensoriel et physique ne peuvent utiliser l'appareil que s'ils ont été parfaitement familiarisés avec les fonctions et les précautions de sécurité par un responsable et s'ils comprennent les risques associés. •...
  • Seite 33: Contenu De L'emballage

    CONTENU DE L‘EMBALLAGE • Enceinte colonne • Télécommande • Câble stéréo RCA • Mode d'emploi • Câble optique...
  • Seite 34: Schéma De Branchement

    SCHÉMA DE BRANCHEMENT Entrée optique Remarques • Insérez les fiches complètement dans les prises ; des connexions desserrées peuvent générer un bourdonnement ou d'autres parasites. • Connectez les enceintes et tout autre périphérique externe, puis connectez le cordon d'alimentation.
  • Seite 35: Utilisation

    UTILISATION Éléments de commande sur la face avant ST.BY Fonction de veille : appuyez et maintenez pendant 3 secondes (dans n'importe quel mode) INPUT Mode (AUX,USB/SD) VOL- Réduire le volume VOL+ Augmenter le volume Titre précédent (en mode USB/SD)  ⏯...
  • Seite 36 Télécommande...
  • Seite 37 Marche / veille INPUT Choix de la source Options d'égalisation DISP Luminosité de l'écran LED MUTE Sourdine MIC VOL+/- Réglage du volume du micro SLEEP -/+ Réglage e la minuterie d'arrêt ⏯ Lecture / Pause (en mode USB/SD) Titre précédent (en mode USB/SD) ...
  • Seite 38: Utilisation

    UTILISATION 1. Connectez une extrémité du câble de la tour droite à la prise droite à l'arrière de la tour de gauche. 2. Assurez-vous que tous les câbles sont correctement connectés, puis connectez le cordon d'alimentation à la prise électrique. 3.
  • Seite 39: Conseils Pour Le Recyclage

    Oxford, OX1 9UW United Kingdom Le soussigné, Chal-Tec GmbH, déclare que l’équipement radioélectrique du type Linie 200A est conforme à la directive 2014/53/UE. Le texte complet de la déclaration UE de conformité est disponible à l’adresse internet suivante : use.berlin/10036137...
  • Seite 41: Datos Técnicos

    Estimado cliente: Le felicitamos por la adquisición de este producto. Lea atentamente el siguiente manual y siga cuidadosamente las instrucciones de uso con el fin de evitar posibles daños. La empresa no se responsabiliza de los daños ocasionados por un uso indebido del producto o por haber desatendido las indicaciones de seguridad.
  • Seite 42 ADVERTENCIA ATENCIÓN: NO ABRIR LA CARCASA PARA EVITAR UNA DESCARGA ELÉCTRICA Y LESIONES PERSONALES GRAVES. EN EL INTERIOR NO EXISTE NINGÚN COMPONENTE QUE EL CLIENTE PUEDA REPARAR. CONTACTE EXCLUSIVAMENTE CON UN SERVICIO TÉCNICO CUALIFICADO. ADVERTENCIA. PARA REDUCIR EL PELIGRO DE INCENDIO O DESCARGA ELÉCTRICA, NO EXPONGA EL APARATO AL AGUA, A LA LLUVIA O A LA HUMEDAD.
  • Seite 43: Indicaciones De Seguridad

    INDICACIONES DE SEGURIDAD Indicaciones generales • Relámpago - Si no va a utilizar el aparato durante un periodo largo de tiempo o si hay una tormenta eléctrica, desenchufe el aparato de la toma de corriente y desconecte el conector de antena. De este modo, protegerá...
  • Seite 44 Indicaciones especiales de utilización • Los niños mayores de 8 años y las personas con discapacidades físicas, sensoriales o psíquicas solamente podrán utilizar el aparato si han sido previamente instruidas sobre su uso y conocen las indicaciones de seguridad y los riesgos que entraña su uso. •...
  • Seite 45: Partes Suministradas

    PARTES SUMINISTRADAS • Altavoz de torre x2 • Mando a distancia x1 • Cable RCA estéreo x1 • Manual de instrucciones x1 • Cable óptico x1...
  • Seite 46: Diagrama De Conexiones

    DIAGRAMA DE CONEXIONES entrada óptica Observaciones • Introduzca completamente los conectores en las tomas. Las conexiones sueltas pueden crear ruidos o interferencias. • Conecte los altavoces y el resto de dispositivos externos y, finalmente, conecte el cable de alimentación.
  • Seite 47: Utilización

    UTILIZACIÓN Parte delantera con elementos de control ST.BY Función de espera: Mantener pulsado el botón durante tres segundos (en el modo que se desee) INPUT Modo (AUX, USB/SD) VOL- Bajar el volumen VOL+ Subir volumen Pista anterior (en modo USB/SD) ...
  • Seite 48 Mando a distancia...
  • Seite 49 Interruptor on/modo espera INPUT Selección de la fuente Opciones del ecualizador DISP Brillo de la pantalla LED MUTE Silenciar el audio MIC VOL+/- Regular el volumen del micrófono SLEEP -/+ Ajustar temporizador de apagado ⏯ Reproducir/Pausar (en modo USB/SD) pista anterior (en modo USB/SD) ...
  • Seite 50: Utilisation

    UTILISATION 1. Connectez une extrémité du câble de la tour droite à la prise droite à l'arrière de la tour de gauche. 2. Assurez-vous que tous les câbles sont correctement connectés, puis connectez le cordon d'alimentation à la prise électrique. 3.
  • Seite 51: Retirada Del Aparato

    Oxford, OX1 9UW United Kingdom Por la presente, Chal-Tec GmbH declara que el tipo de equipo radioeléctrico Linie 200A es conforme con la Directiva 2014/53/UE. El texto completo de la declaración UE de conformidad está disponible en la dirección Internet siguiente: use.berlin/10036137...
  • Seite 53: Dati Tecnici

    Gentile cliente, La ringraziamo per aver acquistato il dispositivo. La preghiamo di leggere attentamente le seguenti istruzioni per l’uso e di seguirle per evitare possibili danni tecnici. Non ci assumiamo alcuna responsabilità per danni scaturiti da una mancata osservazione delle avvertenze di sicurezza e da un uso improprio del dispositivo.
  • Seite 54 AVVERTENZA ATTENZIONE: NON APRIRE L’ALLOGGIAMENTO ONDE EVITARE SCOSSE ELETTRICHE E GRAVI LESIONI PERSONALI. IL PRODOTTO NON CONTIENE COMPONENTI CHE NECESSITANO DI ASSISTENZA DA PARTE DEL CLIENTE. RIVOLGERSI ESCLUSIVAMENTE A TECNICI QUALIFICATI. AVVERTENZA: PER DIMINUIRE IL PERICOLO DI INCENDIO O SCOSSE ELETTRICHE, NON ESPORRE IL DISPOSITIVO ALL’ACQUA, PIOGGIA O UMIDITA’...
  • Seite 55: Avvertenze Di Sicurezza

    AVVERTENZE DI SICUREZZA Avvertenze generali • Colpo di fulmine – Se il dispositivo non viene utilizzato o c’è un temporale, staccare la spina dalla presa di corrente e scollegare il dispositivo dalla connessione dell’antenna. In questo modo si evitano danni al dispositivo dovuti a colpi di fulmine o sovratensione. •...
  • Seite 56 Avvertenze particolari per l’utilizzo • Questo dispositivo può essere utilizzato dai bambini maggiori di 8 anni e dalle persone con limitate capacità fisiche, sensoriali o mentali o da persone con esperienza e conoscenze insufficienti, solo se sono stati informati sulle funzioni del dispositivo e sono consapevoli dei rischi e dei pericoli connessi.
  • Seite 57: Volume Di Consegna

    VOLUME DI CONSEGNA • Altoparlante a torre • Telecomando • Cavo stereo RCA • Manuale d’istruzioni • Cavo ottico...
  • Seite 58 DIAGRAMMA D’ALLACCIAMENTO Ingresso ottico Note • Inserire completamente le spine nelle prese. Gli allacciamenti lenti possono provocare ronzii o altri rumori. • Collegare gli altoparlanti e tutti gli altri dispositivi esterni. Dopodiché collegare il cavo d’alimentazione.
  • Seite 59 UTILIZZO Frontale con comandi ST.BY Funzione standby: tenere premuto per 3 secondi (in qualsiasi modalità) INPUT Modalità (AUX, USB/SD) VOL- Per abbassare il volume VOL+ Per aumentare il volume  Brano precedente (in modalità USB/SD) ⏯ Play/Pause (in modalità USB/SD) ...
  • Seite 60 Telecomando...
  • Seite 61 Tasto ON/Standby INPUT Selezione della fonte Opzioni equalizzatore DISP Spia luminosità MUTE Silenziamento audio MIC VOL+/- Regolazione del volume del microfono SLEEP -/+ Impostazione del timer sleep ⏯ Play/Pause (in modalità USB/SD) Brano precedente (in modalità USB/SD)  Indietro veloce ...
  • Seite 62 UTILIZZO 1. Collegare un’estremità del cavo della torre destra all’uscita destra sul retro della torre sinistra. 2. Assicurarsi che tutti i cavi siano collegati correttamente. Inserire poi il cavo d’alimentazione nella presa elettrica. 3. Quando si accende il dispositivo sul display appare “….”. Premere il tasto corrispondente sul telecomando o sul pannello di controllo dell’altoparlante sinistro.
  • Seite 63: Smaltimento

    PO Box 1145 Oxford, OX1 9UW United Kingdom Il fabbricante, Chal-Tec GmbH, dichiara che il tipo di apparecchiatura radio Linie 200A è conforme alla direttiva 2014/53/UE. Il testo completo della dichiarazione di conformità UE è disponibile al seguente indirizzo Internet: use.berlin/10036137...

Diese Anleitung auch für:

10036137

Inhaltsverzeichnis