Vetus RCTOPB Benutzerhandbuch
Mechanische motorfernbedienung
Inhaltsverzeichnis
Verfügbare Sprachen
Verfügbare Sprachen
Quicklinks
Installatie- en gebruikershandleiding
Mechanische motorafstandsbediening
Installation and user manual
Mechanical remote engine control
Installations- und Benutzerhandbuch
Mechanische Motor-Fernbedienung
Installation and user manual
Mechanical remote engine control
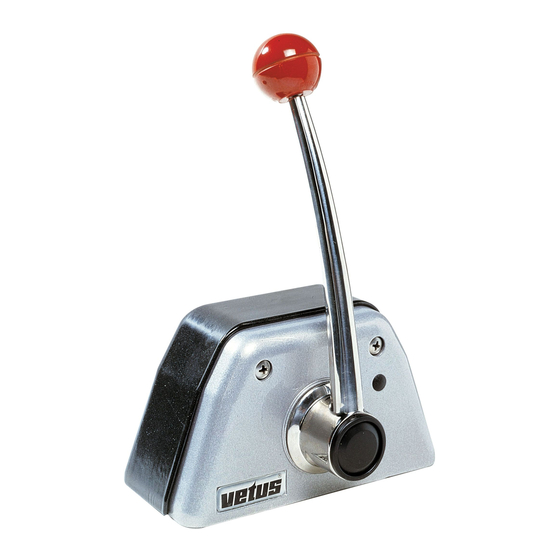
RCTOPB
RCTOPTB
SICO
RCTOPBG
RCTOPTBG
SICOG
Copyright © 2022 Vetus b.v. Schiedam Holland
NEDERLANDS
ENGLISH
DEUTSCH
FRANÇAIS
ESPAÑOL
ITALIANO
Manuel d'Installation et d'utilisation
Télécommande mécanique pour moteur
Manual de instalación y usuario
Mando a distancia mecánico para motores
Manuale d'installazione e d'uso
Telecomandi meccanici per motori
RCTOPS
RCTOPTS
SISCO
2
4
6
8
10
12
RCTOPSG
RCTOPTSG
SISCOG
030606.07
Inhaltsverzeichnis

Verwandte Anleitungen für Vetus RCTOPB


Inhaltszusammenfassung für Vetus RCTOPB
- Seite 1 Installations- und Benutzerhandbuch Manuale d’installazione e d’uso Mechanische Motor-Fernbedienung Telecomandi meccanici per motori Installation and user manual Mechanical remote engine control RCTOPB RCTOPBG RCTOPS RCTOPSG RCTOPTB RCTOPTBG RCTOPTS RCTOPTSG SICO SICOG SISCO SISCOG Copyright © 2022 Vetus b.v. Schiedam Holland 030606.07...
-
Seite 6: Einleitung
(bei SI(S)CO(G)) vom Mechanismus entfernen (siehe Zeichnung auf der rechten Seite). Leerlaufschalter Außer für den von Vetus und Morse gelieferten 33C-Kabeltyp eig- Der Mechanismus ist bereits mit einem Leerlaufschalter ausge- net sich der Mechanismus für den OS-Kabeltyp von OMV und den stattet. -
Seite 7: Einstellung
DEUTSCH Toppmontage: • Mit Hilfe der mitgelieferten Bohrschablone die zu bohrenden Befestigungslöcher und die auszusägende Öffnung anreißen. • Die beiden Bügel am Teil dienen als Befestigungsbügel. Prüfen, ob die Befestigungslöcher mit den angerissenen Löchern korre- spondieren. • Die Löcher bohren und die Öffnung sägen. •... - Seite 15 Elektrisch schema’s Elektrischer Schaltpläne Esquemas eléctricos Electrical circuit diagrams Schémas électrique Schemi elettrici NEDERLANDS DEUTSCH ESPAÑOL A Enkele bedieningsstuurstand A Einzelbedienungssteuerstand A Única posición de navegación para activación B Twee bedieningsstuurstanden B Doppelbedienungssteuerstand B Dos posiciones de navegación para activación C Enkele bedieningsstuurstand met C Einzelbedienungssteuerstand mit C Única posición de navegación para...