AFRISO Eurovac HV Betriebsanleitung
Vorschau ausblenden
Andere Handbücher für Eurovac HV:
- Betriebsanleitung (40 Seiten) ,
- Betriebsanleitung (298 Seiten)
Inhaltsverzeichnis
Werbung
Verfügbare Sprachen
Verfügbare Sprachen
Quicklinks
Betriebsanleitung
Operating instructions
Notice technique
Istruzioni per l'uso
Instrukcja eksploatacji
Eurovac HV
Copyright 2021 AFRISO-EURO-INDEX GmbH. Alle Rechte vorbehalten.
Lindenstraße 20
74363 Güglingen
Telefon +49 7135 102-0
MVV TB C 2
Service +49 7135 102-211
Anl. C 2.15.15
Telefax +49 7135 102-147
info@afriso.de
www.afriso.de
Version: 12.2021.0
ID: 900.000.0511
Werbung
Inhaltsverzeichnis

Verwandte Anleitungen für AFRISO Eurovac HV

Inhaltszusammenfassung für AFRISO Eurovac HV
- Seite 1 Betriebsanleitung Operating instructions Notice technique Istruzioni per l’uso Instrukcja eksploatacji Eurovac HV Copyright 2021 AFRISO-EURO-INDEX GmbH. Alle Rechte vorbehalten. Lindenstraße 20 74363 Güglingen Telefon +49 7135 102-0 MVV TB C 2 Service +49 7135 102-211 Anl. C 2.15.15 Telefax +49 7135 102-147 info@afriso.de...
- Seite 2 Betriebsanleitung Vakuum-Leckanzeigegerät Eurovac HV Typ: Eurovac HV ohne Schutzgehäuse Typ: Eurovac HV im Schutzgehäuse Typ: Eurovac HV im Schutzgehäuse mit Heizung Copyright 2021 AFRISO-EURO-INDEX GmbH. Alle Rechte vorbehalten. Lindenstraße 20 74363 Güglingen Telefon +49 7135 102-0 MVV TB C 2 Service +49 7135 102-211 Anl.
- Seite 3 Über diese Betriebsanleitung Über diese Betriebsanleitung Diese Betriebsanleitung beschreibt das Vakuum-Leckanzeigegerät „Eurovac HV“ (im folgenden auch „Produkt“). Diese Betriebsanleitung ist Teil des Produkts. • Sie dürfen das Produkt erst benutzen, wenn Sie die Betriebsanleitung vollständig gelesen und verstanden haben. •...
- Seite 4 Sie alle im Zusammenhang mit diesem Warnsymbol beschriebenen Hinweise, um Unfälle mit Todesfolge, Verlet- zungen und Sachschäden zu vermeiden. Dieses Symbol warnt vor gefährlicher elektrischer Span- nung. Wenn dieses Symbol in einem Warnhinweis gezeigt wird, besteht die Gefahr eines elektrischen Schlags. Eurovac HV...
-
Seite 5: Informationen Zur Sicherheit
Feststoffe ausscheiden • AdBlue® (Harnstofflösung 32,5 %) nach DIN 70070 Das Produkt muss gegen die Flüssigkeit und deren Dämpfe beständig sein. Die Beständigkeit ist für die Flüssigkeiten der Stoffliste in Kapitel "Stoffliste", nachgewiesen. Eurovac HV... - Seite 6 Ihnen vorgesehene Anwendung nach einem anerkannten Verfahren durch und treffen Sie entsprechende dem Ergebnis alle erforderlichen Sicherheitsmaßnahmen. Berücksichtigen Sie dabei auch die möglichen Fol- gen eines Einbaus oder einer Integration des Produkts in ein System oder in eine Anlage. Eurovac HV...
- Seite 7 Erfahrungen in der Lage sein, mögliche Gefährdungen vorherzusehen und zu erkennen, die durch den Einsatz des Produkts entstehen können. Den Fachkräften müssen alle geltenden Bestimmungen, Normen und Sicherheitsvorschriften, die bei Arbeiten an und mit dem Produkt beachtet werden müssen, bekannt sein. Eurovac HV...
- Seite 8 Gefährdungen auftreten können, die nicht direkt vom Produkt ausge- hen. Veränderungen am Produkt Führen Sie ausschließlich solche Arbeiten an und mit dem Produkt durch, die in dieser Betriebsanleitung beschrieben sind. Nehmen Sie keine Verände- rungen vor, die in dieser Betriebsanleitung nicht beschrieben sind. Eurovac HV...
-
Seite 9: Transport Und Lagerung
Benutzen Sie für den Transport die Originalverpackung. • Lagern Sie das Produkt nur in trockener, sauberer Umgebung. • Stellen Sie sicher, dass das Produkt bei Transport und Lagerung stoßge- schützt ist. Nichtbeachtung dieser Anweisungen kann zu Sachschäden führen. Eurovac HV... - Seite 10 Es stehen Schlauchanschlüsse für die pneumatische Verbindung mit dem Überwachungsraum des Tanks zur Verfügung. Das Produkt überwacht und regelt einen konstanten Unterdruck im Überwa- chungsraum des Tanks und gibt beim Abfallen des Unterdrucks Alarm. Das Produkt kann mit einem EnOcean®-Funkmodul nachgerüstet werden. Eurovac HV...
-
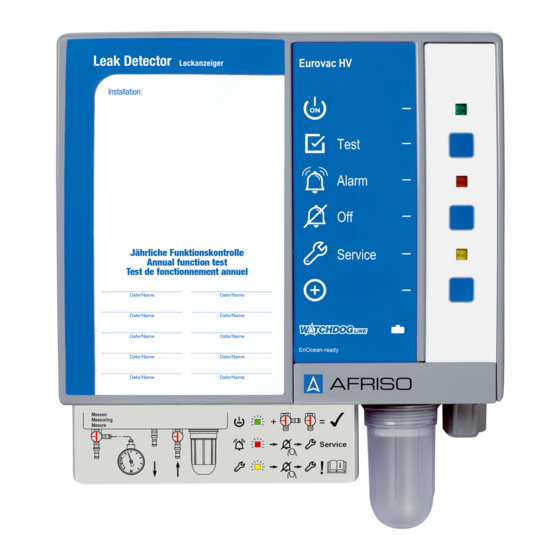
Seite 11: Produktbeschreibung
K. Prüfventil C. Grüne LED L. Saugleitungsanschluss D. Test-Taste M. Auspuffleitungsanschluss E. Rote LED N. Typenschild auf der Unterseite F. Quittiertaste O. Abdeckung für Schlauchanschlüsse G. Gelbe LED P. Messleitungsanschluss H. LRN-Taste Q. Messventil I. Kabelverschraubung R. Prüfanschluss Eurovac HV... - Seite 12 Service fällig ist, wenn die Service- funktion aktiviert ist. Taste Mit der LRN-Taste sendet das Produkt ein Lern-Tele- gramm (LRNTEL), um sich mit dem AFRISOhome Gateway zu verbinden, wenn das optionale EnOcean-Funkmodul installiert ist. Eurovac HV...
-
Seite 13: Abmessungen
Produktbeschreibung Abmessungen 202 mm 70 mm 171 mm 270 mm 360 mm Abbildung 1: Eurovac im Schutzgehäuse, ohne (A) oder mit Heizung (B), anschluss- fertig vormontiert. Die Hupe ist am Ausgangsrelais angeschlossen Eurovac HV... -
Seite 14: Anwendungsbeispiele
Produktbeschreibung Anwendungsbeispiele A. Elektrischer Anschluss F. Tank-Außenmantel B. Saugleitung (klar oder weiß) G. Kondensatgefäße C. Tankentlüftung H. Auspuffleitung (grün) D. Flüssigkeitssperre I. Messleitung (rot) E. Überwachungsraum Eurovac HV... - Seite 15 Produktbeschreibung A. Hupe „HPW 2“ F. Auspuffleitung (grün) G. Saugleitung (klar oder weiß) B. Quittierungsschalter für Hupe „HPW 2“ H. Heizung mit Thermostat C. Produkt I. Netzkabel D. Schutzgehäuse E. Messleitung (rot) Eurovac HV...
- Seite 16 Das Produkt verfügt über einen potentialfreien Wechselkontakt. Wenn kein Alarm aktiv ist, ist das Relais abgefallen. Im Alarmfall zieht das Relais an. Das Produkt kann ohne und mit zusätzlichen Geräten betrieben werden, bei- spielsweise: • Optische und akustische Alarmgeber • Fernmeldegeräte • Gebäudeleittechnik Eurovac HV...
-
Seite 17: Zulassungsdokumente, Bescheinigungen, Erklärungen
-380 ±10 mbar Schaltpunkt Pumpe aus -420 ±10 mbar Verbindungsschlauch PVC-Schlauch 6 x 2 mm Umgebungsbedingungen Umgebungstemperatur Betrieb -5 ... 60 °C Umgebungstemperatur im Außenbe- -25 ... 60 °C reich mit Schutzgehäuse und Heizung Umgebungstemperatur Lagerung -25 ... 60 °C Eurovac HV... - Seite 18 Schutzklasse (EN 60730-1) Schutzart (EN 60529) IP 30 Schutzart im Schutzgehäuse IP 65 Störaussendung CISPR 22 Störfestigkeit EN 61000 EnOcean®-Funk Frequenz 868,3 MHz Sendeleistung Max. 10 mW Reichweite Siehe Kapitel "Informationen zu EnOcean®-Funk" EnOcean®- Equipment Profile (EEP) A5-30-4 Eurovac HV...
- Seite 19 - Im Scheitelbereich des Überwachungsraums muss Luft sein. 8. Stellen Sie die Anschlüsse für Saug- und Messleitung her. - Für die Saugleitung wird der Anschluss der Verbindungsleitung ver- wendet. - Für die Messleitung wird der Anschluss des Prüfhahns verwendet. Eurovac HV...
-
Seite 20: Falscher Betriebsdruck Im Überwachungsraum
Stellen Sie sicher, dass der Druck im Überwachungsraum des Tanks den Spezifikationen entspricht. Nichtbeachtung dieser Anweisungen kann zu Sachschäden führen. 1. Verringern Sie den Unterdruck im Überwachungsraum auf etwa -370 mbar. Wenn der Unterdruck beim Anschluss des Produkts größer ist, kann das Produkt beschädigt oder zerstört werden. Eurovac HV... -
Seite 21: Produkt Montieren
Spritzwasser geschützt ist. Stellen Sie sicher, dass das Produkt bei einer Montage im Freien vor direkter Witterung geschützt ist. - Verwenden Sie ein AFRISO-Schutzgehäuse. 1. Befestigen Sie das Pro- dukt an der Wand (ver- wenden Sie die Befesti- gungsart A oder B). - Seite 22 Montage 2. Öffnen Sie das Produkt. 3. Schließen Sie das Pro- dukt wie in Kapitel "Elektri- scher Anschluss" beschrieben an. Eurovac HV...
- Seite 23 Montage 4. Schließen Sie das Pro- dukt. Eurovac HV...
-
Seite 24: Elektrischer Anschluss
HINWEIS NICHTVERFÜGBARKEIT DER ÜBERWACHUNGSFUNKTION • Installieren Sie keine Netzstecker oder Schalter in der Spannungsversor- gung für das Produkt. • Schalten Sie das Produkt nur über die bauseitige Netzsicherung ein und aus. Nichtbeachtung dieser Anweisungen kann zu Sachschäden führen. Eurovac HV... - Seite 25 3. Führen Sie das Netzkabel durch die obere oder untere Kabelver- schraubung in das Produkt. 4. Schließen Sie die Phase an die Klemme L1 und den Neutralleiter an die Klemme N an. 5. Verschließen Sie die nicht verwendete Kabelverschraubung am Pro- dukt mit den beiliegenden Stopfen. Eurovac HV...
-
Seite 26: Produkt Anschließen
Montage 5.4.2 Produkt anschließen A. Pumpe D. Relaissicherung B. Kabelführung durch obere E. Relaisausgang (potentialfreier Kabelverschraubung Wechselkontakt) C. Kabelführung durch untere F. Netzanschluss Kabelverschraubung Eurovac HV... -
Seite 27: Produkt Im Schutzgehäuse Anschließen
• Es muss ein zusätzlicher akustischer Alarm außerhalb des Schutzge- häuses montiert werden. • Im Schutzgehäuse ohne Hupe oder Heizung muss das Produkt wie in Kapitel 5.4.2 angeschlossen werden A. Netzanschluss C. Anschluss Hupe B. Anschluss Eurovac D. Anschluss Heizung (optional) Eurovac HV... -
Seite 28: Relaisausgang
Produkt. 3. Schließen Sie das Kabel an die mit dem Relaisausgang gekennzeich- neten an. 4. Sorgen Sie für eine sichere Trennung des Kabels. - Die Isoliereigenschaften des Kabels müssen mindestens IEC 60227 oder IEC 60245 entsprechen. Eurovac HV... - Seite 29 Spannungsver- sorgung ist das Produkt sofort betriebsbereit. Ein inzwischen eingetretener Alarmfall wird angezeigt. Bei Betrieb des Produkts in Deutschland ist keine Batte- rie im Lieferumfang enthal- ten. Der Anschluss einer han- delsüblichen 9V- Blockbatterie ist optional. Eurovac HV...
-
Seite 30: Nachrüstung Eines Enocean®-Funkmoduls (Optional)
Sie es mit Hilfe der anti-elektrostatischen Folie in den Steckplatz ein. Nichtbeachtung dieser Anweisungen kann zu Sachschäden führen. 1. Öffnen Sie das Produkt. A. Steckplatz für das EnOcean®- C. Gehäuseaussparung (zur Befesti- Funkmodul gung der Antenne) B. Position Antenne Eurovac HV... -
Seite 31: Schlauchleitungen Anschließen
- Bei bestehenden Anlagen dürfen beim Austausch des Leckanzeigers auch 4 x 2 mm-Schlauchleitungen angeschlossen werden, wenn diese bereits vor dem Austausch verwendet wurden. - Die produktseitigen Schlauchanschlüsse sind für den Anschluss von 4 x 2 mm und 6 x 2 mm Schlauchleitungen ausgelegt. Eurovac HV... - Seite 32 3. Schließen Sie die Messleitung an den Messanschluss des Überwa- chungsraums an. 4. Schließen Sie die Auspuffleitung an das Tankentlüftungsrohr an. - Bei Verwendung einer AFRISO Euroflex-Entnahmeeinrichtung kann die Auspuffleitung im Einstrangbetrieb direkt an den Rücklaufanschluss des Euroflex angeschlossen werden.
-
Seite 33: Ventileinstellungen
Stellen Sie sicher, dass der Druck im Überwachungsraum des Tanks den Spezifikationen entspricht. Nichtbeachtung dieser Anweisungen kann zu Sachschäden führen. Ventilstellung Messventil am Prüfventil am roten Messlei- weißen Saug- tungsanschluss leitungsan- schluss Normaler Betrieb Normaler Betrieb Prüfung mit Druckmessgerät Belüftung Nicht zulässig Nicht zulässig Eurovac HV... - Seite 34 Stellen Sie sicher, dass das AFRISOhome Gateway sich im „Einlern- Modus“ befindet. 1. Schalten Sie die Netzspannung ein. - Die grüne LED leuchtet. 2. Drücken Sie die LRN-Taste (A). - Das Produkt sendet ein Lern-Telegramm (LRNTEL). - Das Produkt ist mit dem AFRISOhome Gateway verbunden. Eurovac HV...
- Seite 35 - Wenn der korrekte Unterdruck erreicht ist, schaltet die Pumpe ab. - Die Anlage ist jetzt betriebsbereit. 2. Führen Sie eine Funktionsprüfung durch. Der Fachbetrieb bescheinigt den Einbau, die Inbetriebnahme und die Prü- fung des Produkts (siehe Kapitel "Bescheinigung des Sachkundigen"). Eurovac HV...
- Seite 36 - Der Unterdruck im Überwachungsraum fällt ab und das Produkt gibt Alarm. 2. Drehen Sie das Prüfventil (weißer Anschluss) in die Stellung "Normaler Betrieb". - Der Unterdruck im Überwachungsraum wird wieder aufgebaut. - Die Alarmsignale müssen selbsttätig erlöschen. Eurovac HV...
- Seite 37 Funktionsprüfung durch Messen Der freie seitliche Anschluss des roten Messventils ist zum Anschließen eines Druckmessgerätes zur Überprüfung der Anlage vorgesehen. Prüf- protokolle finden Sie auf www.afriso.de. 1. Schließen Sie das Druckmessgerät (Unterdruck) an. 2. Drehen Sie das Messventil (roter Anschluss) in die Stellung "Prüfung".
-
Seite 38: Betrieb
Über den Relaisausgang kann das Alarmsignal an zusätzliche Geräte aus- gegeben werden. Bei Produkten mit EnOcean®-Funkmodul verschickt das Produkt eine Mel- dung an das AFRISOhome Gateway. Über die AFRISO App erhält der End- anwender eine Meldung, dass eine Leckage detektiert wurde. Alarm quittieren 1. -
Seite 39: Wartung
Alarm ertönt jede Stunde einmal für circa eine Sekunde. 2. Drücken Sie die Quittier- taste (A), um den akusti- schen Alarm stumm zu schalten. - Die gelbe LED (B) leuch- tet dauerhaft. 3. Lassen Sie eine jährliche Wartung/Service durch einen Fachbetrieb durch- führen. Eurovac HV... -
Seite 40: Wartungsintervalle
Falls vorhanden, tauschen Sie die 9 V-Blockbat- terie für den Alarm bei Netzausfall aus Nach Alarmfall Führen Sie nach jedem Alarmfall eine Funktions- prüfung durch (siehe Kapitel "Funktionsprüfung") Bei Bedarf Tauschen Sie die Relaissicherung F1 (T 2 A) aus Eurovac HV... - Seite 41 4. Setzen Sie eine neue Relaissicherung F1 (T 2 A) ein. 5. Stecken Sie die transparente Abdeckhaube wieder auf. 6. Verbinden Sie die Flachbandleitung mit der Steckerleiste. 7. Setzen Sie das Gehäuseoberteil auf und verschließen es. 8. Schalten Sie die Netzspannung ein. Eurovac HV...
- Seite 42 Gelbe LED blinkt Jährliche Wartung fällig Führen Sie die jährliche Wartung durch (siehe Kapitel "Wartung") Wasser in Kondensat- Leeren Sie das Konden- gefäß satgefäß Filter verschmutzt Tauschen Sie den Schmutzfilter Sonstige Störungen Bitte wenden Sie sich an die AFRISO-Service Hotline Eurovac HV...
-
Seite 43: Störungsbeseitigung
Wenn die grüne LED (A) nur kurz leuchtet, deutet das auf eine entsprechend kurze Pumpenlaufzeit in den letzten fünf Tagen hin. Bei geöffnetem Gehäuse zeigt eine gelbe LED (C) auf der Leiterplatte immer diese Pumpenlaufzeit an (ohne Drücken der Test-Taste). Eurovac HV... -
Seite 44: Außerbetriebnahme Und Entsorgung
4. Entsorgen Sie das Produkt und die optionale Batterie getrennt. Rücksendung Vor einer Rücksendung Ihres Produkts müssen Sie sich mit uns in Verbin- dung setzen (service@afriso.de). Gewährleistung Informationen zur Gewährleistung finden Sie in unseren Allgemeinen Geschäftsbedingungen im Internet unter www.afriso.com oder in Ihrem Kauf- vertrag. Eurovac HV... - Seite 45 Art.-Nr. Art.-Nr. Abbildung (Frankreich) Vakuum-Leckanzeigegerät 43750 2651001 „Eurovac HV“ Vakuum-Leckanzeigegerät 43774 „Eurovac HV“ im Schutzgehäuse ohne Heizung, ohne Hupe Vakuum-Leckanzeigegerät 43776 „Eurovac HV“ im Schutzgehäuse ohne Heizung, mit Hupe Vakuum-Leckanzeigegerät 43793 „Eurovac HV“ im Schutzgehäuse mit Heizung, ohne Hupe Vakuum-Leckanzeigegerät 43781 „Eurovac HV“...
-
Seite 46: Ersatzteile Und Zubehör
100 m, klar PVC-Schlauch 4 x 2 mm, 43648 100 m, rot PVC-Schlauch 4 x 2 mm, 43649 100 m, grün PVC-Schlauch 4 x 2 mm, 43650 100 m, klar Pumpe für „Eurovac HV“ 43777 Rückschlagventil 43605 EnOcean®-Funkmodul 78082 Eurovac HV... -
Seite 47: Möglichkeiten Der Enocean®-Technologie
EnOcean®-Funksystemen finden Sie auf www.enocean.com. • Funkstandard • Funktechnologie • AN001 • AN102 • AN103 14.3 Möglichkeiten der EnOcean®-Technologie Unterlagen über EnOcean®-Technologien finden Sie im Internet unter www.afrisohome.de. Auf unserem YouTube-Channel finden Sie eine Reihe von Videos zu AFRISO-Produkten. Eurovac HV... -
Seite 48: Bescheinigung Des Fachbetriebs
Produkts wird hiermit bestätigt. Pumpe AUS: ___________________________ mbar Pumpe EIN: ____________________________ mbar Alarm EIN: _____________________________ mbar Alarm AUS: ____________________________ mbar Druckabfall Gesamtanlage: _______________ mbar in ______________ Minuten Tank nach Norm: ____________________________ Baujahr: ___________________________________ Liter: ______________________________________ Fabrik-Nr.: _________________________________ O oberirdisch O unterirdisch Eurovac HV... - Seite 49 Anhang Tankhersteller: __________________________________________ __________________________________________ __________________________________________ Fachbetrieb: __________________________________________ __________________________________________ __________________________________________ Betreiber: __________________________________________ __________________________________________ __________________________________________ Eurovac HV...
- Seite 50 Anhang Anlagenort: __________________________________________ __________________________________________ __________________________________________ __________________________________________ Datum, Unterschrift Eurovac HV...
-
Seite 51: Anhang
Schieferöle, Flammpunkt > 100 °C, Siedepunkt > 100 °C 3230 Terpentinölersatz, Flammpunkt > 100 °C, Siede- punkt > 100 °C 3176 Bremsflüssigkeit, hydraulisch, Flammpunkt > 100 °C Glysantin, Frostschutzmittel Aethylglykol, Flammpunkt > 100 °C Diethylenglykol Ethylenglykol Methylglykol Adipinsäuredinitril Arsensäure, wässrige Lösung Eurovac HV... - Seite 52 > 55 °C, Siedepunkt 96 °C Freon Frigen Harnstoff gelöst, Ad Blue, NOx 3085 Harze gelöst in Kohlenwasserstoff ohne Alkohol, Flammpunkt > 100 °C, Siedepunkt > 100 °C Kaliumchlorid Kaliumhydroxid wässrige Lösung max. 20 % Kaliumnitrat wässrige Lösungen Kaliumsulfid Eurovac HV...
- Seite 53 Teere, flüssig, Flammpunkt > 100 °C 3226 Tinkturen, medizinisch, in alkoholischer Lösung, Flammpunkt > 100 °C Natural-Leinöl Natural-Olivenöl Natural-Rizinusöl Natural-Weizenkeimöl Mineral-Salzsole AdBlue® (NOx-Reduktionsmittel AUS 32, Harnstoff- lösung 32,5 %) nach DIN 70070 Flüssigdünger AHL (Ammoniumnitrat-Harnstoff- Lösung) Heizöle DIN 51603 Eurovac HV...
- Seite 54 Anhang Lfd. Nr. Ordn. Nr. Stoffbezeichnung (DIN 6601) Heizöle mit FAME EN 14215 Dieselkraftstoff EN 590 Dieselkraftstoff mit FAME EN 14214 Frischöle für Motoren u. Getriebe Eurovac HV...
-
Seite 55: Eu-Konformitätserklärung
Anhang 15.3 EU-Konformitätserklärung Eurovac HV... -
Seite 56: Leistungserklärung (Dop)
Anhang 15.4 Leistungserklärung (DoP) Eurovac HV... - Seite 57 Anhang CE-Kennzeichnung 900 000 0511 Eurovac HV...
- Seite 58 Vacuum type leak detector Eurovac HV Type: Eurovac HV without protective housing Type: Eurovac HV in protective housing Type: Eurovac HV in protective housing with heating Copyright 2021 AFRISO-EURO-INDEX GmbH. All rights reserved. Lindenstraße 20 74363 Güglingen Telephone +49 7135 102-0 MVV TB;...
- Seite 59 About these operating instructions About these operating instructions These operating instructions describe the vacuum type leak detector "Eurovac HV" (also referred to as "product" in these operating instructions). These operating instructions are part of the product. • You may only use the product if you have fully read and understood these operating instructions.
- Seite 60 This symbol alerts to hazardous electrical voltage. If this symbol is used in a safety message, there is a hazard of electric shock. Eurovac HV...
-
Seite 61: Information On Safety
AdBlue® (urea solution 32.5 %) as per DIN 70070 The product must be resistant to the liquid and its vapours. Resistance has been proven for the liquids listed in the list of substances in chapter "List of substances". Eurovac HV... - Seite 62 Take into account the consequences of installing or integrating the product into a system or a plant. Eurovac HV...
- Seite 63 All persons working on and with the product must be fully familiar with all directives, standards and safety regulations that must be observed for per- forming such work. Eurovac HV...
- Seite 64 Modifications to the product Only perform work on and with the product which is explicitly described in these operating instructions. Do not make any modifications to the product which are not described in these operating instructions. Eurovac HV...
-
Seite 65: Transport And Storage
Use the original packaging when transporting the product. • Store the product in a clean and dry environment. • Verify that the product is protected against shocks and impact during trans- port and storage. Failure to follow these instructions can result in equipment damage. Eurovac HV... - Seite 66 Hose connections are available for the pneumatic connection to the intersti- tial space of the tank. The product monitors and controls constant vacuum in the interstitial space of the tank and triggers an alarm if the vacuum drops. The product can be retrofitted with an EnOcean® wireless module. Eurovac HV...
-
Seite 67: Product Description
M. Exhaust line connection E. Red LED N. Nameplate at the bottom F. Acknowledge key O. Cover for hose connections G. Yellow LED P. Measuring line connection H. LRN key Q. Measurement valve I. Cable gland R. Test port Eurovac HV... - Seite 68 If the LRN key is pressed, the product sends a LRN telegram (LRNTEL) to connect to the AFRISOhome gateway if the optional EnOcean wireless module is installed. Eurovac HV...
- Seite 69 Product description Dimensions 202 mm 70 mm 171 mm 270 mm 360 mm Fig. 1: Eurovac in protective housing, without (A) or with heating (B), pre-assembled and ready to be connected. The horn is connected to the output relay Eurovac HV...
-
Seite 70: Application Examples
Product description Application examples A. Electrical connection F. Outer wall of tank B. Suction line (transparent or G. Condensate traps white) H. Exhaust line (green) C. Tank vent I. Measuring line (red) D. Liquid barrier E. Interstitial space Eurovac HV... - Seite 71 Product description A. Horn "HPW 2" F. Exhaust line (green) G. Suction line (transparent or white) B. Acknowledge key for horn "HPW 2" H. Heating with thermostat C. Product I. Mains cable D. Protective housing E. Measuring line (red) Eurovac HV...
- Seite 72 In case of an alarm, the relay is energised. The product can be operated with or without additional equipment, for exam- ple: • Visual and audible alarm units • Remote alarm equipment • Building control systems Eurovac HV...
-
Seite 73: Technical Specifications
Connecting hose PVC hose 6 x 2 mm Ambient conditions Ambient temperature operation -5 ... 60 °C Ambient temperature outdoor installa- -25 ... 60 °C tion with protective housing and heating Ambient temperature storage -25 ... 60 °C Eurovac HV... - Seite 74 Degree of protection in protective IP 65 housing Emitted interference CISPR 22 Noise immunity EN 61000 EnOcean® wireless Frequency 868.3 MHz Transmission power Max. 10 mW Range See chapter "Information on EnOcean® wireless" EnOcean® Equipment Profile (EEP) A5-30-4 Eurovac HV...
- Seite 75 8. Provide the connections for the suction line and the measuring line. - The connection of the connection line is used for the suction line. - The connection of the test valve is used for the measuring line. Eurovac HV...
-
Seite 76: Incorrect Pressure In Interstitial Space
If audibility cannot be ensured, you must install an additional alarm unit at a suitable location in the building (for example, additional alarm unit ZAG 01, horn KH 1 or combined alarm light and horn from AFRISO). 5.2.1 Basic vacuum Generate a vacuum of approx. -
Seite 77: Mounting The Product
Verify that the product without protective housing is protected against water and splash water. Verify that the product is protected from direct atmospheric influences if it is installed outdoors. - Use an AFRISO protective housing. 1. Mount the product to the wall using mounting type A or B. - Seite 78 Mounting 2. Open the product. 3. Connect the product as described in chapter "Electrical connection". Eurovac HV...
- Seite 79 Mounting 4. Close the product. Eurovac HV...
-
Seite 80: Electrical Connection
UNAVAILABLE MONITORING FUNCTION • Do not install mains plugs or switches in the supply line to the product. • Only power on/power off the product via the on-site mains fuse. Failure to follow these instructions can result in equipment damage. Eurovac HV... - Seite 81 3. Route the mains cable through the upper or bottom cable gland into the product. 4. Connect the phase to terminal L1 and the neutral conductor to terminal N. 5. Close any cable glands of the product that are not used by means of the enclosed plugs. Eurovac HV...
-
Seite 82: Connecting The Product
Mounting 5.4.2 Connecting the product A. Pump D. Relay fuse E. Relay output (Voltage-free B. Cable gland for cable routing via the top changeover contact) C. Cable gland for cable routing F. Mains connection via the bottom Eurovac HV... -
Seite 83: Connecting The Product In Protective Housing
• An additional audible alarm must be installed outside of the protective housing. • In a protective housing without horn or heating, the product must be connected as in chapter 5.4.2 A. Mains connection C. Connection horn B. Connection Eurovac D. Connection heating (optional) Eurovac HV... -
Seite 84: Relay Output
3. Connect the cable to the terminals designated with the relay output. 4. Verify safe separation of the relay cable. - The insulation characteristics of the cable must at least comply with IEC 60227 or IEC 60245. Eurovac HV... - Seite 85 No battery is included in the scope of delivery for opera- tion of the product in other countries. Connection of a standard 9 V monobloc bat- tery is optional. Eurovac HV...
-
Seite 86: Retrofitting An Enocean® Wireless Module (Optional)
Failure to follow these instructions can result in equipment damage. 1. Open the product. A. Slot for EnOcean® wireless C. Housing opening (for fastening module the antenna) B. Position antenna Eurovac HV... - Seite 87 4 x 2 mm hose lines provided such hoses had been used before the leak detector is replaced. - The hose connections of the product are designed for 4 x 2 mm and 6 x 2 mm hose lines. Eurovac HV...
- Seite 88 3. Connect the measuring line to the measurement connection of the inter- stitial space. 4. Connect the exhaust line to the tank vent pipe. - If an AFRISO Euroflex withdrawal system is used, the exhaust line can be directly connected to the Euroflex return connection in the case of single-line operation.
-
Seite 89: Incorrect Pressure In Interstitial Space
Failure to follow these instructions can result in equipment damage. Valve setting Measurement Test valve at valve at red white suction measuring line line connec- connection tion Normal operation Normal operation Test with pressure measur- Venting ing instrument Not permissible Not permissible Eurovac HV... - Seite 90 Verify that the AFRISOhome gateway is in "Learn" mode. 1. Apply mains voltage. - The green LED is on. 2. Press LRN key (A). - The product sends a Learn telegram (LRNTEL). - The product is now connected to the AFRISOhome gateway. Eurovac HV...
- Seite 91 - Once the correct vacuum is reached, the pump switches off. - The system is now ready for operation. 2. Perform a function test. The specialised company certifies the installation, commissioning and test of the product (see chapter "Certificate of expert"). Eurovac HV...
- Seite 92 - The vacuum in the interstitial space drops and the product triggers an alarm. 2. Set the test valve (white connection) to position "Normal Operation". - The vacuum in the interstitial space is regenerated. - The alarm signals must switch off automatically. Eurovac HV...
- Seite 93 Function test by measurement The free lateral connection of the red measurement valve is provided for connecting a pressure measuring instrument to test the system. Test reports can be found at www.afriso.de. 1. Connect the pressure measuring instrument (vac- uum).
- Seite 94 In the case of products with an EnOcean® wireless module, the product sends a message to the AFRISOhome gateway. The user receives a message from the AFRISO app that a leak has been detected. Acknowledging an alarm 1. Press the Acknowledge key to mute the audible alarm.
- Seite 95 2. Press the Acknowledge key (A) to mute the audi- ble alarm. - The yellow LED (B) lights solid. 3. Have the annual mainte- nance/service performed by a specialised com- pany. Eurovac HV...
-
Seite 96: Maintenance Intervals
If a 9 V battery is fitted for alarm in the case of power outage, replace the battery After an alarm condition Perform a function test after each alarm (see chapter "Function test") If required Replace the relay fuse F1 (T 2 A) Eurovac HV... -
Seite 97: Maintenance Activities
4. Fit a new relay fuse F1 (T 2 A). 5. Refit the transparent cover. 6. Connect the flat cable to the connector. 7. Fit the upper part of the housing and close it. 8. Apply mains voltage. Eurovac HV... - Seite 98 Yellow LED flashes Annual maintenance Perform annual mainte- required nance (see chapter "Maintenance") Water in condensate Drain the condensate trap trap Filter polluted Replace the filter Other malfunctions Contact the AFRISO service hotline Eurovac HV...
- Seite 99 If you open the device, the yellow LED (C) on the printed circuit board always displays the pump operating time (you do not need to press the Test key). Eurovac HV...
-
Seite 100: Returning The Device
2. Dismount the product (see chapter "Mounting", reverse sequence of steps). 3. Dispose of the product. Returning the device Get in touch with us before returning your product (service@afriso.de). Warranty See our terms and conditions at www.afriso.com or your purchase contract for information on warranty. Eurovac HV... - Seite 101 Vacuum type leak detector 43750 2651001 "Eurovac HV" Vacuum type leak detector 43774 "Eurovac HV" in protective hous- ing without heating, without horn Vacuum type leak detector 43776 "Eurovac HV" in protective hous- ing without heating, with horn Vacuum type leak detector 43793 "Eurovac HV"...
-
Seite 102: Spare Parts And Accessories
PVC hose 4 x 2 mm, 43648 100 m, red PVC hose 4 x 2 mm, 43649 100 m, green PVC hose 4 x 2 mm, 43650 100 m, transparent Pump for "Eurovac HV" 43777 Check valve 43605 EnOcean® wireless 78082 module Eurovac HV... - Seite 103 • Wireless technology • AN001 • AN102 • AN103 14.3 Features of the EnOcean® technology Visit www.afrisohome.de for documents on EnOcean® technologies. A variety of videos on AFRISO products can also be found on the AFRISO YouTube channel. Eurovac HV...
- Seite 104 Pump ON: _____________________________ mbar Alarm ON: _____________________________ mbar Alarm OFF: ____________________________ mbar Pressure drop entire system: _______________ mbar in ______________ minutes Tank as per standard: ________________________ Year of manufacture: _________________________ Litres: _____________________________________ Factory no.:_________________________________ O aboveground O underground Eurovac HV...
- Seite 105 Appendix Tank manufacturer: __________________________________________ __________________________________________ __________________________________________ Specialised company: __________________________________________ __________________________________________ __________________________________________ Owner/operator: __________________________________________ __________________________________________ __________________________________________ Eurovac HV...
- Seite 106 Appendix Location of system: __________________________________________ __________________________________________ __________________________________________ __________________________________________ Date, signature Eurovac HV...
- Seite 107 Turpentine substitute, flash point > 100 °C boiling point > 100 °C 3176 Brake fluid, hydraulic, flash point > 100 °C Glysantin, antifreeze Ethyl glycol, flash point > 100 °C Diethylene glycol Ethylene glycol Methyl glycol Adipic acid dinitrile Arsenic acid, aqueous solution Eurovac HV...
- Seite 108 Frigen Urea, dissolved, Ad Blue, NOx 3085 Resins dissolved in hydrocarbon without alcohol, flash point > 100 °C, boiling point > 100 °C Potassium chloride Potassium hydroxide aqueous solution max. 20 % Potassium nitrate aqueous solutions Potassium sulphide Eurovac HV...
- Seite 109 Natural linseed oil Natural olive oil Natural caster oil Natural wheat germ oil Mineral brine AdBlue® (NOx reduction agent 32, urea solution 32.5 %) as per DIN 70070 Liquid fertiliser UAN (urea ammonium nitrate solu- tion) Fuel oils DIN 51603 Eurovac HV...
- Seite 110 Appendix Number ID Designation of substance (DIN 6601) Fuel oils with FAME EN 14215 Diesel fuel EN 590 Diesel fuel with FAME EN 14214 Unused motor and gearbox oils Eurovac HV...
-
Seite 111: Eu Declaration Of Conformity
Appendix 15.3 EU Declaration of Conformity Eurovac HV... -
Seite 112: Declaration Of Performance (Dop)
Appendix 15.4 Declaration of Performance (DoP) Eurovac HV... - Seite 113 Appendix CE Marking 900 000 0511 Eurovac HV...
- Seite 114 Eurovac HV Type : Eurovac HV sans boîtier de protection Type : Eurovac HV dans le boîtier de protection Type : Eurovac HV dans le boîtier de protection avec chauffage Copyright 2021 AFRISO-EURO-INDEX GmbH. Tous droits réservés. Lindenstraße 20 74363 Güglingen Téléphone +49 7135 102-0...
- Seite 115 La présente notice technique La présente notice technique Cette notice technique contient la description du détecteur de fuite à dépres- sion "Eurovac HV" (dénommé ci-après "produit"). Cette notice technique fait partie du produit. • Utilisez le produit seulement après que vous aurez lu et compris intégra- lement la notice technique.
- Seite 116 Ce pictogramme avertit d'une tension électrique dange- reuse. Si ce pictogramme s'affiche dans une consigne de sécurité, il y a un risque de choc électrique. Eurovac HV...
-
Seite 117: Informations Sur La Sécurité
• AdBlue® (solution aqueuse d'urée 32,5 %) selon DIN 70070 Le produit doit être compatible avec le liquide et ses vapeurs. La compatibilité des liquides de la liste de substances du chapitre "Liste des substances" a été prouvée. Eurovac HV... - Seite 118 à l'aide d'un procédé reconnu et prenez toutes les mesures de sécurité nécessaires correspondant au résultat. Prenez aussi en compte les conséquences possibles du montage ou de l'intégration du produit dans un système ou une installation. Eurovac HV...
- Seite 119 être en mesure de prévoir et reconnaître les dangers qui peuvent être causés par l'utilisation du produit. Tous les règlements, normes et consignes de sécurité en vigueur sur le lieu d'installation doivent être connus du personnel qualifié travaillant sur le pro- duit et avec celui-ci. Eurovac HV...
- Seite 120 Modification du produit En travaillant sur le produit et avec celui-ci, effectuez exclusivement les opé- rations décrites dans cette notice technique. N'effectuez pas de modifica- tions non décrites dans cette notice technique. Eurovac HV...
-
Seite 121: Transport Et Stockage
Utilisez l'emballage d'origine pour le transport. • Stockez le produit dans un lieu sec et propre. • Assurez-vous que le produit est à l'abri des chocs pendant le transport et le stockage. La non-observation de ces instructions peut causer des dommages maté- riels. Eurovac HV... - Seite 122 à l'espace interstitiel du réservoir. Le produit surveille et contrôle une dépression constante dans l'espace interstitiel du réservoir et déclenche une alarme en cas de baisse de cette dépression. Le produit peut être équipé ultérieurement d'un module sans fil EnOcean®. Eurovac HV...
-
Seite 123: Description Du Produit
M. Raccord échappement E. LED rouge N. Plaque signalétique en bas F. Touche d'acquittement O. Couvercle pour raccords de tuyaux G. LED jaune P. Raccord conduite mesure H. Touche LRN Q. Robinet mesure I. Presse-étoupe R. Raccord de test Eurovac HV... - Seite 124 être effectuée si la fonction de maintenance est active. Touche Si la touche LRN est enfoncée, le produit transmet un télégramme de connexion (LRNTEL) afin se connec- ter à la passerelle AFRISOhome si le module sans fil EnOcean en option est installé. Eurovac HV...
- Seite 125 202 mm 70 mm 171 mm 270 mm 360 mm Figure 1: Eurovac dans le boîtier de protection avec (A) ou sans chauffage (B), préas- semblé et prêt au montage. L'avertisseur sonore est branché au relais de sortie Eurovac HV...
-
Seite 126: Exemples D'application
Description du produit Exemples d'application A. Branchement électrique F. Paroi externe B. Conduite d'aspiration (transpa- G. Pots de condensation rente ou blanche) H. Conduite d'échappement (verte) C. Évent I. Conduite de mesure (rouge) D. Clapet anti-liquide E. Espace interstitiel Eurovac HV... - Seite 127 A. Avertisseur sonore "HPW 2" F. Conduite d'échappement (verte) G. Conduite d'aspiration (transparente B. Bouton d'acquittement pour l'avertisseur sonore "HPW 2" ou blanche) C. Produit H. Chauffage avec thermostat D. Boîtier de protection I. Câble secteur E. Conduite de mesure (rouge) Eurovac HV...
- Seite 128 En cas d'alarme le relais est activé. Le produit peut être utilisé avec ou sans équipements supplémentaires, par ex. : • Des dispositifs pour les alarmes sonores ou visuelles • Appareils de télécommunication • Equipement pour la gestion de bâtiments Eurovac HV...
-
Seite 129: Caractéristiques Techniques
Tuyau PVC 6 x 2 mm Conditions ambiantes Température ambiante service -5 ... 60 °C Température ambiante à l'extérieur -25 ... 60 °C dans le boîtier de protection avec chauf- fage Température ambiante stockage -25 ... 60 °C Données électriques Eurovac HV... - Seite 130 Degré de protection dans le boîtier de IP 65 protection Émission CISPR 22 Immunité EN 61000 EnOcean® sans fil Fréquence 868,3 MHz Puissance de transmission Max. 10 mW Portée Voir chapitre "Informations sur EnOcean® sans fil" EnOcean®- Equipment Profile (EEP) A5-30-4 Eurovac HV...
- Seite 131 8. Réalisez les raccordements pour la conduite d'aspiration et la conduite de mesure. - Le raccord de la conduite de raccordement est utilisé pour la conduite d'aspiration. - Le raccord du robinet de test est utilisé pour la conduite de mesure. Eurovac HV...
-
Seite 132: Préparation Du Montage
Si l'audibilité ne peut être assurée, vous devez installer une unité d'alarme supplémentaire à un endroit approprié dans le bâtiment (par ex. unité d'alarme supplémentaire ZAG 01, avertisseur sonore KH 1 ou gyrophare avec avertisseur sonore AFRISO). 5.2.1 Dépression de base Videz l'espace interstitiel jusqu'à... -
Seite 133: Montage Du Produit
Assurez-vous que le produit est protégé contre les intempéries en cas de montage à l'extérieur. - Utilisez un boîtier de protection AFRISO. 1. Fixez le produit au mur (servez-vous de type de fixation A ou B). - Seite 134 Montage 2. Ouvrez le produit. 3. Raccordez le produit comme décrit dans le cha- pitre "Branchement élec- trique". Eurovac HV...
- Seite 135 Montage 4. Fermez le produit. Eurovac HV...
-
Seite 136: Branchement Électrique
NON DISPONIBILITÉ DE LA FOCNTION DE SURVEILLANCE • N'installez pas des fiches secteur et des commutateurs dans l'alimentation du produit. • Allumez et éteindrez le produit uniquement par l'intermédiaire du fusible sec- teur. La non-observation de ces instructions peut causer des dommages maté- riels. Eurovac HV... - Seite 137 3. Faites passer le câble secteur par le presse-étoupe du haut ou du bas dans le produit. 4. Branchez la phase à la borne L1 et le neutre à la borne N. 5. Fermez les presse-étoupes non utilisés du produit en utilisant la pièce ci-jointe. Eurovac HV...
- Seite 138 Montage 5.4.2 Raccordement du produit A. Pompe D. Fusible relais E. Sortie relais (contact inverseur libre B. Câble via presse-étoupe en haut de potentiel) C. Câble via presse-étoupe en F. Branchement secteur Eurovac HV...
- Seite 139 • Installez une alarme sonore supplémentaire en dehors du boîtier de protection. • Dans le boîtier de protection sans avertisseur sonore ou chauffage, le produit doit être raccordé comme dans le chapitre 5.4.2 A. Branchement secteur C. Branchement avertisseur sonore B. Branchement Eurovac D. Branchement chauffage (en option) Eurovac HV...
- Seite 140 2. Faites passer ce câble par le presse-étoupe du haut ou du bas dans le produit. 3. Branchez le câble aux bornes désignées de relais sortie. 4. Assurez une séparation sûre du câble. - Caractéristiques d'isolation minimales du câble : selon IEC 60227 ou IEC 60245. Eurovac HV...
- Seite 141 Si entre-temps une alarme s'est produite, celle-ci est signalée. En cas d'utilisation du produit en Allemagne, la pile n'est pas fournie. Vous pouvez connecter une pile monobloc 9 V standard en option. Eurovac HV...
- Seite 142 électrostatique. • Ne touchez pas le module sans fil EnOcean® lors de l'installation ; utilisez la feuille anti-électrostatique pour enficher le module dans le connecteur femelle. La non-observation de ces instructions peut causer des dommages maté- riels. Eurovac HV...
- Seite 143 EnOcean® dans le connecteur femelle. Vérifier le suivant pendant cette opération : - Toutes les broches doivent se trouver dans le connecteur femelle. - La position de l'antenne doit être à la droite (près du mur du boîtier). Eurovac HV...
-
Seite 144: Raccordement Des Tuyaux
1. Ne montez aucune vanne ni dispositif de coupure. 2. En cas des applications extérieures ou souterraines, installez les tuyaux dans des tubes de protection appropriés, résistants aux chocs et aux intempéries et étanches aux liquides. Eurovac HV... - Seite 145 3. Raccordez la conduite de mesure au raccord mesure de l'espace inters- titiel. 4. Raccordez le tuyau d'échappement à l'évent du réservoir. - En cas d'utilisation avec l'ensemble d'aspiration AFRISO Euroflex en mode ligne unique, vous pouvez brancher le tuyau d'échappement directement au raccord retour d'Euroflex.
- Seite 146 La non-observation de ces instructions peut causer des dommages maté- riels. Position du Robinet mesure Robinet de robinet au raccord test au rac- mesure rouge cord aspira- tion blanc Fonctionnement normal Fonctionnement normal Test avec manomètre Mise à l'air Non autorisé Non autorisé Eurovac HV...
-
Seite 147: Mise En Service
Vérifiez que la passerelle AFRISOhome est en mode "Connexion". 1. Allumez la tension secteur. - La LED verte est allumée. 2. Appuyez sur la touche LRN (A). - Le produit transmet un télégramme de connexion (LRNTEL). - Le produit est connecté à la passerelle AFRISO- home. Eurovac HV... -
Seite 148: Mise En Service Du Produit
- La pompe s'arrête si la dépression correcte est atteinte. - L'installation est maintenant prête au service. 2. Effectuez un test de fonctionnement. L'entreprise spécialisée atteste l'installation, la mise en service et le test du produit (voir chapitre "Attestation de l'expert"). Eurovac HV... - Seite 149 - La dépression dans l'espace interstitiel chute et l'alarme se déclenche. 2. Mettez le robinet de test (raccord blanc) en position "Normal". - La dépression dans l'espace interstitiel est à nou- veau générée. - Les signaux de l'alarme doivent automatiquement s'arrêter. Eurovac HV...
- Seite 150 Le raccord libre latéral du robinet mesure rouge est prévu pour le bran- chement d'un manomètre permettant de contrôler l'installation. Vous pou- vez trouver des rapports de test sur www.afriso.de. 1. Connectez le manomètre (à vide). 2. Mettez le robinet mesure (raccord rouge) en position "Test".
- Seite 151 Le relais de sortie permet la transmission du signal d'alarme aux équipe- ments supplémentaires. Le produit avec module EnOcean® sans fil envoie un message à la passe- relle AFRISOhome. L'utilisateur reçoit un message via l'app AFRISO indi- quant qu'une fuite a été détectée. Acquittement d'une alarme 1.
- Seite 152 2. Appuyez sur la touche d'acquittement (A) pour arrêter l'alarme sonore. - La LED jaune (B) s'allume en perma- nence. 3. Faites effectuer la mainte- nance annuelle par une entreprise spécialisée. Eurovac HV...
- Seite 153 Remplacez, si applicable, la pile monobloc 9 V pour l'alarme en cas de panne secteur Après une alarme Effectuez un test de fonctionnement après chaque alarme (voir chapitre "Test de fonctionne- ment") Si nécessaire Remplacez le fusible relais F1 (T 2 A) Eurovac HV...
-
Seite 154: Opérations De Maintenance
4. Installez un nouveau fusible relais F1 (T 2 A). 5. Remontez le capot de protection transparent. 6. Branchez le câble plat au connecteur. 7. Remettez et fermez la face avant du boîtier. 8. Allumez la tension secteur. Eurovac HV... - Seite 155 Maintenance annuelle Effectuez la mainte- nance annuelle (voir chapitre "Maintenance") Présence d'eau dans le Videz le pot de conden- pot de condensation sation Le filtre est encrassé Remplacez le filtre Autre dérangement Veuillez contacter l'AFRISO Service Hot- line Eurovac HV...
-
Seite 156: Suppression Des Dérangements
Si la LED verte (A) s'allume pendant une seconde, la durée de fonctionne- ment de la pompe était au total d'un jour au cours des cinq derniers jours. Eurovac HV... - Seite 157 était d'autant plus réduite. Lorsque le boîtier est ouvert, une LED jaune (C) sur la pla- tine affiche toujours cette durée de fonctionnement de la pompe (sans actionnement de la touche Test). Eurovac HV...
-
Seite 158: Mise Hors Service Et Élimination
Retour Avant de retourner le produit, il faut que vous preniez contact avec nous (ser- vice@afriso.de). Garantie Les informations sur la garantie figurent dans nos "Conditions générales de vente" sur le site www.afriso.com ou dans votre contrat d'achat. Eurovac HV... - Seite 159 (France) Détecteur de fuite "Eurovac HV" 43750 2651001 Détecteur de fuite à dépression 43774 "Eurovac HV" dans le boîtier de protection sans chauffage, sans avertisseur sonore Détecteur de fuite à dépression 43776 "Eurovac HV" dans le boîtier de protection sans chauffage, avec avertisseur sonore Détecteur de fuite à...
-
Seite 160: Pièces Détachées Et Accessoires
43648 100 m, rouge Tuyau PVC 4 x 2 mm, 43649 100 m, vert Tuyau PVC 4 x 2 mm, 43650 100 m, transparent Pompe pour "Eurovac HV" 43777 Clapet de retenue 43605 Module sans fil EnOcean® 78082 Eurovac HV... - Seite 161 Technologie de communication radio • AN001 • AN102 • AN103 14.3 Possibilités de la technologie EnOcean® Vous trouverez des documents supplémentaires sur les technologies EnO- cean® sur www.afrisohome.de. Visitez le canal YouTube d'AFRISO et découvrez des vidéos sur les produits AFRISO. Eurovac HV...
- Seite 162 Alarme MARCHE : ______________________ mbar Alarme ARRÊT : _______________________ mbar Chute de pression dans toute l'installation :____ mbar en ___________ minutes Réservoir selon norme :_______________________ Année de fabrication :_________________________ Litres :_____________________________________ N° usine : __________________________________ O aérien O enterré Eurovac HV...
- Seite 163 Annexe Fabricant du réservoir : __________________________________________ __________________________________________ __________________________________________ Entreprise spécialisée : __________________________________________ __________________________________________ __________________________________________ Exploitant : __________________________________________ __________________________________________ __________________________________________ Eurovac HV...
- Seite 164 Annexe Site d'installation : __________________________________________ __________________________________________ __________________________________________ __________________________________________ Date, signature Eurovac HV...
- Seite 165 Huile de térébenthine, point d'éclair > 100 °C, point d'ébullition > 100 °C 3176 Liquide de frein, hydraulique, point d'éclair > 100 °C Glysantin, antigel Ethylène glycol, point d'éclair > 100 °C Diéthylène de glycol Ethylène glycol Méthyle glycol Eurovac HV...
- Seite 166 < 15 % point d'éclair > 55 °C point d'ébullition 96 °C Fréon Frigen Urée résolue, Ad Blue, NOx 3085 Résines dissoutes dans de l'hydrocarbure sans alcool, point d'éclair > 100 °C, point d'ébullition > 100 °C Chlorure de potassium Eurovac HV...
- Seite 167 3167 Goudron liquide, point d'éclair > 100 °C 3226 Teintures médicinales en solution alcool, point d'éclair > 100 °C Huile de lin naturelle Huile d'olive naturelle Huile de ricin naturelle Huile issue de germe de blé naturelle Saumure Eurovac HV...
- Seite 168 32,5 %) selon DIN 70070 Engrais liquide UAN (solution d'urée et de nitrate d'ammonium) Fuel DIN 51603 Fuel avec FAME EN 14215 Gazole EN 590 Gazole avec FAME EN 14214 Huiles de moteur et de boite de vitesse non usagées Eurovac HV...
-
Seite 169: Déclaration De Conformité Ue
Annexe 15.3 Déclaration de conformité UE Eurovac HV... - Seite 170 Annexe 15.4 Déclaration de performance (DoP) Eurovac HV...
- Seite 171 Annexe Marquage CE 900 000 0511 Eurovac HV...
- Seite 172 Rilevatore di perdite a depressione Eurovac HV Tipo: Eurovac HV senza involucro protettivo Tipo: Eurovac HV in involucro protettivo Tipo: Eurovac HV in involucro protettivo con riscaldamento Copyright 2021 AFRISO-EURO-INDEX GmbH. Tutti i diritti sono riservati. Lindenstraße 20 74363 Güglingen Telefono +49 7135 102-0 MVV TB;...
- Seite 173 Su queste Istruzioni per l'uso Su queste Istruzioni per l'uso Queste Istruzioni per l'uso descrivono il dispositivo di segnalazione perdite a depressione "Eurovac HV" (nel proseguio anche "prodotto"). Le presenti Istruzioni per lʼuso costituiscono parte del prodotto. • L'utilizzo del prodotto è permesso soltanto dopo aver letto e capito com- pletamente le Istruzioni per l'uso.
- Seite 174 Questo simbolo segnala tensione elettrica pericolosa. Quando questo simbolo è riportato all'interno un avverti- mento segnala pericolo da scossa elettrica. Eurovac HV...
-
Seite 175: Informazioni Sulla Sicurezza
AdBlue® (soluzione di urea tecnica al 32,5 %) secondo DIN 70070 Il prodotto deve essere resistente contro il liquido e i suoi vapori. La resi- stenza è comprovata per i liquidi dellʼelenco al Capitolo "Elenco dei mate- riali". Eurovac HV... - Seite 176 Quando utilizzate il prodotto, eseguite tutti i lavori esclusivamente nel rispetto delle condizioni specificate nelle Istruzioni per l'uso e sulla targhetta conosci- tiva, nell'ambito dei dati tecnici specificati e in osservanza di tutte le disposi- zioni norme e prescrizioni di sicurezza vigenti sul luogo d'impiego. Eurovac HV...
- Seite 177 Il personale specializzato deve essere a conoscenza di tutte le disposizioni, norme e prescrizioni di sicurezza vigenti che si riferiscono ai lavori con e al prodotto. Eurovac HV...
- Seite 178 Modifiche del prodotto Eseguite esclusivamente i lavori con e al prodotto descritti nelle Istruzioni per l'uso. Non apportate modifiche al prodotto che non sono descritte nelle Istru- zioni per l'uso. Eurovac HV...
-
Seite 179: Trasporto E Magazzinaggio
Per il trasporto, utilizzate l'imballaggio originale. • Immagazzinate il prodotto solo in ambiente asciutto e pulito. • Assicuratevi che il prodotto sia prodotto contro urti durante il trasporto e il magazzinaggio. La mancata osservanza di queste indicazioni può causare danni materiali. Eurovac HV... - Seite 180 Il collegamento pneumatico allo spazio interstiziale del serbatoio prevede due attacchi tubo. Il prodotto sorveglia e regola una depressione costante nello spazio intersti- ziale del serbatoio ed emette un allarme al calo della depressione. Il retrofit con il modulo radio EnOcean® è possibile. Eurovac HV...
-
Seite 181: Descrizione Del Prodotto
N. Targhetta conoscitiva sul lato infe- riore F. Tasto di tacitazione allarme O. Coperchio per raccordi tubo G. LED giallo P. Attacco tubo di misura H. Pulsante LRN Q. Valvola di misurazione I. Fermacavo R. Attacco per prova Eurovac HV... - Seite 182 è attiva. Pulsante Quando il modulo radio EnOcean è collegato, il pul- sante LRN trasmette un telegramma di apprendi- mento (LRNTEL) per collegarsi con il gateway AFRISOhome. Eurovac HV...
- Seite 183 Descrizione del prodotto Dimensioni 202 mm 70 mm 171 mm 270 mm 360 mm Figura 1: Eurovac in involucro, senza (A) o con riscaldamento (B), preassemblato per la connessione. L’avvisatore acustico è collegato al relè d’uscita. Eurovac HV...
-
Seite 184: Esempi Applicativi
A. Allacciamento elettrico F. Mantello esterno del serbatoio B. Condotto di aspirazione (tra- G. Collettori condensa sparente o bianco) H. Condotto di sfiato (verde) C. Sfiato serbatoio I. Condotto di misura (rosso) D. Barriera liquidi E. Spazio interstiziale Eurovac HV... - Seite 185 A. Avvisatore acustico "HPW 2" F. Condotto di sfiato (verde) G. Condotto di aspirazione (trasparente B. Interruttore di tacitazione per avvisatore acustico "HPW2" o bianco) C. Prodotto H. Riscaldamento con termostato D. Involucro protettivo I. Cavo rete E. Condotto di misura (rosso) Eurovac HV...
- Seite 186 è a riposo. In caso di allarme, il relè è eccitato. Il prodotto può essere utilizzato con o senza addizionali unità esterne, ad esempio: • Dispositivi di allarme visivo e acustico • Avvisatori remoti • Sistemi di comunicazione dʼedificio Eurovac HV...
-
Seite 187: Specifiche Tecniche
Tubo PVC 6 x 2 mm Condizioni ambiente Temperatura ambiente - Funziona- -5 ... 60 °C mento Temperatura ambiente allʼaperto, con -25 ... 60 °C involucro protettivo e riscaldamento Temperatura ambiente magazzinaggio -25 ... 60 °C Dati elettrici Eurovac HV... - Seite 188 Grado di protezione nell'involucro pro- IP 65 tettivo Emissioni CISPR 22 Immunità a interferenze EN 61000 Trasmissione radio EnOcean® Frequenza 868,3 MHz Potenza di trasmissione Max. 10 mW Portata Vedere il capitolo "Informazioni sulla funzione radio EnOcean®" EnOcean® Equipment Profile (EEP) A5-30-4 Eurovac HV...
- Seite 189 - In cima allo spazio interstiziale ci deve essere aria. 8. Collegare i condotti di aspirazione e misura. - Per il condotto di aspirazione si utilizza l'attacco per il condotto di col- legamento. - Per il condotto di misura si usa l'attacco del rubinetto di prova. Eurovac HV...
- Seite 190 Se l'udibilità non è assicurata è necessario installare un dispositivo d'allarme aggiuntivo in una posizione adatta all'interno dell'edificio (ad es., allarme aggiuntivo ZAG 01, sirena KH 1 o avvisatore visivo AFRISO). 5.2.1 Vuoto di base Evacuare lo spazio interstiziale fino a una depressione di -400 mbar circa.
-
Seite 191: Montaggio Dell'apparecchio
Assicurare che il prodotto senza involucro protettivo sia protetto contro acqua e spruzzi. Assicurare che il prodotto sia protetto dai fattori atmosferici quando è montato allʼaperto. - All'occorrenza, utilizzate un involucro protettivo AFRISO. 1. Fissare il prodotto a parete (utilizzare il tipo di fissaggio A o B) - Utilizzare la dima di fora- tura a corredo. - Seite 192 Montaggio 2. Aprite il prodotto. 3. Allacciate il prodotto come descritto al Capitolo "Allacciamento elettrico". Eurovac HV...
- Seite 193 Montaggio 4. Chiudere il prodotto. Eurovac HV...
-
Seite 194: Allacciamento Elettrico
• Non installare spine di rete o interruttori lungo l'allacciamento fisso del pro- dotto. • Inserire il prodotto solo mediante la protezione di rete a cura del committente. La mancata osservanza di queste indicazioni può causare danni materiali. Eurovac HV... - Seite 195 3. Introdurre il cavo di allacciamento nellʼunità di segnale facendolo pas- sare attraverso il passacavo superiore o attraverso il passacavo infe- riore. 4. Collegare la fase al morsetto L1 e il conduttore neutro al morsetto N. 5. Chiudere gli avvitamenti non utilizzati sullʼapparecchio con il tappo a corredo. Eurovac HV...
- Seite 196 Montaggio 5.4.2 Collegare il prodotto A. Pompa D. Fusibile relè E. Uscita relè (contatto senza poten- B. Passaggio cavi attraverso il fer- macavo superiore ziale) C. Passaggio cavi attraverso il fer- F. Allacciamento rete macavo inferiore Eurovac HV...
- Seite 197 • È necessario prevedere un addizionale allarme acustico a prova di intemperie allʼesterno dellʼalloggiamento protettivo. • Nell'involucro protettivo senza sirena o riscaldamento il prodotto deve essere allacciato come descritto al Capitolo 5.4.2 A. Allacciamento rete C. Collegamento allarme acustico B. Collegamento Eurovac D. Collegamento riscaldamento (opzio- nale) Eurovac HV...
-
Seite 198: Uscita Relè
3. Collegare il cavo relè ai morsetti contrassegnati per il contatto relè. 4. Verificare la separazione sicura del cavo. - Le caratteristiche isolanti del cavo del relè devono soddisfare almeno la norma CEI 60227 o CEI 60245. Eurovac HV... - Seite 199 è immediata- mente pronto al funziona- mento. Un allarme verifica- tosi nel frattempo viene segnalata. Quando lʼapparecchio viene usato in Germania, il volume di fornitura non contiene la batteria. Il collegamento a una comune batteria 9 V è opzionale. Eurovac HV...
- Seite 200 La mancata osservanza di queste indicazioni può causare danni materiali. 1. Aprite il prodotto. A. Slot per il modulo radio EnO- C. Incavo nellʼinvolucro (per fissare ® cean lʼantenna) B. Posizione antenna Eurovac HV...
- Seite 201 4 x 2 mm, se questi erano già in uso prima della sostituzione. - Gli attacchi per tubi sullʼapparecchio sono previsti per il collegamento di tubi da 4 x 2 mm e 6 x 2 mm. Eurovac HV...
- Seite 202 4. Collegare il tubo di sfiato al tronchetto di sfiato del serbatoio. - Utilizzando un dispositivo di prelievo AFRISO Euroflex, il tubo di sfiato in modalità a circuito singolo può essere collegato direttamente al colle- gamento di ritorno dellʼEuroflex.
- Seite 203 La mancata osservanza di queste indicazioni può causare danni materiali. Posizione val- Valvola di Valvola di vola misura prova sull'attacco del sull'attacco tubo di misura del tubo di rosso aspirazione bianco Esercizio normale Esercizio normale Prova con manometro Aerazione Non ammesso Non ammesso Eurovac HV...
-
Seite 204: Messa In Funzione
1. Inserire la tensione di rete. - Il LED verde è acceso. 2. Premere il tasto "LRN" (A). - Il prodotto trasmette un telegramma di apprendi- mento (LRNTEL). - Il prodotto ha stabilito la connessione al gateway AFRISOhome. Eurovac HV... -
Seite 205: Messa In Funzione Del Prodotto
- Quando la depressione nominale è raggiunta, la pompa viene disinse- rita. - Lʼimpianto è ora pronto allʼuso. 2. Eseguire una prova di funzionamento. Farsi certificare il montaggio, la messa in esercizio e il collaudo del prodotto dallʼazienda specializzata (vedere il Cap. "Certificato dʼesperto"). Eurovac HV... - Seite 206 - La depressione nello spazio interstiziale cala e il prodotto segnala un allarme. 2. Portare la valvola di prova (raccordo bianco) in posi- zione "Esercizio normale". - Viene nuovamente generata una depressione nello spazio interstiziale. - I segnali di allarme devono spegnersi automatica- mente. Eurovac HV...
- Seite 207 Il collegamento laterale libero della valvola di misura rossa è previsto per il collegamento di un manometro per eseguire controlli dellʼimpianto. I pro- tocolli di collaudo si trovano sul sito www.afriso.de. 1. Collegare il manometro (depressione). 2. Portare la valvola di misurazione (raccordo rosso) in posizione di "Prova".
- Seite 208 Tramite il relè d'uscita, il segnale d'allarme si può trasmettere a dispositivi esterni. Nei prodotti dotati di modulo radio EnOcean®, il prodotto trasmette un mes- saggio al gateway AFRISOhome. Tramite la app AFRISO, l'utente finale riceve un messaggio che indica l'identificazione di una perdita. Tacitare l'allarme 1.
- Seite 209 1 secondo circa. 2. Premere il tasto di tacita- zione (A) per disattivare lʼallarme acustico. - Il LED giallo resta acceso continuamente. 3. Fare eseguire la manuten- zione annuale da unʼazienda specializzata. Eurovac HV...
- Seite 210 Se montata, sostituire la batteria 9 V per lʼallarme in caso di caduta di corrente. Dopo ogni allarme Eseguire una prova del funzionamento dopo ogni allarme (vedere Capitolo "Test di funziona- mento"). All'occorrenza Sostituire il fusibile relè F1 (T 2 A). Eurovac HV...
-
Seite 211: Interventi Di Manutenzione
4. Inserire un nuovo fusibile relè F1 (T 2 A). 5. Rimontare il coperchio trasparente sul fusibile. 6. Collegare la piattina multipolare al listello di connessione. 7. Rimontare la parte superiore dell'involucro. 8. Inserire la tensione di rete. Eurovac HV... - Seite 212 LED giallo lampeggia. Tempo di eseguire la Eseguire la manuten- manutenzione annuale. zione annuale (vedere "Manutenzione"). Acqua nel collettore di Svuotare il collettore di condensa. condensa. Filtro imbrattato. Sostituire il filtro. Altri guasti Rivolgetevi alla hotline di assistenza AFRISO Eurovac HV...
-
Seite 213: Riparazione Guasti
Lʼindicazione del LED verde (A) si riferisce sempre agli ultimi 5 giorni. I tempi di attività della pompa vengono indicati come somma. Una durata di accensione del LED verde (A) di 1 secondo corrisponde a un tempo di attività totale della pompa di un giorno durante gli ultimi cinque giorni. Eurovac HV... - Seite 214 Se il LED verde (A) si accende solo brevemente, ciò indica un tempo di accensione della pompa corrispondentemente breve durante gli ultimi cinque giorni. A involucro aperto, un LED giallo (C) sulla platina indica sempre questo tempo di atti- vità della pompa (senza pre- mere il tasto di prova). Eurovac HV...
-
Seite 215: Smontaggio E Smaltimento
3. Smaltire il prodotto. Rispedizione al fornitore Prima di rispedire il prodotto, mettetevi in contatto con noi (ser- vice@afriso.de). Garanzia Le informazioni sulla garanzia sono riportate nelle condizioni di contratto generali in internet sul sito www.afriso.com o nel vostro contratto d'acquisto. Eurovac HV... - Seite 216 Rilevatore di perdite a depres- 43750 2651001 sione "Eurovac HV" Rilevatore di perdite a depres- 43774 sione "Eurovac HV" in involucro protettivo senza riscaldamento e senza avvisatore acustico Rilevatore di perdite a depres- 43776 sione "Eurovac HV" in involucro protettivo senza riscaldamento,...
-
Seite 217: Ricambi E Accessori
43648 100 m, rosso Tubo PVC 4 x 2 mm, 43649 100 m, verde Tubo PVC 4 x 2 mm, 43650 100 m, trasparente Pompa per "Eurovac HV" 43777 Valvola di non ritorno 43605 Modulo radio EnOcean® 78082 Eurovac HV... - Seite 218 Norma radio • Tecnologia radio • AN001 • AN102 • AN103 14.3 I vantaggi della tecnologia EnOcean® Documenti sulle tecnologie EnOcean® sono richiamabili dal sito internet www.afrisohome.de. Video su prodotti AFRISO si trovano anche sul canale YouTube AFRISO. Eurovac HV...
-
Seite 219: O In Superficie O Interrato
Pompa ON: ____________________________ mbar Allarme ON: ____________________________ mbar Allarme OFF: ___________________________ mbar Caduta di pressione impianto completo:_______ mbar in ___________ minuti Serbatoio a norma:___________________________ Anno di fabbricazione: ________________________ Litri: ______________________________________ Numero fabbrica: ____________________________ O in superficie O interrato Eurovac HV... - Seite 220 Appendice Produttore serbatoio: __________________________________________ __________________________________________ __________________________________________ Azienda specializzata: __________________________________________ __________________________________________ __________________________________________ Proprietario/operatore: __________________________________________ __________________________________________ __________________________________________ Eurovac HV...
- Seite 221 Appendice Luogo di installazione: __________________________________________ __________________________________________ __________________________________________ __________________________________________ Data, firma Eurovac HV...
- Seite 222 Sostituto di olio di trementina, punto di infiammabilità > 100 °C, punto di ebollizione > 100 °C 3176 Liquido di frenatura, idraulico, punto di infiammabi- lità > 100 °C Glisantina, anticongelante Glicole etilenico, punto di infiammabilità > 100 °C Glicole dietilenico Glicole etilenico Glicole metilico Eurovac HV...
- Seite 223 > 55 °C, punto di ebollizione 96 °C Freon Frigen Soluzione di urea, Ad Blue, NOx 3085 Resine in soluzione di idrocarburo senza alcool, punto di infiammabilità > 100 °C, punto di ebollizione > 100 °C Cloruro di potassio Eurovac HV...
- Seite 224 3167 Catrami, liquidi, punto di infiammabilità > 100 °C 3226 Tinture mediche, in soluzione alcoolica, punti di infiammabilità > 100 °C Olio di lino naturale Olio dʼoliva naturale Olio di ricino naturale Olio di germe di grano naturale Eurovac HV...
- Seite 225 AdBlue® (riduttore NOx AUS 32, soluzione di urea al 32,5 %) secondo DIN 70070 Concime liquido AHL (soluzione di nitrato ammo- nico-urea) Gasoli DIN 51603 Gasoli con FAME EN 14215 Diesel EN 590 Diesel con FAME EN 14214 Oli freschi per motori e ingranaggi Eurovac HV...
-
Seite 226: Dichiarazione Di Conformità Ue
Appendice 15.3 Dichiarazione di conformità UE Eurovac HV... - Seite 227 Appendice 15.4 Dichiarazione di prestazione (DoP) Eurovac HV...
- Seite 228 Appendice Marchio CE 900 000 0511 Eurovac HV...
- Seite 229 Appendice Eurovac HV...
-
Seite 230: Instrukcja Eksploatacji
Podciśnieniowy detektor wycieków Eurovac HV Typ: detektor wycieków Eurovac HV bez obudowy ochronnej Typ: detektor wycieków Eurovac HV w obudowie ochronnej Typ: detektor wycieków Eurovac HV w obudowie ochronnej z ogrzewaniem Copyright 2021 AFRISO-EURO-INDEX GmbH. Wszelkie prawa zastrzeżone. Lindenstraße 20 74363 Güglingen Telefon +49 7135 102-0 MVV TB;... - Seite 231 Objaśnienia do niniejszej instrukcji eksploatacji Objaśnienia do niniejszej instrukcji eksploatacji Niniejsza instrukcja eksploatacji opisuje podciśnieniowy detektor wycieków „Eurovac HV“ (poniżej zwany także „produktem“). Niniejsza instrukcja eksplo- atacji jest częścią produktu. • Produkt wolno użytkować dopiero po całkowitym przeczytaniu i pełnym zrozumieniu instrukcji eksploatacji.
- Seite 232 Informacje na temat bezpieczeństwa Informacje na temat bezpieczeństwa Wskazówki ostrzegawcze i klasy zagrożenia Niniejsza instrukcja eksploatacji zawiera wskazówki ostrzegawcze zwracające uwagę na potencjalne zagrożenia oraz ryzyka. Poza zaleceniami zawartymi w niniejszej instrukcji eksploatacji trzeba przestrzegać wszystkich warunków, norm oraz przepisów bezpieczeństwa obowiązujących w miejscu użytkowania produktu.
-
Seite 233: Informacje Na Temat Bezpieczeństwa
Informacje na temat bezpieczeństwa Ten symbol ostrzega przed niebezpiecznym napięciem elek- trycznym. O ile symbol ten pojawia się we wskazówce ostrze- gawczej, zachodzi niebezpieczeństwo porażenia prądem elektrycznym. Stosowanie zgodne z przeznaczeniem Niniejszy produkt jest podciśnieniowym detektorem wycieków klasy I według normy EN 13160-1 oraz EN 13160-2. - Seite 234 Informacje na temat bezpieczeństwa Dopuszczalna gęstość cieczy jest zależna od stosowanego zbiornika oraz jego pojemności: Zbiornik zgodny z Wysokość hydrosta- Dopuszczalna normą tyczna gęstość magazyno- wanej cieczy EN 12285-1 ≤ 3,0 m ≤ 1100 kg/m³ klasa A EN 12285-1, ≤ 3,0 m ≤...
- Seite 235 Informacje na temat bezpieczeństwa Podczas użytkowania produktu wszystkie prace należy przeprowadzać wyłącznie w warunkach wyszczególnionych w instrukcji eksploatacji oraz na tabliczce znamionowej, w ramach danych technicznych zawartych w specyfi- kacji oraz w zgodzie ze wszystkimi warunkami, normami i przepisami bezpie- czeństwa obowiązującymi w miejscu użytkowania produktu.
- Seite 236 Informacje na temat bezpieczeństwa Osobiste wyposażenie ochronne Należy zawsze stosować wymagane osobiste wyposażenie ochronne. Pod- czas czynności wykonywanych przy produkcie oraz z jego pomocą należy także uwzględnić, że w miejscu użytkowania mogą występować zagrożenia, których źródłem nie jest bezpośrednio sam produkt. Modyfikacje produktu Przy produkcie oraz z jego pomocą...
-
Seite 237: Transport I Składowanie
Transport i składowanie Transport i składowanie Niewłaściwy transport i składowanie mogą spowodować uszkodzenie pro- duktu. WSKAZÓWKA NIEWŁAŚCIWA OBSŁUGA • Należy upewnić się, że podczas transportu i składowania produktu dotrzymy- wane są warunki otoczenia wyszczególnione w specyfikacji. • Do celów transportowych należy wykorzystywać oryginalne opakowanie. •... -
Seite 238: Opis Produktu
Opis produktu Opis produktu W wykonanej z tworzywa sztucznego i odpornej na uderzenia obudowie pro- duktu znajdują się wskaźniki i elementy obsługi oraz wszystkie układy elektro- niczne. Do dyspozycji stoją przyłącza węży stanowiących połączenie pneumatyczne z przestrzenią międzywęzłową zbiornika. Produkt monitoruje i reguluje stałe podciśnienie w przestrzeni międzywęzłowej zbiornika i uruchamia alarm w razie spadku podciśnienia. - Seite 239 Opis produktu Przegląd A. zatyczka gumowa J. pułapka kondensatu z filtrem zanie- czyszczeń B. oznaczenie typu produktu K. zawór kontrolny C. zielona dioda LED L. przyłącze przewodu ssącego D. przycisk testu M. przyłącze przewodu wydmuchowego E. czerwona dioda LED N. tabliczka znamionowa na spodzie F.
- Seite 240 Opis produktu 4.1.1 Piktogramy Symbol Znaczenie/funkcja Wskaźnik Po włączeniu produktu zielona dioda LED po prawej stronie symbolu sygnalizuje gotowość do eksploatacji. Przycisk Przycisk testu umożliwia sprawdzenie działania pro- duktu. Wskaźnik W razie sytuacji alarmowej czerwona dioda LED po pra- wej stronie symbolu sygnalizuje zakłócenie/alarm. Przycisk Ten przycisk umożliwia wyciszenia alarmu akustycz- nego.
- Seite 241 Opis produktu Wymiary 202 mm 70 mm 171 mm 270 mm 360 mm Ilustracja 1: Detektor Eurovac w obudowie ochronnej, bez układu ogrzewania (A) lub z układem ogrzewania (B), wstępnie zmontowany i przygotowany do zainstalowania. Syrena alarmowa jest podłączona do przekaźnika wyjściowego.
-
Seite 242: Przykłady Zastosowania
Opis produktu Przykłady zastosowania A. przyłącze elektryczne F. płaszcz zewnętrzny zbiornika B. przewód ssący (przezroczysty G. pułapki kondensatu lub biały) H. przewód wydmuchowy (zielony) C. odpowietrzenie zbiornika I. przewód pomiarowy (czerwony) D. układ odcinania cieczy E. przestrzeń międzywęzłowa... - Seite 243 Opis produktu A. syrena alarmowa „HPW 2“ F. przewód wydmuchowy (zielony) B. przełącznik odstawienia syreny G. przewód ssący (przezroczysty lub alarmowej „HPW 2“ biały) C. produkt H. ogrzewanie z termostatem D. obudowa ochronna I. przewód sieciowy E. przewód pomiarowy (czerwony)
- Seite 244 Opis produktu Działanie Produkt monitoruje i reguluje podciśnienie w przestrzeni międzywęzłowej za pośrednictwem elektronicznego czujnika ciśnienia oraz pompy. Jeśli w płaszczu wewnętrznym lub zewnętrznym zbiornika (ścianka zbiornika lub płaszcz przeciwprzeciekowy) nastąpi wyciek powyżej lub poniżej lustra magazynowanej cieczy lub poziomu wody gruntowej i wyciek ten będzie więk- szy od wydajności zasysania pompy próżniowej, podciśnienie spadnie.
- Seite 245 Opis produktu Dopuszczenia, certyfikaty, deklaracje Produkt jest zgodny z: • dyrektywą unijną dotyczącą kompatybilności elektromagnetycznej (2014/30/UE), • dyrektywą unijną dotyczącą sprzętu elektrycznego przewidzianego do sto- sowania w określonych granicach napięcia (2014/35/UE), • rozporządzeniem o produktach budowlanych 305/2011 (EN 13160-2:2003), • dyrektywą unijną dotyczącą ograniczenia stosowania niektórych niebez- piecznych substancji w sprzęcie elektrycznym i elektronicznym (2011/65/UE) (dyrektywa RoHS).
- Seite 246 Opis produktu Parametr Wartość Warunki otoczenia temperatura otoczenia podczas pracy -5 ... 60 °C temperatura otoczenia w warunkach -25 ... 60 °C zewnętrznych z obudową ochronną i ogrzewaniem temperatura otoczenia podczas magazy- -25 ... 60 °C nowania Dane elektryczne napięcie znamionowe AC 100 ...
- Seite 247 Montaż Montaż Przezbrajanie systemu na podciśnienie Ten rozdział dotyczy tylko przypadków przezbrajania systemu z sys- temu cieczy detekcyjnej na podciśnieniowy detektor wycieków. Zbiorniki, których przestrzeń międzywęzłowa jest jeszcze (częściowo) napeł- niona cieczą detekcyjną. 1. Przygotować naczynie do wychwytywania cieczy w celu odciągnięcia cieczy z przestrzeni międzywęzłowej.
-
Seite 248: Przygotowanie Montażu
O ile nie ma możliwości zabezpieczenia odpowiedniej słyszalności sygnału, trzeba zamontować w odpowiednim miejscu dodatkowe urządzenie alarmowe (przykładowo dodatkowe urządzenie alarmowe ZAG 01, syrenę alarmową KH 1 lub syrenę alarmową ze światłem ostrzegawczym z asortymentu firmy AFRISO). 5.2.1 Próżnia bazowa Wytworzyć próżnię w przestrzeni międzywęzłowej do osiągnięcia podci- śnienia o wartości około -400 mbar. -
Seite 249: Montaż Produktu
Należy upewnić się, że w przypadku montażu wykonywanego na wolnym powietrzu produkt jest chroniony przed bezpośrednim wpływem warunków atmosferycznych. - Należy stosować obudowę ochronną AFRISO. 1. Produkt zamontować na ścianie (zastosować rodzaj mocowania A lub B). - Seite 250 Montaż 2. Otworzyć produkt. 3. Podłączyć produkt w spo- sób opisany w rozdziale "Przyłącze elektryczne" .
- Seite 251 Montaż 4. Zamknąć produkt.
-
Seite 252: Przyłącze Elektryczne
Montaż Przyłącze elektryczne NIEBEZPIECZEŃSTWO PORAŻENIE PRĄDEM ELEKTRYCZNYM • Należy upewnić się, że rodzaj instalacji elektrycznej nie zmniejsza zakresu ochrony przed porażeniem prądem elektrycznym (klasa ochronności, izolacja ochronna). • Należy upewnić się, że produkt jest podłączony przy wykorzystaniu trwale uło- żonego przewodu. Nieprzestrzeganie niniejszych zaleceń... -
Seite 253: Zasilanie Elektryczne
Montaż 5.4.1 Zasilanie elektryczne Należy upewnić się, że podłączenie produktu do sieci wykonane zostanie przy pomocy trwale ułożonego, stosownego przewodu (przykładowo NYM-J 2 x 1,5 mm²). Należy upewnić się, że obwód zasilający sygnalizatora jest zabezpieczony osobnym bezpiecznikiem o wartości maksymalnej 16 A. 1. - Seite 254 Montaż 5.4.2 Podłączanie produktu A. pompa D. bezpiecznik przekaźnikowe B. śrubunek do prowadzenia prze- E. wyjście przekaźnika (bezpotencja- wodów górą łowy zestyk przełączny) C. śrubunek do prowadzenia prze- F. przyłącze sieciowe wodów dołem...
- Seite 255 Montaż 5.4.3 Podłączanie produktu w obudowie ochronnej W przypadku produktu zamontowanego w obudowie ochronnej trzeba przestrzegać następujących punktów: • Podłączenie produktu odbywa się za pośrednictwem zewnętrznej skrzynki przyłączeniowej. • Trzeba zamontować dodatkowy alarm akustyczny poza obudową ochronną. • W obudowie ochronnej bez syreny alarmowej lub ogrzewania produkt trzeba podłączyć...
- Seite 256 Montaż 5.4.4 Wyjście przekaźnikowe WSKAZÓWKA PRZEPIĘCIA WYSTĘPUJĄCE PODCZAS ODŁĄCZANIA ODBIORNIKÓW INDUKCYJNYCH Przepięcia występujące podczas odłączania odbiorników indukcyjnych mogą posiadać negatywne oddziaływanie na urządzenia elektryczne i prowadzić do zniszczenia zestyków rozłącznych. • Odbiorniki indukcyjne wyposażyć w dostępne w sprzedaży układy RC, przykła- dowo 0,1 μF/100 Ω.
- Seite 257 Montaż 5.4.5 Bateria 9 V (do uruchamiania sygnału w przypadku zaniku zasilania) Opcjonalnie lub przy stoso- waniu w Szwajcarii 1. Podłączyć do produktu dołączoną baterię 9 V (A). Podłączona bateria spowo- duje w przypadku zaniku zasi- lania włączenie sygnału dźwię- kowego.
- Seite 258 Montaż Dodatkowe wyposażenie w formie modułu bezprzewodowego EnOcean® (opcjonalnie) NIEBEZPIECZEŃSTWO PORAŻENIE PRĄDEM ELEKTRYCZNYM PRZEZ ELEMENTY ZNAJDU- JĄCE SIĘ POD NAPIĘCIEM • Przed rozpoczęciem prac odłączyć napięcie sieciowe i zabezpieczyć urządze- nie przed ponownym włączeniem napięcia. Nieprzestrzeganie niniejszych zaleceń prowadzi do śmierci lub poważ- nych obrażeń.
- Seite 259 Montaż 1. Otworzyć produkt. A. gniazdo wtykowe do modułu bez- C. wycięcie korpusu (do zamocowa- przewodowego EnOcean® nia anteny) B. pozycja anteny 2. Wsunąć moduł bezprze- wodowy EnOcean® do gniazda wtykowego. Podczas montażu przestrze- gać następujących warun- ków: - wszystkie piny muszą zostać...
- Seite 260 Montaż 3. Antenę modułu bezprze- wodowego EnOcean® wcisnąć do dwóch wycięć korpusu produktu. 4. Zamknąć z powrotem pokrywę produktu. Podłączanie przewodów elastycznych Przykład układania węży pomiędzy produktem oraz monitorowanym zbiorni- kiem, patrz rozdział "Przykłady zastosowania". Należy upewnić się, że przewody elastyczne są odporne na magazynowaną ciecz oraz jej opary.
- Seite 261 3. Przewód pomiarowy podłączyć do przyłącza pomiarowego przestrzeni mię- dzywęzłowej. 4. Przewód wydmuchowy podłączyć do rury odpowietrzającej zbiornika. - W przypadku stosowania zespołu poboru cieczy AFRISO Euroflex prze- wód wydmuchowy można podłączyć w trybie pracy jednoprzewodowej bezpośrednio do przyłącza powrotnego zespołu Euroflex.
- Seite 262 Montaż Ustawienia zaworów WSKAZÓWKA NIEPRAWIDŁOWE CIŚNIENIE ROBOCZE W PRZESTRZENI MIĘDZYWĘ- ZŁOWEJ • Należy upewnić się, że ciśnienie w przestrzeni międzywęzłowej zbiornika odpo- wiada specyfikacji. Nieprzestrzeganie niniejszych zaleceń może doprowadzić do powstania szkód materialnych. Ustawienie Zawór pomia- Zawór kon- zaworu rowy na czer- trolny na bia- wonym przyłą- łym przyłączu...
- Seite 263 Uruchomienie Uruchomienie Połączenie produktu z bramką AFRISOhome Gateway (opcjonal- nie) Procedura programowania jest opisana w instrukcji eksploatacji bramki siecio- wej AFRISOhome Gateway lub aplikacji. Należy upewnić się, że sygnał modułu bezprzewodowego EnOcean dociera z produktu do bramki sieciowej AFRISOhome Gateway lub że bramka AFRI- SOhome Gateway znajduje się...
-
Seite 264: Uruchamianie Produktu
Uruchomienie Uruchamianie produktu WSKAZÓWKA NIEPRAWIDŁOWE CIŚNIENIE ROBOCZE W PRZESTRZENI MIĘDZYWĘ- ZŁOWEJ • Należy upewnić się, że ciśnienie w przestrzeni międzywęzłowej zbiornika odpo- wiada specyfikacji. Nieprzestrzeganie niniejszych zaleceń może doprowadzić do powstania szkód materialnych. Należy upewnić się, że produkt został prawidłowo zamontowany i podłą- czony do zasilania elektrycznego. - Seite 265 Uruchomienie Kontrola działania Zlecić wykonanie kontroli działania zakładowi specjalistycznemu i uzyskać od niego odnośne potwierdzenie. Przeprowadzić kontrolę działania w następujących przypadkach: • po każdym uruchomieniu, • po każdym wystąpieniu alarmu, • raz w roku podczas konserwacji. Z każdej kontroli działania trzeba sporządzić raport kontrolny i przechowywać go wraz z dokumentacją...
- Seite 266 Kontrola działania przez pomiar Wolne, boczne przyłącze czerwonego zaworu pomiarowego jest przewi- dziane do podłączenia ciśnieniomierza w celu przeprowadzenia kontroli układu. Protokoły kontrolne znajdują się na stronie internetowej www.afriso.de. 1. Podłączyć ciśnieniomierz (podciśnienie). 2. Zawór pomiarowy (czerwone przyłącze) ustawić na pozycji "kontrola".
- Seite 267 Przekaźnik wyjściowy pozwala na wyprowadzenie sygnału alarmowego do urządzeń dodatkowych. W przypadku produktów z modułem bezprzewodowym EnOcean® produkt wysyła komunikat do bramki AFRISOhome Gateway. Użytkownik końcowy otrzymuje za pośrednictwem aplikacji AFRISO komunikat, że został wykryty wyciek. Potwierdzenie alarmu 1. Wcisnąć przycisk odstawienia w celu wyciszenia alarmu akustycznego.
-
Seite 268: Konserwacja
Konserwacja Konserwacja Produkt jest urządzeniem zabezpieczającym, którego konserwację może wykonywać wyłącznie wykwalifikowany specjalistyczny zakład. Rekomendujemy zawarcie umowy konserwacyjnej z zakładem specjalistycz- nym. Wskaźnik serwisowy Produkt jest wyposażony w zintegrowany wskaźnik sygnalizujący serwis. W stanie fabrycznym produktu podczas wysyłki wskaźnik serwisowy jest nieak- tywny. - Seite 269 Konserwacja Okresy konserwacyjne Termin Czynność Co rok Wykonać kontrolę działania (patrz rozdział "Kon- trola działania"). Sprawdzić pułapkę kondensatu w produkcie oraz ewentualnie pułapki kondensatu zainstalowane w wężach. Pułapki kondensatu opróżnić w razie potrzeby. Wymienić filtr zanieczyszczeń zainstalowany w zaworze zwrotnym w razie zanieczyszczenia. Wymienić...
-
Seite 270: Czynności Konserwacyjne
Konserwacja Czynności konserwacyjne NIEBEZPIECZEŃSTWO PORAŻENIE PRĄDEM ELEKTRYCZNYM PRZEZ ELEMENTY ZNAJDU- JĄCE SIĘ POD NAPIĘCIEM • Przed rozpoczęciem prac odłączyć napięcie sieciowe i zabezpieczyć urządze- nie przed ponownym włączeniem napięcia. Nieprzestrzeganie niniejszych zaleceń prowadzi do śmierci lub poważ- nych obrażeń. Wymiana bezpiecznika przekaźnika F1 ... - Seite 271 żółta dioda LED miga wymagana coroczna wykonać coroczną kon- konserwacja serwację (patrz rozdział "Konserwacja") woda w pułapce kon- opróżnić pułapkę kon- densatu densatu zanieczyszczony filtr wymienić filtr zanieczysz- czeń pozostałe zakłócenia proszę skontaktować się z infolinią serwisową AFRISO...
-
Seite 272: Usuwanie Usterek
Usuwanie usterek Analiza czasu pracy pompy Zakład specjalistyczny może odczytać czas pracy pompy po wciśnięciu przy- cisku testu. W ten sposób można ocenić szczelność całego systemu. 1. Wcisnąć i przytrzymać przycisk testu (B). - Po pięciu sekundach zie- lona dioda LED (A) wska- zuje czas pracy pompy. - Seite 273 2. Wykonać demontaż produktu (patrz rozdział "Montaż" w odwrotnej kolejności). 3. Produkt poddać utylizacji. Zwrot Przed zwrotną wysyłką produktu wymagany jest kontakt z producentem (service@afriso.de). Gwarancja Informacje dotyczące gwarancji są dostępne w naszych Ogólnych Warunkach Handlowych w internecie pod adresem www.afriso.com lub w umowie kupna.
- Seite 274 (Francja) podciśnieniowy detektor wycieków 43750 2651001 „Eurovac HV“ podciśnieniowy detektor wycieków 43774 „Eurovac HV“ w obudowie ochron- nej bez układu ogrzewania, bez syreny alarmowej podciśnieniowy detektor wycieków 43776 „Eurovac HV“ w obudowie ochron- nej bez układu ogrzewania, z syreną alarmową...
-
Seite 275: Części Zamienne I Wyposażenie Dodatkowe
43649 PVC 4 x 2 mm, 100 m, zielony wąż z polichlorku winylu 43650 PVC 4 x 2 mm, 100 m, przezroczysty pompa do detektora wycie- 43777 ków „Eurovac HV“ zawór zwrotny 43605 moduł bezprzewodowy 78082 EnOcean®... - Seite 276 • technologia bezprzewodowa • AN001 • AN102 • AN103 14.3 Możliwości technologii EnOcean® Informacje o zastosowaniach technologicznych systemu EnOcean® znajdują się w internecie na stronie www.afrisohome.de. Zestaw filmów wideo na temat produktów AFRISO znajduje się na kanale YouTube firmy AFRISO.
- Seite 277 Aneks Aneks 15.1 Certyfikat fachowca Niniejszym poświadcza się wykonanie montażu produktu zgodnie z niniejszą instrukcją eksploatacji oraz przeprowadzenie uruchomienia i kontroli działania produktu: WYŁĄCZENIE pompy: _______________________ mbar WŁĄCZENIE pompy: ________________________ mbar WŁĄCZENIE alarmu: ________________________ mbar WYŁĄCZENIE alarmu: _______________________ mbar Spadek ciśnienia w całym układzie: ____________ mbar w ciągu ______________ minut(y) Zbiornik zgodny z normą: _________________________ Rok produkcji: __________________________________...
- Seite 278 Aneks Producent zbiornika: __________________________________________ __________________________________________ __________________________________________ Zakład specjalistyczny: __________________________________________ __________________________________________ __________________________________________ Użytkownik: __________________________________________ __________________________________________ __________________________________________...
- Seite 279 Aneks Miejsce montażu urządzenia: __________________________________________ __________________________________________ __________________________________________ __________________________________________ Data, podpis...
- Seite 280 Aneks 15.2 Wykaz materiałów Nr bie- Nr porząd- Nazwa materiału żący kowy (DIN 6601) zużyte oleje używane oleje silnikowe i przekładniowe oleje hydrauliczne HL i HLP DIN 51524, DIN 51525 oleje silikonowe oleje smarowe DIN 51501, DIN 51511, DIN 51512 oleje termiczne Q DIN 51522 oleje transformatorowe (Clophen) zebrany koncentrat z oddzielaczy oleju powstający...
- Seite 281 Aneks Nr bie- Nr porząd- Nazwa materiału żący kowy (DIN 6601) nitryl kwasu adypinowego kwas arsenowy, roztwór wodny trichlorek benzylu kwas borowy butylofenole, w postaci płynnej chloran wapnia, roztwór wodny maksymalnie 65 %, temperatura zapłonu > 100 °C wodorotlenek wapnia azotan wapnia difenyle roztwór chlorosiarczanu żelazowego (III)
- Seite 282 Aneks Nr bie- Nr porząd- Nazwa materiału żący kowy (DIN 6601) wodorotlenek potasu, roztwór wodny maksymalnie 20 % azotan potasu, roztwory wodne siarczek potasu węglowodory i mieszaniny, temperatura zapłonu > 100 °C roztwory chloranu magnezu roztwory azotanu magnezu roztwory octanu sodowego roztwory chlorku sodowego roztwory fluorku sodu roztwory wodorotlenku sodu, temperatura...
- Seite 283 Aneks Nr bie- Nr porząd- Nazwa materiału żący kowy (DIN 6601) olej naturalny z kiełków pszenicznych solanka mineralna AdBlue® (reduktor NOx AUS 32, roztwór mocznika 32,5 %) według normy DIN 70070 nawóz płynny AHL (roztwór azotanu amonu i mocz- nika) oleje opałowe DIN 51603 oleje opałowe z estrami metylowymi kwasów tłusz- czowych FAME EN 14215...
-
Seite 284: Deklaracja Zgodności Ue
Aneks 15.3 Deklaracja zgodności UE... - Seite 285 Aneks 15.4 Deklaracja właściwości użytkowych (DoP)
- Seite 286 Aneks 15.5 Oznakowanie CE 900 000 0511...