Kapitel
Inhaltsverzeichnis
Fehlerbehebung

Verwandte Anleitungen für Nikon Lite Touch Zomm110s Quartz Date


Inhaltszusammenfassung für Nikon Lite Touch Zomm110s Quartz Date
- Seite 1 Instruction Manuals Instruction Manual (Pages 2-43) Bedienungsanleitung (Seite 44-85) Manuel d’utilisation (Pages 86-127) Manual de instrucciones (Páginas 128-169)
-
Seite 2: For Your Safety
For your safety (Caring for the Camera and Battery) To prevent damage to your Nikon product or injury to yourself or to others, read the following safety precautions in their entirety before using this equipment. Keep these safety instructions where all those who use the product will read them. - Seite 3 Observe proper precautions when handling batteries Batteries may leak or explode if improperly handled. Observe the following precautions when handling batteries for use in this product: • Be sure the product is off before replacing the battery. • Use only a 3 V CR123A or DL123A lithium battery. •...
-
Seite 4: Caring For The Camera And Battery
Caring for the Camera and Battery Keep dry This product is not waterproof, and may malfunction if immersed in water or exposed to high levels of humidity. Rusting of the internal mechanism can cause irreparable damage. Keep free of salt, sand, and dust After using your camera at the beach or seaside, wipe off any sand or salt with a lightly dampened cloth and then dry your camera thoroughly. - Seite 5 Batteries • When you turn the device on, check the battery-level displayed on the LCD panel to determine whether the battery needs to be replaced. The battery needs to be replaced the low battery power indicator appears on the LCD panel. •...
-
Seite 6: Optional Accessories
Thank you for purchasing the Nikon Lite Touch Zoom 110s / Lite Touch Zoom 110s QUARTZ DATE (QD) camera. Be sure to read this manual thoroughly before use, and keep it handy until you feel confident using the camera. Accessory (The following item is supplied with this camera.) -
Seite 7: Inhaltsverzeichnis
Table of Contents For your safety ----------------------------------------- 2 Caring for the Camera and Battery ------------------ 4 To take a picture right away (Quick operation guide) --- 8 Camera parts ------------------------------------------ 10 Body ----------------------------------------------- 10 LCD panel ----------------------------------------- 12 Viewfinder ---------------------------------------- 13 Installing a battery ------------------------------------ 14 Turning the camera on ------------------------------- 15 Checking the battery power ------------------------- 15... -
Seite 8: To Take A Picture Right Away (Quick Operation Guide)
To take a picture right away (Quick operation guide) Insert a battery. p. 14) Open the slide cover to turn the camera on. p. 15) Make sure that the sufficient Battery Power indicator ( ) appears on the LCD panel. ( p. - Seite 9 Remove the film cartridge. p. 23) Take trial shots Take trial shots before shooting at important occasions like weddings or graduations. • Nikon will not be held liable for any damages resulting from the use of this product. Getting Started...
-
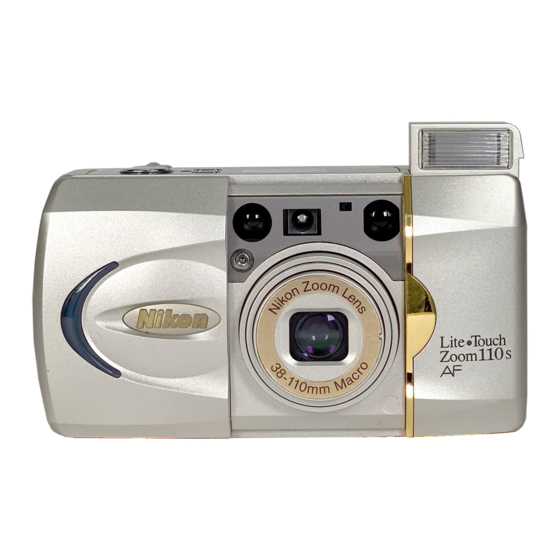
Seite 10: Camera Parts
Camera parts Body Remote-control Viewfinder window sensor* ( p. 35) Lens Auto Exposure Red-eye Reduction lamp metering window pp. 32, 33) Self-timer lamp ( p. 34) Autofocus window Autofocus window Slide cover (power switch) p. 15) Flash pp. 26, 27) LCD panel p. - Seite 11 MODE button* (for selecting date to be imprinted or corrected) pp. 18, 38) Date panel* SEL button* (for selecting the pp. 18, 38) position of date to corrected) p. 38) Green LED pp. 13, 20) ADJUST button* Orange LED (for correcting date) pp.
-
Seite 12: Lcd Panel
Camera parts (continued) LCD panel Red-eye Reduction indicator pp. 32, 33) Battery power indicator Infinity Focus p. 15) Flash Mode indicator Mode indicator pp. 26 - 31) p. 37) Self-timer indicator Frame counter ( p. 17) p. 34) Remote Control indicator ( p. -
Seite 13: Viewfinder
Viewfinder 1Parallax compensation marks ( p. 22) Use for close-up shooting distance less than 1m in telephoto setting. 2Autofocus frame marks ( p. 20) Center the main subject to be in focus with in this frame. 3Orange LED ( p. 27) Slowly blinks while the flash is being charged, and lights up when the flash is ready to fire. -
Seite 14: Installing A Battery
Installing a battery Battery type Use one CR123A or DL123A type 3V lithium battery in this camera. Open the battery chamber lid. While releasing the lock as indicated by the arrow in the left illustration, open the battery chamber lid. Install a new battery. -
Seite 15: Preparations
Turning the camera on Open the slide cover until it clicks. Once you open the slide cover in the direction of the arrow, the camera is turned on, the built-in flash automatically pops up, and the lens extends out. The camera is set in Auto flash mode. p. -
Seite 16: Loading The Film
Loading the film Recommended film Use DX-coded 35mm film with this camera. It is recommended to use DX-coded ISO 400 film, which provides good results when using the flash, and helps avoid blurred images, should camera shake occur. Close the slide cover, then open the camera back. - Seite 17 Close the camera back, and check that “ ” appears on the film counter. Once the camera back is closed, the film automatically advances to the first frame. Until film loading is complete, “ ” blinks on the LCD panel. When the film has been properly set, “...
-
Seite 18: Imprinting The Date/Time On Pictures (Lite Touch Zoom 110S Qd Only)
Imprinting the date/time on pictures (Lite Touch Zoom 110s QD only) Select the date/time indicator by pressing the MODE button. The year is indicated by the last two digits, and the time is displayed by 24- hour clock. The example in the illustration shows June 1, 2002. -
Seite 19: Basic Operations
Holding the camera properly When holding the When holding the camera horizontally camera vertically Prop your elbows against your body and hold the camera with both hands. When holding the camera vertically, make sure that the flash is on top as shown. -
Seite 20: Shooting
Shooting Center the autofocus frame marks “ ” on the main subject. If the main subject is outside the autofocus frame marks: Use focus lock. ( p. 24) Press the shutter release button halfway to focus. Lighting/blinking of the green LED When correct focus has been achieved, the green LED lights up. -
Seite 21: Zooming
Confirm that the green LED lights up and slowly press the shutter release button all the way down. If the subject is dark or backlit in Auto Flash mode, the flash fires automatically. Pressing the shutter release button abruptly can result in picture blur. When not in use, close the slide cover to protect the lens, finder, etc. -
Seite 22: Close-Up Photography
Close-up photography Use the parallax compensation marks when the camera-to-subject distance is shorter than 1 meter in telephoto setting. Minimum camera-to-subject distance is approx. 0.8m If you wish to shoot a subject such as a flower as large as possible in a picture, you can get up to as close as approx. -
Seite 23: Rewinding The Film
Rewinding the film Film starts to rewind automatically when film reaches the end of the roll. While the film is rewinding, the number on the frame counter decreases one by one. Film is completely rewound when the frame counter shows blinking “... -
Seite 24: When The Main Subject Is Not In The Center Of The Picture
When the main subject is not in the center of the picture (Focus lock photography) Focus lock is useful in autofocus shooting when you want to capture a subject that’s framed outside of the autofocus frame marks, and in situations where subjects may be difficult to focus p. -
Seite 25: Difficult-To-Focus Subjects
Difficult-to-focus subjects The following subjects may be difficult to focus. Use the focus lock ( p. 24) to focus on another subject equidistant from the camera, then compose the picture to shoot. Subjects too small to Glossy, light-reflecting surfaces, such as shiny fully cover the autofocus frame mark. -
Seite 26: Flash Photography
Flash photography Selecting flash mode. Select flash mode by pressing the button. You can select any of five flash modes by pressing the button. indicator Indicator Explanation Auto Flash ( p. 28) The flash automatically fires when lighting indicator is poor. Infinity Focus ( p. - Seite 27 Lighting/blinking of the orange LED when the shutter release button is pressed halfway a The orange LED lights up: Flash charging is completed. The flash is ready to fire. a The orange LED blinks slowly: The flash is charging. Take your finger off the shutter release button once, then press the button halfway again.
-
Seite 28: To Use The Flash Automatically
To use the flash automatically (Auto Flash mode) Use this mode for automatic flash operation when lighting is poor. Open the slide cover. When you open the slide cover, the power is turned on and the built-in flash automatically pops up. Compose the picture, then press the shutter release button halfway. -
Seite 29: Advanced Operations
To cancel flash operation (Flash Cancel mode) Use this mode in places, where use of a flash is prohibited, or to achieve a natural lighting effect at dusk or for night scenes. Use a tripod for the Flash Cancel mode Since slow shutter speeds are usually selected in this mode, use a tripod to prevent camera shake. -
Seite 30: To Use The Flash Always
To use the flash always (Anytime Flash mode) Use this mode to intentionally fire the flash regardless of light conditions. Press the button until “ ” appears on the LCD panel. Compose the picture, then press the shutter release button halfway. Check that the orange and green LEDs light up, then shoot. -
Seite 31: To Photograph A Person In A Night View
To photograph a person in a night view (Night Portrait <Slow Sync Flash> mode) Use this mode to capture both subject and background at night or under dim light. Flash fires whenever photo is taken. Use a tripod for the Night Portrait (Slow Sync Flash) mode Since slow shutter speeds are usually selected in this mode, use a tripod to prevent camera shake. -
Seite 32: Button
button Select the mode by pressing button, for the red-eye reduction or self-timer/remote control. Select the mode by pressing button. Each time you press the button, the indicator changes as follows: No indicator (110s) (110s QD) Indicator Explanation Red-eye Reduction mode canceled indicator To cancel Red-eye Reduction mode. -
Seite 33: To Reduce The "Red-Eye" Effect
To reduce the "Red-eye" effect (Red-eye Reduction mode) In flash photographs, the subject’s eyes may sometimes appear bright red. To reduce this “red-eye” effect, use this mode. About Red-eye Reduction mode a The Red-eye Reduction lamp lights up approx. 1sec. before the flash fires. Be careful not to move the camera or let the subject move until the shutter is released. -
Seite 34: Using The Self-Timer
Using the self-timer Use the self-timer when you want to be in the picture. Use a tripod or place the camera on a stable flat surface. Press the button until“ ” or “ ” appears on the LCD panel. Lite Touch Zoom 110s Lite Touch Zoom 110s QD Compose the picture, and press the shutter release... -
Seite 35: Using The Remote Control (Optional) (Lite Touch Zoom 110S Qd Only)
Using the remote control (optional) (Lite Touch Zoom 110s QD only) Use the optional remote control to release the camera’s shutter from a distance. Press the button until “ ” appears on the LCD panel. Use a tripod or place the camera on a stable flat surface. -
Seite 36: Replacing The Remote Control Battery
Replacing the remote control battery While keeping the battery holder release lever pressed as the arrow on the remote control indicates to release the lock 1, pull out the battery holder from the remote control 2. Replace the battery. Use one 3 V lithium (CR2025 type) battery. -
Seite 37: Shooting A Distant View Or Landscape Through A Window
Shooting a distant view or landscape through a window (Infinity Focus mode) Use Infinity Focus mode to shoot a distant view more sharply, or a landscape through a window. Press the button until “ ” appears on the LCD panel. Compose the picture, then press the shutter release button halfway. -
Seite 38: Correcting The Date And Time
Correcting the date and time (Lite Touch Zoom 110s QD only) Press the MODE button to obtain the Year/ Month/Day indication. Press the SEL button so that the indicator to be set blinks. Press the ADJUST button to set the blinking digit. -
Seite 39: Additional Information
Troubleshooting Track down the cause of trouble using the following chart. It may save you a trip to your nearest Nikon service center. Problem Check points and solution Ref. page a The slide cover is not completely open. → Open the slide cover all the way until it clicks to turn the camera on. - Seite 40 Troubleshooting (continued) Problem Check points and solution Ref. page a The battery is installed the wrong way round. → Insert the battery with the No indicator ends appears even positioned as marked inside the battery when the camera chamber. is turned on. a No battery or dead battery.
-
Seite 41: Specifications
Specifications Type of camera 35mm autofocus lens-shutter camera with Nikon zoom lens Usable film DX-coded 35mm film in film cartridge Picture format 24 × 36mm Lens 38mm f/4.5 – 110mm f/11.9, 6 elements in 6 groups Shutter Programmed electronic type; also serves as diaphragm blades; Shutter speed:... - Seite 42 Specifications (continued) Film advance Film automatically advances by one frame after each shot; Auto rewind at the end of film roll; Mid-roll rewind function available Remote control (optional) (Lite Touch Zoom 110s QD only) Infrared wireless remote control; 2 sec. delay shutter release; Effective range is within approx.
- Seite 43 Additional Information...
-
Seite 44: Sicherheitshinweise
(Sorgsamer Umgang mit Kamera und Batterie) Bitte lesen Sie diese Sicherheitshinweise aufmerksam durch, bevor Sie Ihr Nikon-Produkt in Betrieb nehmen, um Schäden am Produkt zu vermeiden und möglichen Verletzungen vorzubeugen. Halten Sie diese Sicherheitshinweise für alle Personen griffbereit, die dieses Produkt benutzen werden. - Seite 45 Sturz oder andere äußere Einwirkungen beschädigt wird, entfernen Sie die Batterie und wenden sich zur Reparatur an Ihren Fachhändler oder an den Nikon-Kundendienst. Vorsicht im Umgang mit Batterien Batterien können bei unsachgemäßer Handhabung auslaufen oder explodieren. Beachten Sie bitte folgende Sicherheitsmaßnahmen im Umgang mit der Batterie für dieses Gerät.
-
Seite 46: Sorgsamer Umgang Mit Kamera Und Batterie
Sorgsamer Umgang mit Kamera und Batterie Setzen Sie die Kamera keiner Feuchtigkeit aus Dieses Nikon-Produkt ist nicht wasserdicht. Bei hoher Luftfeuchtigkeit, oder wenn Wasser ins Gehäuse eindringt, kann es zu Fehlfunktionen kommen. Die Korrosion der internen Mechanik und Elektronik kann zu irreparablen Schäden führen. - Seite 47 Batterie • Beim Einschalten der Kamera sollten Sie zuerst anhand der Batterieanzeige auf dem LCD-Display überprüfen, ob die Ladekapazität zum Betrieb der Kamera ausreicht. Die Batterie muss ausgetauscht werden, wenn die Anzeige für niedrige Batterieladung auf dem LCD-Display erscheint. • Halten Sie eine Ersatzbatterie bereit, wenn Sie Aufnahmen von wichtigen Ereignissen machen wollen.
-
Seite 48: Sonderzubehör
Danke, daß Sie sich für die Kamera Lite Touch Zoom 110s / Lite Touch Zoom 110s QUARTZ DATE (QD) von Nikon entschieden haben. Bitte lesen Sie diese Anleitung sorgfältig durch, bevor Sie die Kamera benutzen, und halten Sie die Anleitung griffbereit, bis Sie mit der Kamera vertraut sind. - Seite 49 Inhalt Sicherheitshinweise ---------------------------------- 44 Sorgsamer Umgang mit Kamera und Batterie ---- 46 So können Sie sofort eine Aufnahme machen (Kurzanleitung) ---- 50 Teile und Bedienelemente der Kamera ------------- 52 Gehäuse ------------------------------------------- 52 LCD-Display -------------------------------------- 54 Sucher --------------------------------------------- 55 Einlegen der Batterie --------------------------------- 56 Einschalten der Kamera ------------------------------ 57 Überprüfen der Batterieladung ---------------------- 57 Vorbereitungen...
-
Seite 50: So Können Sie Sofort Eine Aufnahme Machen (Kurzanleitung)
So können Sie sofort eine Aufnahme machen (Kurzanleitung) Legen Sie eine Batterie ein. S. 56) Öffnen Sie die Schiebeabdeckung, um die Kamera einzuschalten. S. 57) Vergewissern Sie sich, daß die Anzeige für ausreichende Batterieladung ( im LCD-Display erscheint. ( S. 57) Legen Sie einen Film ein. -
Seite 51: Drücken Sie Den Auslöser Halb
S. 65) Machen Sie Probeaufnahmen Es empfiehlt sich, vor wichtigen Aufnahmen, zum Beispiel auf einer Hochzeit oder bei anderen unwiederbringlichen Ereignissen, Probeaufnahmen zu machen. • Nikon übernimmt keine Haftung für irgendwelche Schäden, die auf die Verwendung dieses Produkts zurückzuführen sind. Übersicht... -
Seite 52: Teile Und Bedienelemente Der Kamera
Teile und Bedienelemente der Kamera Gehäuse Fernbedienungssensor* Sucherfenster S. 77) Objektiv Belichtungsmeßfenster Lampe zur Verringerung des “Rote Augen”-Effekts ( S. 74, 75) Selbstauslöseranzeige ( S. 76) Autofokusfenster Autofokusfenster Schiebeabdeckung (Hauptschalter) ( S. 57) Blitz S. 68, 69) LCD-Display S. 54) Riemenöse Taste S. -
Seite 53: Anbringen Des Trageriemens
Taste MODE* (zum Auswählen von Daten, die einbelichtet oder korrigiert werden sollen) ( S. 60, 80) Datums-Display* Taste SEL* S. 60, 80) (zum Auswählen der Position der zu korrigierenden Daten) Grüne LED S. 80) S. 55, 62) Taste ADJUST* Orangefarbene LED (zum Korrigieren von S. -
Seite 54: Lcd-Display
Teile und Bedienelemente der Kamera (Fortsetzung) LCD-Display Anzeige für Verringerung des Batterieanzeige “Rote Augen”-Effekts ( S. 74,75) S. 57) Anzeige für Blitzmodus Anzeige für Unendlicheinstellung S. 68-73) S. 79) Selbstauslöseranzeige Bildzähler ( S. 59) S. 76) Fernbedienungsanzeige ( S. 77) (nur Lite Touch Zoom 110s QD) Auf den in Klammern angegebenen Seiten finden Sie weitere Erläuterungen. -
Seite 55: Sucher
Sucher 1Parallaxenausgleichsmarkierungen ( S. 64) Für Nahaufnahmen mit einem Abstand von unter 1m bei einer Teleaufnahme. 2Autofokusrahmen ( S. 62) Das Hauptmotiv muß innerhalb dieses Rahmens scharf gestellt werden. 3Orangefarbene LED ( S. 69) Blinkt langsam, während der Blitz aufgeladen wird, und leuchtet stetig, wenn der Blitz ausgelöst werden kann. -
Seite 56: Einlegen Der Batterie
Einlegen der Batterie Batterietyp Verwenden Sie für diese Kamera eine Lithiumbatterie des Typs CR123A oder DL123A mit 3V. Öffnen Sie den Batteriefachdeckel. Lösen Sie die Arretierung, wie mit dem Pfeil in der Abbildung links dargestellt, und öffnen Sie dabei den Batteriefachdeckel. -
Seite 57: Vorbereitungen
Einschalten der Kamera Öffnen Sie die Schiebeabdeckung so weit, daß ein Klicken zu hören ist. Wenn Sie die Schiebeabdeckung in Pfeilrichtung aufschieben, wird die Kamera eingeschaltet, der integrierte Blitz klappt automatisch auf, und das Objektiv wird ausgefahren. Die Kamera wird in den Blitzautomatikmodus geschaltet. -
Seite 58: Einlegen Des Films
Einlegen des Films Empfohlener Filmtyp Verwenden Sie für diese Kamera 35-mm-Filme mit DX-Code. Es empfiehlt sich, ISO-400-Filme mit DX-Code zu verwenden, die bei Bildern mit Blitz gute Resultate ergeben und auch bei leichten Kameraerschütterungen Bildverwacklungen vermeiden helfen. Schließen Sie die Schiebeabdeckung, und öffnen Sie die Rückwand der Kamera. -
Seite 59: Tips Für 35Mm-Filme Mit Dx-Code
Schließen Sie die Kamerarückwand, und überprüfen Sie, ob “ ” im Bildzähler erscheint. Sobald die Kamerarückwand geschlossen ist, wird der Film automatisch zum ersten Bild transportiert. Bis dieser Vorgang abgeschlossen ist, blinkt “ ” im LCD-Display. Wenn der Film korrekt eingelegt wurde, erscheint “... -
Seite 60: Einbelichten Von Datum/Uhrzeit In Aufnahmen (Nur Lite Touch Zoom 110S Qd)
Einbelichten von Datum/Uhrzeit in Aufnahmen (nur Lite Touch Zoom 110s QD) Wählen Sie mit der Taste MODE die Datums-/ Uhrzeitanzeige aus. Das Jahr wird mit den letzten beiden Ziffern angegeben, und die Uhrzeit wird im 24- Stunden-Format angezeigt. Das Beispiel in der Abbildung zeigt den 1. -
Seite 61: Richtiges Halten Der Kamera
Richtiges Halten der Kamera Wenn Sie die Kamera Wenn Sie die Kamera waagerecht halten hochkant halten Stützen Sie die Ellbogen gegen den Körper ab, und halten Sie die Kamera mit beiden Händen. Wenn Sie die Kamera vertikal halten, achten Sie darauf, daß sich der Blitz wie in der Abbildung dargestellt oben befindet. -
Seite 62: Fotografieren
Fotografieren Richten Sie die Markierungen für den Autofokusrahmen “ ” in der Mitte auf das Hauptmotiv. Wenn sich das Hauptmotiv außerhalb der Markierungen des Autofokusrahmens befindet: Verwenden Sie die Fokusspeicherfunktion. ( S. 66) Drücken Sie zum Scharfstellen den Auslöser etwa zur Hälfte nach unten. -
Seite 63: Grundfunktionen
Vergewissern Sie sich, daß die grüne LED leuchtet, und drücken Sie den Auslöser langsam ganz nach unten. Wenn Sie mit der Blitzautomatik arbeiten und das Motiv zu dunkel ist oder sich im Gegenlicht befindet, wird der Blitz automatisch ausgelöst. Zu heftiger Druck auf den Auslöser kann die Kamera “verreißen” und zu Verwacklungsunschärfe führen. -
Seite 64: Nahaufnahmen
Nahaufnahmen Verwenden Sie die Parallaxenausgleichsmarkierungen, wenn die Entfernung zwischen Kamera und Motiv bei einer Teleaufnahme weniger als 1 Meter beträgt. Der Mindestabstand zwischen Kamera und Motiv muß ca. 0,8m betragen. Um ein Motiv, zum Beispiel eine Blume, so bildfüllend wie möglich aufzunehmen, können Sie bis auf etwa 0,8m an das Motiv herangehen. -
Seite 65: Zurückspulen Des Films
Zurückspulen des Films Am Filmende wird der Film automatisch zurückgespult. Während der Film zurückgespult wird, verringert sich die Zahl im Bildzähler nacheinander jeweils um eins. Der Film ist vollständig zurückgespult, wenn auf dem Display im Bildzähler “ ” etwa 20 Sekunden lang blinkt und dann “... -
Seite 66: Wenn Sich Das Hauptmotiv Nicht In Der Bildmitte Befindet
Wenn sich das Hauptmotiv nicht in der Bildmitte befindet (Fotografieren mit Fokusspeicherung) Schärfenspeicherung bewährt sich im Autofokus-Betrieb, wenn auf ein Objekt fokussiert werden soll, das außerhalb der Autofokus-Messfelder liegt, und in Situationen, in denen es schwierig ist, auf die Objekte scharfzustellen. ( S. -
Seite 67: Schwer Fokussierbare Motive
Schwer fokussierbare Motive Bei Motiven der folgenden Art kann es zu Problemen beim Fokussieren kommen. Fokussieren Sie mit der Fokusspeicherfunktion ( S. 66) zunächst auf ein anderes Motiv, das sich im gleichen Abstand von der Kamera befindet, und wählen Sie dann den gewünschten Bildausschnitt. Motive, die zu klein Glänzende, stark sind, um den... -
Seite 68: Aufnahmen Mit Blitz
Aufnahmen mit Blitz Auswählen des Blitzmodus Wählen Sie den Blitzmodus aus, indem Sie die Taste drücken. Mit der Taste können Sie einen von fünf Blitzmodi auswählen. Keine Anzeige Anzeige Erläuterung Blitzautomatik ( S. 70) Keine Der Blitz wird automatisch ausgelöst, wenn die Anzeige Umgebung zu dunkel ist. - Seite 69 Leuchten/Blinken der orangefarbenen LED, wenn der Auslöser zur Hälfte gedrückt wird a Die orangefarbene LED leuchtet auf: Der Blitz ist aufgeladen und kann ausgelöst werden. a Die orangefarbene LED blinkt langsam: Der Blitz wird gerade aufgeladen. Lassen Sie den Auslöser kurz los, und drücken Sie ihn dann erneut bis zur Hälfte.
-
Seite 70: So Wird Der Blitz Automatisch Ausgelöst
So wird der Blitz automatisch ausgelöst (Blitzautomatik) Verwenden Sie die Blitzautomatik, wenn die Umgebung zu dunkel ist. Öffnen Sie die Schiebeabdeckung. Wenn Sie die Schiebeabdeckung öffnen, wird die Kamera eingeschaltet, und der integrierte Blitz wird automatisch aufgeklappt. Richten Sie die Kamera auf den gewünschten Bildausschnitt, und drücken Sie dann den... -
Seite 71: Weitere Funktionen
So wird der Blitz deaktiviert (Blitzabschaltung) Diesen Modus sollten Sie wählen, wenn die Verwendung eines Blitzlichts verboten ist oder wenn Sie bei Aufnahmen in der Dämmerung oder bei Nacht die Lichtverhältnisse möglichst naturgetreu wiedergeben wollen. Verwenden Sie bei Blitzabschaltung ein Stativ Da in diesem Modus in der Regel eine längere Verschlußzeit gilt, empfiehlt sich die Verwendung eines Stativs, um Verwacklungsunschärfen zu vermeiden. -
Seite 72: So Wird Der Blitz Immer Ausgelöst
So wird der Blitz immer ausgelöst (Blitz bei jeder Aufnahme) In diesem Modus wird der Blitz unabhängig von den Lichtverhältnissen bei jeder Aufnahme ausgelöst. Drücken Sie die Taste , bis “ ” im LCD- Display erscheint. Richten Sie die Kamera auf den gewünschten Bildausschnitt, und drücken Sie dann den... -
Seite 73: So Fotografieren Sie Ein Motiv Bei Nacht
So fotografieren Sie ein Motiv bei Nacht (Nachtporträt (Langzeitsynchronisation)) Mit diesem Modus nehmen Sie das Motiv und den Hintergrund in der Nacht oder bei schlechter Beleuchtung auf. Der Blitz wird bei jeder Aufnahme ausgelöst. Verwenden Sie für Nachtporträtmodus (Langzeitsynchronisation) ein Stativ Da in diesem Modus in der Regel eine längere Verschlußzeit gilt, empfiehlt sich die Verwendung eines Stativs, um Verwacklungsunschärfen zu vermeiden. -
Seite 74: Taste
Taste Wählen Sie mit der Taste den Modus zur Verringerung des “Rote Augen”-Effekts oder den Selbstauslöser-Fernbedienungsmodus aus. Wählen Sie den Modus aus, indem Sie die Taste drücken. Mit jedem Tastendruck auf wechselt die Anzeige wie unten angegeben: Keine Anzeige (110s) (110s QD) Anzeige Erläuterung... -
Seite 75: So Verringern Sie Den "Rote Augen"-Effekt
So verringern Sie den “Rote Augen”-Effekt (Modus zur Verringerung des “Rote Augen”-Effekts) Bei Blitzaufnahmen erscheinen die Augen einer aufgenommenen Person manchmal leuchtend rot. Verwenden Sie diesen Modus, um diesen “Rote Augen”-Effekt zu verringern. Hinweis zur Verringerung des “Rote Augen”-Effekts aDie Lampe zur Verringerung des “Rote Augen”-Effekts leuchtet etwa eine Sekunde auf, bevor der Blitz ausgelöst wird. -
Seite 76: Der Selbstauslöser
Der Selbstauslöser Der Selbstauslöser gibt Ihnen die Möglichkeit, sich selber aufzunehmen. Verwenden Sie ein Stativ, oder stellen Sie die Kamera auf einer stabilen, waagerechten Oberfläche auf. Drücken Sie die Taste , bis “ ” oder “ ” im LCD-Display erscheint. Lite Touch Zoom 110s Lite Touch Zoom 110s QD Richten Sie die Kamera... -
Seite 77: Die Fernbedienung (Sonderzubehör) (Nur Lite Touch Zoom 110S Qd)
Die Fernbedienung (Sonderzubehör) (nur Lite Touch Zoom 110s QD) Mit der als Sonderzubehör lieferbaren Fernbedienung kann die Kamera fernausgelöst werden. Drücken Sie die Taste , bis “ ” im LCD-Display erscheint. Verwenden Sie ein Stativ, oder stellen Sie die Kamera auf einer stabilen, waagerechten Oberfläche auf. -
Seite 78: Austauschen Der Batterie In Der Fernbedienung
Austauschen der Batterie in der Fernbedienung Halten Sie den Batteriehalterlösehebel an der Fernbedienung in Richtung des Pfeils gedrückt, um den Batteriehalter zu entriegeln 1, und ziehen Sie den Batteriehalter aus der Fernbedienung heraus 2. Tauschen Sie die Batterie aus. Verwenden Sie eine 3-V- Lithiumbatterie (Typ CR2025). -
Seite 79: Fernaufnahmen Oder Aufnahmen Durch Ein Fenster
Fernaufnahmen oder Aufnahmen durch ein Fenster (Unendlicheinstellung) Mit der Unendlicheinstellung können Sie bei Fernaufnahmen eine höhere Bildschärfe erzielen oder Landschaften durch ein Fenster fotografieren. Drücken Sie die Taste , bis “ ” im LCD-Display erscheint. Richten Sie die Kamera auf den gewünschten Bildausschnitt, und drücken Sie dann den Auslöser halb. -
Seite 80: Korrigieren Von Datum Und Uhrzeit
Korrigieren von Datum und Uhrzeit (nur Lite Touch Zoom 110s QD) Drücken Sie die Taste MODE, so daß Jahr/ Monat/Tag angezeigt werden. Drücken Sie die Taste SEL, bis die Angabe blinkt, die Sie korrigieren wollen. Stellen Sie die blinkende Zahl mit der Taste ADJUST ein. -
Seite 81: Weitere Informationen
Fehlersuche Versuchen Sie zunächst, anhand der folgenden Tabelle die Fehlerursache zu ermitteln. Sie ersparen sich damit unter Umständen einen Besuch bei Ihrem Nikon-Kundendienstzentrum. Problem Ursachen und Abhilfemaßnahmen Siehe Seite a Die Schiebeabdeckung ist nicht ganz geöffnet. → Schieben Sie die Schiebeabdeckung vollständig auf, bis ein Klicken zu hören ist, so daß... - Seite 82 Fehlersuche (Fortsetzung) Problem Ursachen und Abhilfemaßnahmen Siehe Seite a Bei der Aufnahme wurde die Kamera bewegt. → Drücken Sie den Auslöser behutsam, oder 61,71, verwenden Sie ein Stativ, bzw. stellen Sie die Kamera Das Motiv auf einer stabilen, waagerechten Fläche auf. erscheint auf dem a Ein Bereich vor oder hinter dem eigentlichen Abzug...
-
Seite 83: Technische Daten
Technische Daten Kameratyp 35-mm-Kleinbildkamera mit Autofokus, Zentralverschluß und Nikon-Zoom-Objektiv Geeignetes Filmmaterial 35-mm-Kleinbildfilmpatrone mit DX-Code Bildformat 24 × 36mm Objektiv 38mm (f/4,5) – 110mm (f/11,9), 6 Elemente in 6 Gruppen Blende Programmierte elektronische Blende, Verschlußlamellen dienen gleichzeitig als Blendenlamellen; Verschlußzeit: 2 bis 1/300 Sekunden Sucher Realbild-Sucher, Bildfeld: ca. - Seite 84 Technische Daten (Fortsetzung) Filmtransport Nach jeder Aufnahme automatischer Weitertransport zum nächsten Bild; Automatische Rückspulung am Ende der Filmrolle; Rückspulung teilbelichteter Filme möglich. Fernbedienung (Sonderzubehör) (nur Lite Touch Zoom 110s QD) Drahtlose Infrarot-Fernbedienung (Verschluß aus lösung mit einer Verzögerung von 2 Sekunden. Reichweite: ca. 5m in gerader Linie vor der Kamera. Eine 3-V- Lithiumbatterie (CR2025).
- Seite 85 Weitere Informationen...
-
Seite 86: Pour Votre Sécurité
Pour votre sécurité (Entretien de votre appareil photo et de sa pile) Pour ne pas risquer d’endommager votre matériel Nikon ou de causer des blessures, à vous-même ou d’autres personnes, prenez soin de lire attentivement les recommandations suivantes avant d’utiliser votre matériel. - Seite 87 Si votre appareil photo s’ouvre à la suite d’une chute ou de tout autre accident, retirez la pile, puis confiez-le immédiatement à un centre de service agréé Nikon pour le faire examiner. Suivez attentivement les consignes concernant les piles Les piles peuvent fuir ou exploser si elles ne sont pas manipulées correctement.
-
Seite 88: Entretien De Votre Appareil Photo Et De Sa Pile
Entretien de votre appareil photo et de sa pile Gardez-le au sec Ce matériel n’est pas étanche et peut ne plus fonctionner correctement s’il est immergé dans l’eau ou exposé à de hauts niveaux d’humidité. La rouille sur le mécanisme interne peut provoquer des dommages irréparables. - Seite 89 Piles • Lorsque vous allumez votre appareil photo, vérifiez le niveau de charge de la pile sur l’écran de contrôle CL pour vérifier s’il faut la remplacer. La batterie doit être remplacée lorsque l’indicateur de tension de pile clignote. • Gardez toujours à portée de main une pile de rechange lors de séances importantes de prises de vues.
-
Seite 90: Accessoires En Option
Merci d’avoir fait l’acquisition d’un appareil Nikon Lite Touch Zoom 110s/Lite Touch Zoom 110s QUARTZ DATE (QD). Lisez attentivement le présent manuel avant toute utilisation et gardez-le à portée de la main jusqu’à ce que vous soyez familiarisé avec votre nouvel appareil. - Seite 91 Table des Matières Pour votre sécurité ----------------------------------- 86 Entretien de votre appareil photo et de sa pile ---------------- 88 Pour prendre une photo directement (Guide d’utilisation rapide) ------------------------ 92 Descriptif de l’appareil ------------------------------- 94 Boîtier --------------------------------------------- 94 Ecran de contrôle CL ---------------------------- 96 Viseur --------------------------------------------- 97 Installation d’une pile -------------------------------- 98 Mise en marche de l’appareil ------------------------ 99...
-
Seite 92: Pour Prendre Une Photo Directement (Guide D'utilisation Rapide)
Pour prendre une photo directement (Guide d’utilisation rapide) Introduisez une pile. p. 98) Ouvrez le couvercle coulissant pour mettre l’appareil photo en marche. p. 99) Vérifiez que l’indicateur d’autonomie suffisante de la pile ( ) apparaît sur l’écran de contrôle CL. ( p. - Seite 93 Retirez la cartouche du film. p. 107) Faites des photos d’essai Faites des photos d’essai avant les grandes occasions comme un mariage ou des vacances. • Nikon ne peut être tenu responsable de tout dommage résultant de l’utilisation de ce produit. Démarrage...
-
Seite 94: Descriptif De L'appareil
Descriptif de l’appareil Boîtier Capteur de télécommande* Fenêtre du viseur p. 119) Objectif Fenêtre Illuminateur d’atténuation des d’exposition yeux rouges ( pp. 116, 117) automatique Témoin du retardateur p. 118) Fenêtre de mise au point automatique Fenêtre de mise au point automatique Couvercle coulissant (commutateur marche/arrêt) - Seite 95 Bouton MODE* (pour sélectionner les données à imprimer ou à corriger) pp. 102, 122) Panneau dateur* Bouton SEL* pp. 102, 122) (pour sélectionner la position des données à corriger) Témoin vert p. 122) pp. 97, 104) Bouton ADJUST* Témoin orange (pour corriger des pp.
-
Seite 96: Ecran De Contrôle Cl
Descriptif de l’appareil (suite) Ecran de contrôle CL Indicateur d’atténuation des Indicateur du mode de mise au point sur yeux rouges ( pp. 116, 117) l’infini ( p. 121) Indicateur du mode de Indicateur d’autonomie de la flash ( pp. 110-115) pile ( p. -
Seite 97: Viseur
Viseur 1Repères de correction de parallaxe ( p. 106) Utilisez ces repères lorsque la distance de prise de vue en cadrage serré est inférieure à 1m en mode téléobjectif. 2Repères du cadre de mise au point automatique ( p. 104) Centrez dans cette zone le sujet principal à... -
Seite 98: Installation D'une Pile
Installation d’une pile Type de pile Utilisez une pile au lithium CR123A ou DL123A de type 3 V avec cet appareil photo. Ouvrez le couvercle du logement de la pile. Ouvrez le couvercle du logement de la pile en dégageant la fermeture comme indiqué par la flèche de l’illustration de gauche. -
Seite 99: Mise En Marche De L'appareil
Mise en marche de l’appareil Ouvrez le couvercle coulissant jusqu’à ce qu’il s’encliquette. Lorsque vous ouvrez le couvercle coulissant dans le sens de la flèche, l’appareil photo s’allume, le flash intégré sort automatiquement de son logement et l’objectif se déploie. L’appareil photo est réglé... -
Seite 100: Chargement D'un Film
Chargement d’un film Film conseillé Utilisez des films 35mm codés DX avec cet appareil. Nous préconisons l’emploi de films codés DX 400 ISO qui offrent de bons résultats en photographie au flash et une protection contre les risques de bougé, le cas échéant. Refermez le couvercle coulissant puis ouvrez le dos de l’appareil. - Seite 101 Refermez l’appareil et vérifiez que “ ” apparaît dans le compteur de vues. Lorsque vous refermez le dos de l’appareil, le film avance automatiquement à la première vue. Tant que le chargement du film est en cours, l’indication “ ” clignote dans l’écran de contrôle.
-
Seite 102: Impression De La Date/L'heure Sur Les Photos (Lite Touch Zoom 110S Qd Uniquement)
Impression de la date/l’heure sur les photos (Lite Touch Zoom 110s QD uniquement) Sélectionnez l’indicateur date/heure en appuyant sur le bouton MODE. L’année est indiquée par les deux derniers chiffres et l’heure est affichée suivant le système 24 heures. L’exemple illustré... -
Seite 103: Opérations De Base
Prise en main correcte de l’appareil Prise en main Prise en main verticale horizontale de l’appareil de l’appareil Serrez les coudes le long du corps et maintenez l’appareil des deux mains. Lorsque vous maintenez l’appareil verticalement, veillez à ce que le flash soit au-dessus comme illustré. -
Seite 104: Prise De Vues
Prise de vues Centrez le sujet principal à l’intérieur des repères du cadre de mise au point automatique “ ”. Si le sujet principal se trouve en dehors des repères du cadre de mise au point automatique : Utilisez la fonction de mémorisation de la mise au point. ( p. -
Seite 105: Cadrage Au Zoom
Vérifiez que le témoin vert s’allume et appuyez doucement sur le déclencheur jusqu’à ce qu’il soit complètement enfoncé. Si le sujet est sombre ou à contre-jour en mode de flash automatique, le flash se déclenche automatiquement. Une pression trop brusque du déclencheur peut entraîner une image floue. -
Seite 106: Photographie De Plans Rapprochés
Photographie de plans rapprochés Utilisez les repères de correction de parallaxe lorsque la distance entre l’appareil photo et le sujet est inférieure à 1 mètre en réglage téléobjectif. La distance minimale entre l’appareil et le sujet est d’approximativement 0,8m. Si vous souhaitez photographier un sujet comme une fleur et si vous souhaitez qu’elle apparaisse la plus grande possible sur la photo, vous pouvez vous rapprocher jusqu’à... -
Seite 107: Rembobinage Du Film
Rembobinage du film Le film se rebobine automatiquement dès qu’il arrive à sa fin. Pendant le rembobinage du film, le nombre dans le compteur de vues diminue unité par unité. Le film est rembobiné complètement lorsque “ ” clignote pendant environ 20 secondes sur l’écran de contrôle CL du compteur de vues, puis que “... -
Seite 108: Si Le Sujet Principal Ne Se Trouve Pas Au Centre De La Zone De Mise Au Point
Si le sujet principal ne se trouve pas au centre de la zone de mise au point (Mémorisation de la mise au point) Le verrouillage de la mise au point s’avère utile en mode autofocus lorsque vous souhaitez photographier un sujet se trouvant en dehors des repères du cadre de la mise au point et lorsque la mise au point sur les sujets peut se révéler difficile ( p. -
Seite 109: Sujets Difficiles À Mettre Au Point
Sujets difficiles à mettre au point Les sujets suivants peuvent s’avérer difficiles à mettre au point. Utilisez la fonction de mémorisation de la mise au point ( p. 108) pour faire la mise au point sur un autre sujet équidistant de l’appareil, puis composez l’image pour prendre la photo. -
Seite 110: Photographie Au Flash
Photographie au flash Sélection du mode de flash Sélectionnez le mode de flash en appuyant sur le bouton Vous pouvez sélectionner l’un des cinq modes de flash en appuyant sur le bouton d’indicateur Indicateur Explication Flash automatique ( p. 112) Le flash se déclenche automatiquement indicateur lorsque l’éclairage est insuffisant. - Seite 111 Témoin orange allumé/clignotant lorsque le déclencheur est à moitié enfoncé. a Le témoin orange s’allume: Le recyclage du flash est terminé. Le flash est prêt à se déclencher. a Le témoin orange clignote lentement: Le flash est en train de se recycler. Relâchez immédiatement le déclencheur, puis appuyez à...
-
Seite 112: Pour Utiliser Le Flash Automatiquement
Pour utiliser le flash automatiquement (Mode de flash automatique) Utilisez ce mode pour un déclenchement automatique du flash lorsque la lumière est insuffisante. Ouvrez le couvercle coulissant. Lorsque vous ouvrez le couvercle coulissant, l’appareil se met sous tension et le flash intégré sort de son logement. -
Seite 113: Opérations Évoluées
Annulation du flash (Mode de flash annulé) Utilisez ce mode dans des endroits où l’utilisation du flash est interdite, pour obtenir un effet d’éclairage naturel au crépuscule ou pour les scènes de nuit. Utilisez un trépied pour la photographie en mode de flash annulé... -
Seite 114: Pour Utiliser Le Flash En Permanence
Pour utiliser le flash en permanence (Mode de flash imposé) Utilisez ce mode pour déclencher le flash intentionnellement quelles que soient les conditions de luminosité. Appuyez sur le bouton jusqu’à ce que “ ” apparaisse dans l’écran de contrôle CL. Cadrez la photo, puis appuyez à... -
Seite 115: Pour Photographier Une Personne De Nuit
Pour photographier une personne de nuit (Mode de Portrait /Nuit (flash en synchronisation lente)) A utiliser pour capturer à la fois le sujet et l’arrière-plan de nuit ou dans des conditions de faible lumière. Le flash se déclenche à chaque prise de vue. Utilisez un trépied pour la photographie en mode de Portrait /Nuit (synchronisation lente) du flash. -
Seite 116: Bouton
Bouton Sélectionnez le mode en appuyant sur le bouton pour la fonction d’atténuation des yeux rouges ou le retardateur/télécommande. Sélectionnez le mode en appuyant sur le bouton Chaque fois que vous appuyez sur le bouton l’indicateur change dans l’ordre suivant: d’indicateur (110s) (110s QD) -
Seite 117: Pour Atténuer L'effet Des "Yeux Rouges
Pour atténuer l’effet des “yeux rouges” (Mode d’atténuation des yeux rouges) En mode de photographie au flash, il arrive parfois que les yeux du sujet apparaissent rouges vif. Utilisez ce mode pour atténuer cet effet des “yeux rouges”. A propos du mode d’atténuation des yeux rouges aLe témoin de réduction des “yeux rouges”... -
Seite 118: Utilisation Du Retardateur
Utilisation du retardateur Utilisez le retardateur lorsque vous souhaitez figurer sur la photo. Montez l’appareil sur un trépied ou installez-le sur une surface stable. Appuyez sur le bouton jusqu’à ce que “ ” ou “ ” apparaisse dans l’écran de contrôle Lite Touch Zoom 110s Lite Touch Zoom 110s QD Composez l’image et... -
Seite 119: Utilisation De La Télécommande (En Option) (Lite Touch Zoom 110S Qd Uniquement)
Utilisation de la télécommande (en option) (Lite Touch Zoom 110s QD uniquement) La télécommande permet de déclencher l’appareil à distance. Appuyez sur le bouton jusqu’à ce que “ ” apparaisse dans l’écran de contrôle CL. Montez l’appareil sur un trépied ou installez-le sur une surface stable. -
Seite 120: Remplacement De La Pile De La Télécommande
Remplacement de la pile de la télécommande Maintenez le levier de libération du support de la pile enfoncé, comme indiqué par la flèche pour désactiver le verrouillage 1, puis sortez le support de la pile de la télécommande 2. Remplacez la pile. Utilisez une pile au lithium 3 V (type CR2025). -
Seite 121: Prise De Vues À Distance Ou D'un Paysage À Travers Une Vitre
Prise de vues à distance ou d’un paysage à travers une vitre (Mode de mise au point sur l’infini) Utilisez la mise au point sur l’infini pour réaliser des prises de vue plus nettes de sujets à distance ou d’un paysage à travers une vitre. Appuyez sur le bouton jusqu’à... -
Seite 122: Correction De La Date Et De L'heure
Correction de la date et de l’heure (Lite Touch Zoom 110s QD uniquement) Appuyez sur le bouton MODE pour afficher l’indication Année/Mois/Jour. Appuyez sur le bouton SEL de façon à ce que l’indicateur à régler se mette à clignoter. Appuyez sur le bouton ADJUST pour régler le chiffre qui clignote. -
Seite 123: Informations Complémentaires
Dépannage Recherchez la cause de la défaillance en consultant le tableau suivant. Cela peut vous épargner un déplacement vers un centre de service après-vente Nikon. Problème Points à vérifier et remèdes Voir page a Le couvercle coulissant n’est pas complètement ouvert. - Seite 124 Dépannage (suite) Problème Points à vérifier et remèdes Voir page a Effet d’un bougé de l’appareil. → Appuyez doucement sur le déclencheur ou 103,113, montez l’appareil sur un trépied, ou placez-le sur une surface stable. Le sujet apparaît a La mise au point s’effectue sur quelque chose qui flou sur la photo.
-
Seite 125: Spécifications
Spécifications Type d’appareil Appareil 24 × 36 (Film 135) autofocus à obturateur et zoom Nikon Films utilisables Cartouches de films 35mm codés DX Format d’image 24 × 36mm Objectif 38mm f/4,5–110mm f/11,9, 6 éléments en 6 groupes Obturateur Type électronique programmé; sert également de diaphragme. Vitesse d’obturation De 2 à... - Seite 126 Spécifications (suite) Avancement du film Avancement automatique d’une vue après chaque prise de vues; rembobinage automatique à la fin du film; fonction de rembobinage d’un film partiellement exposé Télécommande (option) (Lite Touch Zoom 110s QD uniquement) Télécommande sans fil à infrarouge; temporisation du déclenchement de l’obturateur de 2 s;...
- Seite 127 Informations complémentaires...