Inhaltsverzeichnis
Werbung
Verfügbare Sprachen
Verfügbare Sprachen
Quicklinks
Werbung
Inhaltsverzeichnis

Verwandte Anleitungen für urmet 1096/406


Inhaltszusammenfassung für urmet 1096/406
- Seite 1 Quick guide 1096/406 - 1096/407 - 1096/506 - 1096/507 TELECAMERE AHD DAY & NIGHT 5 MPX DAY&NIGHT AHD 5 MPX CAMERAS CAMÉRAS AHD 5MPX DAY & NIGHT 5MPX AHD TAG & NACHT KAMERAS www.urmet.com IF YOU LOVE YOUR BUILDING...
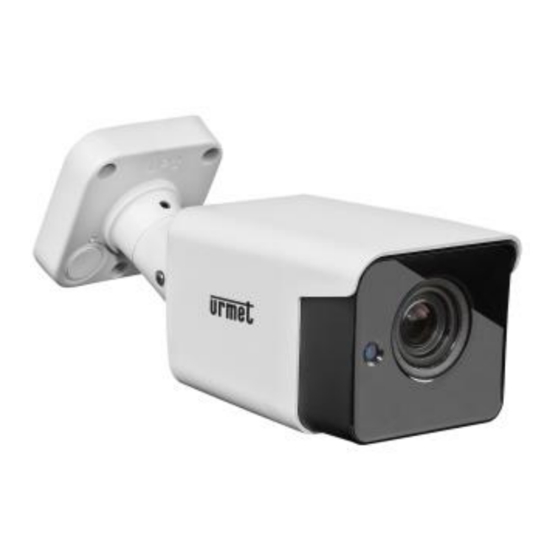
- Seite 2 1096/406 TELECAMERA COMPATTA AHD 5 MPX DAY&NIGHT AUTOFOCUS 2.8-12MM 1096/407 TELECAMERA COMPATTA AHD 5 MPX DAY&NIGHT AUTOFOCUS 6-22MM 1096/506 TELECAMERA MINIDOME AHD 5MPX DAY&NIGHT AUTOFOCUS 2.8-12MM 1096/507 TELECAMERA VANDAL DOME AHD 5MPX DAY&NIGHT AUTOFOCUS 2.8-12MM DS1096-116C...
- Seite 3 Precauzioni d’uso • Assicurarsi dell’integrità dell’apparecchio dopo averlo tolto dall’imballo. • Prima di effettuare qualsiasi operazione di pulizia o di manutenzione disinserire l’apparecchio dalla rete di alimentazione elettrica. Non usare prodotti spray per la pulizia dell’apparecchio. • Controllare che la temperatura d’esercizio sia nei limiti indicati e che l’ambiente non sia particolarmente umido.
-
Seite 4: Caratteristiche Di Funzionamento
Installazione Prima d’iniziare l’installazione, assicurarsi che tutte le unità da collegare non siano alimentate. POSIZIONAMENTO E CONNESSIONI 1. Allentare le ghiere e le viti di bloccaggio 2. Orientare il dispositivo nella posizione voluta. Nel caso delle telecamere compatte, posizionare la staffa in modo tale da riprendere le immagini prescelte; è possibile regolare la telecamera secondo l’asse ORIZZONTALE, VERTICALE e TRASVERSALE. - Seite 5 ZOOM - Accesso al menu OSD delle telecamere Utilizzando interfaccia UTC, tramite l’uso dei dispositivi HVR del catalogo Urmet che lo prevedono, è possibile accedere al menu OSD delle telecamere premendo il tasto centrale dell’interfaccia grafica del telecomando degli HVR e poi scorrere i menu tramite i tasti freccia.
- Seite 6 è composta l’apparecchiatura. QR Code Guida rapida e manuale completo dei dispositivi sono altresì disponibile per il DOWNLOAD dal sito URMET nella sezione DOCUMENTAZIONE E RISORSE al seguente indirizzo: 1096/406...
- Seite 7 1096/406 AHD 5 MPX DAY&NIGHT COMPACT CAMERA AUTOFOCUS 2.8-12MM 1096/407 AHD 5 MPX DAY&NIGHT COMPACT CAMERA AUTOFOCUS 6-22MM 1096/506 AHD 5 MPX AY&NIGHT MINIDOME AUTOFOCUS 2.8-12MM 1096/507 AHD 5 MPX AY&NIGHT VANDAL DOME AUTOFOCUS 2.8-12MM DS1096-116B...
-
Seite 8: Installation Specifications
Precautions • Make sure that the device is intact after removing it from the package. • Disconnect the device from the mains before cleaning or maintenance. Do not use spray products to clean the device. • Check that the working temperature is within the indicated range and that the environment is not particularly humid. -
Seite 9: Operating Features
Installation Make sure that no units are powered before starting the installation procedure. POSITIONING AND CONNECTIONS 1. Loosen the locking ring on the bracket and the screw 2. Position the bracket on horizontal, vertical and transversal axes point the camera in the desired direction. - Seite 10 It is also possible to move the zoom and manually adjust the focus through the UTC/PTZ interface of the HVR devices in the Urmet catalogue. The zoom can be moved and the focus can be adjusted using the arrow keys of the HVR remote control graphic interface. The zoom is adjusted using the UP and DOWN arrows;...
- Seite 11 QR Code Quick guide and complete user manual of the products are also available for DOWNLOAD from the URMET website under the section DOCUMENTATION AND RESOURCES at the following links: 1096/406...
- Seite 12 1096/406 CAMÉRA COMPACTE AHD 5MPX DAY & NIGHT AUTOFOCUS 2.8-12MM 1096/407 CAMÉRA COMPACTE AHD 5MPX DAY & NIGHT AUTOFOCUS 6-22MM 1096/506 CAMÉRA MINI-DÔME AHD 5MPX DAY & NIGHT AUTOFOCUS 2.8-12MM 1096/507 CAMÉRA VANDAL-DÔME AHD 5MPX DAY & NIGHT AUTOFOCUS 2.8-12MM...
-
Seite 13: Précautions D'utilisation
Précautions d’utilisation • Après avoir retiré l'emballage, s’assurer que l’appareil est intact. • Avant de brancher l’appareil au secteur d’alimentation, s’assurer que les données nominales correspondent à celles du secteur d’alimentation. • Veiller à bien tenir compte de la température de fonctionnement de l’unité avant de décider du lieu d’installation. -
Seite 14: Caractéristiques De Fonctionnement
Installation Avant de procéder à l’installation, s’assurer qu’aucune des unités à brancher n’est alimentée. POSITIONNEMENT ET BRANCHEMENT 1. Desserrer les bagues et les vis de fixation 2. Orienter le dispositif vers la position souhaitée. En cas de caméras compactes, placer l’étrier de sorte à... - Seite 15 ZOOM - Accès au menu OSD des caméras À l’aide des dispositifs HVR du catalogue Urmet le prévoyant, l’interface UTC permet d’accéder au menu OSD des caméras en appuyant sur la touche centrale de l’interface graphique de la télécommande des HVR et permet ensuite de défiler les menus à l’aide des touches flèche.
- Seite 16 QR Code Le guide rapide et le manuel d'utilisation complet des produits sont également disponibles en téléchargement (DOWNLOAD) à partir du site Web URMET dans la section DOCUMENTATION AND RESOURCES (le site web est en anglais) au lien suivant: 1096/406...
- Seite 17 1096/406 5MPX AHD TAG & NACHT KOMPAKTKAMERA AUTOFOCUS 2.8-12MM 1096/407 5MPX AHD TAG & NACHT KOMPAKTKAMERA AUTOFOCUS 6-22MM 1096/506 5MPX AHD TAG & NACHT DOME KAMERA AUTOFOCUS 2.8-12MM 1096/507 VANDALISMUSGESCHÜTZTE 5MPX AHD TAG & NACHT DOME KAMERA AUTOFOCUS 2.8-12MM DS1096-116C...
-
Seite 18: Vorsichtsmaßnahmen
Vorsichtsmaßnahmen • Stellen Sie nach dem Auspacken des Geräts sicher, dass es unbeschädigt ist. • Trennen Sie das Gerät vom Stromversorgungsnetz, bevor Sie es reinigen oder warten. Verwenden Sie für die Reinigung des Geräts keine Sprays. • Überprüfen Sie, ob die Betriebstemperatur sich innerhalb der angezeigten Grenzwerte befindet und die Umgebung nicht besonders feucht ist. -
Seite 19: Funktionsweise
Installation Stellen Sie vor Beginn der Installation sicher, dass alle anzuschließenden Einheiten von der Versorgung getrennt sind. POSITIONIERUNG UND ANSCHLÜSSE 1. Lösen Sie den Sicherungsring und die Befestigungsschrauben 2. Bringen Sie das Gerät in die gewünschte Position. Positionieren Sie im Fall von Kompaktkameras die Halterung so, dass die gewählten Bilder aufgenommen werden. - Seite 20 ZOOM - Zugriff auf das OSD-Menü der Kameras Unter Einsatz der UTC-Schnittstelle über die HVR-Geräte aus dem Katalog von Urmet, die dies vorsehen, erhält man durch Betätigen der mittleren Taste der Grafikschnittstelle der Fernbedienung der HVRs und Scrollen in den Menüs mit den Pfeiltasten Zugriff auf das OSD-Menü...
- Seite 21 Zubehörteile fachgerecht zu entsorgen, um die nachhaltige Wiederverwertung von stofflichen Ressourcen zu fördern. QR Code Die Schnellanleitung und die vollständige Bedienungsanleitung der Produkte können auch von der URMET-Website unter dem Abschnitt DOCUMENTATION AND RESOURCES unter den folgenden Links heruntergeladen werden: 1096/406 1096/407...
- Seite 22 DS1096-116C...
- Seite 23 DS1096-116C...
- Seite 24 Customer Care Italia: 011 23 39 810 Export Dept.: +39 011 24 00 250/256 URMET S.p.A. Via Bologna, 188/C | 10154 Torino (ITALY) www.urmet.com | info@urmet.com MADE IN CHINA IF YOU LOVE YOUR BUILDING DS1096-116C...