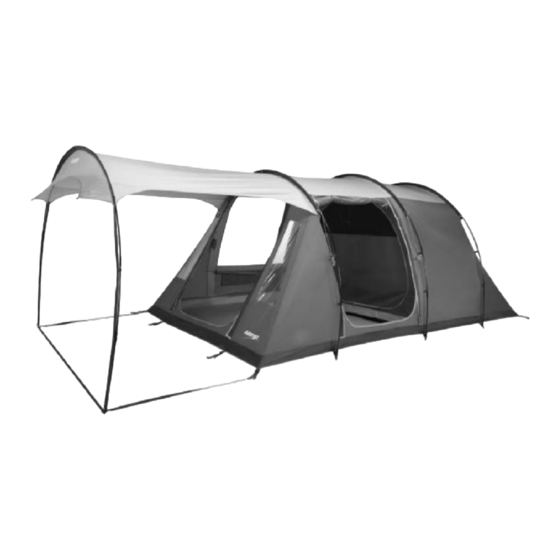
Vango CALDER Aufbauanleitung
TENT PITCHING INSTRUCTIONS – CALDER (UK)
FLYSHEET FIRST PITCHING:
Open out flysheet and position in required direction
Insert all poles through the pole sleeves on outside of fly sheet
Poles are colour coded to match corresponding pole sleeve
entry points
Locate one end of each pole at one side of the tent into the metal pin system attached to the groundsheet
Make sure poles locate into correct pin system, all poles follow corresponding flysheet seams to pin system
Push poles into an arch from opposite ends and locate pole ends into corresponding metal pin
Securely peg out the rear corners of the tent
Pull the tent forward until taut and peg out the main corners at the other end of the tent using the V pegs
Ensure the tent is in a straight line
Peg out the remaining poles and pegging points using pin pegs at the base of poles
Peg out ALL guy lines using pin-pegs ensuring that guy line fabric attachment points are evenly tensioned.
PRE-ATTACHED SUN CANOPY:
Vango awnings are designed for use in lowland, sheltered campsites. Do not pitch in high winds or exposed campsites
To erect the pre-attached canopy, insert the pole into the sleeve, connect to Ring and Pin system, tighten the tension
straps and attach pole clips to pole.
Pull canopy away from tent until roof of canopy is taut
Pull porch taut, away from main body of tent and peg down the corners of the porch through the shock-cord pegging
points using pin-pegs
To roll away the pre-attached canopy, roll it away along the top until the guylines and webbing are rolled away neatly, flip
the already rolled section to the underside of the canopy and continue rolling
Secure with the toggles provided
INNER ATTACHMENT:
Open out inner tent inside flysheet and position doorways to correspond with the living area
Suspend the inner by attaching toggles of inner tent through rings on inside of flysheet
The inner attachments are colour coded to match the clips on the roof of the flysheet
Do the rear first and work forward
It is advisable to remove the inner when taking down the tent when wet.
TENSION BAND SYSTEM:
Remove Tension Band System from pockets and attach into the corresponding clips at the apex of the pole
Adjust the straps until they are taut
DO NOT OVERTENSION. Excess tension will alter the shape of the tent
Tension bands are designed to stabilise the tunnel structure of the tent
The bands are not required to be used in calm weather
RING & PIN SYSTEM:
Locate one end of pole onto the corresponding metal pin (figure 1)
Peg the corners of the tent through the metal rings using pin-pegs (figure 2)
Pegs should be positioned at a 45 degree angle to ensure maximum grip
AUFBAUANLEITUNG– CALDER (DE)
MIT AUßENZELTAUFBAU ZUERST:
Außenzelt auslegen und korrekt ausrichten.
Stecken Sie alle Stangen durch die Gestängekanäle an der Außenseite des Außenzelts ein.
Die Stangen sind farbcodiert und farblich auf die zugehörigen Gestängekanaleingangspunkte abgestimmt.
Befestigen Sie ein Ende jeder Stange auf einer Seite des Zelts in dem an der Bodenplane befestigte Metallstiftsystem.
Achten Sie darauf, dass die Stangen in das korrekte Stift-System eingesteckt werden; alle Stangen verlaufen an den
zugehörigen Außenzeltnähten entlang zum Stift-System.
Schieben Sie die Stangen von den gegenüberliegenden Seiten in eine gewölbte Form und stecken Sie die Stangenenden in
die zugehörigen Metallstifte ein.
Stecken Sie die hinteren Ecken des Zelts fest aus.
Zelt bis zur Straffung nach vorn ziehen und die Hauptecken auf der anderen Seite des Zelts mithilfe der V-Heringe
feststecken.
Achten Sie darauf, dass sich das Zelt in einer geraden Linie ausgerichtet befindet.
Übrige Stangen und Verankerungspunkte mithilfe der Stiftheringe unten an den Stangen fixieren.
ALLE Abspannleinen mit Stiftheringen fixieren, wobei darauf zu achten ist, dass die Befestigungspunkte der Abspannleinen
an der Plane gleichmäßig festgezogen sind.
VORBEFESTIGTES SONNENDACH:
Vango Vorzelte werden konzipiert, um auf tiefliegenden, geschützten Campingplätzen verwendet zu werden. Stellen Sie
sie nicht in starkem Wind oder auf ungeschützten Campingplätzen auf.

Verwandte Anleitungen für Vango CALDER


Inhaltszusammenfassung für Vango CALDER
- Seite 1 PRE-ATTACHED SUN CANOPY: Vango awnings are designed for use in lowland, sheltered campsites. Do not pitch in high winds or exposed campsites To erect the pre-attached canopy, insert the pole into the sleeve, connect to Ring and Pin system, tighten the tension straps and attach pole clips to pole.
- Seite 2 Planter tous les cordes d'ancrage avec des piquets, en s'assurant que les points d'attache soient sous tension égale PARE-SOLEIL PRÉ-ATTACHÉ: Les auvents Vango sont conçus pour être utilisés en plaine, sur des campings abrités Pour dresser l'auvent pré-attaché, insérer l'arceau dans le fourreau, le relier au système d'attache Ring and Pin, resserrer les sangles de tension et attacher les crochets à...
- Seite 3 VERANDA PARASOLE PRE-MONTATA: I teli parasole Vango sono progettati per essere usati in aree di campeggi pianeggianti e riparati. Non utilizzarli in zone ventose o campeggi esposti alle intemperie. Per erigere la veranda pre-montata, inserire il palo nella guaina, attaccarlo al sistema anello-paletto, fissare le cinghie di tensione e collegare i ganci del palo al palo.
- Seite 4 PŘIPOJTE MARKÝZU: Vango markýzy jsou navrženy pro použití v nížinách, krytých kampech. Nepoužívejte je ve velkém větru a otevřených kampech Pro postavení přídavní ložnice, vložte tyče do rukávků a upevněte v spodní části. Pro napnutí tyčí stáhněte popruhy a připojte umělé...