Herunterladen Diese Seite drucken
GPO BERMUDA Bedienungsanleitung
Vorschau ausblenden Andere Handbücher für BERMUDA:

Werbung

Verfügbare Sprachen
  • DE

Verfügbare Sprachen

All manuals and user guides at all-guides.com
1

Werbung

loading

Inhaltszusammenfassung für GPO BERMUDA

  • Seite 1 All manuals and user guides at all-guides.com...
  • Seite 2: Inhaltsverzeichnis

    All manuals and user guides at all-guides.com Content English ................ German ..............French ..............Dutch ................ Spanish ..............GPO_Bermuda_EU_Manual.indd 2 14/09/2016 1...
  • Seite 3: English

    All manuals and user guides at all-guides.com English GPO_Bermuda_EU_Manual.indd 3 14/09/2016 1...
  • Seite 4 All manuals and user guides at all-guides.com Introduction Thanks for purchasing the GPO Bermuda. You are now the proud owner of a British design classic, based on the legendary Dansette Bermuda which graced homes the length and breadth of the country. To get the most from your new turntable, please read these instructions carefully before use, and store them in a safe place for future reference.
  • Seite 5 All manuals and user guides at all-guides.com 4. Open the lid of the unit. 5. Remove the black tie-wrap from the tone arm. 6. Remove the white stylus protective cap. 7. Release the tone arm’s needle arm lock. 8. Connect the small DC jack into the power input socket at the rear of the unit.
  • Seite 6 All manuals and user guides at all-guides.com Location of Controls Built-in Speaker Mode Selection Power/Volume Control Panel Clasp Stylus Arm Turntable GPO_Bermuda_EU_Manual.indd 6 14/09/2016 1...
  • Seite 7 All manuals and user guides at all-guides.com Control Buttons Select Mode: To select the Turntable, USB or AUX-IN mode, gently t control knob on the front of the unit to the position ind indicator light on the side of the unit will illuminate to c selected mode.
  • Seite 8 All manuals and user guides at all-guides.com Input and Output Side Panel Rear Panel AUX-IN DC-IN USB SLOT AUX-OUT Earphones Out GPO_Bermuda_EU_Manual.indd 8 14/09/2016 1...
  • Seite 9 All manuals and user guides at all-guides.com Turntable Mode 1.Ensure that the unit is correctly unpacked and set up as described in the Unpacking section 2. Place your chosen vinyl record onto your turntable 3. Set the correct speed (rpm) of your record (either 33rpm, 45rpm or 78rpm) 4.
  • Seite 10 All manuals and user guides at all-guides.com AUX-IN Play Mode 1. Ensure that the unit is correctly unpacked and set up as described in the Unpacking section 2. Connect your external audio source (smartphone, tablet device, MP3 player, etc) to the AUX-IN socket on the side panel.
  • Seite 11 6. Press once to record the whole vinyl as one track, and press twice to split the tracks. RCA Audio Out You can connect extra speakers to the GPO Bermuda using the RCA audio cable provided. The relevant Audio Out slots are located on the rear of the unit.
  • Seite 12 All manuals and user guides at all-guides.com Replace Stylus The turntable’s stylus will need to be replaced every three to four months to continue playing vinyl. Replacement styluses can be ordered from www.gporetro.com. Replacement instructions are given here: GPO_Bermuda_EU_Manual.indd 12 14/09/2016 1...
  • Seite 13 All manuals and user guides at all-guides.com Troubleshooting Q) The unit will not turn on A) Ensure that the DC cable is properly connected to the unit and plugged in to a working outlet. Ensure that the power dial has been turned far enough clockwise. Q) The speaker is making noises A) Make sure that your vinyl record is not damaged or warped.
  • Seite 14 All manuals and user guides at all-guides.com Product Care • DO NOT leave vinyl records on the turntable after use • Store vinyl records in their original packaging • Return the tone arm to the rest position after use, and secure •...
  • Seite 15 All manuals and user guides at all-guides.com GPO_Bermuda_EU_Manual.indd 15 14/09/2016 1...
  • Seite 16 All manuals and user guides at all-guides.com GPO_Bermuda_EU_Manual.indd 16 14/09/2016 1...
  • Seite 17: German

    All manuals and user guides at all-guides.com German GPO_Bermuda_EU_Manual.indd 17 14/09/2016 1...
  • Seite 18 All manuals and user guides at all-guides.com Einleitung Vielen Dank, dass Sie den GPO Bermuda gekauft haben. Sie sind nun stolzer Besitzer eines britischen Designklassikers, der auf der legendären Dansette Bermuda basiert, die im ganzen Land Freude in die Häuser brachte. Damit Sie die größtmögli- che Freude an Ihrem neuen Plattenspieler haben, lesen Sie sich diese Anweisungen bitte sorgfältig durch, bevor Sie das Gerät...
  • Seite 19 All manuals and user guides at all-guides.com 3. Lösen Sie die beiden Klemmen von jeder Seite des Deckels. 4. Öffnen Sie den Gerätedeckel. 5. Entfernen Sie den schwarzen Kabelbinder vom Tonarm. 6. Entfernen Sie die weiße Schutzkappe von der Nadel. 7.
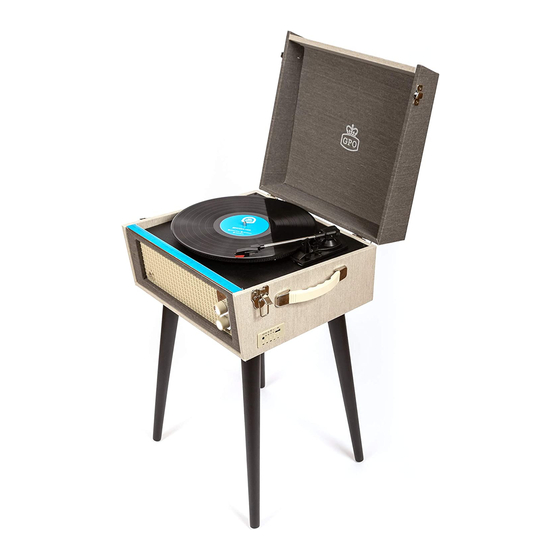
  • Seite 20 All manuals and user guides at all-guides.com Anordnung der Bedienelemente Eingebauter Lautsprecher Betriebswahlschalter Ein/Aus und Lautstärke Bedienfeld Klemme Tonabnehmerarm Plattenspieler GPO_Bermuda_EU_Manual.indd 20 14/09/2016 1...
  • Seite 21 All manuals and user guides at all-guides.com Bedienelemente Betriebswahlschalter: Drehen Sie den Kontrollknopf an der Vorderseite vorsi angezeigte Position, um den Plattenspieler-, USB- oder AUX-In-Modus zu wählen. Das Licht an der Seite des G beginnt zu leuchten, um den ausgewählten Modus zu b Plattenspielermodus - spielen Sie eine Vinylschallplatte über eingebauten Lautsprecher ab.
  • Seite 22 All manuals and user guides at all-guides.com Ein- und Ausgänge Seitliches Bedienfeld Hinteres Bedienfeld AUX-IN DC-IN USB-Anschluss AUX-OUT Kopfhörerausgang GPO_Bermuda_EU_Manual.indd 22 14/09/2016 1...
  • Seite 23 All manuals and user guides at all-guides.com Plattenspielermodus 1. Vergewissern Sie sich, dass das Gerät korrekt ausgepackt ist (siehe Abschnitt „Auspacken“). 2. Legen Sie Ihre Schallplatte auf den Plattenteller. 3. Stellen Sie die gewünschte Geschwindigkeit (UpM) der Schallplatte ein (entweder 33 UpM, 45 UpM oder 78 UpM). 4.
  • Seite 24 All manuals and user guides at all-guides.com AUX-In-Wiedergabemodus 1. Vergewissern Sie sich, dass das Gerät korrekt ausgepackt ist (siehe Abschnitt „Auspacken“). 2. Schließen Sie Ihre externe Audioquelle (Smartphone, Tablet, MP3-Spieler usw.) an die AUX-In-Buchse am seitlichen Bedienfeld an. 3. Drehen Sie den Lautstärkeknopf an der Vorderseite des Geräts im Uhrzeigersinn, um das Gerät einzuschalten.
  • Seite 25 6 Drücken Sie einmal, um die ganze Platte als ein Lied aufzunehmen, und zweimal, um die Lieder aufzuteilen. RCA Audio-Ausgang äts Mit dem mitgelieferten RCA-Audiokabel können Sie externe Lautsprecher an den GPO Bermuda anschließen. Die entsprechenden Audioausgänge befinden sich an der Hinterseite des Geräts. GPO_Bermuda_EU_Manual.indd 25 14/09/2016 1...
  • Seite 26 All manuals and user guides at all-guides.com Ersetzen der Nadel Die Nadel sollte alle drei bis vier Monate gewechselt werden, wenn Sie häufig Schallplatten abspielen. Bestellen Sie Ersatznadeln auf www.gporetro.com. Die folgenden Bildern illustrieren das Auswechseln der Nadel. GPO_Bermuda_EU_Manual.indd 26 14/09/2016 1...
  • Seite 27 All manuals and user guides at all-guides.com Fehlersuche F) Das Gerät lässt sich nicht einschalten. A) Stellen Sie sicher, dass das Kabel korrekt an das Gerät und eine Steckdose angeschlossen ist und dass Sie den Lautstärk- eregler weit genug nach rechts gedreht haben. F) Der Lautsprecher macht Geräusche.
  • Seite 28: Produktpflege

    All manuals and user guides at all-guides.com Produktpflege • Lassen Sie Schallplatten nach dem Abspielen NICHT auf dem • Lagern Sie Vinylschallplatten in ihrer Originalverpackung. • Bewegen Sie den Tonarm nach Gebrauch in seine • Setzen Sie die Schutzkappe nach Gebrauch auf. •...
  • Seite 29 All manuals and user guides at all-guides.com GPO_Bermuda_EU_Manual.indd 29 14/09/2016 1...
  • Seite 30 All manuals and user guides at all-guides.com GPO_Bermuda_EU_Manual.indd 30 14/09/2016 1...
  • Seite 31: French

    All manuals and user guides at all-guides.com French GPO_Bermuda_EU_Manual.indd 31 14/09/2016 1...
  • Seite 32 All manuals and user guides at all-guides.com Introduction Merci d'avoir acheté le GPO Bermuda. Vous êtes à présent l'heureux propriétaire d'une référence du design britannique, inspirée du légendaire Dansette Bermuda qui a orné de nombreuses maisons à travers le pays. Pour profiter pleinement...
  • Seite 33 All manuals and user guides at all-guides.com 4. Ouvrez le couvercle de l'unité. 5. Retirez l'attache noire du bras de lecture. 6. Retirez le capuchon blanc de protection de la pointe de lecture. 7. Déverrouillez le serre-bras du bras de lecture. 8.
  • Seite 34 All manuals and user guides at all-guides.com Emplacement des commandes Haut-parleur intégré Sélection du mode Marche/Volume Panneau de commandes Fermoir Bras de la pointe de lecture Platine GPO_Bermuda_EU_Manual.indd 34 14/09/2016 1...
  • Seite 35 All manuals and user guides at all-guides.com Boutons de commande électionner le mode : Pour sélectionner le mode platine, USB ou auxiliaire, to légèrement le bouton de commande devant l'unité dans position indiquée. Le voyant sur le côté de l'unité s'allu confirmer le mode sélectionné.
  • Seite 36 All manuals and user guides at all-guides.com Entrée et sortie Panneau latéral Panneau arrière Entrée auxiliaire Entrée CC Port USB Sortie auxiliaire Sortie écouteurs GPO_Bermuda_EU_Manual.indd 36 14/09/2016 1...
  • Seite 37 All manuals and user guides at all-guides.com Mode platine 1. Veillez à ce que l'unité soit correctement déballée et installée comme indiqué dans la section Déballage. 2. Placez le vinyle de votre choix sur la platine. 3. Réglez la vitesse appropriée (tr/min) de votre disque (33 tr/min, 45 tr/min ou 78 tr/min).
  • Seite 38 All manuals and user guides at all-guides.com Mode auxiliaire 1. Veillez à ce que l'unité soit correctement déballée et installée comme indiqué dans la section Déballage. 2. Raccordez votre source audio externe (Smartphone, tablette, lecteur MP3, etc.) à l'entrée auxiliaire sur le panneau latéral de l'unité.
  • Seite 39 Sortie audio RCA Vous pouvez brancher des haut-parleurs supplémentaires au GPO Bermuda grâce au câble audio RCA fourni. Les sorties audio correspondantes sont situées à l'arrière de l'unité. 'unité. mmande. GPO_Bermuda_EU_Manual.indd 39...
  • Seite 40 All manuals and user guides at all-guides.com Remplacer la pointe de lecture La pointe de lecture de la platine doit être remplacée tous les 3-4 mois pour pouvoir continuer à lire des vinyles. Vous pouvez commander des pointes de lecture de rechange à cette adresse : www.gporetro.com.
  • Seite 41 All manuals and user guides at all-guides.com Résolution des problèmes L'unité ne s'allume pas. - Vérifiez que le câble CC est correctement raccordé à l'unité et branché à une prise de courant qui fonctionne. Vérifiez que le bouton Marche est suffisamment tourné dans le sens des aiguilles d'une montre.
  • Seite 42 All manuals and user guides at all-guides.com Précautions d'utilisation du produit • Ne laissez surtout pas votre vinyle sur la platine après • Rangez vos vinyles dans leurs pochettes d'origine. • Remettez le bras de lecture en position repos après utilisation •...
  • Seite 43 All manuals and user guides at all-guides.com GPO_Bermuda_EU_Manual.indd 43 14/09/2016 1...
  • Seite 44 All manuals and user guides at all-guides.com GPO_Bermuda_EU_Manual.indd 44 14/09/2016 1...
  • Seite 45: Dutch

    All manuals and user guides at all-guides.com Dutch GPO_Bermuda_EU_Manual.indd 45 14/09/2016 1...
  • Seite 46 All manuals and user guides at all-guides.com Inleiding Hartelijk dank voor uw aanschaf van de GPO Bermuda. U bent nu de trotse eigenaar van een Britse designklassieker. De GPO Bermuda is gebaseerd op de legendarische Dansette Bermuda die een pronkstuk vormde in menige huiskamer. Om alles uit uw...
  • Seite 47 All manuals and user guides at all-guides.com 4. Open het deksel van de koffer. 5. Verwijder het zwarte trekbandje van de toonarm. 6. Verwijder de witte beschermkap van de naald. 7. Geef de vergrendeling van de toonarm vrij. 8. Steek het kleine voedingsstekkertje in de voedingsingang aan de achterkant van het apparaat.
  • Seite 48 All manuals and user guides at all-guides.com Wat zit waar? Ingebouwde speaker Modusselectie Aan/uit/Volume Regelpaneel Sluiting Toonarm Draaitafel GPO_Bermuda_EU_Manual.indd 48 14/09/2016 1...
  • Seite 49: Afspelen Of Pauzeren

    USB-stick AUX-IN-modus - muziek op uw muziekspeler, smartphone o ander apparaat afspelen via de ingebouwde speakers va GPO Bermuda Aan/uit en volume: Draai de knop rechtsom om de speaker aan te zetten en het volume te verhogen Draai de knop linksom om het volume te verlagen en de...
  • Seite 50 All manuals and user guides at all-guides.com Ingang en uitgang Zijpaneel Achterpaneel AUX-IN DC-IN USB-POORT AUX-OUT Uitgang koptelefoon GPO_Bermuda_EU_Manual.indd 50 14/09/2016 1...
  • Seite 51 All manuals and user guides at all-guides.com Draaitafelmodus 1. Zorg dat het apparaat correct is uitgepakt en opgesteld, zoals beschreven onder Uitpakken 2. Leg een vinylplaat op de draaitafel 3. Stel het juiste toerental (tpm) van de plaat in (33, 45 of 78 tpm) 4.
  • Seite 52 All manuals and user guides at all-guides.com AUX-In-afspeelmodus 1. Zorg dat het apparaat correct is uitgepakt en opgesteld, zoals beschreven onder Uitpakken 2. Sluit uw externe audiobron (smartphone, tablet, MP3-speler enz.) aan op de AUX-IN-aansluiting op het zijpaneel. 3. Draai de volumeknop aan de voorzijde rechtsom om de platenspeler aan te zetten 4.
  • Seite 53 6. Druk 1x om de hele plaat als één track op te nemen; druk 2x om de tracks te splitsen. RCA Audio-uitgang Met de meegeleverde RCA-kabel kunt u extra speakers aansluiten op de GPO Bermuda. De betreffende mpje Audio-Out-aansluitingen vindt u aan de achterzijde. GPO_Bermuda_EU_Manual.indd 53...
  • Seite 54 All manuals and user guides at all-guides.com Naald vervangen De naald moet om de drie à vier maanden worden vervangen om vinylplaten te kunnen blijven afspelen. U kunt reservenaalden bestellen op www.gporetro.com. Instructies voor het vervangen van een naald vindt u hier: GPO_Bermuda_EU_Manual.indd 54 14/09/2016 1...
  • Seite 55 All manuals and user guides at all-guides.com Problemen oplossen V) Het apparaat gaat niet aan A) Controleer of de voedingskabel correct is aangesloten en of de stekker in een werkend stopcontact zit. Controleer of de Aan/uit-knop ver genoeg rechtsom is gedraaid. V) De speaker maakt ruisgeluiden A) Controleer of de vinylplaat niet krom of beschadigd is.
  • Seite 56 All manuals and user guides at all-guides.com Productverzorging • Laat vinylplaten na gebruik NIET op de draaitafel liggen • Doe vinylplaten terug in hun hoes • Leid de toonarm na gebruik terug naar zijn rustpositie en zet • Plaats na gebruik de beschermkap terug om het element •...
  • Seite 57 All manuals and user guides at all-guides.com GPO_Bermuda_EU_Manual.indd 57 14/09/2016 1...
  • Seite 58 All manuals and user guides at all-guides.com GPO_Bermuda_EU_Manual.indd 58 14/09/2016 1...
  • Seite 59: Spanish

    All manuals and user guides at all-guides.com Spanish GPO_Bermuda_EU_Manual.indd 59 14/09/2016 1...
  • Seite 60 All manuals and user guides at all-guides.com Introducción Gracias por adquirir el reproductor Bermuda GPO. Ya puede sentirse orgulloso de poseer un clásico del diseño británico, basado en el legendario Dansette Bermuda que decoró los hogares de todo el país. Para sacarle el máximo partido a su nuevo tocadiscos, lea atentamente estas instrucciones antes de usarlo y consérvelas en un lugar seguro para consultarlas en...
  • Seite 61 All manuals and user guides at all-guides.com 3. Abra los dos cierres a ambos lados de la tapa. 4. Abra la tapa. 5. Retire la banda de sujeción negra del brazo. 6. Retire el tapón protector blanco de la cápsula. 7.
  • Seite 62 All manuals and user guides at all-guides.com Ubicación de los mandos Altavoz integrado Selección del modo Encendido/Volumen Panel de control Cierre Brazo con la cápsula Tocadiscos GPO_Bermuda_EU_Manual.indd 62 14/09/2016 1...
  • Seite 63 All manuals and user guides at all-guides.com Botones de control Seleccionar modo: Para seleccionar el modo Tocadiscos, USB o AUX-IN gi suavemente el mando de control en la parte delantera d unidad hasta la posición indicada. La luz indicadora en lateral de la unidad se encenderá...
  • Seite 64 All manuals and user guides at all-guides.com Entrada y salida Panel lateral Panel posterior RANURA USB DC-IN AUX-IN AUX-OUT Salida para auriculares GPO_Bermuda_EU_Manual.indd 64 14/09/2016 1...
  • Seite 65 All manuals and user guides at all-guides.com Modo Tocadiscos 1. Asegúrese de que la unidad se desembala correctamente y se coloca como se describe en la sección Desembalaje. 2. Coloque el vinilo elegido en el tocadiscos. 3. Elija la velocidad adecuada (rpm) del disco (33 rpm, 45 rpm o 78 rpm).
  • Seite 66 All manuals and user guides at all-guides.com Modo de reproducción AUX-IN 1. Asegúrese de que la unidad se desembala correctamente y se coloca como se describe en la sección Desembalaje. 2. Conecte su fuente de audio externa (smartphone, tableta, reproductor MP3, etc.) a la toma AUX-IN en el panel lateral. 3.
  • Seite 67 6. Pulse este botón una vez para grabar todo el vinilo como una sola pista; púlselo dos veces para dividir las pistas. Salida de audio RCA Puede conectar altavoces adicionales al Bermuda GPO usando el cable de audio RCA que se suministra. Las ranuras de salida ad para de audio correspondientes están situadas en la parte posterior...
  • Seite 68 All manuals and user guides at all-guides.com Sustitución de la cápsula La cápsula del tocadiscos debe reemplazarse cada tres o cuatro meses para continuar reproduciendo vinilos. Puede pedir cápsulas nuevas en www.gporetro.com. Instrucciones de sustitución: GPO_Bermuda_EU_Manual.indd 68 14/09/2016 1...
  • Seite 69 All manuals and user guides at all-guides.com Resolución de problemas P) El equipo no se enciende R) Compruebe que el cable CC está conectado correctamente a la unidad y enchufado a una toma eléctrica que funcione. Compruebe que la rueda de encendido se ha girado lo suficiente hacia la derecha.
  • Seite 70 All manuals and user guides at all-guides.com Cuidado del producto • NO deje los discos en el tocadiscos después de su uso. • Guarde los vinilos en su funda original. • Vuelva a colocar el brazo en la posición de reposo tras su uso •...
  • Seite 71 All manuals and user guides at all-guides.com GPO_Bermuda_EU_Manual.indd 71 14/09/2016 1...
  • Seite 72 All manuals and user guides at all-guides.com www.gporetro.com GPO_Bermuda_EU_Manual.indd 72 14/09/2016 1...