Herunterladen Inhalt Inhalt Diese Seite drucken
Intenso 7" PHOTOAGENT Bedienungsanleitung
Vorschau ausblenden Andere Handbücher für 7" PHOTOAGENT:
Inhaltsverzeichnis

Werbung

Verfügbare Sprachen
  • DE

Verfügbare Sprachen

  • DEUTSCH, seite 1
Intenso
V 1.1

Werbung

Inhaltsverzeichnis
loading

Inhaltszusammenfassung für Intenso 7" PHOTOAGENT

  • Seite 1 Intenso V 1.1...
  • Seite 2 Bedienungsanleitung Intenso PHOTOAGENT...
  • Seite 3: Inhaltsverzeichnis

    Inhaltsverzeichnis EINFÜHRUNG ..........................................1 ALLGEMEINE PRODUKTMERKMALE ..................................2 ÜBERSICHT ..........................................3 FERNBEDIENUNG ........................................4 EINSETZEN DER BATTERIE IN DIE FERNBEDIENUNG ............................5 BEFESTIGEN DES STANDFUßES .................................... 5 ERSTE SCHRITTE ........................................6 NUTZUNG VON SPEICHERKARTEN ..................................7 HAUPTMENÜ ..........................................8 BETRACHTEN VON FOTOS ..................................... 9 Abspielen einer Diashow ......................................
  • Seite 4 Anzeigen von Uhrzeit und Kalender ..................................15 SETUP MENÜ ........................................... 16 Einstellmöglichkeiten......................................17 Datum und Uhrzeit einstellen ....................................19 Aktivieren des automatischen Ein- und Ausschaltens ............................20 HÄUFIG GESTELLTE FRAGEN ....................................21 PRODUKT SPEZIFIKATIONEN ....................................24 PFLEGE UND WARTUNG ......................................25...
  • Seite 5: Einführung

    EINFÜHRUNG Danke, dass Sie sich für den DIGITALEN FOTORAHMEN ( DF ) von Intenso entschieden haben. Bevor Sie dieses Gerät nutzen, lesen Sie bitte diese Bedienungsanleitung gründlich durch und beachten Sie alle Warnhinweise. Wir empfehlen eine sichere Aufbewahrung dieser Anleitung, um etwaig auftretende Fragen selbstständig beantworten zu können.
  • Seite 6: Allgemeine Produktmerkmale

    ALLGEMEINE PRODUKTMERKMALE Dekorative Erscheinung, gute Qualität Anzeige von Fotos (JPEG) ohne einen Computer Automatische Diashow mit Übergangseffekten und individueller Anzeigedauer Kalender Funktion Timer Funktion Kompatibel mit SD / MMC / MSD Karten USB Steckplatz für den Anschluss von USB Massenspeichern 2 Wege der Steuerung: 7 Tasten auf der Rückseite des , Infrarot Fernbedienung DE - 2...
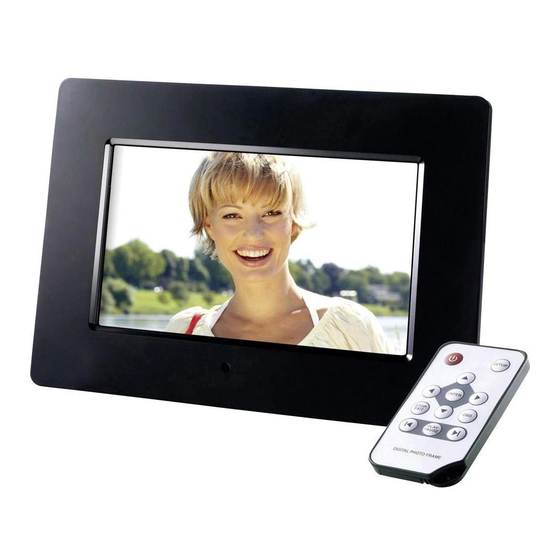
  • Seite 7: Übersicht

    ÜBERSICHT Vorderansicht Seiten- und Rückansicht Infrarot Sensor Aufwärts/Zurück [ ]Taste. Halten Sie diese Taste für 3 Sek gedrückt, SD / MMC / MS Karten Slot um das Hauptmenü aufzurufen. USB Host Rechts [ ]Taste. Halten Sie diese Taste für 3 Sek. gedrückt, um das DC 5V 1A Eingang [ ] Links Taste.
  • Seite 8: Fernbedienung

    FERNBEDIENUNG Power On/ Off Bewegt den Cursor aufwärts im Auswahlmenü Bewegt den Cursor nach links im Auswahlmenü oder zurück zum vorherigen Bild im Diashow-Modus MENU Aufrufen des Hauptmenüs Bewegt den Cursor abwärts im Auswahlmenü Rücksprung zum vorherigen Foto in der Diashow oder zurück zur vorherigen Seite im Bilder-Vorschaumenü Zoom In.
  • Seite 9: Einsetzen Der Batterie In Die Fernbedienung

    EINSETZEN DER BATTERIE IN DIE FERNBEDIENUNG Platzieren Sie die Fernbedienung mit den Tasten nach unten. Drücken Sie die Feder links neben dem Batteriefach nach rechts und ziehen Sie gleichzeitig das Batteriefach heraus. Setzen Sie eine CR2025 Lithium Batterie mit dem Plus Symbol nach oben in das Batteriefach ein. Schieben Sie das Batteriefach wieder vollständig in das Gehäuse der Fernbedienung.
  • Seite 10: Erste Schritte

    ERSTE SCHRITTE Verbinden Sie das mitgelieferte Netzteil mit dem DF. Stecken Sie das andere Ende des mitgelieferten Netzteils in die Steckdose. Schieben Sie den Regler des DF Für die erste Inbetriebnahme wählen Sie bitte nach dem ersten Einschalten die Sprache in dem erscheinenden Fenster mittels der Tasten auf der Rückseite oder der Fernbedienung aus.
  • Seite 11: Nutzung Von Speicherkarten

    NUTZUNG VON SPEICHERKARTEN Setzen Sie SD / MMC / MS Karten mit den Kontakten in Richtung des Display schauend in den 3-in-1 Karten Slot ein. Verbinden Sie USB Speichermedien mit dem DIGITALEN FOTORAHMEN durch Einsetzen der Medien in den USB Steckplatz (USB Host). Hinweis: Bitte setzen Sie Speicherkarten nicht mit Gewalt ein.
  • Seite 12: Hauptmenü

    HAUPTMENÜ Nach dem Einschalten gelangen Sie direkt in das Hauptmenü. Hinweis: Wenn Sie ein Speichermedium mit dem DF verbunden haben, startet die Diashow direkt nach dem Einschalten. Wenn mehrere Speichermedien mit dem DF verbunden sind, liest er nach dem Einschalten immer zuerst die Bilder aus dem USB-Stick. Im Hauptmenü...
  • Seite 13: Betrachten Von Fotos

    BETRACHTEN VON FOTOS Abspielen einer Diashow Sie können in jedem Menü die [ ] Taste auf der Fernbedienung zum Starten der Diashow nutzen. Sie beginnt jeweils mit dem ersten Foto. Zum Anhalten der Diashow und zum Anzeigen eines einzelnen Fotos drücken Sie die Taste auf dem DF oder die OK-Taste auf der Fernbedienung.
  • Seite 14: Bilder-Vorschaumenü

    Bilder-Vorschaumenü Die Bilder auf dem ausgewählten Speichermedium werden als Miniaturbilder dargestellt. Es können bis zu 15 Bilder gleichzeitig angezeigt werden. Wählen Sie im Hauptmenü ein Speichermedium (USB, SD/MMC/MS) aus und drücken Sie die auf dem DF oder auf der Fernbedienung die OK-Taste. [ ] Taste Zum Navigieren zwischen den Miniaturbildern nutzen Sie die [ ],[ ],[ ],[ ] Tasten auf dem DF oder die...
  • Seite 15: Anzeige Eines Einzelnen Bildes

    Anzeige eines einzelnen Bildes Sie können ein einzelnes Bild auswählen. Wählen Sie im Bilder-Vorschaumenü ein Bild aus und drücken Sie die Taste auf dem DF oder die OK-Taste auf der Fernbedienung. Das Bild wird nun im Vollbildmodus angezeigt und Sie sehen das Symbol in der rechten oberen Ecke des Bildschirms.
  • Seite 16: Ändern Des Anzeigemodus

    Ändern des Anzeigemodus Während des Betrachtens eines Bildes oder während der Diashow können Sie durch Drücken der [4:3/16:10] Taste auf der Fernbedienung den Anzeigemodus wechseln. 4:3: Bei dieser Auswahl wird ein Bild, welches im 4:3 Format gespeichert ist, im Originalformat mit schwarzem Balken am linken und rechten Rand angezeigt.
  • Seite 17: Nutzung Des Osd Menüs

    Nutzung des OSD Menüs Sie können das OSD Menü nutzen, um die nachfolgenden Aktionen auszuführen. Drücken Sie während des Betrachtens eines Bildes oder einer Diashow die [OSD] Taste auf der Fernbedienung oder halten Sie die [ ] Taste auf dem DF für 3 Sekunden gedrückt. Das OSD Menü...
  • Seite 18 Drücken Sie die [ ], [ ] Tasten auf dem DF oder die Tasten auf der Fernbedienung, um zwischen den Funktionen zu navigieren. Zum Stoppen oder Fortsetzen der Diashow wählen Sie bitte das Symbol aus und drücken die auf dem DF oder die [ ] Taste OK Taste auf der Fernbedienung.
  • Seite 19: Anzeigen Von Uhrzeit Und Kalender

    Anzeigen von Uhrzeit und Kalender In diesem Modus wird Ihnen die aktuelle Uhrzeit, das aktuelle Datum, der aktuelle Wochentag und eine verkleinerte Diashow mit den verfügbaren Bildern angezeigt. Wählen Sie im Hauptmenü den Menüpunkt Uhr aus. Durch Drücken der [ ] Taste auf der Fernbedienung oder für 3 Sekunden gedrückt Halten der [ ] Taste auf dem DF gelangen Sie zurück in das Uhrzeitmodus Hauptmenü.
  • Seite 20: Setup Menü

    SETUP MENÜ Sie können die Systemeinstellungen des DF individuell einstellen. Wählen Sie im Hauptmenü den Menüpunkt Einstellungen aus und bestätigen Sie Ihre Auswahl mit der Taste auf dem DF oder der OK-Taste auf der Fernbedienung. Sie gelangen außerdem durch Drücken der [SETUP] Taste auf der Fernbedienung direkt in dieses Menü.
  • Seite 21: Einstellmöglichkeiten

    Einstellmöglichkeiten Einstellmöglichkeiten Beschreibung Fotoeinstellungen Anzeigedauer Wählen Sie aus, wie lange ein Bild während einer Diashow angezeigt werden soll. Einstellmöglichkeiten: 3 Sek., 5 Sek., 15 Sek., 1 Min., 15 Min. Fotomodus Wählen Sie zwischen Vollbild- und Standardanzeige der Bilder. Bildübergänge Wählen Sie zwischen zufälligen und einem kontinuierlichen Bildübergang. Bildinformation Hier werden im Vollbildmodus und in der Diashow die Entstehungsdaten des Bildes angezeigt.
  • Seite 22 Kontrast Einstellen des Kontrastes des Displays. Sättigung Einstellen der Farbsättigung des Displays. Auto Run Stellen Sie hier den Modus ein, in dem Ihr Fotorahmen nach dem Einschalten startet (Foto, Hauptmenü, Uhr, Kalender). Einschalten Aktivieren des automatischen Einschaltens. Aus / Einmal / Täglich Ausschalten Aktivieren des automatischen Ausschaltens.
  • Seite 23: Datum Und Uhrzeit Einstellen

    Datum und Uhrzeit einstellen Stellen Sie die Uhrzeit auf dem Intenso DF ein: Wählen Sie im Menü Einstellungen den Menüpunkt Uhr/Kalender Setup aus. Drücken Sie die [ ], [ ] Tasten auf dem DF oder die Tasten auf der Fernbedienung, um den Eintrag Zeiteinstellung auszuwählen und bestätigen Sie die Auswahl.
  • Seite 24: Aktivieren Des Automatischen Ein- Und Ausschaltens

    Aktivieren des automatischen Ein- und Ausschaltens Sie können den DF von Intenso zu einer von Ihnen gewünschten Uhrzeit automatisch ein- und ausschalten lassen. Hinweis: Für diese Funktion muss im Vorfeld die korrekte Uhrzeit eingegeben werden. Wählen Sie im Menü Einstellungen den Menüpunkt Allgemeines Setup aus.
  • Seite 25: Häufig Gestellte Fragen

    Es ist eine Speicherkarte eingesteckt. Der DF kann jedoch nicht von dieser lesen. Was kann ich machen? Als erstes überprüfen Sie bitte, ob diese Karte kompatibel zum DIGITALEN FOTORAHMEN von Intenso ist. Überprüfen Sie danach, ob die Karte in der richtigen Art und Weise in den Kartenslot eingesteckt wurde. Denken Sie bitte auch stützt wird.
  • Seite 26 Warum werden einige Bilder schneller geladen als andere? Bilder mit einer höheren Auflösung benötigen länger bis sie angezeigt werden können. Um die Anzeigegeschwindigkeit zu erhöhen, nutzen Sie bitte Bilder mit einer niedrigeren Auflösung. Hinweis: Der Photo Frame unterstützt eine Auflösung bis 8000*8000 Pixel. Warum startet die Software nicht, obwohl die Stromversorgung gegeben ist und Power auf O Wahrscheinlich liegt ein Systemfehler vor.
  • Seite 27 In welcher Auflösung sollten Bilder sein, um optimal auf dem Display dargestellt werden zu können ? Die beste Auflösung für diesen DF ist 432*234 Pixel. Warum funktionieren die Funktionen: Automatisches Einschalten / Ausschalten nicht, obwohl ich sie aktiviert habe? Stellen Sie sicher, dass Sie die korrekte Uhrzeit eingestellt haben. Wenn die eingestellte Uhrzeit in der Vergangenheit liegt , wird die Funktion zum ersten Mal am nächsten Kalendertag aktiviert.
  • Seite 28: Produkt Spezifikationen

    PRODUKT SPEZIFIKATIONEN Analoges TFT LCD Display Größe: 7 (168mm sichtbare Bilddiagonale) Anzeige Anzeigemodus: 16:10 Auflösung: 432*234 Pixel Input: 100~240V AC, 50/60Hz Netzteil Output: 5V 1A DC USB Host 2.0 Device USB port Unterstützt USB Speichermedien Unterstützte (Secure Digital Card), MMC (MultiMedia Card), MS (Memory Stick) Speicherkarten...
  • Seite 29: Pflege Und Wartung

    PFLEGE UND WARTUNG Pflege Um die Gefahr von elektrischen Stromstößen zu vermeiden, entfernen Sie bitte weder die Schrauben noch das Gehäuse. Benutzen Sie dieses Gerät nicht in der Nähe von Wasser. Setzen Sie dieses Gerät weder Regen noch Feuchtigkeit aus. Stellen Sie keine Gegenstände in der Nähe des Gerätes ab, die Wasser oder andere Flüssigkeiten speichern .
  • Seite 30 Wartung des Gerätes Das Gerät muss ausgeschaltet sein. Sprühen oder tragen Sie niemals eine Flüssigkeit direkt auf das Display oder Gehäuse auf. Säuberung des Displays / Gehäuses / Rahmens Wischen Sie Gehäuse, Rahmen und LCD Display vorsichtig mit einem weichen, fussel - und chemikalienfreien Tuch ab. Verwenden Sie nur Reinigungsmittel, die speziell für LCD-Displays bestimmt sind.
  • Seite 31 Operating Instructions HOTOAGENT...
  • Seite 32 Table of Contents INTRODUCTION ......................................... 1 GENERAL PRODUCT CHARACTERISTICS ................................2 OVERVIEW ..........................................3 REMOTE CONTROL ........................................4 INSERTING BATTERIES INTO REMOTE CONTROL .............................. 5 FASTENING THE FRAME BASE ....................................5 FIRST STEPS..........................................6 USING MEMORY CARDS ......................................7 MAIN MENU ..........................................8 VIEWING PHOTOS ........................................
  • Seite 33 Displaying time and date ....................................... 15 SET-UP MENU .......................................... 16 Setting options........................................17 Setting the time and date ...................................... 19 Activating automatic on/off ....................................20 FAQs............................................21 PRODUCT SPECIFICATIONS....................................24 SERVICE AND MAINTENANCE ....................................25...
  • Seite 34: Introduction

    INTRODUCTION Before using this device please carefully read these operating instructio ns and observe all safety notes. Please store these instructions at a safe place to have an answer at hand whenever you have questions. These instructions have been compiled wit h great care to enable you to safely use all functions of the DF.
  • Seite 35: General Product Characteristics

    GENERAL PRODUCT CHARACTERISTICS Decorative appearance, excellent quality Shows pictures (JPEG) without requiring a computer Automatic slide show with various transition effects and individual display duration Calendar function Timer function Compatible with SD / MMC and MS cards USB slot to connect USB flash drives 2-way control: 7 buttons on the digital photo frame, infrared remote control EN - 2...
  • Seite 36: Overview

    OVERVIEW Front view Side and rear view Infrared sensor Up/Back [ ] button. Press and hold this button for 3 seconds to open SD / MMC / MS card slot the main menu. USB host slot Right [ ] button. Press and hold this button for 3 seconds to open the DC 5V 1A input [ ] left button.
  • Seite 37: Remote Control

    REMOTE CONTROL Power On/ Off Moves the cursor upwards in the selection menu Moves the cursor to the left in the selection menu or back to the previous picture in the slide show mode MENU Starts the main menu Moves the cursor downwards in the selection menu Leaps back to the previous picture in the slide show or back to the previous page in the picture preview menu Zoom in Magnifies picture details...
  • Seite 38: Inserting Batteries Into Remote Control

    INSERTING BATTERIES INTO REMOTE CONTROL Turn your remote control upside down with the buttons facing down. There is a spring on the left side of the battery compartment. Hold it to the right and simultaneously pull out the battery compartment. Insert a CR2025 Lithium battery to the battery compartment with the Plus symbol facing upwards.
  • Seite 39: First Steps

    FIRST STEPS Connect the frame base to the DIGITAL PHOTO FRAME ( DF ). Connect the mains adapter provided with the Plug the other end of the provided mains adapter into the power outlet. Using the device for the first time please select the Language in the appearing window by use of the keys on the rear side or the remote control.
  • Seite 40: Using Memory Cards

    USING MEMORY CARDS Insert SD / MMC / MS cards into the 3-in-1 card slot with the contacts facing the display. USB storage mediums can be connected with the DIGITAL PHOTE FRAME by inserting these mediums into the USB port (USB host). Please note: Please do not insert memory cards by use of force.
  • Seite 41: Main Menu

    MAIN MENU The main menu will automatically open when the device is turned on. Note: If a memory device is connected to the DF, a slide show will automatically start when the device is turned on. If several memory devices are connected to the DF, it will always read the photos on the USB stick first after the device is turned on.
  • Seite 42: Viewing Photos

    VIEWING PHOTOS Playing a slideshow You can use the [ ] button on the remote control to start the slide show from any menu. The slideshow will start with the first photo. To pause the slideshow to view an individual photo, press the [ ] button on the DF or the OK button on the remote control. Press the [ ] button on the DF or the OK button on the remote control again to continue with the slideshow.
  • Seite 43: Photo Preview Menu

    Photo preview menu The photos on the selected device are displayed as thumbnails in the photo preview menu. Up to 15 thumbnails can be displayed at a single time. Select a memory device from the main menu (USB, SD/MMC/MS) and press the button on the DF or the OK button on the remote control.
  • Seite 44: Viewing And Individual Photo

    Viewing and individual photo You can select an individual photo to be displayed. Select a photo from the photo preview menu and press the button on the DF or the OK button on the remote control. The photo will then be displayed in full view and the symbol will appear in the upper right corner of the screen.
  • Seite 45: Changing The View

    Changing the view You can change the viewing mode while viewing an individual photo or watching a slideshow by pressing the [4:3/16:10] button on the remote control. 4:3: When this option is selected, a photo that is saved in 4:3 will be displayed in its original format with a black border on the left and right side.
  • Seite 46: Using The Osd Menu

    Using the OSD Menu You can perform the following actions from the OSD menu. Press the [OSD] button on the remote control or press and hold the [ ] button on the DF for 3 seconds. The slideshow will stop and the OSD menu will open. Note: If you do not make a selection within the amount of time given, the OSD menu disappear.
  • Seite 47 Press the [ ], [ ] buttons on the DF or the buttons on the remote control to navigate between the different options. To pause or continue to slideshow, select the symbol and press the button on the DF or the OK button on the remote control.
  • Seite 48: Displaying Time And Date

    Displaying time and date In this mode, the current time, date, day and a smaller version of the slideshow of the available photos is displayed. Select Clock from the main menu. Press the [ ] button on the remote control or press and hold [ ] button the DF for 3 seconds to return to the main menu.
  • Seite 49: Set-Up Menu

    SET-UP MENU You can create indiviudal settings for the DF. Select Settings from the main menu and confirm your selection with button on the DF or with the OK button on the remote control. You can also open this menu directly by pressing the [SET-UP] button on the remote control.
  • Seite 50: Setting Options

    Setting options Setting options Description Photo settings Display time Select the amount of time to display each picture during the slideshow. You can choose from: 3 sec, 5 sec., 15 sec., 1 min, 15 min Photo mode Choose between full view and standard view. Transition mode Choose between random and continual transition.
  • Seite 51 Auto Run Select the starting mode for when the device is turned on (photo, main menu, clock, calendar). Activate automatic start. Off / Once / Daily Activate automatic shut off. Off / Once / Daily Warn time Select the amount warn time for a selection to be made (in the OSD menu, for example). Original settings Restore the original settings.
  • Seite 52: Setting The Time And Date

    Setting the time and date Set the time on the Intenso DF as follows: Select Clock/Calendar set-up from the settings menu. Press the [ ], [ ] buttons on the DF or the buttons on the remote control to select the time settings and confirm your selection.
  • Seite 53: Activating Automatic On/Off

    Activating automatic on/off You can set your Intenso DF to automatically turn on/off at a desired time. Note: You must set the clock to the correct time before this function can be used. Select General Set-up from the settings menu.
  • Seite 54: Faqs

    Some not so widespread storage mediums are not compatible with the DF. Please use a compatible card. Please bear in mind that A memory card is inserted but the DF cannot read this card. What can I do? At first please check if this card is actually compatible with Intenso's DIGITAL PHOTOFRAME. supported.
  • Seite 55 Why are some pictures loaded faster than others? Pictures with a high resolution need longer times to be displayed. To increase the loading speed please use pictures with a lower resolution. Please note: The photo frame supports a resolution of up to 8000*8000 pixels. Why does the software not start although power supply is ensured and the power This might be a system error.
  • Seite 56 What is the ideal resolution to display pictures on the DF? The ideal resolution for this DF is 432*234 pixels. Why do the functions: Automatic power-on / off not work although I have enabled them? Please make sure your time settings are correct. If the set time is in the past, the function will be enabled on the next cal endar day for the first time.
  • Seite 57: Product Specifications

    PRODUCT SPECIFICATIONS Analog TFT LCD Display size: 7 inch (168 mm visible screen size) Display Display modus: 16:10 Resolution: 432*234 pixels Input: 100~240V AC, 50/60Hz Mains adapter Output: 5V 1A DC USB Host 2.0 Device USB port Supports USB storage mediums Memory cards supported JPEG, max.
  • Seite 58: Service And Maintenance

    SERVICE AND MAINTENANCE Service To avoid risks of electric shocks please do not remove screws or the housing. Do not use the device in the vicinity of water. Do not expose the device to rain or moisture . Do not place any objects in the vicinity of the device that store water or any other liquids.
  • Seite 59: Device Maintenance

    Device Maintenance THE DEVICE MUST BE SWITCHED OFF. NEVER SPRAY OR APPLY LIQUID SUBSTANCES DIRECTLY ONTO THE DISPLAY OR THE HOUSING. Cleaning the display / housing / frame Clean the housing, frame and LCD display carefully with a soft cloth which is free of lint and chemicals. Only use cleaning a gents which are suitable for cleaning LCD displays.
  • Seite 60 Intenso OTOAGENT...
  • Seite 61 Sommario INTRODUZIONE ......................................... 1 CARATTERISTICHE GENERALI DEL PRODOTTO ..............................2 RIEPILOGO ..........................................3 TELECOMANDO ........................................4 INSERIMENTO DELLA BATTERIA NEL TELECOMANDO ............................5 FISSAGGIO DEL PIEDINO ......................................5 I PRIMI PASSI ..........................................6 USO DI SCHEDE DI MEMORIA ....................................7 MENU PRINCIPALE ........................................
  • Seite 62 Visualizzazioni di orario e calendario ..................................15 MENU IMPOSTAZIONI ......................................16 Possibilità di impostazione ....................................17 Possibilità di .......................................... 17 impostazione ......................................... 17 Impostare data e orario ......................................19 ..........................20 DOMANDE FREQUENTI ......................................21 SPECIFICAZIONI DEL PRODOTTO ..................................24 CURA E MANUTENZIONE .......................................
  • Seite 63: Introduzione

    INTRODUZIONE Grazie di aver deciso di acquistare una CORNICE DI FOTO DIGITALE ( CF ) di Intenso. enze. Raccomandiamo di conservare in un luogo sicuro queste istruzioni al fine di poter rispondere in modo indipendente a eventuali domande. Il contenuto di queste istruzioni è strutturato in modo tale che Lei possa utilizzare in modo sicuro tutte le funzio ni della La CF Le permette di guardare le foto digitali direttamente dalla scheda di memoria della Sua videocamera.
  • Seite 64: Caratteristiche Generali Del Prodotto

    CARATTERISTICHE GENERALI DEL PRODOTTO Aspetto decorativo, alto livello qualitativo Visualizzazione di foto (JPEG) senza computer Diashow automatico con effetti di passaggio e durata di visualizzazione personalizzata Funzione calendario Funzione timer Compatibile con schede SD / MMC / MS Porta USB per il collegamento di memorie di massa USB 2 percorsi di comando: 7 tasti sul retro della CF, telecomando infrarosso IT - 2...
  • Seite 65: Riepilogo

    RIEPILOGO Vista fronte Vista laterale e vista retro Sensore infrarosso Tasto Avanti/Indietro [ ]. Tenga premuto questo tasto per 3 secondi Slot schede SD / MMC / MS per richiamare il menu principale. USB Host Tasto destro [ ]. Tenga premuto questo tasto per 3 secondi per Entrata DC 5V 1A [ ] Tasto sinistro.
  • Seite 66: Telecomando

    TELECOMANDO Power acceso/ spento . nel modo diashow MENU Richiamare il menu principale Muove il cursore verso il basso nel menu di selezione Ritorno alla foto precedente nel diashow o indietro alla pagina precedente nel modo anteprima immagine Zoom In 4:3/16:10 Selezione della visualizzazione immagine: 4:3 , 16:10 SETUP...
  • Seite 67: Inserimento Della Batteria Nel Telecomando

    INSERIMENTO DELLA BATTERIA NEL TELECOMANDO Posizioni il telecomando con i tasti verso il basso. Prema la molla a sinistra del comparto delle batterie verso destra, estraendo allo stesso tempo il comparto delle batterie. Inserisca una batteria di litio CR202 La preghiamo di attenersi a quanto segue: La preghiamo di assicurare uno smaltimento delle batterie corrispondente alle prescrizioni legali.
  • Seite 68: I Primi Passi

    I PRIMI PASSI Fissi il piedino sulla CORNICE DI FOTO DIGITALE ( CF ). Colleghi il comp Posizioni il regolatore della CF nella posizione idioma dopo la prima accensione nella finestra che appare mediante i tasti sul retro o con il telecomando. Confermi la Sua selezione con il tasto [ ] sul retro oppure con il tasto OK del telecomando. IT - 6...
  • Seite 69: Uso Di Schede Di Memoria

    USO DI SCHEDE DI MEMORIA Inserisca le schede SD / MMC / MS con i contatti in direzione dello schermo nello slot di 3 carte in 1. Colleghi le chiavi USB con la CORNICE DI FOTO DIGITALE, inserendo le chiavi nella porta USB (host USB). Avviso: La preghiamo di non inserire le schede di memoria con forza.
  • Seite 70: Menu Principale

    MENU PRINCIPALE ipale. Avviso: Se ha collegato un mezzo di memoria con il DF, Se diversi mezzi di memoria sono collegati con il DF, legge sempre prima le immagini dalla chiave USB. il menu delle impostazioni. Viene visualizzato con la chiave USB collegata. Scheda memoria.
  • Seite 71: Visualizzazione Di Foto

    VISUALIZZAZIONE DI FOTO Riproduzione di uno show di diapositive In ogni menu può utilizzare il tasto [ ] sul telecomando per iniziare lo show di diapositive. Esso inizia rispettivamente con la prima foto. Per interrompere lo show di diapositive e per visualizzare una singola foto prema il tasto DF o il tasto OK sul telecomando.
  • Seite 72: Menu Di Anteprima Delle Immagini

    Menu di anteprima delle immagini Le immagini sul mezzo di memoria selezionato sono riprodotte quali immagini in miniatura. Si possono visualizzare in contemporanea fino a 15 immagini. Selezioni un mezzo di memoria (USB, SD/MMC/MS) nel menu principale e prema il tasto DF o il tasto OK sul telecomando.
  • Seite 73 Può DF o il tasto OK sul tel [ ] sul visualizzata nella modalità di immagine completa e vede il simbolo in alto a destra dello schermo. Per visualizzare la foto precedente o quella successiva, prema i tasti [ ], [ ] sul DF o i tasti sul telecomando.
  • Seite 74: Modifica Della Modalità Di Visualizzazione

    Modifica della modalità di visualizzazione [4:3/16:10] sul telecomando può cambiare la modalità di visualizzazione. 4:3: :3 viene visualizzata nel formato originale con la barra nera sul bordo sinistro e destro. 16:10: in forma allungata e come immagine completa. Avviso: Una foto memorizzata nel formato 16:10 può essere rappresentata solo nel formato 16:10. La funzione sovra menzionata nel caso delle foto con risoluzione inferiore a 432*234 pixel non è...
  • Seite 75: Impiego Del Menu Osd

    Impiego del menu OSD Può utilizzare il menu OSD per eseguire le operazioni riportate qui a seguito. [OSD] sul telecomando o tenga premuto il tasto [ ] sul DF per 3 secondi. Il menu OSD appare sullo schermo e lo show di diapositive viene interrotto. Avviso: Se non inserisce nulla nel tempo di avviso da Lei selezionato, il menu OSD viene nascosto.
  • Seite 76 Prema i tasti [ ], [ ] sul DF o i tasti sul telecomando per navigare tra le funzioni. Per interrompere la continuazione dello show delle diapositive, La preghiamo di selezionare il simbolo e di premere [ ] sul OK sul telecomando. DF o il tasto Per ingrandire la foto, La preghiamo di selezionare il simbolo e di premere ripetutamente il tasto...
  • Seite 77: Visualizzazioni Di Orario E Calendario

    Visualizzazioni di orario e calendario In questa modalità si visualizzano orario attuale, la data attuale, il giorno attuale della settimana e uno show di diapositive rimpicciolito con le immagini disponibili. Selezioni il punto del menu orario nel menu principale. Premendo il tasto [ ] sul telecomando o tenendo premuto per 3 secondi il tasto [ ] sul DF ritorna al menu principale.
  • Seite 78: Menu Impostazioni

    MENU IMPOSTAZIONI Lei può eseguire le impostazioni di sistema del DF a livello personalizzato. Selezioni il punto del menu Impostazioni nel menu principale e confermi la Sua selezione con il tasto sul DF o il tasto OK sul telecomando. Inoltre premendo il tasto [SETUP] sul telecomando arriva direttamente in questo menu.
  • Seite 79: Possibilità Di Impostazione

    Possibilità di impostazione Possibilità di Descrizione impostazione Impostazioni foto Durata di visualizzazione diapositive. Possibilità : 3 sec., 5 sec., 15 sec., 1 min., 15 min. Modalità foto Selezioni tra indicazione immagine piena e standard delle immagini. Passaggi immagine Selezioni tra passaggio immagine casuale e continuativo. Informazione foto Qui si visualizzano i dati di creazione della foto nella modalità...
  • Seite 80 Impostazione Lingua Selezioni la lingua desiderata. generale Luminosità Impostazione della luminosità dello schermo. Contrasto Impostazione del contrasto dello schermo. Saturazione Impostazione della saturazione cromatica dello schermo. Auto Run (foto, menu principale, orologio, calendario). Accendere Acceso / Una volta / Ogni giorno Spegnere Attivazione dello spegnimento automatico.
  • Seite 81: Impostare Data E Orario

    DF o il tasto OK sul telecomando. [ ] sul retro del Imposti la data sul DF di Intenso: Selezioni nel Menu impostazioni il punto del menu Orologio/Calendario impostazione. Prema i tasti [ ], [ ] sul DF o i tasti Data e confermi la selezione.
  • Seite 82 Attiva Può accendere e spegnere automaticamente il DF di Intenso ad un orario da Lei desiderato. Avviso: Selezioni nel Menu impostazioni il punto di menu Impostazione generale. Prema i tasti [ ], [ ] sul DF o i tasti sul telecomando per selezionare il punto di menu Accendere o Spegnere e confermi la Sua selezione.
  • Seite 83: Domande Frequenti

    Alcuni mezzi di memoria non molto diffuso non sono compatibili con la CF. La preghiamo di usare una scheda compatibile. La Innanzitutto La preghiamo di controllare se questa scheda è compatibile con la CORNICE DI FOTO DIGITALE di Intenso. Verifichi dunque se la scheda è stata inserita in modo corretto nello slot della scheda. La preghiamo di voler anche consider are il unico formato file supportato è...
  • Seite 84 Per quale motivo alcune immagini si caricano più rapidamente rispetto ad altre? Immagini con una risoluzione superiore necessitano più tempo per essere visualizzate. Per aumentare la velocità di visualizzazione, La preghiamo di utilizzare immagini con una risoluzione ridotta. Avviso: La cornice di foto supporta una risoluzione fino a 8000*8000 Pixel. Probabilmente si ha un errore di sist alcuni secondi.
  • Seite 85 In che risoluzione devono essere le immagini per poter essere riprodotte in modo ottimale sullo schermo? La miglior risoluzione per questa CF è di 432*234 Pixel. Per quale motivo le funzioni Accensione automatica / Spegnimento automatico non funzionano, anche se le ho attivate? to, la funzione viene attivata per la prima volta appena nel corso del prossimo giorno del calendario .
  • Seite 86: Specificazioni Del Prodotto

    SPECIFICAZIONI DEL PRODOTTO TFT LCD analog Visualizzazione Modo di visualizzazione: 16:10 Risoluzione: 432*234 Pixel Input: 100~240V AC, 50/60Hz Adattatore Output: 5V 1A DC USB Host 2.0 Porta USB Supporta le chiavi di memoria USB Schede di memoria (Secure Digital Card), MMC (MultiMedia Card), MS (Memory Stick) supportate...
  • Seite 87: Cura E Manutenzione

    CURA E MANUTENZIONE Cura Per evitare il pericolo di scosse elettriche La preghiamo di non levare viti e/o involucro. Non depositi oggetti che conservano acqua o altri liquidi parecchiatura. Non installi questa cornice di foto vicino a termosifoni, fori o altre apparecchiature che producono calore. Lasci questo lavoro al personale specializzato.
  • Seite 88: Smaltimento Di Apparecchiature Elettroniche Usate

    Pulizia di schermo / involucro / cornice Utilizzi esclusivamente detergenti appositamente destinati agli schermi LCD. Smaltimento di apparecchiature elettroniche usate Le apparecchiature caratterizzate con questo simbolo sottostanno alla direttiva CEE/2002/96. Tutte le apparecchiature elettroniche ed elettriche usate devono essere smaltite separatamente dai rifiuti domestici pressi i punti di smaltimento previsti dallo stato.
  • Seite 90 Table des Matières INTRODUCTION ......................................... 1 CARACTERISTIQUES GENERALES DU PRODUIT ..............................2 VUE D'ENSEMBLE ........................................3 TELECOMMANDE ........................................4 METTRE LES PILES DANS LA TELECOMMANDE ..............................5 FIXATION DU SUPPORT ......................................5 PREMIERS PAS .......................................... 6 UTILISATION DE CARTES DE MEMOIRE ................................7 MENU PRINCIPAL ........................................
  • Seite 91 Affichage de l'heure et de la date ..................................15 MENU D'INSTALLATION ......................................16 Définition des options ......................................17 Réglage de l'heure et la date ....................................19 Activation marche / arrêt automatique .................................. 20 QUESTIONS FREQUEMMENT POSEES ................................21 CARACTÉRISTIQUES DU PRODUIT ..................................24 SOIN ET ENTRETIEN .......................................
  • Seite 92: Introduction

    INTRODUCTION Nous (CPN) Intenso. Nous vous e pouvoir répondre indépendamment à des questions survenant éventuellement plus tard. Le contenu de cette instruction vous permet de profiter de toutes les fonctions du CPN . Le CPN vous permet de regarder des photos numériques directement de la carte de m émoire de votre appareil photo. Vous avez la possibilité...
  • Seite 93: Caracteristiques Generales Du Produit

    CARACTERISTIQUES GENERALES DU PRODUIT Apparence décorative, bonne qualité Visualisation de photos (JPEG) sans ordinateur Diaporama automati Fonction Calendrier Fonction Réveil Compatible avec cartes SD / MMC / MS Fente USB pour la connexion de mémoires de masse USB 2 possibilités de navigation N ou télécommande infrarouge FR - 2...
  • Seite 94: Vue D'ensemble

    VUE D'ENSEMBLE Vue de face Côté et vue arrière Capteur infrarouge Touche haute / Retour [ ]. Appuyez et maintenez cette touche SD / MMC / MS emplacement de carte pendant 3 secondes pour ouvrir le menu principal. Port USB Touche [ ] droite.
  • Seite 95: Telecommande

    TELECOMMANDE Power On/ Off Bouge le curseur en amont dans le menu de choix Bouge le curseur MENU Appeler le menu principal Bouge le curseur en aval dans le menu de choix Affiche la photo précédente dans le diaporama ou la page précédente du m Zoom In 4:3/16:10 : 4:3, 16:10...
  • Seite 96: Mettre Les Piles Dans La Telecommande

    METTRE LES PILES DANS LA TELECOMMANDE Placez la télécommande à tel point que les touches montrent vers le bas. Pousser le ressort à la côté gauche du compartiment à piles à droite et dégagez le compartiment en même temps. Mettez une pile de lithium CR2025 dans le compartiment, le symbole « + » montre vers le haut. Poussez le compartiment à...
  • Seite 97: Premiers Pas

    PREMIERS PAS Fixer le support au cadre photo numérique (CPN). Pousser le régulateur du CPN vers la position « On ». Après la première mise en marche, vous pouvez choisir la langue de la télécommande. Valieder le choix avec la touche [ ] OK de la télécommande.
  • Seite 98: Utilisation De Cartes De Memoire

    UTILISATION DE CARTES DE MEMOIRE Mettez les cartes SD / MMC / MS dans la fente trois en un. Connectez le module de mémoire au CPN en mettant les modules dans la fente USB Host. Remarques : carte SD / MMC ou MS Pour déconnecter des cartes du CPN, dégagez-les prudemment de la fente de carte.
  • Seite 99: Menu Principal

    MENU PRINCIPAL Le menu principal s'ouvre automatiquement lorsque l'appareil est allumé. Note : Si une carte mémoire est connectée au DF, un diaporama démarrera automatiquement lorsque l'appareil est allumé. Si plusieurs dispositifs de mémoire sont connectés au DF, il va toujours lire les photos stockées sur la clé USB premier après que l'appareil est allumé. Vous pouvez sélectionner la carte mémoire (s) connecté...
  • Seite 100: Visualisation De Photos

    VISUALISATION DE PHOTOS Création d'un diaporama Vous pouvez utiliser la touche [ ] sur la télécommande pour démarrer le diaporama à partir de n'importe quel menu. Le diaporama va commencer avec la première photo. Pour interrompre le diaporama pour afficher une photo individuelle, appuyez sur la touche [ ] sur le DF ou sur la touche OK de la télécommande.
  • Seite 101: Menu De Prévisualisation De Photo

    Menu de prévisualisation de photo Les photos sur l'appareil sélectionné sont affichées sous forme de vignettes de prévisualisation dans le menu photo. Jusqu'à 15 vignettes peuvent être affichées à un seul moment. Sélectionnez un périphérique mémoire à partir du menu principal (USB, SD / MMC / MS) et appuyez sur la touche sur le DF ou sur la touche OK de la télécommande.
  • Seite 102: Affichage D'une Photo Unique

    Affichage d'une photo unique Vous pouvez sélectionner une photo individuelle pour être affichée. Sélectionnez une photo dans le menu Aperçu de la photo et appuyez sur la touche sur le DF ou sur la touche OK de la télécommande. La photo sera ensuite affichée à la vue et le symbole apparaîtra dans le coin supérieur droit de l'écran.
  • Seite 103: Changement De L'affichage

    Changement de l'affichage Vous pouvez changer le mode d'affichage lors de l'affichage d'une photo ou regarder un diaporama en appuyant sur la touche [4:3 / 16:10] bouton sur la télécommande. 4:3: Lorsque cette option est sélectionnée, une photo qui est enregistrée en 4:3 sera affichée dans son format d'origine avec une bordure noire sur le côté...
  • Seite 104: Utilisation Du Menu Osd

    Utilisation du menu OSD Vous pouvez effectuer les actions suivantes dans le menu OSD. Appuyez sur la touche [OSD] sur la télécommande ou appuyez et maintenez la touche [ ] sur le DF pendant 3 secondes. Le diaporama s'arrête et le menu OSD va s'ouvrir. Note : Si vous ne faites pas une sélection au sein de la quantité...
  • Seite 105 Appuyez sur les touches [ ], [ ] sur le DF ou sur les touches sur la télécommande pour naviguer entre les différentes options. Pour faire une pause ou continuer le diaporama, sélectionnez le symbole et appuyez sur la touche sur le DF ou sur la touche OK de la télécommande.
  • Seite 106: Affichage De L'heure Et De La Date

    Affichage de l'heure et de la date Dans ce mode, l'heure actuelle, la date, le jour et une version plus petite du diaporama des photos disponibles sont affichés. Sélectionnez l'horloge dans le menu principal. Appuyez sur la touche [ ] sur la télécommande ou appuyez sur la touche et maintenez sur la touche [ ]DF pendant 3 secondes pour revenir au menu principal.
  • Seite 107: Menu D'installation

    MENU D'INSTALLATION Vous pouvez créer des paramètres individuel pour le DF. Sélectionnez les paramètres dans le menu principal et validez votre sélection avec la touche sur le DF ou avec la touche OK de la télécommande. Vous pouvez également ouvrir ce menu directement en appuyant sur la touche [SET-UP] sur la télécommande.
  • Seite 108: Définition Des Options

    Définition des options Définition des options Déscription Paramètres photo Affichage du temps Sélectionnez la quantité de temps d'affichage de chaque image pendant le diaporama. Vous pouvez choisir entre : 3 sec., 5 sec., 15 sec., 1 min., 15 min. Mode Photo Choisir entre la vue et d'affichage standard.
  • Seite 109 Exécution automatique Sélectionnez le mode de départ lorsque l'appareil est sous tension (photo, le menu principal, horloge, calendrier). Marche Activer le démarrage automatique. Arrêt / Une fois / Quotidien Arrêt Activer arrêt automatique. Déclenché / Une fois / Quotidien Avertissement temps Sélectionnez le montant avertir temps pour une sélection effectuée (dans le menu OSD, par exemple).
  • Seite 110: Réglage De L'heure Et La Date

    Pour confirmer votre saisie, appuyez sur la touche sur le dos de la DF ou sur le bouton OK sur la télécommande. Réglez la date sur le DF Intenso comme il suite : Sélectionnez Horloge / Calendrier mis en place à partir du menu des paramètres.
  • Seite 111: Activation Marche / Arrêt Automatique

    Activation marche / arrêt automatique Vous pouvez configurer votre Intenso DF pour éteindre automatiquement marche / arrêt à une heure désirée. Note : Vous devez régler l'horloge à l'heure correcte avant de pouvoir utiliser cette fonction. Sélectionnez les Paramètres Généraux à partir du menu des paramètres.
  • Seite 112: Questions Frequemment Posees

    QUESTIONS FREQUEMMENT POSEES dur et est soumis aux directives du SI (Système International equel 1024 MB correspondent à 1 GB. Dans le standard SI, 1000 MB correspondent à 1 GB. A cause des ces calculs différents, il y a une différence entre les indications de capacité.
  • Seite 113 Pourquoi quelquels images sont . Pour diminuer la durée, utilisez des images avec une Remarque : Le cadre photo numérique peut afficher des photos avec une résolution de 8000*8000 pixels au maximum. Il existe probablement une erreur de système. Lancez le logiciel de nouveau en coupant quelques secondes.
  • Seite 114 ran ? Une résolution de 432*234 pixels est optimale pour ce CPN. Pourquoi les fonctions « Mise en marche/hors marche automatique » ne marche pas bien que je les aie activées ? sé, la fonction sera activée le lendemain pour la première fois.
  • Seite 115: Caractéristiques Du Produit

    CARACTÉRISTIQUES DU PRODUIT TFT LCD analogue 7 pouces Affichage ffichage: 16:10 Résolution : 432*234 Pixels Input: 100~240V AC, 50/60Hz; Output: 5V 1A DC Hôte USB 2.0 Port USB Soutient les supports de mémoire USB Soutient les cartes Secure Digital Card), MMC MultiMedia Card), MS Memory Stick) mémoire...
  • Seite 116: Soin Et Entretien

    SOIN ET ENTRETIEN Ne posez pas des objets s émettant de la chaleur. orifice du CPN. Ainsi, vous évitez des chargements électrostatiques. Connecter tous les raccordements correctement et sûrement . Le cadre photo numérique ne peut lire que des formats compatibles. Des images peuvent être soumises au copyright.
  • Seite 117 n chiffon tendre, sans peluches et sans produits chimiques. Mise en rebut de vieux appareils électro Les appareils marqués avec ce symbole sont soumis à la directive européenne 2002/96/EC. tat. FR - 26...
  • Seite 118 Instrucciones de uso Intenso AGENT...
  • Seite 119 Índice INTRODUCCIÓN ......................................... 1 CARACTERÍSTICAS GENERALES DEL PRODUCTO ............................2 VISIÓN GENERAL ........................................3 MANDO A DISTANCIA ....................................... 4 COLOCAR LAS PILAS EN EL MANDO A DISTANCIA ............................5 FIJACIÓN DEL SOPORTE ......................................5 PRIMEROS PASOS ........................................6 UTILIZACIÓN DE LAS TARJETAS DE MEMORIA ..............................7 MENÚ...
  • Seite 120 Visualización de la hora y del calendario ................................15 MENÚ DE CONFIGURACIÓN (SET UP) ................................. 16 Posibilidades de configuración ..................................... 17 Configuración de la fecha y la hora ..................................19 Activación del encendido y apagado automático ..............................20 PREGUNTAS MÁS FRECUENTES ..................................21 ESPECIFICACIONES DEL PRODUCTO .................................
  • Seite 121: Introducción

    INTRODUCCIÓN Gracias por haber elegido el MARCO DE FOTOS DIGITAL (MD) de Intenso. Antes de utilizar este producto le rogamos que lea con atención el manual de instrucciones y que tenga en cuenta las advertencias de seguridad. Le recomendamos que guarde estas instrucciones para poder responder de manera independiente a eventuales preguntas que se le presenten.
  • Seite 122: Características Generales Del Producto

    CARACTERÍSTICAS GENERALES DEL PRODUCTO Aspecto decorativo, buena calidad Presentación de fotos (JPEG) sin necesidad de ordenador Presentación automática de diapositivas con efecto de transición y definición individual de la duración de la visualización Función de calendario Función timer Compatible con tarjetas SD / MMC / MS Enchufe para USB para conectar memorias USB 2 modos de manejo: 7 teclas en la parte posterior del MD, mando a distancia infrarrojo ES - 2...
  • Seite 123: Visión General

    VISIÓN GENERAL Visión frontal Visión lateral y posterior Sensor de infrarrojo [ ] Tecla arriba/atrás. Mantenga pulsada esta tecla durante 3 Ranura para tarjeta SD / MMC / MS segundos, para acceder al menú principal. Puerto USB [ ] Tecla derecha. Mantenga pulsada esta tecla durante 3 segundos, Entrada DC 5V 1A para acceder al menú...
  • Seite 124: Mando A Distancia

    MANDO A DISTANCIA Power On/ Off (encendido/apagado) Mueve el cursor hacia arriba en el menú de selección Mueve el cursor hacia la izquierda en el menú de selección o retrocede a la imagen anterior en el modo de presentación de diapositivas MENU Abre el menú...
  • Seite 125: Colocar Las Pilas En El Mando A Distancia

    COLOCAR LAS PILAS EN EL MANDO A DISTANCIA Coloque el mando a distancia con las teclas hacia abajo. Oprima el resorte a la izquierda del compartimento para pilas hacia la derecha y al mismo tiempo tire del compartimento hacia afuera. Coloque una pila de litio CR2025 en el compartimento para pilas con el símbolo + hacia arriba.
  • Seite 126: Primeros Pasos

    PRIMEROS PASOS Fije el soporte al MARCO DE FOTOS DIGITAL ( MD ). Conecte la fuente de alimentación incluida al MD. Conecte el otro extremo de la fuente de alimentación al enchufe de corriente. Para ponerlo en funcionamiento por primera vez seleccione tras la primera conexión el idioma en la ventana que aparece mediante la tecla en la parte posterior o usando el mando a distancia.
  • Seite 127: Utilización De Las Tarjetas De Memoria

    UTILIZACIÓN DE LAS TARJETAS DE MEMORIA Introduzca las tarjetas SD / MMC / MS con los contactos mirando hacia la pantalla en la ranura 3 en 1 para tarjetas. Conecte la memoria USB al MARCO DE FOTOS DIGITAL introduciendo la memoria en la ranura para USB (USB Host) Advertencias: No introduzca la tarjeta de memoria por la fuerza.
  • Seite 128: Menú Principal

    MENÚ PRINCIPAL Cuando enciende el aparato aparece inmediatamente el menú principal. Advertencia: si ha conectado una unidad de memoria al marco de fotos digital (MFD), cuando se encienda el aparato se iniciará inmediatamente la presentación de diapositivas. Cuando están conectadas varias unidades de memoria al MFD, al encender el aparato se leerán primero las imágenes en la memoria USB.
  • Seite 129: Visualización De Fotos

    VISUALIZACIÓN DE FOTOS Ver una sesión de diapositivas Puede usar la tecla [ ] en el mando a distancia, para iniciar una presentación de diapositivas desde cualquier menú. Se iniciará siempre con la primera foto. Para detener la presentación de diapositivas y mostrar una única foto, pulse la tecla en el MFD o la tecla OK en el mando a distancia.
  • Seite 130: Menú De Previsualización De Imágenes

    Menú de previsualización de imágenes Las imágenes del soporte de memoria seleccionado se presentarán en miniatura. Se pueden mostrar así hasta 15 imágenes. Seleccione un soporte de memoria en el menú principal (USB, SD/MMC/MS) y pulse la tecla OK en el mando a distancia. [ ] en el MFD o la tecla Para navegar por las fotos en miniatura use las teclas [ ],[ ],[ ],[ ] en el MFD o las teclas...
  • Seite 131: Mostrar Una Sola Imagen

    Mostrar una sola imagen También puede seleccionar una sola imagen. Elija una imagen del menú de previsualización de imagen y pulse la tecla en el MFD o la tecla OK en el mando a distancia. La imagen se presentará a pantalla completa y aparecerá el símbolo en la esquina superior derecha de la pantalla.
  • Seite 132: Cambiar El Modo De Visualización

    Cambiar el modo de visualización Durante la visualización de una imagen o durante una presentación de diapositivas, pulsando la tecla [4:3/16:10] en el mando a distancia, puede cambiar el modo de visualización. 4:3: Seleccionando 4:3:, una imagen guardada en formato 4:3, se mostrará en formato original con los márgenes izquierdo y derecho en negro.
  • Seite 133: Uso Del Menú Osd

    Uso del menú OSD Puede usar el menú OSD para ejecutar las siguientes funciones: Mientras visualiza una foto o una presentación de diapositivas, pulse la tecla [OSD] en el mando a distancia o mantenga pulsada la tecla [ ] del MFD durante 3 segundos. Aparece el menú...
  • Seite 134 Pulse las teclas [ ], [ ] en el MFD, o las teclas en el mando a distancia, para navegar por las funciones. Para detener la presentación de diapositivas o proseguir con ella, seleccione el símbolo y pulse la tecla [ ] en el MFD o la OK en el mando a distancia.
  • Seite 135: Visualización De La Hora Y Del Calendario

    Visualización de la hora y del calendario En este modo se mostrará la hora y la fecha actual, el día de la semana actual y una presentación de diapositivas en miniatura de las imágenes disponibles. Seleccione el punto del menú Reloj en el menú principal. Si pulsa la tecla [ ] en el mando a distancia o mantiene pulsada durante 3 segundos la tecla [ ] en el MFD, volverá...
  • Seite 136: Menú De Configuración (Set Up)

    MENÚ DE CONFIGURACIÓN (SET UP) Puede establecer la configuración del sistema del MFD de forma individual. Seleccione el punto del menú Configuración en el menú principal y confirme su selección con la tecla en el MFD o con la tecla OK en el mando a distancia.
  • Seite 137: Posibilidades De Configuración

    Posibilidades de configuración Posibilidades de Descripción Configuración Configuración de Duración de Seleccione el tiempo de visualización de las fotos durante una presentación de fotos visualización diapositivas. Posible configuración: 3 seg., 5 seg., 15 seg., 1 min., 15 min. Modo de fotos Puede elegir entre la visualización estándar de la imagen o a pantalla completa.
  • Seite 138 Configuración Lengua Seleccione la lengua que desee. general Brillo Configuración del brillo de la pantalla Contraste Configuración del contraste de la pantalla. Satinado Configuración del satinado de la pantalla. Auto Run Configure aquí el modo con el que debe iniciarse su MFD cuando lo enciende (foto, menú principal, reloj, calendario).
  • Seite 139: Configuración De La Fecha Y La Hora

    Configuración de la fecha y la hora Configure la hora del MFD de intenso: Seleccione en Configuraciones del menú el punto del menú Configuración de la hora/calendario. Pulse las teclas [ ], [ ] en el MFD o las teclas en el mando a distancia, para seleccionar Configuración de la hora, y...
  • Seite 140: Activación Del Encendido Y Apagado Automático

    Activación del encendido y apagado automático Puede programar su MFD de Intenso para que se encienda y/o apague de forma automática a la hora que usted desee. Advertencia: para esta función es preciso configurar primero la hora actual. Seleccione en Configuraciones del Menú el punto del menú Configuración general.
  • Seite 141: Preguntas Más Frecuentes

    He introducido una tarjeta de memoria. No obstante, el MD no puede leerla. ¿Qué puedo hacer? En primer lugar, compruebe que esa tarjeta es compatible con el MARCO DE FOTOS DIGITAL de Intenso . A continuación, asegúrese de que la tarjeta haya sido introducida en la ranura para tarjetas del modo correcto. Tenga también en cuenta que solo se pueden reproducir imágenes en formato de archivo...
  • Seite 142 ¿Por qué algunas imágenes se cargan antes que otras? Imágenes con una alta resolución necesitan más tiempo para ser visualizadas. Para acelerar la velocidad de visualización utilice fotos con una resolución más baja. Advertencia: El marco de fotos soporta una resolución de hasta 8000*8000 pixel. ¿Por qué...
  • Seite 143 ¿Qué resolución deben de tener las imágenes para que se representen de forma óptima? La mejor resolución para este MD es de 432*234 pixel. ¿Por qué no funcionan las funciones conexión y desconexión automáticas a pesar de haberlas activado? Asegúrese de que ha configurado correctamente la hora. Si la hora programada está en el pasado la función se activará por primera vez al día siguiente.
  • Seite 144: Especificaciones Del Producto

    ESPECIFICACIONES DEL PRODUCTO LCD TFT analog Visualización Modo de visualización: 16:10 Resolución: 432*234 Pixel Input: 100~240V AC, 50/60Hz Fuente de alimentación Output: 5V 1A DC USB Host 2.0 Puerto USB Soporta memorias USB Tarjetas de memoria (Secure Digital Card), MMC (MultiMedia Card), MS (Memory Stick) aceptadas...
  • Seite 145: Cuidado Y Mantenimiento

    CUIDADO Y MANTENIMIENTO Para evitar el riesgo de descarga eléctrica no retire ni los tornillos ni la carcasa. No utilice este aparato cerca del agua. No ponga en contacto al aparato ni con lluvia ni con humedad. No coloque cerca del aparato ningún objeto que almacene agua o cualquier otro tipo de líquido.
  • Seite 146: Mantenimiento Del Aparato

    Mantenimiento del aparato EL APARATO DEBE ESTAR DESCONECTADO. NUNCA ROCÍE NI PONGA EN CONTACTO DIRECTO CON LÍQUIDOS EL DISPLAY O LA CARCASA. Limpieza del display / carcasa / marco Limpie cuidadosamente la carcasa, el marco y el display LCD con un paño suave, sin pelusas ni químicos. Emplee solo productos de limpieza especialmente apropiados para displays LCD.
  • Seite 147 Instruções de uso Intenso AGENT...
  • Seite 148 Índice INTRODUÇÃO ..........................................1 CARACTERÍSTICAS GERAIS DO PRODUTO ................................. 2 VISTA GERAL ..........................................3 CONTROLE REMOTO........................................ 4 INSERINDO PILHAS NO CONTROLE REMOTO ..............................5 FIXANDO O PÉ DE APOIO ......................................5 PRIMEIROS PASSOS......................................... 6 UTILIZAÇÃO DE MÍDIAS DE ARMAZENAMENTO ..............................7 MENU PRINCIPAL ........................................
  • Seite 149 Visualização das horas e do calendário ................................15 MENU DE CONFIGURAÇÃO (SET UP) .................................. 16 Possibilidades de configuração .................................... 17 Configuração da data e das horas ..................................19 Activação da ligação e do apagamento automáticos ............................20 PERGUNTAS COMUNS ......................................21 ESPECIFICAÇÕES DE PRODUTO ..................................
  • Seite 150: Introdução

    INTRODUÇÃO Agradecemos pela escolha da Moldura Digital (MD) da Intenso. Antes de utilizar o aparelho, leia com atenção este manual de instruções e observe todos as advertências. Recomendamos guardar este manual de instruções com cuidado, assim eventuais perguntas podem ser respondidas por você mesmo. O conteúdo deste manual está...
  • Seite 151: Características Gerais Do Produto

    CARACTERÍSTICAS GERAIS DO PRODUTO Aparência decorativa, alta qualidade. Visualização de fotos (JPEG) sem computador Slideshow automático com efeitos de transições e tempo de visualização individuais. Função calendário Função Timer Compatível com cartões SD / MMC / MS Entrada USB para conexão com mídias de armazenamento USB 2 opções de controle: 7 teclas na parte traseira da MD, controle remoto infravermelho.
  • Seite 152: Vista Geral

    VISTA GERAL Vista frontal Vista lateral e posterior Sensor de infravermelhos [ ] Tecla para cima/atrás. Mantenha este botão pressionado durante Ranhura para cartões SD / MMC / MS 3 segundos para aceder ao menu principal. Porta USB [ ] Tecla direita. Mantenha este botão pressionado durante 3 segundos Entrada DC 5V 1A para aceder ao menu de configuração.
  • Seite 153: Controle Remoto

    CONTROLE REMOTO Power On/ Off Move o cursor para cima no menu seleção Move o cursor para a esquerda no menu seleção ou para trás para a foto anterior em modo Slideshow MENU Ir para o Menu Principal Move o cursor para trás no menu seleção Volta para foto anterior no Slideshow ou volta para a página anterior no modo de visualização de fotos.
  • Seite 154: Inserindo Pilhas No Controle Remoto

    INSERINDO PILHAS NO CONTROLE REMOTO Posicione o controle remoto com as teclas para baixo. Pressione a mola à esquerda do compartimento de pilhas e puxe, ao mesmo tempo, o compartimento para fora. Encaixe uma pilha CR2025 Litio com o símbolo Mais para cima no compartimento. Empurre todo o compartimento de pilhas de volta para dentro do controle remoto.
  • Seite 155: Primeiros Passos

    PRIMEIROS PASSOS Fixe o pé de apoio na MOLDURA DIGITAL (MD) Conecte o cabo de força incluído na embalagem à MD. Insira a outra extremidade do cabo em uma tomada. Na primeira vez em que for ligada, selecione com as teclas na parte posterior ou no controle remoto o Idioma na janela que aparecer. Confirme sua seleção com a tecla [ ] na parte posterior ou a tecla OK no controle remoto.
  • Seite 156: Utilização De Mídias De Armazenamento

    UTILIZAÇÃO DE MÍDIAS DE ARMAZENAMENTO Insira cartões SD / MMC / MS na entrada de cartões 3em1 com os contatos virados para o display. Conecte a mídia de armazenamento USB com a MD, inserindo-a na entrada USB. (USB Host) Importante: Não utilize violência ao inserir os cartões.
  • Seite 157: Menu Principal

    MENU PRINCIPAL Quando liga o aparelho aparece imediatamente o menu principal. Aviso: Se tiver ligado uma unidade de memória à moldura de fotografias digital (MFD), quando se liga o aparelho inicia-se imediatamente a apresentação de diapositivos. Quando estão ligadas várias unidades de memória à MFD, ao ligar o aparelho serão lidas as imagens na memória USB.
  • Seite 158: Visualização De Fotografias

    VISUALIZAÇÃO DE FOTOGRAFIAS Ver uma sessão de diapositivos Pode usar a tecla [ ] no comando remoto, para iniciar uma apresentação de diapositivos a partir de qualquer menu. Irá iniciar sempre com a primeira fotografia. Para parar a apresentação de diapositivos e mostrar uma única fotografia, pressione a tecla na MFD ou a tecla OK no comando remoto.
  • Seite 159: Menu De Pré-Visualização De Imagens

    Menu de pré-visualização de imagens As imagens do suporte de memória seleccionado serão apresentadas em miniatura. Pode- se mostra assim até 15 imagens. Seleccione um suporte de memória no menu principal (USB, SD/MMC/MS) e pressione a tecla OK no comando remoto. [ ] na MFD ou a tecla Para navegar pelas fotografias em miniatura, use as teclas [ ],[ ],[ ],[ ] na MFD ou as teclas...
  • Seite 160: Mostrar Uma Única Imagem

    Mostrar uma única imagem Também poderá seleccionar só uma imagem. Escolha uma imagem do menu de pré-visualização de imagem e pressione a tecla na MFD ou a tecla OK no comando remoto. A imagem será apresentada no ecrã completo e aparecerá o símbolo no canto superior direito do ecrã.
  • Seite 161: Mudar O Modo De Visualização

    Mudar o modo de visualização Durante a visualização de uma imagem ou durante uma apresentação de diapositivos, pressionando a tecla [4:3/16:10] no comando remoto, poderá mudar o modo de visualização. 4:3: Ao seleccionar 4:3:, uma imagem guardada em formato 4:3, aparecerá em formato original com as margens esquerda e direita a preto.
  • Seite 162: Uso Do Menu Osd

    Uso do menu OSD Poderá usar o menu OSD para executar as seguintes funções: Enquanto visualiza uma fotografia ou uma apresentação de diapositivos, pressione a tecla [OSD] no comando remoto, ou mantenha pressionada a tecla [ ] da MFD durante 3 segundos. Aparece o menu OSD no ecrã...
  • Seite 163 Pressione as teclas [ ], [ ] na MFD, ou as teclas no comando remoto, para navegar pelas funções. Para parar a apresentação de diapositivos ou continuar com ela, seleccione o símbolo e pressione a tecla na MFD ou a tecla OK no comando remoto.
  • Seite 164: Visualização Das Horas E Do Calendário

    Visualização das horas e do calendário Neste modo aparecerão as horas e a data actual, o dia da semana actual e uma apresentação de diapositivos em miniatura das imagens disponíveis. Seleccione o ponto do menu Relógio no menu principal. Se pressionar a tecla [ ] no comando remoto ou mantiver pressionada a tecla [ ] na MFD durante 3 segundos, voltará...
  • Seite 165: Menu De Configuração (Set Up)

    MENU DE CONFIGURAÇÃO (SET UP) Poderá estabelecer a configuração do sistema da MFD de forma individual. Seleccione o ponto do menu Configuração no menu principal e conforme a sua selecção com a tecla OK no [ ] na MFD ou a tecla comando remoto.
  • Seite 166: Possibilidades De Configuração

    Possibilidades de configuração Possibilidades de Descrição configuração Configuração de Duração de visualização Seleccione o tempo de visualização das fotografias durante uma apresentação de fotografias diapositivos. Configuração possível: 3 seg., 5 seg., 15 seg., 1 min., 15 min. Modo de fotografias Poderá...
  • Seite 167 Configuração Língua Seleccione a língua que pretender. geral Brilho Configuração do brilho do ecrã. Contraste Configuração do contraste do ecrã. Acetinado Configuração do acetinada do ecrã. Auto Run Configure aqui o modo com o qual deverá iniciar a sua MFD quando a ligar (fotografia, menu principal, relógio, calendário).
  • Seite 168: Configuração Da Data E Das Horas

    Configuração da data e das horas Configure as horas da MFD Intenso: Seleccione em Configurações do menu o ponto do menu Configuração das horas/calendário. Pressione as teclas [ ], [ ] na MFD, ou as teclas no comando remoto, para seleccionar Configuração das horas e confirme a selecção.
  • Seite 169: Activação Da Ligação E Do Apagamento Automáticos

    Activação da ligação e do apagamento automáticos Poderá programar a sua MFD da Intenso para que esta se ligue e/ou desligue de forma automática à hora que desejar. Aviso: Para esta função, é preciso configurar primeiro as horas actuais. Seleccione em Configurações do Menu o ponto do menu Configuração geral.
  • Seite 170: Perguntas Comuns

    Um cartão de memória está inserido. No entanto, a MD não consegue ler a partir dele. O que fazer? Em primeiro lugar, confira se este cartão é compatível com a Moldura Digital Intenso . Confira em seguida, se o cartão foi inserido de maneira correta no compartimento para cartões.
  • Seite 171 Por que algumas fotos são carregadas mais rapidamente do que as outras? Fotos com alta definição precisam de mais tempo até que possam ser visualizadas. Para aumentar a velocidade d e visualização, utilize fotos com definição mais baixa. Aviso: A Photo Frame suporta uma definição de até 8000*8000 Pixel. Por que o software não inicializa, embora haja energia e o interruptor de força esteja em Provavelmente existe um erro de sistema.
  • Seite 172 Em que definição devem ser mostradas as fotos, para serem mostradas de maneira ideal no visor? A melhor definição para esta MD é 432x234 Pixels. Por que as funções Ligar / Desligar automático não funcionam, embora eu as tenha ativado? Certifique-se de que a hora certa foi ajustada.
  • Seite 173: Especificações De Produto

    ESPECIFICAÇÕES DE PRODUTO Visor TFT LCD Analog Visor Visualização: 16:10 Definição: 432*234 Pixel Input: 100~240V AC, 50/60Hz Alimentação Output: 5V 1A DC USB Host 2.0 USB port Suporta mídias de armazenamento USB Cartões de (Secure Digital Card), MMC (MultiMedia Card), MS (Memory Stick) armazenamento compatíveis...
  • Seite 174: Cuidado E Manutenção

    CUIDADO E MANUTENÇÃO CUIDADO Para evitar o perigo de choques elétricos, não remova paraf usos nem a caixa externa. Não utilize o aparelho próximo à água. Não submeta o aparelho à chuva ou umidade. Não coloque outros objetos que armazenem água ou outros líquidos na proximidade deste aparelho.
  • Seite 175: Manutenção Do Aparelho

    MANUTENÇÃO DO APARELHO O APARELHO DEVE ESTAR DESLIGADO NUNCA ESPIRRE OU DERRAME LÍQUIDOS DIRETAMENTE SOBRE O VISOR OU SOBRE A PARTE EXTERNA DO APARELHO Limpeza do visor / Parte externa / Moldura Limpe a parte externa, moldura e o visor LCD cuidadosamente com pano macio, s em felpas e sem aditivos químicos. Utilize somente produtos de limpeza especiais para Visors de LCD.
  • Seite 176 Instrukcja obs...
  • Seite 177 WPROWADZENIE ........................................1 OGÓLNE CECHY PRODUKTU ....................................2 WIDOK............................................3 PILOT ............................................4 UMIESZCZANIE BATERII W PILOCIE ..................................5 ZAMOCOWANIE STOJAKA ...................................... 5 PIERWSZE KROKI ........................................6 ..................................7 ......................................... 8 ........................................9 ....................................9 ......................................10 ....................................11 ....................................12 Korzystanie z menu OSD ......................................
  • Seite 178 ..................................15 ........................................16 ......................................17 Ustawienie daty i zegara ....................................... 19 ............................20 ....................................21 SPECYFIKACJE PRODUKTU ....................................24 ..................................25...
  • Seite 179: Wprowadzenie

    WPROWADZENIE RAMKI CYFROWEJ (DF) firmy Intenso. (Memory Stick) oraz USB-Stick. wo do nieinformowania o tym fakcie z wyprzedzeniem. PL - 1...
  • Seite 180: Ogólne Cechy Produktu

    OGÓLNE CECHY PRODUKTU Funkcja kalendarza Funkcja minutnika Kompatybilny z kartami SD / MMC / MS 2 opcje sterowania: 7 klawiszy na drugiej stronie ramki cyfrowej, pilot IR PL - 2...
  • Seite 181: Widok

    WIDOK Widok z przodu Przycisk do góry / powrót [ Slot kart SD / MMC / MS rzez 3 sek. USB Host Przycisk w prawo [ ]. 3 sek. OSD, 3 sek. 3 sek. Przycisk Play/Enter [ ]. Podstawka PL - 3...
  • Seite 182: Pilot

    PILOT Power On/ Off Porusza kursor do góry w menu wyboru. Porusza kursor w lewo w menu wyboru lub z powrotem do poprzedniego obrazu w trybie pokazu slajdów. MENU Zoom In 4:3/16:10 SETUP Potwierdzenie wyboru. Start/Zatrzymaj pokaz slajdów Porusza kursor w prawo w menu wyboru lub przeskok do kolejnego obrazu w trybie pokazu slajdów. -Screen-Display (OSD) podczas pokazu slajdów Powrót do poprzedniego menu PL - 4...
  • Seite 183: Umieszczanie Baterii W Pilocie

    UMIESZCZANIE BATERII W PILOCIE Uwaga: Prosimy o zapewnien baterii. ZAMOCOWANIE STOJAKA PL - 5...
  • Seite 184: Pierwsze Kroki

    PIERWSZE KROKI Zamocuj stojak przy RAMCE CYFROWEJ. OK na pilocie. PL - 6...
  • Seite 185 Uwaga: Czytnik kart 3-w- Prosimy o PL - 7...
  • Seite 186 Wskazówka: Card Clock Calendar Pokazuje kalendarz. Setup DF przez 3 sekundy lub przycisk menu na pilocie i dodatkowo przyciski [ ],[ ] Wskazówka: , które zatwierdz PL - 8...
  • Seite 187 Aby rozpocz lub przycisk OK na piloci na pilocie zdalnego sterowania prezentacja zostaje uruchomiona na nowo. przycisk [ ] na MENU z powrotem Wskazówka: art SD/MMC drugim. PL - 9...
  • Seite 188 przycisk F lub OK na pilocie. [ ] w ],[ ],[ ],[ na pilocie. Wskazówka: [ ] na pilocie lub PL - 10...
  • Seite 189 DF lub OK w prawym górnym rogu ekranu. ], [ na pilocie. ycisk na pilocie. ], [ ], [ ], [ ] na OK na pilocie. [ ] na pilocie. PL - 11...
  • Seite 190 u [4:3/16:10] 4:3: 16:10: Wskazówka: *234 pikseli. PL - 12...
  • Seite 191: Korzystanie Z Menu Osd

    Korzystanie z menu OSD [OSD] Wskazówka: OK na pilocie lub PL - 13...
  • Seite 192 Aby wybi ], [ DF lub na pilocie. OK na pilocie. na pilocie. ],[ ],[ ],[ OK na pilocie. Poprzez wybór symbolu DF lub OK PL - 14...
  • Seite 193 aktualna data, aktualna godzina i pomniejszona prezentacja zegar. [ ] na pilocie lub Wskazówka: menu ustawienia. Tryb zegara i pomniejszona prezentacja kalendarz. na pilocie, ],[ ] DF lub Tryb kalendarza Wskazówka: menu ustawienia. PL - 15...
  • Seite 194 ustawienia przyciskiem DF lub OK na pilocie. [SETUP] na pilocie. [ ], [ ] DF lub [ ] na pilocie lub PL - 16...
  • Seite 195 Opis : 3 sek., 5 sek., 15 sek., 1 min., 15 min., 1 godz.. Efekt przej Informacja na Przypadkowe Ustawienia daty i godziny Ustawienia czasu Format czasu y 12 godz. a 24godz.. Data Format daty Ogólne ustawienia PL - 17...
  • Seite 196 Kontrast lacza. Nasycenie Auto Run wskazówki Ustawienia producenta PL - 18...
  • Seite 197 Ustawienie daty i zegara punkt ustawienia zegara/ kalendarza. ], [ na pilocie i wybór. ], [ pilocie. [ ], [ ] Dla potwierdzenia DF lub OK na pilocie. punkt ustawienia godziny / kalendarza. ], [ na pilocie i wybór. ], [ pilocie.
  • Seite 198 o wybranej porze. Wskazówka: menu ustawienia punkt ogólne ustawienia. [ ], [ ] [ ], [ (godzina, minuta). [ ], [ ] na czasowy. Deaktywacja 1 raz: jednorazowy Codziennie: dniowy OK na pilocie. PL - 20...
  • Seite 199 1gigabajt. Standard SI mierzy w wielokrot Niektóre niezbyt popularne i rozpowszechnione Uwaga: PL - 21...
  • Seite 200 Dlaczego niektóre z Uwaga: sekund. Nie. W PL - 22...
  • Seite 201 dla ramki cyfrowej jest 432*234 pikseli. i, funkcja ta by). PL - 23...
  • Seite 202: Specyfikacje Produktu

    SPECYFIKACJE PRODUKTU Analogiczne TFT LCD 16:10 432*234 pikseli Input: 100~240V AC, 50/60Hz Zasilacz Output: 5V 1A DC USB Host 2.0 Port USB Secure Digital Card), MMC MultiMedia Card), MS Memory Stick) obrazu Temperatura robocza 0°C ~ +45°C <80% Wymiary 219*151.6*29 mm Waga 381 gr.
  • Seite 203 owy. elektrostatycznych. etalowymi przedmiotami. utraty danych. PL - 25...
  • Seite 204 czonej powierzchni. odpadami z gospodarstwa domowego. czyszczenia. PL - 26...
  • Seite 205 AGENT...
  • Seite 206 ..........................................1 ................................1 ................................2 ............................................3 ..................................4 ........................5 ......................................5 ......................................... 6 ..................................7 ........................................8 ....................................9 ....................................9 ............................10 ..................................11 .................................... 12...
  • Seite 207 ............................13 ..................................15 ....................................... 16 ...................................... 17 ....................................19 ..........................20 ..................................21 ......................................24 ................................25...
  • Seite 208 RUS - 1...
  • Seite 209 RUS - 2...
  • Seite 210 USB Host [ ] . RUS - 3...
  • Seite 211 MENU 4:3/16:10 SETUP RUS - 4...
  • Seite 212 RUS - 5...
  • Seite 213 RUS - 6...
  • Seite 214 RUS - 7...
  • Seite 215 Card Clock Calendar Setup RUS - 8...
  • Seite 216 MENU RUS - 9...
  • Seite 217 [ ],[ ],[ ],[ RUS - 10...
  • Seite 218 ], [ ], [ ], [ ], [ RUS - 11...
  • Seite 219 4:3/16:10 4:3: 16:10: RUS - 12...
  • Seite 220 RUS - 13...
  • Seite 221 ], [ ] ],[ ],[ ],[ RUS - 14...
  • Seite 222 RUS - 15...
  • Seite 223 SETUP ], [ ] RUS - 16...
  • Seite 224 Setup RUS - 17...
  • Seite 225 RUS - 18...
  • Seite 226 ], [ ], [ [ ], [ ], [ ], [ [ ], [ RUS - 19...
  • Seite 227 ], [ ], [ [ ], [ RUS - 20...
  • Seite 228 SI (International System of Units). RUS - 21...
  • Seite 229 RUS - 22...
  • Seite 230 432*234 RUS - 23...
  • Seite 231 16:10 - 432*234 USB Host 2.0 - ory Stick) 0°C ~ +45°C 219+151.6+29 RUS - 24...
  • Seite 232 RUS - 25...
  • Seite 233 RUS - 26...

Inhaltsverzeichnis