INtRoD. 2. Introd. Vă mulțumim pentru faptul că v-ați decis în favoarea unui produs Hama! Vă rugăm să vă luați timpul necesar pentru a citi următoarele instrucțiuni și indicații în totalitate. Păstrați aceste instrucțiuni de utilizare mai apoi într-un loc sigur, pentru a le putea consulta în caz de necesitate. În cazul în care doriți să...
INDICAțII DE SECURItAtE 3. Indicații de securitate • Produsul este conceput pentru utilizarea casnică, necomercială. • Protejați produsul de murdărie, umiditate și supraîncălzire și utilizați-l numai în spații uscate. • Nu lăsați acest produs, la îndemâna copiilor! • Nu lăsați produsul să cadă și nici nu îl expuneți unor vibrații puternice. •...
StRUCtURA RADIoULUI șI A ACCESoRIILoR 5. Structura radioului și a accesoriilor 5.1 Vedere din spate LINE OUT LINE OUT Denumirea Funcția Conexiune la rețea Conectarea adaptorului de rețea alăturat la alimentarea electrică Conexiune analogică cu un set de căști cu fir, cu conexiune jack Conexiune pentru căști (3,5 mm) de 3,5 mm Conexiune analogică...
StRUCtURA RADIoULUI șI A ACCESoRIILoR 5.2 Vedere din față tasta Denumirea Tasta favoritelor 1 Tasta favoritelor 2 Tasta favoritelor 3 Tasta favoritelor 4 Comutator pornire/oprire Redare radio Căutare automată a posturilor Accesare listă de posturi Accesarea setărilor din fabrică Navigare/OK/Volum Display...
CoNCEPtUL DE oPERARE 6. Conceptul de operare 6.1 operare generală Simbol Denumirea Funcția Simbolul mâinii Apăsat o singură dată Simbolul mâinii Apăsat în mod repetat Simbolul mâinii Apăsare repetată Simbolul mâinii Menținere timp de 3 secunde tasta Denumirea Funcția • Navigare înainte în meniul actual Butonul rotativ •...
CoNCEPtUL DE oPERARE 6.2 Administrarea favoritelor tasta Denumirea Funcția • Apăsare scurtă a tastei: accesarea spațiului pentru memorarea canalului preferat 1 în modul actual de redare Tasta • Apăsare lungă a tastei: memorarea postului actual în spațiul pentru memorarea canalului preferat 1 •...
Aveți în vedere, că poate fi necesar un adaptor specific țării. • O selecție de agenți de curățare adecvați o puteți găsi la www.hama.com. După ce produsul este conectat la priză are loc inițializarea.
NAVIGAțIA șI CoMANDA 8. Navigația și comanda După ce radioul a fost inițializat pentru prima dată, porniți-l pe acesta eventual cu ajutorul tastei (tasta Power), pentru a începe setarea inițială a produsului. În cele ce urmează sunt descriși pașii corespunzători pe scurt, informații suplimentare putând să găsiți în capitolele detaliate corespunzătoare. 8.1 Posibilitățile de operare Operare generală...
RADIo DAB 9. Radio DAB Acest radio recepționează toate frecvențele radio uzuale în gama 174 MHz până la 240 MHz (banda III, canalele 5A până la 13F). Căutarea automată a posturilor DAB începe la prima pornire în modul DAB în mod automat.
DEștEPtătoR 11. Deșteptător Radioul dispune de două ore de trezire ce pot fi setate individual. 12.1 Setările Deșteptătorul 1 și 2 sunt configurate identic și permit salvarea a două ore de trezire diferite. Apăsați [ALARMA] (9), pentru a deschide meniul de setări. Selectați deșteptătorul 1 sau 2 cu ajutorul regulatorului rotativ (10).
SEtăRI DE SIStEM 12. Setări de sistem Pentru a ajunge la setările de sistem, asigurați-vă că radioul este pornit. Și țineți apoi tasta PORNIRE/OPRIRE apăsată timp de 8 secunde. 12.1 Standby ecran Selectați treapta de luminozitate care să fie utilizată pentru ecran atunci când acesta este în standby. 12.2 Setarea orei Radioul permite reprezentarea într-un format de 12 ore (am/pm) sau în format de 24 de ore.
DAtE tEHNICE 13. Date tehnice Date tehnice Display TFT de 4,0" (10,16 cm) Difuzoare Difuzoare cu gamă completă (5W RMS) Alimentare electrică 12,0 V 1,0 A 12,0 W Limbi suportate Română, Engleză, Germană Conținutul Radio digital, alimentator ambalajului Conexiuni audio Ieșiri Căști 3,5 mm, Line Out Surse...
INtRoDUCtIoN 2. Introduction Thank you for choosing a Hama product. Take your time and read the following instructions and information completely. Please keep these instructions in a safe place for future reference. If you sell the device, please pass these operating instructions on to the new owner.
SAFEty INStRUCtIoNS 3. Safety instructions • The product is intended for private, non-commercial use only. • Protect the product from dirt, moisture and overheating and use it in dry rooms only. • As with all electrical products, this device should be kept out of the reach of children. •...
SEttING UP tHE RADIo AND ACCESSoRIES 5. Setting up the radio and accessories 5.1 Rear view LINE OUT LINE OUT Designation Function Mains connection Connection of the enclosed mains adapter to the power supply Analogue connection with wired headphones with a 3.5 mm jack Headphone jack (3.5 mm) connection Analogue connection with external loudspeakers and other audio...
SEttING UP tHE RADIo AND ACCESSoRIES 5.2 Front view No. Button Designation Favourites button 1 Favourites button 2 Favourites button 3 Favourites button 4 On/Off button Radio playback Automatic station search Call up station list Call up alarm settings Navigation/OK/Volume Display...
oPERAtING CoNCEPt 6. operating concept 6.1 General operation Icon Designation Function Hand symbol Press once Hand symbol Press multiple times Hand symbol Press repeatedly Hand symbol Hold for 3 seconds Button Designation Function • Navigation forwards in the current menu Rotary controller •...
oPERAtING CoNCEPt 6.2 Managing favourites Button Designation Function • Short button press: Access favourite storage space 1 for current playback mode button • Long button press: Save the current station to favourite storage space 1 • Short button press: Access favourite storage space 2 for current playback mode button •...
• The power supply unit is suitable for mains voltages between 100 and 240 V and can therefore be used on virtually any AC power grid. Please note that a country-specific adapter may be necessary. • You can find an appropriate selection of Hama products at www.hama.com. Once the product has been connected to mains power, initialisation takes place.
NAVIGAtIoN AND CoNtRoLS 8. Navigation and controls Once the radio has been initialised for the first time, switch it on using the button (Power button) if required to start the product setup process. Below, the relevant steps are explained in brief. Further information can be found in the relevant detailed sections.
DAB RADIo 9. DAB radio This radio receives all common digital radio frequencies in the range of 174 MHz to 240 MHz (band III, channels 5A to 13F). The automatic DAB station search starts automatically when DAB mode is started for the first time.
ALARM CLoCK 11. Alarm clock The radio has two individually adjustable alarm times. 12.1 Settings Alarm 1 and Alarm 2 are configured identically and allow two separate alarm times to be saved. Press [ALARMA] (9) to open the Settings menu. Select Alarm 1 or 2 using the rotary controller (10). Confirm your selection by pressing rotary controller (10).
SyStEM SEttINGS 12. System settings To access the system settings, ensure that the radio is switched on. Then hold the ON/OFF button down for 8 seconds. 12.1 Standby screen Select a brightness setting for the display that is to be used in standby mode. 12.2 time settings The radio allows the time to be displayed in 12-hour (am/pm) or 24-hour format.
tECHNICAL DAtA 13. technical data technical data Display 4.0" (10.16 cm) TFT Loudspeaker Full-range loudspeaker (5W RMS) Power supply 12.0 V 1.0 A 12.0 W Languages Romanian, English, German supported Packaging contents Digital radio, power supply unit Audio connections outputs Headphone 3.5mm, Line Out sources Favourites...
EINLEItUNG 2. Einleitung Vielen Dank, dass Sie sich für ein Hama Produkt entschieden haben! Nehmen Sie sich Zeit und lesen Sie die folgenden Anweisungen und Hinweise zunächst ganz durch. Bewahren Sie diese Bedienungsanleitung anschließend an einem sicheren Ort auf, um bei Bedarf darin nachschlagen zu können. Sollten Sie das Gerät veräußern, geben Sie diese Bedienungsanleitung an den neuen Eigentümer weiter.
SICHERHEItSHINWEISE 3. Sicherheitshinweise • Das Produkt ist für den privaten, nicht-gewerblichen Haushaltsgebrauch vorgesehen. • Schützen Sie das Produkt vor Schmutz, Feuchtigkeit und Überhitzung und verwenden Sie es nur in trockenen Räumen. • Dieses Produkt gehört, wie alle elektrischen Produkte, nicht in Kinderhände! •...
AUFBAU DES RADIoS UND DES ZUBEHöRS 5. Aufbau des Radios und des Zubehörs 5.1 Rückseitenansicht LINE OUT LINE OUT Bezeichnung Funktion Netzanschluss Anschluss des beiliegenden Netzadapters zur Stromversorgung Analoge Verbindung mit einem kabelgebundenen Kopfhörer mit Köpfhöreranschluss (3.5mm) 3.5mm Klinkenanschluss Analoge Verbindung mit externen Lautsprechern und anderen Line-Out (3.5mm) Audiogeräten per 3.5mm Klinkenkabel Antenne...
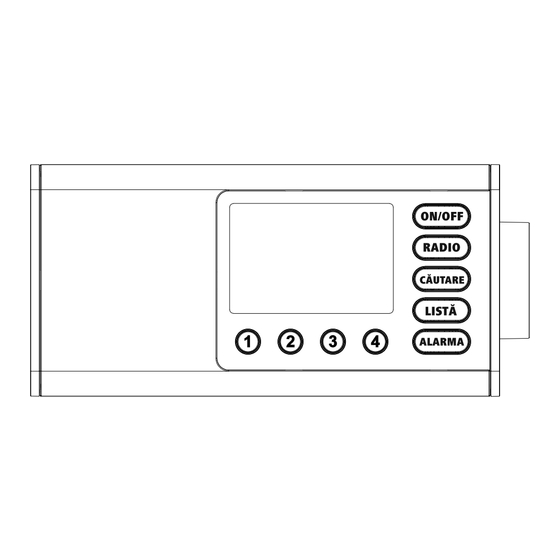
BEDIENKoNZEPt 6. Bedienkonzept 6.1 Allgemeine Bedienung Symbol Bezeichnung Funktion Hand - Symbol Einmaliges Drücken Hand - Symbol Mehrmaliges Drücken Hand - Symbol Wiederholtes Drücken Hand - Symbol Halten für 3 Sekunden taste Bezeichnung Funktion • Navigation vorwärts im aktuellen Menü Drehknopf •...
• Das Netzteil ist für eine Netzspannung von 100-240 V geeignet und daher in nahezu allen Stromnetzen auf Wechselstrom-Basis einsetzbar. Beachten Sie, dass hierzu ein länderspezifischer Adapter notwendig sein kann. • Eine entsprechende Auswahl an Produkten finden Sie unter www.hama.com. Nachdem das Produkt mit der Steckdose verbunden ist, findet die Initialisierung statt. Das Radio wird gestartet.
NAVIGAtIoN UND StEUERUNG 8. Navigation und Steuerung Nachdem das Radio erstmalig initialisiert wurde, schalten Sie dieses ggf. über die -Taste (Powertaste) ein, um mit der Einrichtung des Produkts zu beginnen. In der Folge werden die entsprechenden Schritte kurz erläutert, weitere Informationen erhalten Sie in den entsprechenden Detailkapiteln.
DAB-RADIo 9. DAB-Radio Dieses Radio empfängt alle gängigen Digitalradio-Frequenzen im Bereich von 174 MHz bis 240 MHz (Band III, Kanäle 5A bis 13F). Der automatische DAB Sendersuchlauf startet beim ersten Start im DAB- Modus automatisch. Sobald dieser abgeschlossen wurde, wird die aktuelle Senderliste dargestellt. Durch drücken eines der Tasten können Sie auf folgendes zugreifen.
WECKER 11. Wecker Das Radio verfügt über zwei individuell einstellbare Weckzeiten. 12.1 Einstellungen Wecker 1 und Wecker2 werden identisch konfiguriert und ermöglichen die Speicherung von zwei gesonderten Weckzeiten. Drücken Sie [ALARMA] (9), um das Einstellungsmenü zu öffnen. Wählen Sie Wecker 1 oder 2 mithilfe des Drehreglers (10) aus.
SyStEMEINStELLUNGEN 12. Systemeinstellungen Um in die Systemeinstellungen zu gelangen, stellen Sie sicher, dass das Radio eingeschaltet ist. Und halten Sie dann die EIN/AUS Taste für 8 Sekunden gedrückt. 12.1 Bildschirm Standby Wählen Sie eine Helligkeitsstufe für das Display, welche im Standby angewendet werden soll. 12.2 Zeiteinstellungen Das Radio erlaubt die Darstellung im 12-Stundenformat (am/pm) oder Darstellung im 24-Stundenformat.
Hama GmbH & Co KG 86652 Monheim / Germany Service & Support www.hama.com +49 9091 502-0 All listed brands are trademarks of the corresponding companies. Errors and omissions excepted, and subject to technical changes. Our general terms of delivery and payment are applied.