Herunterladen Diese Seite drucken
Vorschau ausblenden Andere Handbücher für PY0101:

Werbung

Verfügbare Sprachen

Verfügbare Sprachen

REAR VIEW CAMERA
PY0101
PY0101P
PY0101M
BEDIENUNGSANLEITUNG
OWNER'S MANUAL
INSTRUKCJA OBSŁUGI
MANUAL DE UTILIZARE

Werbung

loading

Inhaltszusammenfassung für Peiying PY0101

  • Seite 1 REAR VIEW CAMERA PY0101 PY0101P PY0101M BEDIENUNGSANLEITUNG OWNER’S MANUAL INSTRUKCJA OBSŁUGI MANUAL DE UTILIZARE...
  • Seite 3: Sie Sich, Dass Alle Verbindungen

    Bedienungsanleitung SICHERHEITSANLEITUNGEN Lesen Sie sorgfältig diese Bedienungsanleitung vor dem ersten Gebrauch und bewahren Sie auf zum späteren Nachschlagen. Der Hersteller ist nicht verantwortlich für Beschädigungen oder Verletzungen, hervorgerufen durch unsachgemäße Benutzung / Montage/ Umgang mit dem Gerät. 1. Stellen Sie sicher, dass Sie die Verbindungen herstellen, wenn der Fahrzeugmotor ausgeschaltet ist.
  • Seite 4 Bedienungsanleitung 9. Bei Zweifeln bezüglich des Montage-Ortes wenden Sie sich an den Händler Ihres Fahrzeugs. Vor dem Bohren der Löcher in der Fahrzeugkarosserie sicherstellen, dass keine elektrischen Kabel, Bremssysteme, Kraftstofftanks usw. beschädigt werden. Beachten Sie bei der Montage, dass alle losen Teile im Falle eines Unfalls eine Gefahr darstellen können - stellen Sie sicher, dass Sie jedes Teil richtig montieren, um die Sicherheit zu gewährleisten.
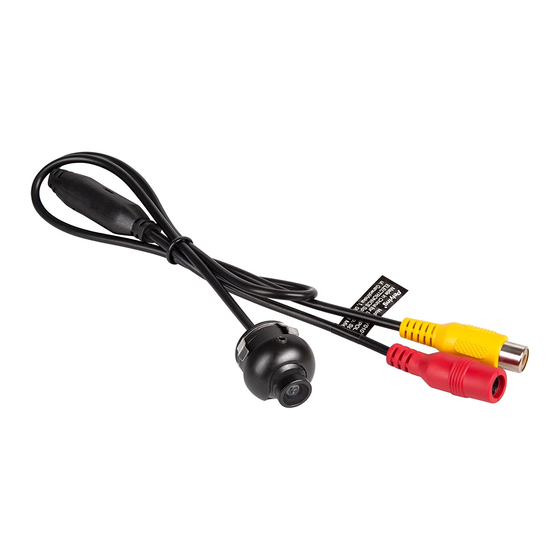
  • Seite 5 Bedienungsanleitung MONTAGE Kameramontage Vor der Montage, wählen Sie einen geeigneten Platz: • Mit gutem Ausblick, bestmögliche Sicht hinter / vor dem Fahrzeug (hinsichtlich des Aufstellungs-Ortes) • NICHT direkt neben oder unter einer Rückfahrtleuchte (da dies zum erblinden der Kamera führen kann) •...
  • Seite 6 Bedienungsanleitung Empfohlene Positionen zur Kameramontage: Rückseitig: Front: Verbindungen 1. Nach der Auswahl eines Montagepunkts entfernen Sie, wenn möglich, das Paneel und kleben den Bereich der gebohrt werden soll, mit Klebeband ab, um die Umgebung zu schützen. 2. Nach dem Bohren vorsichtig alle Graten oder scharfen Kanten entfernen, damit das Kabel beim Durchziehen nicht beschädigt wird.
  • Seite 7 Bedienungsanleitung • Verbinden Sie das Videoausgangskabel (2) mit dem Videoeingang am Fahrzeugmonitor (1) und verbinden Sie das rote Kabel (5) mit der Stromversorgung (+12 V) und das schwarze Kabel (6) mit GND (empfohlene Methode). 1. Monitor 2. Video-Ausgang 3. Spannungsversorgung (12 V) 4.
  • Seite 8: Technische Daten

    Bedienungsanleitung TECHNISCHE DATEN • Bildsensor: ¼ Farb-CMOS • Auflösung: 648x488 Pixel • Linsenwinkel: 140 Grad • Energieverbrauch: max. 1 W • Min. Beleuchtung: 0,3 Lux • Videoausgang: CVBS 1.0 V (p-p) / 75 Ohm • TV System: PAL • Bild: Gespiegelt •...
  • Seite 9 Bedienungsanleitung Deutsch Korrekte Entsorgung dieses Produkts (Elektromüll) (Anzuwenden in den Ländern der Europäischen Union und anderen europäischen Ländern mit einem separaten Sammelsystem) Die Kennzeichnung auf dem Produkt bzw. auf der dazugehörigen Literatur gibt an, dass es nach seiner Lebensdauer nicht zusammen mit dam normalen Haushaltsmüll entsorgt werden darf.
  • Seite 10: Safety Instructions

    Owner’s manual SAFETY INSTRUCTIONS Please read this operation instruction carefully before use, and keep it for future reference. Producer does not take responsibility for damages or injuries caused by inappropriate handling / use / installation of the product. 1. Make sure to perform connections when the vehicle engine is turned off.
  • Seite 11 Owner’s manual installation keep in mind, that any loose parts may pose danger in case of an accident – make sure to install every piece properly to ensure safety. 10. The camera cannot obscure rear/front lights, license plate, etc. It cannot stick out beyond the outline of the vehicle! Safe driving Pay attention to your surroundings! Keep in mind that responsibility for safety while operating...
  • Seite 12 Owner’s manual • Before drilling the holes in vehicle’s body, make sure to select location in which you will not damage any electrical cables, brake system, fuel tank etc. • The camera cannot obscure rear lights, license plate nor any other part of the vehicle. •...
  • Seite 13 Owner’s manual 3. Carefully route the camera cable connector through the hole and insert the camera into the hole. 4. Wire the cables as indicated on below illustrations (Important: pay attention to the set you have purchased. Perform connections according to wiring cables in your set).
  • Seite 14 Owner’s manual 1. Monitor 2. Video out 3. Power (12 V) 4. Camera 5. Power (in) (12 V) - red 6. GND (in) - black SPECIFICATION • Image sensor: ¼ color CMOS • Resolution: 648x488 px • Lens angle: 140 degrees •...
  • Seite 15 Owner’s manual • Resolution: 640 x 480 px • Lens angle: 170 degrees • Power consumption: max. 1 W • Min. illumination: 0,2 Lux • Video output: CVBS 1.0 V (p-p) / 75 Ohm • TV system: PAL / NTSC •...
  • Seite 16 Instrukcja obsługi KWESTIE BEZPIECZEŃSTWA Przed użyciem, należy dokładnie zapoznać się z treścią instrukcji obsługi, oraz zachować ją w celu późniejszego wykorzystania. Producent nie ponosi odpowiedzialności za obrażenia/szkody powstałe w skutek nieprawidłowego użycia / obsługi / montażu tego urządzenia. 1. Przed podłączeniem należy się upewnić, że silnik pojazdu jest wyłączony! 2.
  • Seite 17 Instrukcja obsługi 8. Zabrania się montażu jakichkolwiek komponentów w pobliżu poduszek powietrznych! 9. W razie wątpliwości związanych z montażem urządzenia w pojeździe, należy się skontaktować ze swoim dealerem samochodowym. Przed rozpoczęciem wiercenia otworów montażowych w karoserii pojazdu, należy się upewnić, że nie zostaną w tym procesie uszkodzone żadne przewody elektryczne, układ hamulcowy, zbiornik na paliwo itp.
  • Seite 18 Instrukcja obsługi INSTALACJA Instalacja kamery Przed montażem, należy wybrać odpowiednie miejsce montażu kamery: • o odpowiedniej perspektywie, z możliwie największym polem widzenia za/z przodu pojazdu (w zależności czy kamera będzie montowana z przodu czy z tyłu pojazdu) • kamera nie powinna się znajdować bezpośrednio obok lub pod światłem cofania (gdyż...
  • Seite 19 Instrukcja obsługi Sugerowane miejsce montażu kamery: Tył: Przód: Podłączenie 1. Po wybraniu odpowiedniego miejsca montażu, należy, jeśli to możliwe zdjąć element nadwozia w którym będzie montowana kamera, oraz zakleić taśmą miejsce, w którym ma zostać wywiercony otwór (w celu zabezpieczenia powierzchni). 2.
  • Seite 20 Instrukcja obsługi przewód (3) do zasilania (+12 V). • podłącz przewód video (2) do wejścia video na wyświetlaczu (1) pojazdu, oraz podłącz czerwony przewód (5) do zasilania (+12 V) a przewód czarny (6) do masy GND (metoda zalecana). 1. Wyświetlacz 2.
  • Seite 21: Specyfikacja

    Instrukcja obsługi SPECYFIKACJA • Przetwornik: ¼ CMOS (kolorowy) • Rozdzielczość: 648 x 488 px Kąt widzenia: 140 o • • Pobór mocy: maks. 1 W • Min. oświetlenie: 0,3 Lux • Wyjście video: CVBS 1.0 V (p-p) / 75 Ohm •...
  • Seite 22 Instrukcja obsługi Poland Prawidłowe usuwanie produktu (zużyty sprzęt elektryczny i elektroniczny) Oznaczenie umieszczone na produkcie lub w odnoszących się do niego tekstach wskazuje, że po upływie okresu użytkowania nie należy usuwać z  innymi odpadami pochodzącymi z gospodarstw domowych. Aby uniknąć szkodliwego wpływu na środowisko naturalne i zdrowie ludzi wskutek niekontrolowanego usuwania odpadów, prosimy o oddzielenie produktu od innego typu odpadów oraz odpowiedzialny recykling w celu promowania ponownego użycia zasobów materialnych jako stałej praktyki.
  • Seite 23: Instrucțiuni Privind Siguranța

    Manual de utilizare INSTRUCȚIUNI PRIVIND SIGURANȚA Vă rugăm să citiți cu atenție acest manual de instrucțiuni înainte de a utiliza produsul și păstrați-l pentru consultări ulterioare. Producătorul nu își asumă responsabilitatea pentru daunele sau vătămările provocate de manipularea / utilizarea / instalarea necorespunzătoare a produsului. 1.
  • Seite 24 Manual de utilizare 9. În cazul în care nu sunteți sigur de locul montării dispozitivului, contactați distribuitorul vehiculului. Înainte de a găuri caroseria vehiculului, asigurați-vă că nu deteriorați cablurile electrice, sistemul de frânare, rezervorul pentru combustibil, etc. În timpul instalării, țineți cont de faptul că...
  • Seite 25 Manual de utilizare INSTALAREA Instalarea camerei Înainte de instalare, selectați o locație potrivită: • Cu vizibilitate adecvată, cea mai bună vedere în spatele/ fața vehiculului (în ceea ce privește locul de instalare) • NU direct lângă sau sub lumina pentru marșarier (poate obstrucționa camera) •...
  • Seite 26 Manual de utilizare Poziția recomandată pentru instalarea camerei: În spate: În față: Conectarea 1. După selectarea locului de montare, îndepărtați bara, dacă este posibil, și marcați zona care urmează să fie găurită cu bandă adezivă. 2. După ce ați găurit, neteziți orice muchie ascuțită pentru a nu deteriora cablurile când le trageți prin gaură.
  • Seite 27 Manual de utilizare alimentare (+12 V) și cablul negru (6) la GND (metoda recomandată). 1. Monitor 2. Ieșire video 3. Alimentare (12 V) 4. Camera 5. Alimentare + 12 V – roșu (in interiorul mufei) 6. GND (masa) – negru ( in exteriorul mufei)
  • Seite 28 Manual de utilizare SPECIFICAȚII • Senzor de imagine: color ¼ CMOS • Rezoluție: 648x488 px • Unghi obiectiv: 140 grade • Consum de putere: max. 1 W • Iluminare minima: 0,3 Lux • Ieșire video: CVBS 1.0 V (p-p) / 75 Ohm •...
  • Seite 29 Manual de utilizare Romania Reciclarea corecta a acestui produs (reziduuri provenind din aparatura electrica si electronica) Marcajale de pe acest produs sau mentionate in instructiunile sale de folosire indica faptul ca produsul nu trebuie aruncat impreuna cu alte reziduuri din gospod arie atunci cand nu mai este in stare de functionare. Pentru a preveni posibile efecte daunatoare asupra mediului inconjurator sau a san ata tii oamenilor datorate evacuarii necontrolate a reziduurilor, vă...
  • Seite 30 NOTES...

Diese Anleitung auch für:

Py0101pPy0101m