Werbung
Quicklinks
Werbung
Fehlerbehebung

Verwandte Anleitungen für Hammerbacher VXMST Serie


Inhaltszusammenfassung für Hammerbacher VXMST Serie
- Seite 1 Montageanleitung Assembly instructions VXMST Technische Daten Technical specifi cations Typenschilder Identifi cation Sticker EG Konformitätserklärung Declaration of conformity Montageanleitung Operating instructions Reset Reset Klappfunktion Video 08/2021 MNMONT_XMST-2_114780 VXMST...
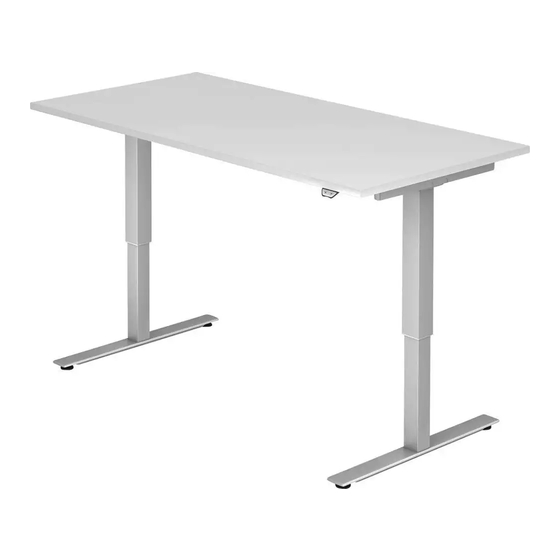
- Seite 2 Technische Daten / Technical specifications VXMST Baujahr / Year of construction 2021 Ursrpungsland / Production country Dänemark System 1- stufig / step Material Stahl & Kunststoff / Steel and plastic Hub (max.) / Stroke (max.) 50 cm Belastbarkeit dynamisch/statisch (max.) 70/90 kg Load capacity dynamic/static (max.) Eigengewicht / Frame weight...
- Seite 3 Technische Daten / Technical specifications VXMST 160 cm 154 cm 80 cm 7 cm 6 cm 133 cm 80 cm 67,2 cm 62 cm 62 cm 15 cm 15 cm 7 cm 7 cm 75 cm 64 cm Tischhöhe / Table Height 71 - 120 cm Gestelltiefe / Frame Depth 62 cm...
- Seite 4 Typenschilder / Identification Sticker Hersteller / Manufacturer Hammerbacher GmbH Daimlerstrasse 4-6 D - 92318 Neumarkt Hammerbacher GmbH Daimlerstraße 4+6 Serie: VXMST 92318 Neumarkt Baujahr: 2021 Germany 100-240 V, 50-60Hz, 1,2 A Duty Cycle: 2 min on/ 18 min off max. 70 kg, Class II info@hammerbachergmbh.de...
-
Seite 5: Eg Konformitätserklärung / Declaration Of Conformity
Name und Adresse des Bevollmächtigten für die Zusammenstellung der Dokumentation. Name and address of the authorised person for the composition of documentation. Bernhard Hammerbacher, Daimlerstr. 6, 92318 Neumarkt/OPf. Unterschrift kann auf Verlangen vorgezeigt werden. The signature is only available in the original and can be presented on request. - Seite 6 Montageanleitung Stand_2021/06 VXMST Operating instructions Manuel d‘exploitation Istruzioni per l‘uso Manual de instrucciones Provozní návod 2 x 4 2 x 1 2 x 2 1 x 5 114758 112194 114759 112163 112164 114760 112162 1 x O 2 x 3 1 x P Seko 11476 *...
- Seite 7 VXMST6/** 8 x A 8 x A 8 x A 8 x A VXMST/** VXMST22/** 4 x A 4 x A 331mm 331mm 8 x J 5x 60mm 8 x J VXMST...
- Seite 8 4x C 2x B 2 x C Seko 1 x B 14x50mm 3 x 16mm 2 x C 1 x B 4x D 4x E SW 5 "Master" M6 x 25 2x D 2x E 2x D 2x E "Follower" 4x D 4x E SW 5...
- Seite 9 4x F SW 4 M6 x 10 2x F 2x F 8x G SW 4 4 x H 4x G 2x H Ø80 M10 x 20 M6 x 45 4x G 2x H 1 x 7 2x K 1 x L 1 x L 2x K "Master"...
- Seite 10 Taster-Kabel Netzteil-Kabel Master / Follower Master / Netzteil (SMPS) "Master" "Follower" 1 x P 1 x O 5 x 30 mm 130 mm 1 x O 1 x P VXMST...
-
Seite 11: Fehlerbehebung
Inbetriebnahme Vor Inbetriebnahme des Tisches: Alle Komponenten fest miteinander verschrauben • • das Netzteil (7) mit Bügel (L) am Tisch befestigen • Kabel mit Kabelklemme (O) und Kabelhalter (N) befestigen, sodass keine Kabel lose sind • Bedenken Sie, dass ihr Tischgestell höhenverstellbar ist. Das Anschlusskabel muss der maximalen Verstellhöhe folgen können. -
Seite 12: Troubleshooting
Initialisation Before putting the table into operation: • crew all components tightly together • attach the power supply (7) to the table using clamp (L) • fi x all cables using cable holders (O) and (N) • Keep in mind that your desk is height adjustable. The power supply cable must be able to follow the movement of the desk completely •...