Renson Endura Twist Montageanleitung
Vorschau ausblenden
Andere Handbücher für Endura Twist:
- Bedienungsanleitung (56 Seiten) ,
- Bedienungsanleitung (132 Seiten)
Inhaltsverzeichnis
Werbung
Verfügbare Sprachen
Verfügbare Sprachen
Quicklinks
Werbung
Kapitel
Inhaltsverzeichnis

Verwandte Anleitungen für Renson Endura Twist


Inhaltszusammenfassung für Renson Endura Twist
- Seite 1 Endura Twist ® Montageanleitung Assembly instructions...
-
Seite 2: Inhaltsverzeichnis
Endura Twist ® Inhaltsverzeichnis 1 • Einleitung ................................1.1 • Allgemeine Sicherheitshinweise ......................1.2 • Allgemeine Vorschriften und spezifische Maßnahmen ..............2 • Zusammensetzung des Produkts ........................2.1 • Öffnen der Verpackung ........................2.2 • Inhalt der Verpackung ........................... 3 • Montage auf dem Fenster .......................... -
Seite 3: Einleitung
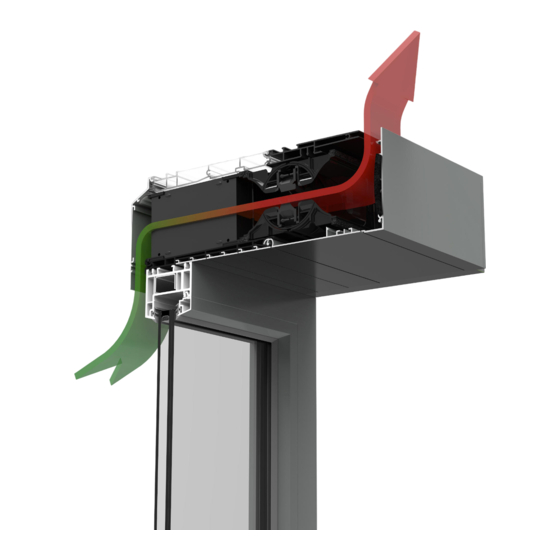
Endura Twist ® 1 • Einleitung Die Montage und die Handlungen, die in dieser Anleitung beschrieben sind, dürfen ausschließlich von qualifizierten Monteuren ausgeführt werden und zwar exakt gemäß den in der Anleitung beschriebenen und dokumentierten Montage-, Betriebs- und Wartungsanweisungen. Der Endura Twist kann sowohl horizontal als auch vertikal montiert werden, jeweils mit ®... -
Seite 4: Allgemeine Sicherheitshinweise
Anleitung. Die Nichteinhaltung dieser Sicherheitsvorschriften, Warnungen, Hinweise und Anweisungen kann zu Schäden am Endura Twist oder zu Personenschäden führen. Hierfür ® übernimmt RENSON NV keine Haftung. ® • Die Montage des Endura Twist ist in Übereinstimmung mit den allgemein und lokal ®... -
Seite 5: Zusammensetzung Des Produkts
Endura Twist ® 2 • Zusammensetzung des Produkts 2.1 • Öffnen der Verpackung ➊ ➋ Öffnen Sie die Verpackung. Entnehmen Sie das Verpackungsmaterial aus dem Endura ® Entnehmen Sie das Gerät Twist. Legen Sie den Endura Twist auf eine Werkbank, ®... -
Seite 6: Inhalt Der Verpackung
Endura Twist ® 2.2 • Inhalt der Verpackung ACHTUNG: Ein Etikett mit der Garantienummer Ihres Geräts finden Sie hinten in der Bedienungsanleitung. Bewahren Sie die Bedienungsanleitung sorgfältig auf und geben Sie sie an Benutzer weiter, die das Gerät evtl. nach Ihnen verwenden. Mitgelieferte Teile: •... - Seite 7 Endura Twist ® Querschnitt des Endura Twist ® Regenabdeckung Transparentes Oberprofil mit Dübelschlitzen Schraube zur Befestigung auf dem Fenster Aluminium-Oberprofil innen Kabel (Stromkabel und optionales I/O-Kabel) Einschlagdübel zur Befestigung im Sturz PVC-Abschlussprofil weiß Frontales Innenprofil (3 Varianten) Schalldämmendes Material 10. Filter 11.
- Seite 8 Benötigtes Werkzeug (nicht von Renson mitgeliefert): ® • Schaumtape • Elektroschrauber • Schraubanker (zu bestellen über Renson : Schraubanker 18 cm oder Schraubanker 24 cm): ® Der Endura Twist ist an der Oberseite der Kassette mit einem Dübelschlitz versehen, um die ®...
-
Seite 9: Montage Auf Dem Fenster
Endura Twist ® 3 • Montage auf dem Fenster Das Endura Twist kann auf zweierlei Weise am Fensterprofil verankert werden: ® − mit einer sichtbar montierten Verankerung, bei der die Schraubköpfe auf dem oberen Profil sichtbar bleiben; − mit eine verdeckt montierte Verankerung, mit verborgenen Schrauben im transparenten PVC- Profil und abgedichtet mit einem ausreichend wasserdichten Dichtungsband (Butyl, Bitumen oder gleichwertig). -
Seite 10: Bohren Der Löcher Für Eine Verdeckt Montierte Verankerung
Endura Twist ® Durchbohren Sie jede Zwischenwand mindestens einmal ➌ (überprüfen Sie auf dem Fensterprofil). + 15 mm ACHTUNG: Ø 6,5 Verwenden Sie immer einen Bohrer mit einem Durchmesser von 6,5. Verwenden Sie immer einen ausreichend langen Bohrer, sodass das Gerät vollständig durchgebohrt + 15 mm wird. - Seite 11 Endura Twist ® ACHTUNG: Für Aluminiumfenster: durchbohren Sie niemals in + 15 mm Zwischenwänden in der Zone des Eckwinkels des Fensters + 15 mm. Durchbohren Sie dann immer ab der nächsten Zwischenwand. + 15 mm Durchbohren Sie jede Zwischenwand mindestens einmal ➍...
-
Seite 12: Montieren Des Endura ® Twist Auf Dem Fensterprofil
Endura Twist ® 3.3 • Montieren des Endura Twist auf dem Fensterprofil ® Bringen Sie ein Schaumtape/Compriband ➊ ➋ oder ein Silikonband über die gesamte Länge des Fensterprofils an. HINWEIS: Bringen Sie zuerst ein Schaumtape/ Compriband (nicht im Lieferumfang enthalten) über die gesamte Länge des Fensterprofils an. - Seite 13 Endura Twist ® Ziehen Sie die Schrauben ✓ ➋ an, bis der Endura Twist fest ® am Fensterprofil anschließt. Ziehen Sie die Schrauben nicht weiter an, um eine Durchbiegung bzw. Verformung des transparenten PVC- Oberprofils zu vermeiden. 3.4.2 • Verdeckt montierte Verankerung Schrauben Sie das Endura Twist an der unteren Schicht des ®...
-
Seite 14: Montage Und Sicherung Des Endura
Endura Twist ® 4 • Montage und Sicherung des Endura Twist an der ® Oberseite Montieren Sie das Fenster mit dem Endura Twist nach den Regeln der Technik in den ® Fensterrahmen, sowohl hinsichtlich der Montage und als auch der Abdichtung. 4.1 •... - Seite 15 Endura Twist ® 4.1.1 • Verankerung mit Dübeln Der Endura Twist ist an der Oberseite der Kassette mit einem Dübelschlitz versehen, um die ® Befestigung am Rohbau mithilfe von Schraubankern (nicht im Lieferumfang enthalten, separat zu bestellen) mühelos und schnell zu gestalten. Dazu ist die Kassette mit Euronut-Dübelschlitzen versehen.
- Seite 16 Endura Twist ® Öffnen Sie die Wartungsklappe des Endura Twist, um nach oben hin verankern zu können. ® Abhängig von der gewählten Zuluftrichtung des Endura Twist (nach unten oder nach oben) ist ® die Art der Sicherung unterschiedlich: 1 • Für Typ „Zuluft nach unten“ (mit oder ohne Putzprofil): Öffnen Sie die Wartungsklappe (an der Unterseite) des Endura Twist.
- Seite 17 Endura Twist ® A. Vorbohren im Kartonschutz: In jedem Endura Twist befinden sich 2 Schutzkartons, einer auf Höhe jedes Ventilatormoduls. ® Die Schutzkartons fungieren sowohl als Schutz vor dem Eindringen von Schmutz und Staub in die Ventilatormodule bei der Montage und während der Rohbauphase sowie als Bohrschablone. Bohren Sie auf der angedeuteten Bohrlinie.
- Seite 18 Endura Twist ® B. Vorbohren direkt im Aluminium-Oberprofil: Wenn nicht auf Höhe der Ventilatormodule gebohrt wird, kann direkt im Aluminium-Oberprofil gebohrt werden. Durchbohren Sie in diesem Fall immer auf der vorgesehenen Schraublinie. Beachten Sie die oben genannten Zwischenabstände. Nachdem der Endura Twist festgeschraubt ist: ®...
-
Seite 19: Sicherung An Der Oberseite Bei Fenstertiefe > 170 Mm
Endura Twist ® 4.2 • Sicherung an der Oberseite bei Fenstertiefe > 170 mm Bei Fenstertiefen > 170 mm wird die Sicherung an der Oberseite durch Verankerung mit Dübeln ausgeführt. Der Endura Twist ist an der Oberseite der Kassette mit einem Dübelschlitz versehen, ®... -
Seite 20: Endbearbeitung
Endura Twist ® 5 • Endbearbeitung 5.1 • Endbearbeitung innen Der Endura Twist wurde entwickelt, um eine makellose Endbearbeitung zu ermöglichen. Dafür ist ® oben an der Kassette ein Abschlussprofil mit einer Abreißrippe angebracht. Es kann bis an diese Rippe verputzt werden oder die Rippe kann entfernt werden, um eine Verarbeitung mit Gipskarton zu ermöglichen. -
Seite 21: Endbearbeitung Außen
Endura Twist ® 5.2 • Endbearbeitung außen Abhängig von der Außenverarbeitung wird ein Abdichten mit Kitt empfohlen: 5.2.1 • Endbearbeitung außen mit Backstein, Anbringung nicht vollständig hinter dem Sturz Abdichten mit Kitt 5.2.2 • Endbearbeitung außen mit Backstein, Anbringung vollständig hinter dem Sturz Abdichten mit Kitt Ausfüllen mit optionalem Aluminium- Auffüllprofil (25 x 20 x 2 mm) links und... -
Seite 22: Entfernen Der Schutzkartons
Endura Twist ® 6 • Entfernen der Schutzkartons Vor der Inbetriebnahme des Geräts müssen die Schutzkartons folgendermaßen entfernt werden: Zuluft nach unten Zuluft nach oben ACHTUNG: Wenn der Kartonschutz nicht entfernt wird, wird das Gerät nicht funktionieren. Diese Schutzkartons dürfen nicht vorher entfernt werden, um ein Eindringen von Staub zu verhindern. - Seite 23 Endura Twist ® − Bei Fenstertiefen > 170 mm: Aufgrund des tieferen Fensterprofils ist es nicht mehr möglich, die Schutzkartons über die Wartungsklappe zu entfernen. Das Frontprofil muss mithilfe des hierfür vorgesehenen Hilfswerkzeugs entfernt werden. ➊ ➋ Klicken Sie das Frontprofil (an der Vorderseite) mit dem Stützen Sie dabei die mitgelieferten Hilfswerkzeug heraus.
- Seite 24 Endura Twist ® • Für Typ „Zuluft nach unten + Putzprofil“: ➊ ➋ Öffnen Sie die Wartungs- Entfernen Sie die Schutz- Schließen Sie anschließend klappe (an der Unterseite) kartons. die Wartungsklappe. des Endura Twist. ® • Für Typ „Zuluft nach oben“: ➊...
-
Seite 25: Austausch Der Filter
Endura Twist ® 7 • Austausch der Filter • Um die (optionalen) Coarse 45% (G3)- oder ePM1 80% (F7)-Filter des Endura Twist anzubringen oder ® auszutauschen, muss die Wartungsklappe des Endura ® Twist geöffnet werden. Siehe Abschnitt 6 für den richtigen Zugang zu den Ventilatormodulen. - Seite 26 Endura Twist ® • Zugang über das Frontprofil (siehe Voraussetzungen Abschnitt 6) ➊ ➋ Entfernen Sie das Frontprofil Ersetzen/reinigen Sie die mithilfe des Hilfswerkzeugs. Filter und klicken Sie das Frontprofil wieder an seinen Platz. ACHTUNG: Die Filter müssen immer genau vor den Ventilatoröffnungen angebracht werden.
-
Seite 27: Filterzeit Einstellen
Endura Twist ® 8 • Filterzeit einstellen In diesem Menü können Sie einstellen, ob ein Filter in der Endura Twist angebracht ist und wenn ® ja, welche Art. Da Coarse 45% (G3)-Filter und ePM1 80% (F7)-Filter jeweils unterschiedliche Luftwiderstände haben, muss angegeben werden, welche Art von Filter im Gerät vorhanden ist, um einen korrekten Betrieb zu gewährleisten. -
Seite 28: Einstellen Der Filter Mit Der Tastenbedienung
Endura Twist ® 8.2 • Einstellen der Filter mit der Tastenbedienung Halten Sie ■ und ▼ 5 Sekunden lang gedrückt. Auf dem Display blinkt „FıL". Verwenden Sie ▲ und ▼, um das Zeitintervall zu ändern (von 90 bis 360 Tagen + OFF (Standardeinstellung ist OFF)). Zur Bestätigung auf ■... -
Seite 29: Anschlusspläne
Endura Twist ® 9 • Anschlusspläne LEISTUNGSKABEL I/O-KABEL 3 x min. 0,75 mm - max. 1,5 mm 8 x 0,34 mm 230V ± 10% Nur für die Steuerung über GMS-System... -
Seite 30: Reinigung Und Wartung
Endura Twist ® 10 • Reinigung und Wartung 10.1 • Allgemeines Verwenden Sie keine Sprays, Scheuermittel, Spülmittel, lösungsmittel- oder chlorhaltige Reinigungsmittel. Diese können das Gerät beschädigen. Reinigen Sie der Endura Twist mit ® einem feuchten Tuch und etwas lösungsmittelfreier Seife. 10.2 • Kontrolle Lassen Sie Störungen und Schäden, die die Sicherheit gefährden, unverzüglich von einem qualifizierten Monteur beheben. -
Seite 31: Ecodesign Produktkarte
Maalbeekstraat 10 • IZ 2 Vijverdam • B -8790 Waregem • Belgium O U T D O O R Tel. +32 (0)56 62 71 11 • info@renson.be • w w w.renson.eu * Technische Daten auf Grund internen Testergebnisse. Mögliche Abweichungen in externen Testergebnisse. - Seite 32 S UN P ROTE C T I O N Maalbeekstraat 10 • IZ 2 Vijverdam • B -8790 Waregem • Belgium O U T D O O R Tel. +32 (0)56 62 71 11 • info@renson.be • w w w.renson.eu...
-
Seite 33: Endura ® Twist 2X2
S U N P ROT E C T I O N Maalbeekstraat 10 • IZ 2 Vijverdam • B -8790 Waregem • Belgium O U T D O O R Tel. +32 (0)56 62 71 11 • info@renson.be • w w w.renson.eu... - Seite 34 S UN P ROTE C T I O N Maalbeekstraat 10 • IZ 2 Vijverdam • B -8790 Waregem • Belgium O U T D O O R Tel. +32 (0)56 62 71 11 • info@renson.be • w w w.renson.eu...
-
Seite 35: Endura ® Twist 2X3
S U N P ROT E C T I O N Maalbeekstraat 10 • IZ 2 Vijverdam • B -8790 Waregem • Belgium O U T D O O R Tel. +32 (0)56 62 71 11 • info@renson.be • w w w.renson.eu... - Seite 36 S UN P ROTE C T I O N Maalbeekstraat 10 • IZ 2 Vijverdam • B -8790 Waregem • Belgium O U T D O O R Tel. +32 (0)56 62 71 11 • info@renson.be • w w w.renson.eu...
-
Seite 37: Endura ® Twist 2X4
S U N P ROT E C T I O N Maalbeekstraat 10 • IZ 2 Vijverdam • B -8790 Waregem • Belgium O U T D O O R Tel. +32 (0)56 62 71 11 • info@renson.be • w w w.renson.eu... - Seite 38 S UN P ROTE C T I O N Maalbeekstraat 10 • IZ 2 Vijverdam • B -8790 Waregem • Belgium O U T D O O R Tel. +32 (0)56 62 71 11 • info@renson.be • w w w.renson.eu...
-
Seite 39: Endura ® Twist 2X5
S U N P ROT E C T I O N Maalbeekstraat 10 • IZ 2 Vijverdam • B -8790 Waregem • Belgium O U T D O O R Tel. +32 (0)56 62 71 11 • info@renson.be • w w w.renson.eu... - Seite 40 S UN P ROTE C T I O N Maalbeekstraat 10 • IZ 2 Vijverdam • B -8790 Waregem • Belgium O U T D O O R Tel. +32 (0)56 62 71 11 • info@renson.be • w w w.renson.eu...
-
Seite 41: Endura ® Twist 2X6
S U N P ROT E C T I O N Maalbeekstraat 10 • IZ 2 Vijverdam • B -8790 Waregem • Belgium O U T D O O R Tel. +32 (0)56 62 71 11 • info@renson.be • w w w.renson.eu... - Seite 42 S UN P ROTE C T I O N Maalbeekstraat 10 • IZ 2 Vijverdam • B -8790 Waregem • Belgium O U T D O O R Tel. +32 (0)56 62 71 11 • info@renson.be • w w w.renson.eu...
-
Seite 43: Eu-Herstellererklärung
Maalbeekstraat 10 • IZ 2 Vijverdam • B -8790 Waregem • België SU N P ROT EC T I O N Tel. +32 (0)56 62 71 11 • Fax +32 (0)56 60 28 51 O U T D O O R info@renson.be • w w w.renson.eu... -
Seite 44: Gewährleistung
Die Garantiezeit beträgt 2 Jahre. Die Installation und die Wartung müssen entsprechend der Anweisungen und nach allen Regeln der Kunst durchgeführt werden. Für detaillierte Garantiebedingungen besuchen Sie bitte unsere Webseite www.renson.eu. Ausschluss: Eindringen von Bauschmutz, Einspritzen von anderen als den geeigneten Produkten, Verwendung von aggressiven Flüssigkeiten oder Lösungsmittel, Schäden infolge von falschem oder abnormalem... - Seite 45 Endura Twist ® Bitte kontaktieren Sie Ihren RENSON Installateur und geben Sie dabei die Garantienummer und ® Produktionsdatum auf eine Dienstanwendung auf Ihrem Gerät an. Hier wird der Sticker mit der einmaligen Nummer von Endura Twist aufgeklebt. ® Beispiel: Garantienummer...
- Seite 46 Endura Twist ® Table of contents 1 • Introduction ..............................1.1 • General safety instructions ........................ 1.2 • General rules and specific measures ..................... 2 • Composition of the product ........................2.1 • Opening the package ........................2.2 • Package contents ..........................
-
Seite 47: Introduction
Endura Twist ® 1 • Introduction The assembly and actions described in these instructions may only be carried out by experienced installers, exactly according to the assembly, operating and maintenance instructions described and documented in this manual. The Endura Twist can be installed either horizontally or vertically, in each case with 3 different ®... -
Seite 48: General Safety Instructions
Always follow the safety regulations, warnings, comments and instructions from the manual. Failure to follow these safety regulations, warnings, comments and instructions can cause damage to the Endura Twist or can result in a personal injury, for which Renson NV cannot be held ®... -
Seite 49: Composition Of The Product
Endura Twist ® 2 • Composition of the product 2.1 • Opening the package ➊ ➋ Open the package. Carefully Remove the packaging material from the Endura Twist. ® remove the unit from the film. Place the Endura Twist on a workbench, trestle system or soft ®... -
Seite 50: Package Contents
Endura Twist ® 2.2 • Package contents PLEASE NOTE: A sticker with the warranty number of your appliance is integrated at the back of this manual. Save this manual and pass it along to future users. Included parts: • Box with inner and outer aluminium profiles •... - Seite 51 Endura Twist ® Section of Endura Twist ® Rain cover Transparent top profile, provided with dowel slots Screw for mounting on window Inner aluminium top profile Cables (power cable and optional I/O cable) Hammer-in plug for fixing in lintel Finishing profile PVC white Inner front profile (three variants) Acoustic damping material 10.
- Seite 52 Necessary tools (not supplied by Renson ® • Foam tape • Screw machine • Dowels (can be ordered via Renson : Screw-in anchor 18 cm or 24 cm): ® the Endura Twist is provided with a dowel slot at the top of the box so that the attachment to ®...
-
Seite 53: Installation On The Window
Endura Twist ® 3 • Installation on the window There are two ways for anchoring the Endura Twist onto the window frame, being: ® − a visible anchoring, with visible screws on top of the transparent PVC-profile. − a hidden anchoring, with hidden screws inside the transparent PVC-profile and sealed off with a sufficient watertight sealing tape (butyl, bitumen or equivalent). -
Seite 54: Drilling Holes For A Hidden Anchoring
Endura Twist ® Drill at least once through each partition (check on the window ➌ frame). + 15 mm Ø 6,5 PLEASE NOTE: Always use a drill bit with a diameter of 6.5. Always use a sufficiently long bit so that the unit is + 15 mm drilled through fully. - Seite 55 Endura Twist ® PLEASE NOTE: For aluminium windows: never drill the partitions in the + 15 mm zone of the fixation corner of the window + 15 mm. Start drilling from the following partition. + 15 mm Drill at least once through each partition (check on the window ➍...
-
Seite 56: Installation Endura ® Twist On Window Frame
Endura Twist ® 3.3 • Installation Endura Twist on window frame ® Place a foam tape/compriband or silicone ➊ ➋ strip along the entire length of the window frame. PLEASE NOTE: Place a foam tape/compriband (not included) over the entire length of the window frame first. - Seite 57 Endura Twist ® Tighten the screw until the ✓ ➋ Endura Twist connects ® securely to the window frame. Don’t continue tightening the screw in order to prevent bending/deformation of the transparent PVC. 3.4.2 • Hidden anchoring Screw the Endura Twist securely to the window frame on the ®...
-
Seite 58: Installation And Securing The Top Of Your Endura
Endura Twist ® 4 • Installation and securing the top of your Endura Twist ® Install the window with the Endura Twist in the window opening according to standard practice, ® both regarding installation and sealing. 4.1 • Securing the top for window depth ≤ 170 mm All types of Endura Twist, with any of the three types of air inflow openings, can be installed with ®... - Seite 59 Endura Twist ® 4.1.1 • Anchoring with dowels The Endura Twist is provided with a dowel slot at the top so that it can be attached to the ® structure easily and quickly with the aid of dowels (not included; order separately). For this purpose, the cover is provided with 'Euronut' dowel slots.
- Seite 60 Endura Twist ® For anchoring upwards, open the maintenance profile of the Endura Twist. The securing method ® depends on the chosen airflow of the Endura Twist (downwards or upwards): ® 1 • For ‘airflow downwards’ type (with or without plaster profile): Open the maintenance profile (bottom) of the Endura Twist.
- Seite 61 Endura Twist ® A. Pre-drilling in the cardboard protection: Each Endura Twist contains two protective cardboards, positioned near each fan module. The ® protective cardboards act both: − to prevent dirt and dust from entering into the fan modules during assembly and during the shell construction phase −...
- Seite 62 Endura Twist ® B. Pre-drilling directly into the aluminium upper profile: If there’s no drilling near the fan modules, you can drill directly into the aluminium upper profile. In that case, always drill on the marked screwing line. Follow the intervals as indicated above. After the Endura Twist has been screwed securely in place: ®...
-
Seite 63: Securing The Top With Window Depth > 170 Mm
Endura Twist ® 4.2 • Securing the top with window depth > 170 mm With window depth > 170 mm, the top is anchored with dowels. The Endura Twist is provided ® with a dowel slot at the top of the cover so that it can be easily and quickly attached to the structure with the aid of dowels (not included;... -
Seite 64: Finishing
Endura Twist ® 5 • Finishing 5.1 • Interior The Endura Twist was developed with a perfect finish in view. For example, there is a finishing ® profile at the top with a tear-off edge. One can plaster against this edge, or the edge can be removed in order to allow finishing with plasterboard. -
Seite 65: Exterior
Endura Twist ® 5.2 • Exterior Depending on the exterior finishing, it is recommended to use sealant: 5.2.1 • Finishing exterior with brickwork; placement not entirely behind the facade Sealing 5.2.2 • Finishing exterior with brickwork; placement entirely behind the facade Sealing Fill in with optional aluminium filling profile (25 x 20 x 2 mm) to the left and to... -
Seite 66: Removing The Protective Cardboard
Endura Twist ® 6 • Removing the protective cardboard Before putting the unit into service, the protective cardboards should be removed according to the procedure below: Airflow downwards Airflow upwards PLEASE NOTE: If the protective cardboard is not removed, the unit will not function. In order to prevent dust entering the unit, this protection must not be removed earlier. - Seite 67 Endura Twist ® − For window depths > 170 mm: Due to the deeper window frame, it is no longer possible to remove the protective cardboard by means of the maintenance profile. The front profile must be removed with the aid of the auxiliary tool supplied for this purpose.
- Seite 68 Endura Twist ® • For ‘airflow downwards + plaster profile’ type: ➊ ➋ Open the maintenance Remove the protective Then close the maintenance profile (bottom) of the cardboard. profile again. Endura Twist. ® • For ‘airflow upwards’ type: ➊ ➋ Click the front profile (front) Remove the protective Then click the front profile...
-
Seite 69: Filter Replacement
Endura Twist ® 7 • Filter replacement • In order to place or replace the (optional) Coarse 45% (G3) or ePM1 80% (F7) filters of the Endura Twist, the ® maintenance profile of the Endura Twist must be opened. ® See Section 6 for the correct way to access the fan modules. - Seite 70 Endura Twist ® • Access via front profile (see section 6) ➊ ➋ Remove the front profile Replace/clean the filters and using the auxiliary tool. click the front profile back into place. PLEASE NOTE: The filters must always be positioned exactly in front of the fan openings.
-
Seite 71: Setting The Filter Time
Endura Twist ® 8 • Setting the filter time When a filter (Coarse 45% (G3) / ePM1 80% (F7)) is placed in the Endura Twist, the filter time ® can be set. This is a time-controlled signal. Therefore, you decide for yourself when you wish to receive notification about cleaning/replacing the filters. -
Seite 72: Setting Filters With The Button Control
Endura Twist ® 8.2 • Setting filters with the button control Keep ■ and ▼ pressed in for 5 seconds. ‘FıL’ flashes on the display. Use ▲ and ▼ to change the time interval (from 90 to 360 days + OFF (default on OFF)). Press ■... -
Seite 73: Wiring Diagrams
Endura Twist ® 9 • Wiring diagrams POWER CABLE I/O CABLE 3 x min. 0.75 mm - max. 1.5 mm 8 x 0.34 mm 230V ± 10% Only for control with BMS system... -
Seite 74: Cleaning And Maintenance
Endura Twist ® 10 • Cleaning and maintenance 10.1 • General Do not use sprays, abrasives, dish washing detergents, solvents or cleaning agents that contain chlorine. These may damage the unit. Clean the Endura Twist with a damp cloth and some ®... -
Seite 75: Ecodesign Product Sheets
Maalbeekstraat 10 • IZ 2 Vijverdam • B -8790 Waregem • Belgium O U T D O O R Tel. +32 (0)56 62 71 11 • info@renson.be • w w w.renson.eu * Technical characteristics based on internal test results. Variation possible on external testing. - Seite 76 S UN P ROTE C T I O N Maalbeekstraat 10 • IZ 2 Vijverdam • B -8790 Waregem • Belgium O U T D O O R Tel. +32 (0)56 62 71 11 • info@renson.be • w w w.renson.eu...
-
Seite 77: Endura ® Twist 2X2
S U N P ROT E C T I O N Maalbeekstraat 10 • IZ 2 Vijverdam • B -8790 Waregem • Belgium O U T D O O R Tel. +32 (0)56 62 71 11 • info@renson.be • w w w.renson.eu... - Seite 78 S UN P ROTE C T I O N Maalbeekstraat 10 • IZ 2 Vijverdam • B -8790 Waregem • Belgium O U T D O O R Tel. +32 (0)56 62 71 11 • info@renson.be • w w w.renson.eu...
-
Seite 79: Endura ® Twist 2X3
S U N P ROT E C T I O N Maalbeekstraat 10 • IZ 2 Vijverdam • B -8790 Waregem • Belgium O U T D O O R Tel. +32 (0)56 62 71 11 • info@renson.be • w w w.renson.eu... - Seite 80 S UN P ROTE C T I O N Maalbeekstraat 10 • IZ 2 Vijverdam • B -8790 Waregem • Belgium O U T D O O R Tel. +32 (0)56 62 71 11 • info@renson.be • w w w.renson.eu...
-
Seite 81: Endura ® Twist 2X4
S U N P ROT E C T I O N Maalbeekstraat 10 • IZ 2 Vijverdam • B -8790 Waregem • Belgium O U T D O O R Tel. +32 (0)56 62 71 11 • info@renson.be • w w w.renson.eu... - Seite 82 S UN P ROTE C T I O N Maalbeekstraat 10 • IZ 2 Vijverdam • B -8790 Waregem • Belgium O U T D O O R Tel. +32 (0)56 62 71 11 • info@renson.be • w w w.renson.eu...
-
Seite 83: Endura ® Twist 2X5
S U N P ROT E C T I O N Maalbeekstraat 10 • IZ 2 Vijverdam • B -8790 Waregem • Belgium O U T D O O R Tel. +32 (0)56 62 71 11 • info@renson.be • w w w.renson.eu... - Seite 84 S UN P ROTE C T I O N Maalbeekstraat 10 • IZ 2 Vijverdam • B -8790 Waregem • Belgium O U T D O O R Tel. +32 (0)56 62 71 11 • info@renson.be • w w w.renson.eu...
-
Seite 85: Endura ® Twist 2X6
S U N P ROT E C T I O N Maalbeekstraat 10 • IZ 2 Vijverdam • B -8790 Waregem • Belgium O U T D O O R Tel. +32 (0)56 62 71 11 • info@renson.be • w w w.renson.eu... - Seite 86 S UN P ROTE C T I O N Maalbeekstraat 10 • IZ 2 Vijverdam • B -8790 Waregem • Belgium O U T D O O R Tel. +32 (0)56 62 71 11 • info@renson.be • w w w.renson.eu...
-
Seite 87: Eu Declaration Of Conformity
Maalbeekstraat 10 • IZ 2 Vijverdam • B -8790 Waregem • België SU N P ROT EC T I O N Tel. +32 (0)56 62 71 11 • Fax +32 (0)56 60 28 51 O U T D O O R info@renson.be • w w w.renson.eu... -
Seite 88: Warranty Conditions For User
• In the event of modification of the product, the warranty is void. See also our general terms and conditions of sale: the full description of the warranty conditions for paint, anodizing, lacquering and recesses are included in the RENSON price list. ®... - Seite 89 Endura Twist ® Contact your RENSON installer and specify the warranty number and production date if you ® have a service enquiry concerning your device. The sticker with the unique number of the Endura Twist is pasted here. ® Example:...
- Seite 90 Endura Twist ®...
- Seite 91 Endura Twist ®...
- Seite 92 All photos shown are for illustrative purposes; the actual product may vary due to product placement. Renson reserves the right to make technical changes to the products described in this brochure. ® The most recent product information, availability, and your local distributor can always be found on www.renson.eu *L2000806*...