Herunterladen Inhalt Inhalt Diese Seite drucken
Technoline WS6830 Bedienungsanleitung

Technoline WS6830 Bedienungsanleitung

Led-wetterstation mit funkuhr und alarm

Werbung

Verfügbare Sprachen
  • DE

Verfügbare Sprachen

  • DEUTSCH, seite 1
WS6830 - BEDIENUNGSANLEITUNG
LED-WETTERSTATION MIT FUNKUHR UND ALARM
DE1

Werbung

Inhaltsverzeichnis
loading

Inhaltszusammenfassung für Technoline WS6830

  • Seite 1 WS6830 - BEDIENUNGSANLEITUNG LED-WETTERSTATION MIT FUNKUHR UND ALARM...
  • Seite 2: Umwelteinflüsse Auf Funkempfang

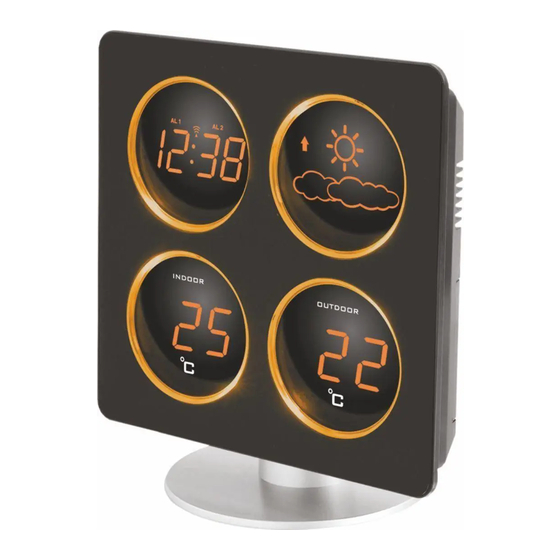
    A – Vorderseite A1: Uhrzeit A2: Innentemperatur A3: Tendenzanzeige A4: Wettervorhersage A5: Außentemperatur B – Hinterseite B1: Snooze/Dimmer-Taste B2: Time-Taste B3: Alarm On/Off-Taste B4: Hour/Wave-Taste B5: Minute-Taste B6: Alarm 1-Taste B7: Alarm 2-Taste B8: Reset-Taste B9: Anschluss für Netzteilstecker B10: Batteriefachabdeckung B11: Netzteil B12: Netzteilstecker C –...
  • Seite 3: Dcf Funksignalempfang Und Funkempfang-Indikator

    Schritt 4 Entfernen Sie die Schutzfolie vom Display. Die Wetterstation ist nun betriebsbereit. Die Station empfängt nach wenigen Sekunden die Temperaturdaten des Außensenders. Platzieren Sie diesen nun draußen an einem trockenen und schattigen Ort. Bringen Sie die Halterung an der Unterseite des Außensender für die Tischaufstellung an oder legen bringen Sie es an der Rückseite des Außensenders für die Wandmontage an.
  • Seite 4: Die Wettervorhersage

    Während des Funkempfangs wechselt der Signalstärke-Indikator möglicherweise von 1 Balken zu 2 Balken zu 3 Balken. Dies ist zu erwarten da die Station neben dem DCF-Signal auch andere Signale in der Luft erfasst. Drücken Sie die TIME Taste um zur normalen Zeitanzeige zurück zu wechseln (wenn nach 21 Minuten keine Funkuhrzeit empfangen werden konnte, wird automatisch zur normalen Zeitanzeige zurückgewechselt).
  • Seite 5: Zeitzoneneinstellung

    Hinweis: Die Uhrzeitanzeige erfolgt im 24-Stunden-Format. ZEITZONENEINSTELLUNG Halten Sie die TIME und SNOOZE Taste gleichzeitig gedrückt. Die Zeitanzeige zeigt 01 an. Lassen Sie die SNOOZE Taste los und halten Sie lediglich die TIME Taste gedrückt. Drücken Sie die MINUTE Taste, um die Zeitzone einzustellen: “00”...
  • Seite 6: Fehlerbehebung

    Drücken Sie die SNOOZE / DIMMER Taste um die Helligkeit der LED-Anzeige heller oder dunkler einzustellen. FEHLERBEHEBUNG Sollte die Station falsche Werte anzeigen, könnte das an elektrostatischer Ladung oder einer Störung durch andere Geräte liegen. Drücken Sie die RESET Taste der Station und entnehmen Sie die Batterien aus dem Außensender und legen Sie diese erneut ein.
  • Seite 7  Verwenden Sie nur Alkali-Batterien, keine wiederaufladbaren Batterien.  Legen Sie die Batterien unter Beachtung der Polarität (+/-) richtig ein.  Ersetzen Sie stets einen vollständigen Batteriesatz.  Mischen Sie niemals alte und neue Batterien.  Entfernen Sie erschöpfte Batterien sofort. ...
  • Seite 8 WS6830 - INSTRUCTION MANUAL LED WEATHER STATION WITH RADIO CONTROLLED CLOCK AND ALARM...
  • Seite 9: Quick Setup

    A – Front side A1: Time A2: Indoor temperature A3: Tendency indicator A4: Weather forecast A5: Outdoor temperature B – Back side B1: Snooze/Dimmer button B2: Time button B3: Alarm On/Off button B4: Hour/Wave button B5: Minute button B6: Alarm 1 button B7: Alarm 2 button B8: Reset button B9: DC socket...
  • Seite 10 Insert the holder to the bottom of the outdoor transmitter for table standing or insert it to the back of the transmitter for wall mounting purpose. During reception of the DCF time signal, your thermometer does not take temperature measurement. It will change to low brightness and will resume to high brightness after auto reception.
  • Seite 11: Time Zone Setting

    This clock starts reception automatically everyday at 1:00 am. If auto reception fails at 1:00 am, it will start again at 2:00 am. If it fails at 2:00 am, it will start again at 3:00 am, 4:00 am and 5:00 am. If auto reception still fails at 5:00 am, it will start automatic reception at 1:00 again in the next day.
  • Seite 12: Troubleshooting

    Press and hold ALM 2 button and at the same time press HOUR button once at a time to set hour or press MINUTE button once at a time to set minute. To turn on or off the alarm To turn on Alarm 1 only, press AL ON/OFF button. The ALM 1 LED lights up on the display. To turn on Alarm 2 only, press AL ON/OFF button again.
  • Seite 13 Alarm duration: 5 minutes Snooze duration: 5 to 60 minutes AC/DC adapter: HX-12-0501200-AG Precautions  This main unit is intended to be used only indoors.  Do not subject the unit to excessive force or shock.  Do not expose the unit to extreme temperatures, direct sunlight, dust or humidity. ...
  • Seite 14 WS6830 – MANUAL D'INSTRUCTIONS STATION MÉTÉOROLOGIQUE À LED AVEC HORLOGE RADIOCOMMANDÉE ET FONCTION RÉVEIL...
  • Seite 15: Réglage Rapide

    A – Face avant A1: Heure A2: Température intérieure A3: Indicateur de tendance A4: Prévisions météo A5: Température extérieure B – Face arrière B1: Bouton Snooze/Dimmer B2: Bouton Time B3: Bouton Alarm On/Off B4: Bouton Hour/Wave B5: Bouton Minute B6: Bouton Alarm 1 B7: Bouton Alarm 2 B8: Bouton Reset B9: Prise CC...
  • Seite 16: Piles De Secours

    Étape 2 Branchez l'adaptateur CA/CA sur une prise secteur 230 V. Branchez l'extrémité CA de l'adaptateur sur le connecteur d'alimentation situé à l'arrière de la station. Insérez le socle de base dans le cylindre d’accueil noir situé sur la station météo (voir illustrations). Tournez le socle vers la droite afin de bien le stabiliser dans sa position.
  • Seite 17: Previsions Meteorologiques

    Lorsque la station n'est plus reliée à la prise secteur, elle assure un fonctionnement minimal en basculant sur les piles de secours. L'écran à LED reste alors éteint, mais les fonctions horloge et réveil continuent de fonctionner (ce mode est également activé en cas de panne de courant). RÉCEPTION DU SIGNAL RADIO ET INDICATEUR DE SIGNAL Dès que vous allumez la station météo, celle-ci se place en mode de réception des signaux radio.
  • Seite 18: Reglage De L'heure

    La prévision météo est affichée avec 4 icônes météo différentes: Ensoleille Ensoleille & Nuageux Nuageux Pluvieux Remarque: Déplacer la station météo à l'intérieur de la maison ou au voisinage de la maison provoque un changement soudain dans le comportement de la station et affecte l'exactitude des prévisions météorologiques.
  • Seite 19: Réglage De La Luminosité De L'écran

    Pour activer seulement l'alarme 2, appuyez nouveau sur la touche AL ON/OFF. La LED de ALM 2 s'allume sur l'écran. Pour activer les deux alarmes, appuyez nouveau sur la touche AL ON/OFF. Les LED de ALM 1 et ALM 2 s'allument sur l'écran. Pour inactiver les deux alarmes permanente, appuyez nouveau sur la touche AL ON/OFF.
  • Seite 20: Spécifications

    SPÉCIFICATIONS Température de fonctionnement: 0°C à 45°C Plage de mesure de la température: Intérieur: 0°C à +45°C (en-deçà et au-delà de ces limites, l'écran affiche HH.H / LL.L) Extérieur: -40°C à +70°C (en-deçà et au-delà de ces limites, l'écran affiche HH.H / LL.L) Résolution en température: 1°C Durée de la sonnerie de réveil:...
  • Seite 21 Utilisez le produit uniquement pour son usage prévu! Noter l'obligation de la Loi sur la batterie Les piles ne doivent pas être déposées avec vos ordures ménagères. Dans le cas où vous le faites vous risquez de provoquer des dommages importants à votre environnement ou à...
  • Seite 22 WS6830 – MANUAL DE INSTRUCCIONES ESTACIÓN METEOROLÓGICA POR LED CON RELOJ RADIO-CONTROLADO Y ALARMA...
  • Seite 23: Configuración Rápida

    A – Parte delantera A1: Tiempo A2: Temperatura interior A3: Indicador de tendencia A4: Previsión del tiempo A5: Temperatura exterior B – Parte trasera B1: Botón Snooze/Dimmer B2: BotónTime B3: Botón Alarm On/Off B4: Botón Hour/Wave B5: Botón Minute B6: Botón Alarm 1 B7: Botón Alarm 2 B8: Botón Reset B9: Toma de CC...
  • Seite 24 AAA (no incluidas) en el compartimiento de la batería della estación. Observe la polaridad correcta "+/-" de las pilas! Cierre el compartimento de las pilas Paso 4 Retire la etiqueta protectora de la parte delantera. La estación meteorológica está lista para trabajar para usted.
  • Seite 25: Previsión Del Tiempo

    Durante la recepción, pulsando el botón HOUR / WAVE se mostrará el modo de recepción y la fuerza de la señal indicación: Cuando se detecta una señal DCF fuerte, en la pantalla aparecen 3 barras Cuando es débil o no se detecta la señal DCF, la pantalla muestra Durante la recepción, la fuerza de la señal puede variar entre 1 barra, 2 barras y 3 barras.
  • Seite 26: Ajustar La Hora

    AJUSTAR LA HORA Pulsar y mantener pulsado el botón TIME y al mismo tiempo pulsar el botón HOUR una vez para ajustar las horas. Pulsar y mantener pulsado el botón TIME y al mismo tiempo pulsar el botón MINUTE una vez para ajustar los minutos.
  • Seite 27: Resolución De Problemas

    parpadear (quedará estático). La alarma volverá a sonar otra vez a la misma hora al día siguiente. Ajustar la duración de la repetición (de 5 a 60 min) Pulsar y mantener pulsado el botón SNOOZE y la pantalla de la hora mostrará 05 (duración de la repetición por defecto).
  • Seite 28  No exponga la unidad a temperaturas extremas, directa a los rayos del sol, polvo o humedad.  No la sumerja en el agua.  Evite el contacto con cualquier material corrosivo.  No se deshaga de esta unidad arrojándola al fuego ya que puede explotar. ...
  • Seite 29 WS6830 - GEBRUIKSHANDLEIDING LED WEERSTATION MET RADIOGESTUURDE KLOK EN ALARM...
  • Seite 30 A – Voorkant A1: Tijd A2: Binnentemperatuur A3: Neigingindicator A4: Weersvoorspelling A5: Buitentemperatuur B – Achterkant B1: Snooze/Dimmer-knop B2: Time-knop B3: Alarm On/Off-knop B4: Hour/Wave-knop B5: Minute-knop B6: Alarm 1-knop B7: Alarm 2-knop B8: Reset-knop B9: DC-aansluiting B10: Batterijvakdeur B11: AC/DC-adaptor B12: DC-stekkeraansluiting C –...
  • Seite 31 Stap 4 Verwijder de beschermfolie van de display. Het weerstation is nu gebruiksklaar. Het station zal binnen enkele seconden het gegevenssignaal vanaf de buiten- sensor ontvangen. Plaats de buitensensor vervolgens buitenshuis op een droge plek in de schaduw. Plaats de houder aan de onderkant van de outdoor-zender voor tafel staand of steek deze aan de achterkant van de zender voor wandmontage doel.
  • Seite 32 De signaalsterkte kan tijdens ontvangst wisselen van 1 streepje naar 2 streepjes naar 3 streepjes. Dit is normaal omdat de klok gelijkertijd bezig is met detectie van het DFC signaal en van andere signalen in de lucht. Druk op TIME toets om terug te keren naar de tijdweergave met knipperend icoontje.
  • Seite 33: Tjidzoneinstelling

    Opmerking: De tijd wordt weergegeven in het 24-uur formaat. TJIDZONEINSTELLING Druk tegelijkertijd op de TIME en SNOOZE toets, het tijdsdisplay zal overspringen naar 01. Laat de SNOOZE toets los en terwijl u de TIME toets ingedrukt houdt, drukt u op de MINUTE toets om de tijdzone in te stellen: “00”...
  • Seite 34: Probleemoplossing

    PROBLEEMOPLOSSING In het geval dat het station valse cijfers toont, kan het worden aangetast door elektrostatische ontlading of interferenties vanaf andere apparatuur. Druk op de RESET toets op de het station en afhalen en opnieuw laden in een buitensensor. Het station zal worden teruggesteld op de standaard tijd- en kalenderinstellingen en opnieuw beginnen met ontvangst van het radiogestuurde tijdsignaal.
  • Seite 35  Combineer nooit gebruikte en nieuwe batterijen.  Verwijder onmiddellijk uitgeputte batterijen.  Verwijder batterijen wanneer niet in gebruik.  Batterijen nooit opladen of in vuur werpen om ontploffing te voorkomen.  Houd de batterijen niet in de nabijheid van metalen voorwerpen. Een contact kan een kortsluiting veroorzaken.
  • Seite 36 WS6830 - MANUALE DI ISTRUZIONI STAZIONE METEOROLOGICA A LED CON OROLOGIO E SVEGLIA RADIO CONTROLLATO...
  • Seite 37: Configurazione Rapida

    A – Lato anteriore A1: Tempo A2: Temperatura interna A3: Indicatore di tendenza A4: Previsioni meteo A5: Temperatura esterna B – Lato posteriore B1: Pulsante Snooze/Dimmer B2: Pulsante Time B3: Pulsante Alarm On/Off B4: Pulsante Hour/Wave B5: Pulsante Minute B6: Pulsante Alarm 1 B7: Pulsante Alarm 2 B8: Pulsante Reset B9: Presa DC...
  • Seite 38 Fase 4 Rimuovere la pellicola protettiva dal display. La stazione meteo è ora operativo. La stazione riceverà il segnale dati dal sensore esterno in pochi secondi. Quindi posizionare il sensore esterno in un area asciutta e all'ombra. Inserire il supporto al fondo del trasmettitore esterno per la tavola in piedi o inserire al retro del trasmettitore per montaggio a parete scopo.
  • Seite 39: Previsioni Meteo

    Durante la ricezione, la potenza di segnale può passare da 1 barretta a 2 barrette a 3 barrette. Ciò è normale in quanto l'orologio sta rilevando un segnale DCF e altri segnali nell'aria allo stesso tempo. Premendo il pulsante TIME si ritornerà alla visualizzazione dell'orario (se l’orologio non rileva alcun segnale orario DCF per 21 minuti, viene ripristinata la normale visualizzazione dell’orario).
  • Seite 40: Impostazione Sveglia

    Nota: L'orario è visualizzato in formato 24 ore. IMPOSTAZIONE FUSO ORARIO Premere TIME ed il pulsante SNOOZE contemporaneamente, sul display appare 01. Lasciare il pulsante SNOOZE e tenere premuto TIME. Premere MINUTE per impostare il fuso orario: “00” GMT +0 (Regno Unito) “01”...
  • Seite 41: Risoluzione Dei Problemi

    RISOLUZIONE DEI PROBLEMI Nel caso in cui la stazione mostri dei numeri errati, ciò potrebbe essere influenzato da interferenze o scariche elettrostatiche provenienti da altri dispositivi. Premere il pulsante RESET sul della stazione e portar via e ricaricare in un sensore esterno. La stazione sarà ripristinata alle impostazioni predefinite di orario e calendario e sarà...
  • Seite 42  Rimuovere immediatamente le batterie scariche.  Rimuovere le batterie quando non sono utilizzate.  Non conservare le batterie in prossimità di oggetti metallici. Un contatto potrebbe causare un corto circuito.  Non ricaricare le batterie e non gettarle nel fuoco perché potrebbero esplodere. ...
  • Seite 43 WS6830 – NÁVOD K POUŽITÍ METEOROLOGICKÁ STANICE LED S RÁDIOVĚ ŘÍZENÝMI HODINAMI A BUDÍKEM...
  • Seite 44: Rychlé Nastavení

    A – Přední strana A1: Čas A2: Vnitřní teplota A3: Indikátor tendence A4: Předpověď počasí A5: Venkovní teplota B – Zadní strana B2: Tlačítko Time B3: Tlačítko Alarm On/Off B1: Tlačítko Snooze/Dimmer B4: Tlačítko Hour/Wave B5: Tlačítko Minute B6: Tlačítko Alarm 1 B7: Tlačítko Alarm 2 B8: Tlačítko Reset B9: DC zásuvka...
  • Seite 45 Stanice začne za pár sekund přijímat datový signál z venkovního čidla. Potom umístěte venkovní čidlo na suché a stinné venkovní místo. Vložte držák na dně venkovního vysílače ploše nebo vložte jej do zadní části vysílače na stěnu univerzální držák. Během příjmu DCF signálu stanice neprovádí měření teploty. To se změní na nízkém jasu a bude pokračovat vysoký...
  • Seite 46: Předpověď Počasí

    automaticky vrátí do normálního zobrazení času). Stiskněte a podržte tlačítko HOUR / WAVE tlačítka zastavíte příjem DCF. Úspěšný příjem nebo neúspěšný příjem Ikona se stane statickou (přestane blikat) když dojde k úspěšnému příjmu. Když selže příjem, tak ikona zmizí. Automatický příjem a manuální příjem Stanice začne automaticky přijímat signál každý...
  • Seite 47: Nastavení Alarmu

    “02” GMT +2 (Čas východní Evropa) Poznámka: Časové pásmo může být nastaveno pouze v případěkdyž hodinyúspěšně přijímají rádiová signál. NASTAVENÍ ALARMU Stlačte a držte tlačítko ALM 1 a současně jednou za čas stiskněte tlačítko HOUR k nastavení hodiny nebo tlačítko MINUTE k nastavení minut. Stlačte a držte tlačítko ALM 2 a současně...
  • Seite 48 Pokud ztratíte venkovní teplotu Když číslice venkovní teploty ukazují „--“, tak je bezdrátový přenos buď přerušen, nebo ztracen. Stiskněte tlačítko MINUTE ve stanici a odběr a opětovné načtení do venkovního senzoru. Pokud bude opakovaně docházet ke ztrátě venkovního teplotního displeje, zkuste vysílač umístit do jiného prostředí, abyste zajistili hladké...
  • Seite 49  Ukládejte baterie mimo dosah dětí. Existuje riziko udušení. Výrobek používejte pouze ke stanovenému účelu! Všimněte si požadavky podle baterie-směrnice Staré baterie nepatří do domovního odpadu, protože by mohly způsobit škody na zdraví a životní prostředí. Můžete se vrátit použité baterie a akumulátory bezplatně...
  • Seite 50 WS6830 - INSTRUKCJA OBSŁUGI STACJA METEOROLOGICZNA LED Z ZEGAREM STEROWANYM RADIOWO I ALARMEM...
  • Seite 51 A – Strona przednia A2: Temperatura wewnętrzna A3: Wskaźnik tendencji A1: Czas A5: Temperatura zewnętrzna A4: Prognoza pogody B – Tylna strona B1: Przycisk Snooze/Dimmer B2: Przycisk Time B3: Przycisk Alarm On/Off B4: Przycisk Hour/Wave B5: Przycisk Minute B6: Przycisk Alarm 1 B9: Gniazdo prądu stałego B7: Przycisk Alarm 2 B8: Przycisk Reset...
  • Seite 52 Krok 4 Usuń folię ochronną z wyświetlacza. Stacja meteorologiczna już działa. Stacja odbierze sygnał danych z czujnika zewnętrznego za kilka sekund. Następnie należy ustawić czujnik zewnętrzny w suchym i ocienionym miejscu na zewnątrz. Włożyć uchwyt do dołu na zewnątrz nadajnika dla stojących stole lub wprowadzić je do tylnej ścianki obudowy przetwornika celu montażu.
  • Seite 53: Prognoza Pogody

    Podczas odbioru siła sygnału może zmieniać się z 1 kreski do 2 i 3 kresek. Jest to normalne, ponieważ zegar odbiera sygnał DCF i inne sygnały w powietrzu w tym samym czasie. Naciśnięcie przycisku TIME spowoduje powrót do normalnego wyświetlania czasu (jeżeli otrzymane po 21 minut brak sygnał...
  • Seite 54: Ustawienie Strefy Czasowej

    Uwaga: Czas jest wyświetlany w formacie 24-godzinnym. USTAWIENIE STREFY CZASOWEJ Po naciśnięciu razem przycisku TIME i SNOOZE, wyświetlacz czasu zmieni się na :01. Należy puścić przyciskSNOOZE i przytrzymać przycisk TIME, a następnie nacisnąć przycisk MINUTE, aby ustawić strefę czasową: “00” GMT +0 (Zjednoczone Królestwo) “01”...
  • Seite 55: Rozwiązywanie Problemów

    Po naciśnięciu i przytrzymaniu przycisku SNOOZE, na wyświetlaczu czasu pojawi się :05 (standardowy czas trwania drzemki). Następnie należy nacisnąć przycisk MINUTE, aby ustawić żądany czas trwania drzemki. FUNKCJA REGULATORA OŚWIETLENIA Nacisnąć przycisk SNOOZE / DIMMER, aby wyregulować dużą lub małą jasność wyświetlacza LED. ROZWIĄZYWANIE PROBLEMÓW Jeśli stacja pokaże nieprawidłowe cyfry, może to oznaczać...
  • Seite 56  Nie otwierać obudowy i nie ingerują w wewnętrzne części urządzenia. Ostrzeżenia bezpieczeństwa dotyczące baterii  Używać tylko baterii alkalicznych. Nie wolno używać akumulatorów.  Włożyć baterie prawidłowo, zgodnie z biegunowością (+/-).  Zawsze należy wymieniać cały zestaw baterii.  Nigdy nie wolno mieszać...

Inhaltsverzeichnis