Herunterladen Inhalt Inhalt Diese Seite drucken
SPORTSTECH HTX500 Bedienungsanleitung
Vorschau ausblenden Andere Handbücher für HTX500:

Werbung

Verfügbare Sprachen
  • DE

Verfügbare Sprachen

  • DEUTSCH, seite 1
HTX500
DE
EN
ES
FR
IT
NL

Werbung

Inhaltsverzeichnis
loading

Inhaltszusammenfassung für SPORTSTECH HTX500

  • Seite 1 HTX500...
  • Seite 3 Sehr geehrter Kunde, wir freuen uns, dass Sie sich für ein Gerät aus der SPORTSTECH Produktpalette entschieden haben. SPORTSTECH Sportgeräte bieten Ihnen hohe Qualität und neue Technologie. Um die Leistungsfähigkeit des Gerätes voll nutzen zu können und viele Jahre Freude an Ihrem Gerät zu haben, lesen Sie bitte vor der Inbetriebnahme und dem Beginn des Trainings dieses Benutzerhandbuch sorgfältig durch und verwenden Sie das Gerät den Anweisungen entsprechend.
  • Seite 4: Video Tutorials

    Aufbau, Benutzung, Abbau. 1. QR-Code scannen 2. Videos anschauen 3. Schnell und sicher starten Link zu den Videos: https://service.innovamaxx.de/htx500_video Uns gibt es auch auf Social Media! Hol dir die neuesten Produktinfos, Trainingsinhalte uvm. auf unserer: Instagram-Seite Facebook-Seite https://www.instagram.com/sportstech.de https://www.facebook.com/sportstech.de...
  • Seite 5: Inhaltsverzeichnis

    INHALT TECHNISCHE ANGABEN UND LIEFERUMFANG ..............6 WICHTIGE SICHERHEITSHINWEISE ................7 EXPLOSIONSZEICHNUNG/ERSATZTEILLISTE ..............9 HINWEISE VOR DER MONTAGE ..................9 MONTAGE/AUFBAU ..................... 10 DEHNÜBUNGEN ......................17 WARTUNG / PFLEGE ....................18 ENTSORGUNG ......................18...
  • Seite 6: Technische Angaben Und Lieferumfang

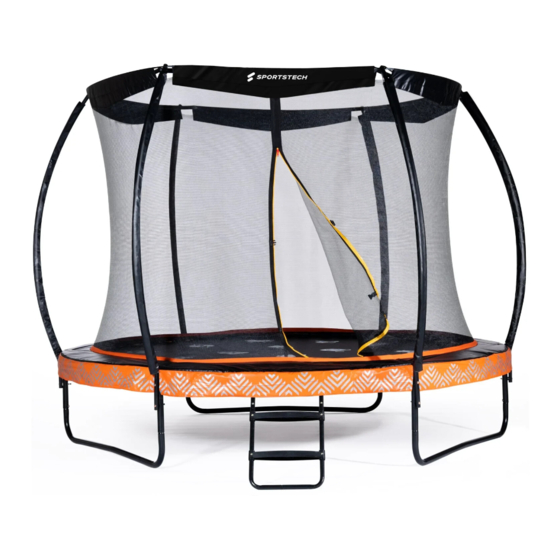
    TECHNISCHE ANGABEN UND LIEFERUMFANG Produktinformationen 8 ft - Ø 244 cm 10 ft - Ø 305 cm Abmessungen (L x B x H) ca. 244 x 244 x 215 cm ca. 305 x 305 x 240 cm Produktgewicht 36 kg 51 kg Maximales Körpergewicht des Nutzers 100 kg...
  • Seite 7: Wichtige Sicherheitshinweise

    WICHTIGE SICHERHEITSHINWEISE Diese allgemeinen Sicherheitsinformationen müssen unbedingt für die Benutzung dieses Produkts beachtet werden. Lesen Sie alle Hinweise, bevor Sie das Produkt in Benutzung nehmen. • Es ist wichtig, das gesamte Handbuch vor der Montage und Inbetriebnahme aufmerksam zu lesen. Die sichere und wirksame Anwendung kann nur dann gegeben sein, wenn das Gerät ordnungsgemäß...
  • Seite 8 • WEITERE HINWEISE • Dieses Produkt darf immer nur von einer Person benutzt werden. • Achten Sie darauf, dass Sie stets im Trampolinzentrum springen! • Bei der Nutzung des Gerätes achten Sie auf Rutschgefahr durch den Sprinkler. • Das Gerät ist nicht für die Nutzung bei starkem Wind vorgesehen. •...
  • Seite 9: Explosionszeichnung/Ersatzteilliste

    EXPLOSIONSZEICHNUNG/ERSATZTEILLISTE Unter folgendem Link Unter folgendem Link finden Sie die Explosionszeichnung finden Sie die Explosionszeichnung und die Ersatzteilliste: und die Ersatzteilliste: https://service.innovamaxx.de/htx500_spareparts https://service.innovamaxx.de/htx500_spareparts HINWEISE VOR DER MONTAGE HINWEISE ZUR MONTAGE • Die Montage des Produktes muss sorgfältig und von zwei oder mehr erwachsenen Personen vorgenommen werden.
  • Seite 10: Montage/Aufbau

    MONTAGE/AUFBAU Alle Bauteile und vormontierten Teile fest anziehen! Schritt 1: Abbildung 1 Nehmen Sie einen Standfuß (#A1) und fügen Sie diesen an beiden Seiten mit jeweils einer Standfußverlängerung (#A2) zusammen. Wiederholen Sie diesen Schritt insgesamt drei Mal. Übrigens: Eine einfache Video- Aufbauanleitung finden Sie auf YouTube.
  • Seite 11: Schritt 5: Abbildung

    Schritt 4: Haben Sie die 6 Rahmenstücke Abbildung 5 (#A3) vollständig zusammengesteckt und festgeschraubt, heben Sie den Metallrahmen an und stecken Sie die in Schritt 1 & 2 zusammengebauten Standfüße in die dafür vorgesehenen Halterungen an der Unterseite (Abb.5). Das Grundgerüst sollte nun allein &...
  • Seite 12 Schritt 7: Verbinden Sie diese Schutznetzhalter nun mit dem Grundgerüst, sodass das lange Ende nach oben zeigt und zur Trampolinmitte gewölbt ist. Abbildung 10 Zur Befestigung führen Sie jeweils zwei lange Schrauben (M6*7) von außen durch die dafür vorgesehenen Öffnungen am unteren Ende des Schutznetzhalters ein und bestücken diese auf der anderen Rohrseite mit jeweils einer Gummi-Mutter (Abb.10).
  • Seite 13 Schritt 10: Abbildung 14 Anschließend platzieren Sie das Sprungtuch (#C) in der Mitte des Grundgerüstes und legen Sie das Schutznetz (#D1) darüber. Achten Sie dabei darauf, dass die am Schutznetz angebrachten Klettverschlüsse nach innen zur Trampolinmitte zeigen und die am unteren Rand befindlichen Öffnungen parallel zu den Metallhaken des Sprungnetzes positioniert sind.
  • Seite 14 Schritt 13: Legen Sie nun die Randabdeckung (#E) an den Rand des Sprungtuches (#C), sodass das Grundge- rüst sowie die Metallfedern (#D2) verdeckt werden. Dabei sollten sich die Nähte der Randabdeckung jeweils auf Höhe der Schutznetzhalter befinden (Abb.20). WICHTIG: Achten Sie zudem darauf, dass sich die auf der Randabdeckung angebrachten Sicherheits- hinweise am Ein- und Ausgang des Schutznetzes befinden (Abb.21).
  • Seite 15 Schritt 15: Abbildung 24 Verbinden Sie die beiden Leiterstangen (#F1), indem Sie diese am unteren Ende zusammenführen. Schieben Sie anschließend die beiden Treppenstufen (#F2) auf das zusammengesetzte Leitergestell. Achten Sie dabei darauf, dass die Oberseite der Treppenstufen nach oben zeigt und sich die kleinen Löcher auf beiden Seiten der Treppenstufen auf der Seite befinden, an der die Leiter- stangen jeweils 3 Löcher aufweisen (Abb.24).
  • Seite 16 Schritt 18: Abbildung 28 Zur Erhöhung der Stabilität Ihres Trampolins bringen Sie nun das Befestigungsseil (#H1) mit dem Klickverschluss am Metallrahmen unterhalb der Randabdeckung an und ziehen Sie es fest. Haken Sie je einen Hering (#H2) am Befestigungsseil ein, spannen Sie dieses und drehen Sie den Hering unter Spannung im Uhrzeigersinn in den Boden hinein (Abb.28).
  • Seite 17: Dehnübungen

    DEHNÜBUNGEN Vor jedem Training sollten Sie Ihre Muskeln mindestens 5-10 Minuten lang dehnen, um sie ausreichend aufzuwärmen. Wiederholen Sie die nachfolgenden Dehnungsübungen daher fünf Mal. Das Dehnen vor dem Training trägt zur Verbesserung der Flexibilität bei und verringert das Verletzungsrisiko. MIT DEM KOPF ROLLEN Drehen Sie den Kopf nach rechts für eine Sekunde, fühlen Sie die Streckung auf der linken Seite des Nackens, dann drehen Sie den Kopf zurück für eine Sekunde, recken Sie Ihr Kinn nach oben und lassen...
  • Seite 18: Wartung / Pflege

    WARTUNG / PFLEGE • Überprüfen Sie nach dem Zusammenbau und vor dem Einsatz des Gerätes, ob alle Teile vollständig und korrekt festgezogen sind. • Reinigen Sie das Gerät regelmäßig mit einem leicht angefeuchteten Tuch unter Einsatz eines milden Reinigungsmittels. ENTSORGUNG Recyclingkreislauf Verpackungsmaterialien können wieder dem Rohstoffkreislauf zugeführt werden.
  • Seite 19 Dear customer, We are pleased you chose a device from the SPORTSTECH product range. SPORTSTECH sports equip- ment offers you high quality and new technology. In order to fully use the potential of your device and be able to enjoy it for many years, please read this manual carefully before starting up and beginning of training, and use the device according to the instruc- tions.
  • Seite 20 1. Scan the QR code 2. Watch videos 3. Start fast and safely Link to the videos: https://service.innovamaxx.de/htx500_video We are also on social media! Get the latest product information, training content and much more on our: Instagram-page Facebook-page https://www.instagram.com/sportstech.de https://www.facebook.com/sportstech.de...
  • Seite 21 INDEX TECHNICAL DETAILS ....................22 IMPORTANT SAFETY INSTRUCTIONS ................23 EXPLODED DRAWING/SPARE PARTS LIST ..............25 MOUNTING/ASSEMBLY ....................26 STRETCH EXERCISE ....................33 MAINTENANCE/CARE ....................34 DISPOSAL ........................34...
  • Seite 22: Technical Details

    TECHNICAL DETAILS Product information 8 ft - Ø 244 cm 10 ft - Ø 305 cm Dimensions (L x B x H) ca. 244 x 244 x 215 cm ca. 305 x 305 x 240 cm Total weight 36 kg 51 kg Maximum weight of the user 100 kg...
  • Seite 23: Important Safety Instructions

    • IMPORTANT SAFETY INSTRUCTIONS Basic precautions should always be followed, including the following safety instructions when using the crosstrainer: Read all instructions before using this equipment. • It is important to read the entire manual carefully and fully prior to installation. Safe and effective use can only be assured if the device is properly assembled, properly maintained and cared for.
  • Seite 24 • FURTHER INSTRUCTIONS • This product may only be used by one person at a time. • Make sure you always jump in the trampoline center! • When using the device, watch out for the danger of slipping with the sprinkler. •...
  • Seite 25: Exploded Drawing/Spare Parts List

    EXPLODED DRAWING/SPARE PARTS LIST At the following link At the following link you will find the exploded drawing you will find the exploded drawing and the spare parts list: and the spare parts list: https://service.innovamaxx.de/htx500_spareparts https://service.innovamaxx.de/htx500_spareparts INSTRUCTIONS FOR INSTALLATIONS INSTRUCTIONS FOR INSTALLATION •...
  • Seite 26: Mounting/Assembly

    MOUNTING/ASSEMBLY Firmly tighten all component parts and pre-assembled parts! Figure 1 Step 1: Take a stand (#A1) and attach it to either side with one on each stand extension (#A2) together. Repeat this step a total of three times. Did you know?: Scan the QR code on page 20 and look up our installation video on YouTube.
  • Seite 27 Step 4: Once you have pushed the 6 frame Figure 5 pieces (#A3) together and screwed them tight, lift the metal frame and insert the feet you assembled in step 1 & 2 into the brackets provided for this on the underside (Fig.5). The structure should now be alone &...
  • Seite 28 Step 7: Now connect this protective net holder to the basic structure so that the long end follows at the top and is curved towards the center of the Figure 10 trampoline. To fix it, use two screws (M6 * 7) from the outside through the openings provided at the lower end of the protective net holder and equip them with one on the other side of the pipe rubber...
  • Seite 29 Step 10: Figure 14 Then place the jumping mat (#C) in the middle of the basic structure and lay it down with the protective net (#D1) above. Make sure that the protective net Velcro fastenings point inwards towards the center of the trampoline and those on the lower edge openings are positioned parallel to the metal hooks of the jumping net.
  • Seite 30 Step 13: Now place the edge cover (#E) on the edge of the jumping mat (#C) so that the basic structure and the metal springs (#D2) are covered. The seams of the edge cover should be at the same level as the protective net holder (Fig. 20). IMPORTANT: Make sure that the safety instructions on the edge cover are at the entrance and exit of the protective net (Fig.
  • Seite 31 Step 15: Figure 24 Connect the two ladder poles (#F1) by bringing them together at the bottom. Then slide the two steps (#F2) onto the assembled ladder frame. Make sure that the top of the stairs is facing upwards and that the small ho- les on both sides of the stairs are on the side where the ladder bars have 3 holes each (Figure 24).
  • Seite 32 Step 18: Figure 28 To increase the stability of your trampoline, bring the fastening rope (#H1) with the click fastener on the metal frame below the edge cover and pull it tight. Hook a peg (#H2) onto the fastening rope, tighten it and twist the peg under tension clockwise into the ground (Fig.
  • Seite 33: Stretch Exercise

    STRETCH EXERCISE Before each workout you should stretch your muscles for at least 5-10 minutes to warm them up sufficiently. Repeat the following stretching exercises five times. Stretching before training helps improve flexibility and reduces the risk of injury. HEAD ROLLS Rotate your head to the right for one count, feeling the stretch up the left side of your neck, then rotate your head back for one count, stretching your chin to the ceiling and letting your mouth open.
  • Seite 34: Maintenance/Care

    MAINTENANCE/CARE • Check that all screws are fully and correctly tightened after assembly and before using the device. • Regularly clean the device with a slightly moistened cloth and a mild detergent. • Especially the handles, as these parts are in contact with your body during the whole training. DISPOSAL Recycling loop Packaging material can be conveyed back to the raw material cycle.
  • Seite 35 Estimado cliente, Nos complace que haya elegido un dispositivo de la línea de productos SPORTSTECH. Las máquinas de deporte de SPORTSTECH ofrecen una gran calidad y una tecnología innovadora. Con el fin de usar todo el potencial de su dispositivo y para que pueda disfrutarlo durante muchos años, por favor lea este manual cuidadosamente antes de comenzar a ejercitarse, y use el dispositivo de acuer- do a las instrucciones.
  • Seite 36 Montaje, Utilizar, Desmontaje. 1. Escanear el código QR 2. Ver vídeos 3. Comienza rápido y seguro Enlace a los videos: https://service.innovamaxx.de/htx500_video ¡También estamos en redes sociales! Obtenga la última información sobre nuestros productos, entrenamientos y mucho más aquí: Instagram Facebook https://www.instagram.com/sportstech.de https://www.facebook.com/sportstech.de...
  • Seite 37 CONTENIDOS INFORMACIÓN TÉCNICA ....................38 INSTRUCCIONES IMPORTANTES DE SEGURIDAD ............39 DIBUJO DE EXPLOSIÓN/LISTA DE REPUESTOS .............. 41 INSTALACIÓN / MONTAJE .................... 42 EJERCICIOS DE ESTIRAMIENTO ..................49 MANTENIMIENTO / CUIDADO ..................50 DESECHO ........................50...
  • Seite 38: Información Técnica

    INFORMACIÓN TÉCNICA Detalles del producto 8 ft - Ø 244 cm 10 ft - Ø 305 cm Dimensiones (L x B x H) ca. 244 x 244 x 215 cm ca. 305 x 305 x 240 cm Peso total 36 kg 51 kg Peso del usuario máximo 100 kg...
  • Seite 39: Instrucciones Importantes De Seguridad

    INSTRUCCIONES IMPORTANTES DE SEGURIDAD Al usar la caminadora siempre se deben seguir las precauciones básicas, incluyendo las siguientes instrucciones de seguridad importantes. Lea todas las instrucciones antes de usar este producto. • Lea detenidamente el manual de instrucciones completo antes del montaje y la puesta en funcionamiento.
  • Seite 40 • MÁS INFORMACIÓN • Solo una persona puede utilizar el producto al mismo tiempo. • Asegúrese de que salta siempre en el centro de la cama elástica. • Durante el uso del equipo preste atención al riesgo de resbalar que puede provocar el aspersor. •...
  • Seite 41: Dibujo De Explosión/Lista De Repuestos

    DIBUJO DE EXPLOSIÓN/LISTA DE REPUESTOS En el siguiente enlace En el siguiente enlace encontrarás el dibujo de explosión encontrarás el dibujo de explosión y la lista de repuestos: y la lista de repuestos: https://service.innovamaxx.de/htx500_spareparts https://service.innovamaxx.de/htx500_spareparts INSTRUCCIONES DE INSTALACIÓN INSTRUCCIONES DE INSTALACIÓN •...
  • Seite 42: Instalación / Montaje

    INSTALACIÓN / MONTAJE Apriete todos los componentes y piezas premontadas! Ilustración 1 Paso 1: Coja una pata (#A1) y ensamble en ambos lados una extensión de pata (#A2). Repita este paso un total de tres veces. Por cierto: puedes encontrar sencillas instrucciones de montaje en vídeo en YouTube.
  • Seite 43 Paso 4: Cuando haya armado y atornillado Ilustración 5 completamente las 6 piezas del marco (#A3), eleve el marco metálico e introduzca las patas que ha montado en los pasos 1 y 2 en los soportes previstos en la parte inferior (Fig. 5).
  • Seite 44 Paso 7: Una el soporte de la red de seguridad con la estructura base, de modo que el extremo largo apunte hacia arriba y esté arqueado hacia el centro de la cama elástica. Para fijarlo introduzca Ilustración 10 dos tornillos largos (M6*7) desde el exterior a través de las aberturas previstas en el extremo inferior del soporte de la red de seguridad y coloque cada tornillo con una tuerca de goma en...
  • Seite 45 Paso 10: Ilustración 14 Por último, ponga la colchoneta (#C) en el centro de la estructura base y eche la red de seguridad (#D1) por encima. Preste atención a que los cierres de velcro de la red de seguridad apunten hacia el centro de la cama elástica y a que las aberturas del borde inferior estén posicionadas de forma paralela a los ganchos metálicos de la red de salto.
  • Seite 46 Paso 13: Coloque ahora la cubierta del borde (#E) en el borde de la colchoneta (#C) para cubrir tanto el marco base, como los muelles de metal (#D2). Las costuras de la cubierta del borde deben estar a la altura de los soportes de la red de seguridad (Fig. 20).
  • Seite 47 Paso 5: Ilustración 24 Una las dos varillas de la escalera (#F1) juntándolas por el extremo inferior. A continuación, empuje los dos peldaños de la escalera (#F2) en el marco de la escale- ra que ha montado. Asegúrese de que la parte superior de los peldaños esté...
  • Seite 48 Paso 18: Abbildung 28 Para una mayor estabilidad de la cama elástica, coloque la cuerda de sujeción (#H1) con el cierre de clic en el marco metálico por debajo de la cubierta del borde y apriétela. Enganche una piqueta (#H2) en cada cuerda de sujeción, tire y gire la piqueta con tensión en sentido horario hacia el suelo (Fig. 28).
  • Seite 49: Ejercicios De Estiramiento

    EJERCICIOS DE ESTIRAMIENTO Antes de cada entrenamiento debes estirar tus músculos durante al menos 5-10 minutos para calentarlos lo suficiente. Repita los siguientes ejercicios de estiramiento cinco veces. El estiramiento antes del entrena- miento ayuda a mejorar la flexibilidad y reduce el riesgo de lesiones. GIROS CON LA CABEZA Gire su cabeza hacia la derecha por un segundo, sienta como se estira el lado izquierdo de su cuello, luego gire su cabeza hacia tras por un segundo, estirando su barbilla hacia el techo y dejando su boca abierta.
  • Seite 50: Mantenimiento / Cuidado

    MANTENIMIENTO / CUIDADO • Asegúrese de que todos los tornillos estén bien apretados después de ensamblar y antes de usar el dispositivo. • Limpie regularmente el equipo con un paño ligeramente humedecido con un detergente suave. • Sobre todo, hay que limpiar los mangos porque están en contacto con el cuerpo durante el entrena- miento.
  • Seite 51 FRANÇAIS Cher client, Nous sommes ravis que vous ayez choisi un appareil de la gamme de produits SPORTSTECH. Les équi- pements sportifs SPORTSTECH vous offrent une qualité élevée et une technologie innovante. Afin d'utiliser pleinement le potentiel de votre appareil et de pouvoir l'apprécier pendant de nombreuses années, lisez attentivement ce manuel avant l'utilisation et le début de votre entraînement et utilisez l'ap-...
  • Seite 52 3. Démarrez rapidement et en toute sécurité Lien vers les vidéos: https://service.innovamaxx.de/htx500_video Vous pouvez aussi nous trouver sur les réseaux sociaux! Retrouve les dernières informations sur les produits, le contenu des entraînements et bien plus encore sur notre: la page Instagram la page Facebook https://www.instagram.com/sportstech.de https://www.facebook.com/sportstech.de...
  • Seite 53 CONTENU DONNÉES TECHNIQUES ....................54 CONSEILS DE SÉCURITÉ IMPORTANTS ................55 DESSIN ÉCLATÉ/LISTE DES PIÈCES DE RECHANGE ............57 EXCERCICE D'ÉTIREMENT .................... 65 MAINTENANCE/SOIN ....................66 MISE AU REBUT ......................66...
  • Seite 54: Données Techniques

    DONNÉES TECHNIQUES Informations sur le produit 8 ft - Ø 244 cm 10 ft - Ø 305 cm Messures (L x B x H) ca. 244 x 244 x 215 cm ca. 305 x 305 x 240 cm Poids total 36 kg 51 kg Poids total de l'utilisateur...
  • Seite 55: Conseils De Sécurité Importants

    CONSEILS DE SÉCURITÉ IMPORTANTS Les précautions de base, y compris les consignes de sécurité importantes suivantes doivent toujours être respectées lorsque vous utilisez ce tapis roulant. Lisez toutes les instructions avant d'utiliser cette appareil. • Il est important de lire attentivement l'ensemble du manuel avant l'installation et la mise en service. Une utilisation sûre et efficace ne peut être garantie que si le dispositif est correctement assemblées et entretenues.
  • Seite 56 • AUTRES CONSEILS • Ce produit ne peut être utilisé que par une seule personne à la fois. • Assurez-vous de toujours sauter dans le centre du trampoline! • Lors de l'utilisation de l'appareil, soyez conscient des risques de glissement de l'arroseur. •...
  • Seite 57: Dessin Éclaté/Liste Des Pièces De Rechange

    DESSIN ÉCLATÉ/LISTE DES PIÈCES DE RECHANGE A l‘adresse suivante A l‘adresse suivante vous trouverez le dessin éclaté vous trouverez le dessin éclaté et la liste des pièces de rechange: et la liste des pièces de rechange: https://service.innovamaxx.de/htx500_spareparts https://service.innovamaxx.de/htx500_spareparts CONSEIL DE MONTAGE CONSEIL DE MONTAGE •...
  • Seite 58 MONTAGE Serrez fermement tous les composants et les pièces préassemblées ! Représentation 1 Étape 1: Prenez un pied (#A1) et joignez-le des deux côtés avec une extension du pied (#A2). Répétez cette étape trois fois au total. À propos: vous pouvez trouver des instructions de montage vidéo simples sur YouTube.
  • Seite 59 Étape 4: Représentation 5 Une fois que vous avez entièrement assemblé les 6 pièces du cadre (#A3) et que vous les avez bien vissées, soulevez le cadre métallique et insérez les pieds assemblés aux étapes 1 et 2 dans les supports prévus à...
  • Seite 60 Étape 7 Reliez maintenant ces supports de filet de sécurité au cadre de base de manière à ce que la longue extrémité pointe vers le haut et soit incurvée vers Représentation 10 le centre du trampoline. Pour les fixer, insérez deux vis longues (M6*7) de l'extérieur dans les trous prévus à...
  • Seite 61 Étape 10: Représentation 14 Placez ensuite la toile de rebond (#C) au milieu du cadre de base et placez le filet de sécurité (#D1) par-dessus. Assurez-vous que les attaches Velcro fixées au filet de sécurité sont tournées vers l'intérieur, vers le centre du trampoline, et les ouvertures en bas sont parallèles aux crochets métalliques de la toile de rebond.
  • Seite 62 Étape 13: Placez maintenant le couvre-bord (#E) sur le bord de la toile de rebond (#C) de manière à couvrir le cadre de base et les ressorts métalliques (#D2). Les coutures du couvre-joint doivent être à la hauteur des supports du filet de sécurité (Fig.20). IMPORTANT: Veillez également à...
  • Seite 63 Étape 15: Représentation 24 Assemblez les deux poteaux de l'échelle (#F1) en les rapprochant en bas. Faites ensuite glisser les deux mar- ches d'escalier (#F2) sur le cadre de l'échelle assem- blée. Assurez-vous que le haut des marches de l'escalier est orienté...
  • Seite 64 Étape 18: Abbildung 28 Pour augmenter la stabilité de votre trampoline, fixez la corde de fixation (#H1) au cadre métallique situé sous la couverture du bord à l'aide de la fixation à clic et serrez-la. Accrochez un piquet (#H2) sur chaque corde d'attache, serrez-la et rentrez-la dans le sol en tournant le piquet sous tension dans le sens des aiguilles d'une montre (Fig.28).
  • Seite 65: Excercice D'étirement

    EXCERCICE D'ÉTIREMENT Avant chaque séance d'entraînement, vous devez étirer vos muscles pendant au moins 5 à 10 minutes pour les réchauffer suffisamment. Répétez les exercices d'étirement suivants cinq fois. Les étirements avant l'entraînement permettent d'améliorer la flexibilité et de réduire le risque de blessure. ROULER LA TÊTE Tournez la tête vers la droite une fois, en étirant le côté...
  • Seite 66: Maintenance/Soin

    MAINTENANCE/SOIN • Vérifiez après le montage et avant l'utilisation de l'appareil, si toutes les vis sont complètement et correctement serrés. • Nettoyez l'appareil régulièrement avec un chiffon légèrement humide combiné avec un détergent doux. • Ceci concerne particulièrement les poignées, puisque ces pièces sont en contact avec le corps pendant tout l'entraînement.
  • Seite 67 ITALIANO Gentile cliente Siamo lieti che abbiate scelto un dispositivo della gamma SPORTSTECH. L'attrezzatura sportiva SPORT- STECH ti offre alta qualità e tecnologia innovativa. Per sfruttare a pieno il potenziale del dispositivo e poterlo utilizzare per molti anni, raccomandiamo di leggere attentamente questo manuale prima di iniziare l’allenamento e di utilizzare il dispositivo seguen-...
  • Seite 68 2. Guarda il video 3. Inizia ad allenarti veloce e sicuro Link per il Video: https://service.innovamaxx.de/htx500_video Ci siamo anche sui social! Scopri le ultime novità sui prodotti, contenuti per l'allenamento e molto altro ancora sul nostro: pagina Instagram pagina Facebook https://www.instagram.com/sportstech.de https://www.facebook.com/sportstech.de...
  • Seite 69 INDICE DATI TECNICI ......................70 ISTRUZIONI DI SICUREZZA IMPORTANTI ................ 71 DISEGNO ESPLOSO/LISTA DEI PEZZI DI RICAMBIO ............73 MONTAGGIO/ASSEMBLAGGIO ..................74 ESERCIZI DI STRETCHING .................... 81 MANUTENZIONE/CURA ....................82 SMALTIMENTO ......................82...
  • Seite 70: Dati Tecnici

    DATI TECNICI Informazioni prodotto 8 ft - Ø 244 cm 10 ft - Ø 305 cm Misure (L x B x H) ca. 244 x 244 x 215 cm ca. 305 x 305 x 240 cm Peso totale 36 kg 51 kg Peso totale massimo utente 100 kg...
  • Seite 71: Istruzioni Di Sicurezza Importanti

    ISTRUZIONI DI SICUREZZA IMPORTANTI Precauzioni minime, incluse importanti istruzioni di sicurezza incluse nel presente manual dovrebbero essere sempre seguite durante l’uso del tapisroulant. Leggere tutte le istruzioni prima di utilizzare il dispositivo. • È importante leggere attentamente l'intero manuale prima dell'installazione e della messa in funzione. L'uso sicuro ed efficace può...
  • Seite 72 • ULTERIORI CONSIGLI • Questo prodotto può essere usato solo da una persona alla volta. • Assicurati di saltare sempre nel centro trampolino! • Quando si usa il dispositivo, essere consapevoli del rischio di scivolare a causa dell'irrigatore. • L'unità non è destinata all'uso in caso di vento forte. •...
  • Seite 73: Disegno Esploso/Lista Dei Pezzi Di Ricambio

    DISEGNO ESPLOSO/LISTA DEI PEZZI DI RICAMBIO Al seguente link Al seguente link troverete il disegno esploso troverete il disegno esploso e la lista dei pezzi di ricambio: e la lista dei pezzi di ricambio: https://service.innovamaxx.de/htx500_spareparts https://service.innovamaxx.de/htx500_spareparts INDICAZIONI PER IL MONTAGGIO INDICAZIONI PER IL MONTAGGIO •...
  • Seite 74: Montaggio/Assemblaggio

    MONTAGGIO/ASSEMBLAGGIO Avvitare bene tutti gli elementi e i pezzi preassemblati! Figura 1 Passo 1: Prendi un piede d'appoggio (#A1) e uniscilo su entrambi i lati con la rispettiva estensione del supporto (#A2). Ripetere questo passo per un totale di tre volte.
  • Seite 75 Passo 4: Una volta che i 6 pezzi del telaio Figura 5 (#A3) sono completamente assemblati e avvitati in posizione, sollevare il telaio metallico e inserire i pezzi del supporto assemblati nei passi 1 e 2 nelle staffe fornite sul lato inferiore (Fig.5).
  • Seite 76 Passo 7: Ora collegate questi supporti per la rete di sicurezza al telaio di base in modo che l'estremità lunga sia rivolta verso l'alto e verso il centro Figura 10 del trampolino. Per fissarli, inserire due lunghe viti (M6*7) dall'esterno attraverso i fori previsti all'estremità...
  • Seite 77 Passo 10: Figura 14 Poi, mettete la rete da salto (#C) al centro del telaio di base e mettete la rete di sicurezza (#D1) sopra di essa. Assicurarsi che le chiusure in velcro attaccate alla rete di sicurezza. Le chiusure in velcro della rete di sicurezza sono rivolte verso il centro del trampolino e le aperture sul fondo sono parallele ai ganci di metallo.
  • Seite 78 Passo 13: Ora mettete la copertura del bordo (#E) sul bordo del foglio di salto (#C), in modo che il telaio di base e le molle di metallo (#D2). Le cuciture della copertura del bordo devono essere allo stesso livello dei supporti della rete di protezione (Fig.20).
  • Seite 79 Passo 15: Figura 24 Collegare i due pali della scala (#F1) unendoli in basso. Successivamente, far scorrere i due gradini (#F2) sul telaio della scala assemblato. Assicuratevi che la parte superiore dei gradini sia rivolta verso l'alto e che i piccoli fori su entrambi i lati dei gradini siano sul lato in cui le aste della scala hanno 3 fori ciascuna (Fig.24).
  • Seite 80 Passo 18: Figura 28 Per aumentare la stabilità del tuo trampolino, attacca la corda di fissaggio (#H1) al telaio metallico sotto la copertura del bordo con la chiusura a scatto e stringila. Agganciare il lucchetto al telaio metallico sotto il coperchio del bordo e stringerlo. Agganciare un picchetto ciascuno (#H2) alla corda di attacco, stringerlo e girare il picchetto in tensione in senso orario nel terreno (Fig.28).
  • Seite 81: Esercizi Di Stretching

    ESERCIZI DI STRETCHING Prima di ogni allenamento si dovrebbe allungare i muscoli per almeno 5-10 minuti per riscaldarli a suffici- enza. Ripetere i seguenti esercizi di stretching per cinque volte. Lo stretching prima dell'allenamento aiuta a migliorare la flessibilità e riduce il rischio di lesioni. RULLI PER LA TESTA Ruotare la testa a destra, fino a sentir allungare il lato sinistro del collo, poi ruotare la testa indietro, allungan- do il mento verso il soffitto e aprendo la bocca.
  • Seite 82: Manutenzione/Cura

    MANUTENZIONE/CURA • Dopo l'assemblaggio e prima dell'utilizzo verificate che vi siano tutte le viti necessarie e che siano ben salde. • Pulite costantemente l'apparecchio con un panno leggermente umido utilizzando un detergente non invasivo. • Pulire specialmente la maniglia di appoggio perché questa particolarmente a contatto col vostro corpo durante l'allenamento.
  • Seite 83 GEBRUIKSAANWIJZING NEDERLANDS Geachte klant, We zijn blij dat je een apparaat uit het SPORTSTECH-assortiment hebt gekozen. De sportuitrusting van SPORTSTECH brengt hoogwaardige apparaten met nieuwe technologieën. Lees vóór gebruik deze gebruikershandleiding aandachtig door en gebruik het apparaat zoals aangege- ven. Zo zul je ten volle van de prestaties van het apparaat kunnen profiteren en er vele jaren geniet van hebben.
  • Seite 84 1. Scan de QR-code 2. Bekijk video‘s 3. Begin snel en veilig Link naar de video's: https://service.innovamaxx.de/htx500_video We zijn ook actief op social media! Raadpleeg voor de meest recente productinformatie, trainingen en nog veel meer, onze: Instagram-pagina Facebook-pagina https://www.instagram.com/sportstech.de https://www.facebook.com/sportstech.de...
  • Seite 85 INHOUD TECHNISCHE INFORMATIE ................... 86 BELANGRIJKE VEILIGHEIDSINSTRUCTIES ............... 87 EXPLOSIETEKENING/ONDERDELENLIJST ............... 89 MONTAGE/OPBOUW ....................90 STRETCHOEFENINGEN ....................97 ONDERHOUD/ZORG ....................98 VERWIJDERING ......................98...
  • Seite 86: Technische Informatie

    TECHNISCHE INFORMATIE Productinformatie 8 ft - Ø 244 cm 10 ft - Ø 305 cm Afmetingen (L x B x H) ca. 244 x 244 x 215 cm ca. 305 x 305 x 240 cm Totaalgewicht 36 kg 51 kg Maximaal gebruikersgewicht 100 kg 120 kg...
  • Seite 87: Belangrijke Veiligheidsinstructies

    BELANGRIJKE VEILIGHEIDSINSTRUCTIES Deze algemene veiligheidsinformatie moet strikt worden nageleefd bij het gebruik van dit product. Lees alle instructies voordat je het apparaat gebruikt. • Het is belangrijk dat je vóór de installatie en ingebruikname de hele handleiding zorgvuldig doorleest. Een veilig en effectief gebruik kan alleen worden gegarandeerd als het apparaat correct wordt gemonteerd en onderhouden.
  • Seite 88 • OVERIGE OPMERKINGEN • Dit product mag altijd slechts door één persoon tegelijk worden gebruikt. • Zorg dat je altijd in het midden van de trampoline springt! • Let bij het gebruik van het apparaat op slipgevaar door de sproeier. •...
  • Seite 89: Explosietekening/Onderdelenlijst

    EXPLOSIETEKENING/ONDERDELENLIJST Onder de volgende link Onder de volgende link vind je de explosietekening vind je de explosietekening en de reserveonderdelenlijst: en de reserveonderdelenlijst: https://service.innovamaxx.de/htx500_spareparts https://service.innovamaxx.de/htx500_spareparts AANWIJZINGEN VOOR DE MONTAGE AANWIJZINGEN VOOR DE MONTAGE • De montage van het apparaat moet zorgvuldig door twee of meer volwassen personen worden uitgevoerd.
  • Seite 90: Montage/Opbouw

    MONTAGE/OPBOUW Alle componenten en voorgemonteerde onderdelen stevig vastdraaien! Afbeelding 1 Stap 1: Neem een voetstuk (#A1) en verbind het aan beide kanten met elk een voetstukverlengstuk (#A2). Herhaal deze stap in totaal drie keer. Opmerking: op YouTube vindt u eenvoudige montage-instructies op video.
  • Seite 91 Stap 4: Als de 6 framestukken (#A3) Afbeelding 5 helemaal in elkaar zijn gezet en vastgeschroefd, til je het metalen frame op en plaats je de in de stappen 1 en 2 gemonteerde voetstukken in de daarvoor bestemde beugels aan de onderkant (afb.
  • Seite 92 Stap 7: Verbind nu deze beugels van het beschermingsnet met het basisframe, zodat het lange uiteinde naar boven wijst en gebogen is naar het midden van de Afbeelding 10 trampoline. Steek voor de bevestiging telkens twee lange schroeven (M6x7) van buitenaf door de daarvoor bestemde openingen aan de onderkant van de beugels van het beschermingsnet en bevestig elk van deze schroeven met een...
  • Seite 93 Stap 10: Afbeelding 14 Plaats vervolgens het springdoek (#C) in het midden van het basisframe en leg het beschermingsnet (#D1) erover. Zorg ervoor dat de klittenbandsluitingen die aan het beschermingsnet zijn bevestigd naar binnen wijzen (naar het midden van de trampoline) en dat de openingen aan de onderrand evenwijdig staan met de metalen haken van het springdoek.
  • Seite 94 Stap 13: Plaats nu de randbekleding (#E) op de rand van het springdoek (#C), zodat zowel het basisframe als de metalen veren (#D2) bedekt zijn. De naden van de randbekleding moeten op de hoogte van de beugels van het beschermingsnet liggen (afb. 20). BELANGRIJK: let er ook op dat de veiligheidsaan- wijzingen op de randbekleding bij de in- en uitgang van het beschermingsnet staan (afb.
  • Seite 95 Stap 15: Afbeelding 24 Verbind beide ladderrails (#F1) door ze aan het onderste uiteinde samen te brengen. Schuif vervolgens de twee traptreden (#F2) op het gemonteerde ladderframe. Zorg ervoor dat de bovenkant van de traptreden naar boven wijst en dat de kleine gaatjes aan beide kanten van de traptreden aan de kant zitten waar de ladderrails elk 3 gaatjes hebben (afb.
  • Seite 96 Stap 18: Afbeelding 28 Om de stabiliteit van je trampoline te vergroten, maak je nu het bevestigingstouw (#H1) met de kliksluiting vast aan het metalen frame onder de randbekleding en draai je het vast. Haak een pen (#H2) aan elk bevestigingstouw, span het touw aan en draai de pen onder spanning met de klok mee in de grond (afb.
  • Seite 97: Stretchoefeningen

    STRETCHOEFENINGEN Voor elke training moet u uw spieren minstens 5-10 minuten strekken om ze voldoende op te warmen. Herhaal de volgende stretchoefeningen vijf keer. Rekken voor de training helpt de flexibiliteit te verbeteren en vermindert het risico op letsel. MET JE HOOFD ROLLEN Draai je hoofd een seconde naar rechts, voel de stretch aan de linkerkant van je nek, draai dan je hoofd een seconde terug, strek je kin omhoog en laat je mond open.
  • Seite 98: Onderhoud/Zorg

    ONDERHOUD/ZORG • Controleer na de montage en vóór het gebruik van het apparaat of alle schroeven volledig zijn en correct zijn aangehaald. • Maak het apparaat regelmatig schoon met een licht bevochtigde doek en een mild schoonmaakproduct. • Dit geldt met name voor de handgrepen, omdat deze onderdelen tijdens de training in contact komen met je lichaamsdelen.
  • Seite 100 Verkauf durch / Distributed by / Distribuido por / Distribué / Distribuito da / Verkoop via Sportstech Brands Holding GmbH Potsdamer Platz 11 10785 Berlin +49 30 220 663 520 www.sportstech.de...

Inhaltsverzeichnis