Inhaltsverzeichnis
Werbung
Verfügbare Sprachen
Verfügbare Sprachen
Quicklinks
All manuals and user guides at all-guides.com
OPERATIONS MANUAL
BEDIENUNGSHANDBUCH
MANUAL DEL OPERADOR
MANUEL D'INSTRUCTIONS
XL-500 II
DIRECT-DRIVE MANUAL TURNTABLE
HANDDREHSCHEIBE MIT DIREKTANTRIEB
GIRADISCOS MANUAL DE ACCIONAMIENTO DIRECTO
TABLE TOURNANTE MANUELLE À ENTRAÎNEMENT DIRECT
MULTI LANGUAGE INSTRUCTIONS:
English......................................................................................................Page 4
Deutsch.....................................................................................................Page 6
Español.....................................................................................................Page 8
Francais.................................................................................................Page 10
(1)
Werbung
Inhaltsverzeichnis

Verwandte Anleitungen für Gemini XL-500II


Inhaltszusammenfassung für Gemini XL-500II
- Seite 1 All manuals and user guides at all-guides.com OPERATIONS MANUAL BEDIENUNGSHANDBUCH MANUAL DEL OPERADOR MANUEL D’INSTRUCTIONS XL-500 II DIRECT-DRIVE MANUAL TURNTABLE HANDDREHSCHEIBE MIT DIREKTANTRIEB GIRADISCOS MANUAL DE ACCIONAMIENTO DIRECTO TABLE TOURNANTE MANUELLE À ENTRAÎNEMENT DIRECT MULTI LANGUAGE INSTRUCTIONS: English......................Page 4 Deutsch.....................Page 6 Español.....................Page 8 Francais....................Page 10...
- Seite 2 All manuals and user guides at all-guides.com Figure 1...
- Seite 3 All manuals and user guides at all-guides.com Figure 2 Figure 3...
-
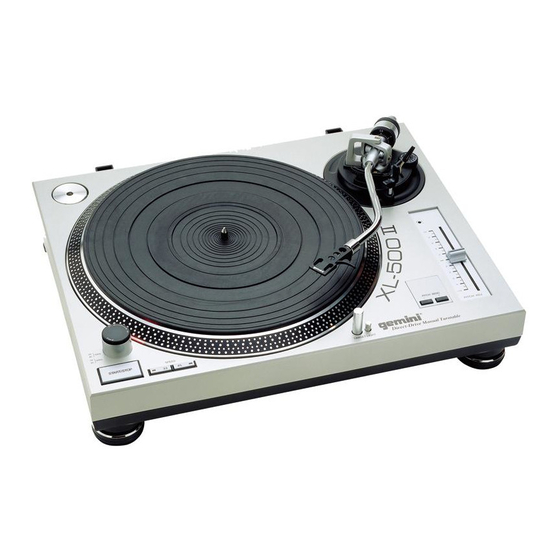
Seite 4: Parts Checklist
INTRODUCTION: the terminals of most cartridges are color coded. Connect each lead Congratulations on purchasing a Gemini XL-500 II turntable. This state wire to the terminal of the same color. of the art turntable includes the latest features. Prior to use, we suggest that you carefully read all the instructions. -
Seite 5: Specifications
All manuals and user guides at all-guides.com 2. Hold the dustcover in position, directly above the turntable, and slide the 2. When not being used, the TARGET LIGHT should be turned off. hinge bases into the holders mounted on the rear panel. ADJUSTING THE PITCH CONTROL: 3. -
Seite 6: Leistungsmerkmale
All manuals and user guides at all-guides.com EINLEITUNG: EINBAU DES TONABNEHMERS: Wir gratulieren Ihnen zum Kauf eines Gemini XL-500 II Plattenspielers. (SIEHE ABBILDUNG 2) Dieses hochentwickelte erstklassige Gerät enthält die neuesten Weil alle Tonabnehmer individuell ausgeführt sind, siehe jeweilige Leistungsmerkmale. Vor Anwendung dieses Plattenspielers bitte alle Anweisungen für Tonabnehmer, um richtigen Einbau sicherzustellen. -
Seite 7: Spezifikationen
All manuals and user guides at all-guides.com 7. Nach dem horizontalen NULLPUNKTABGLEICH das abgeglichene 9. Bei Beendigung des Spielens heben Sie den TONE ARM (6), schieben BALANCEGEWICHT - COUNTERWEIGHT (8) gegen den Uhrzeigersinn ihn auf die ARM REST (10) und befestigen ihn mit der ARM CLAMP (9). drehen, bis der vom Tonabnehmerhersteller empfohlene Auflagedruck auf dem AUFLAGEDRUCKRING - STYLUS PRESSURE RING (11) 10.Nun haben Sie die Option, den Strom abzuschalten, indem Sie den... - Seite 8 INSTALACIÓN DEL CARTUCHO: (VÉASE LA FIG. 2) Debido a que todos los cartuchos son de diseño distinto, sírvase Felicitaciones por su compra de un tocadiscos Gemini XL-500 II. Este referirse a las instrucciones de su cartucho específico, para garantizar tocadiscos de la más avanzada tecnología está dotado de la instalación correcta.
-
Seite 9: Instrucciones De Operación
All manuals and user guides at all-guides.com 7. Después de ajustar el equilibrio cero (0) horizontal, gire el 10.Ahora tiene la opción de apagar la unidad, pasando el INTERRUPTOR CONTRAPESO - COUNTERWEIGHT (8) equilibrado hacia la izquierda DE ENERGÍA - POWER (13) a la posición de “APAGADO” o de detener el hasta que aparezca en el ARO DE PRESIÓN DE AGUJA - STYLUS PLATO - PLATTER (2), oprimiendo el BOTÓN DE ARRANQUE/PARADA PRESSURE RING (11) la presión de aguja recomendada del fabricante... -
Seite 10: Caractéristiques
Il ne contient pas DE PIÈCES À REMPLACER PAR Vert (R-)........Canal droit - L'UTILISATEUR À L'INTÉRIEUR. Prière de contacter le Service technique de Gemini ou votre concessionnaire homologué pour parler à un 2. Installez la cartouche dans LA COQUILLE - HEADSHELL (5) et serrez- technicien homologué. - Seite 11 All manuals and user guides at all-guides.com 6. Faites flotter le BRAS DE LECTURE de nouveau pour vous assurer de 9. Une fois l’enregistrement terminé, soulevez le TONE ARM (6), guidez-le l'équilibre zéro horizontal (0). Si l'équilibre zéro n'est pas maintenu, vers le ARM REST (10) et bloquez-le à...
- Seite 12 Germany • Gemini Sound Products GmbH • Ottostrasse 6, 85757 Karlsfeld, Germany Tel: 08131 - 39171-0 • Fax: 08131 - 39171-9 UK • Gemini Sound Products • Unit C4 Hazleton Industrial Estate, Waterlooville, UK P08 9JU Tel: 087 087 00880 • Fax: 087 087 00990 Spain •...