
Verwandte Anleitungen für BALDR B0360WST2H2PR-V1


Inhaltszusammenfassung für BALDR B0360WST2H2PR-V1
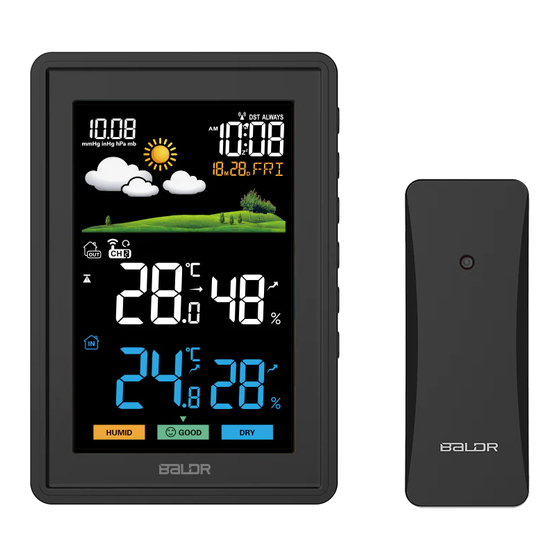
- Seite 1 USER MANUAL MODEL:B0360WST2H2PR-V1 RADIO-CONTROLLED WEATHER STATION English Deutsche Français Italiano Español...
-
Seite 2: Inhaltsverzeichnis
CONTENTS English - - - - - - - - - - - - - - - - - - - - - - - - - - - - - - - - - - - - - - - - - - 03 ~ 22 Deutsche - - - - - - - - - - - - - - - - - - - - - - - - - - - - - - - - - - - - - - - - - - 23 ~ 42 Français - - - - - - - - - - - - - - - - - - - - - - - - - - - - - - - - - - - - - - - - - - 43 ~ 62 Italiano... -
Seite 3: For The Start-Up Of This Device You Require
MODEL:B0360WST2H2PR-V1 RADIO-CONTROLLED WEATHER STATION We hereby thank you for purchasing Baldr Color radio-controlled Weather Station.We design and manufacture the item using innovative components and techniques to enable the perfect display of temperature and humidity by this device. It is also equipped with weather forecast functions. -
Seite 4: Product Overview
Product Overview Front View 12.Alarm indicator 1. Sensor signal indication 2. Outdoor sensor channel 13.Snooze indicator Switch channel from CH1--CH2 --CH3--Channel scan... - Seite 5 3. Current outdoor temperature 14.Current indoor humidity Arrow icon indicates the direction Arrow icon indicates the temperature is trending direction humidity is trending 15.Max/min records for indoor 4. Max/min records for outdoor temperature and humidity temperature and humidity Max/min temperature & Max/min temperature &...
- Seite 6 Back View 1. Hanging Hole 2. Sensitive vents 3. Battery Compartment 4. Stand Bracket 5. DC Hole Top View Backlight/Snooze touch button Press to switch backlight brightness among 100%, 50% ,10%,3% and off...
- Seite 7 Side View 1. “SET ’’ button Long press to enter into time setting 2. “▲/CH ’’button Short press to switch channel Long press to enter into signal receiving 3. “▼/RCC’’ button Short press to exit the RCC signal receiving Long press to receive RCC signal /RCC 4.
-
Seite 8: Outdoor Sensor
OUTDOOR SENSOR 1. Signal light(Working:Red light flashing) 2. Hanging hole 3. Battery compartment 4. Channel 1-2-3 switch Features 1. Measures indoor and outdoor temperature(C/F) and humidity 2. Indoor temperature range:-10℃~50℃(14℉~122℉) 3. Outdoor temperature range:-40℃~60℃(-40℉~140℉) 4. Indoor and outdoor humidity range:1%-99% 5. -
Seite 9: Package Content
1xDigital Weather Station 1xRemote Sensor 1xAc Adaptor 1xUser Manual Getting Started BALDR recommends high quality alkaline or lithium batteries for the best product performance. Heavy duty or rechargeable batteries are not recommended. MAIN UNIT INSTALLATION Powered by AC Adaptor: Connect the power adaptor with DC hole on side of the main unit... -
Seite 10: Sensor Installation
Powered by batteries: 1. Remove the battery compartment cover. 2. Insert 3x AAA batteries matching the polarity(+and-) 3. Replace the battery cover SENSOR INSTALLATION 1. Remove the battery compartment cover 2. Insert 2xAA batteries matching the polarity(+and-) 3. Replace the battery cover SENSOR SETUP ●... - Seite 11 MAIN UNIT SETUP When power on or reset, LCD will full display for 3 seconds with “ BI”sound The default value is : Weekday Weekday Pressure Unit Pressure Unit Display Time Display Time Language Language (DCF/MSF) (WWVB) (DCF) (WWVB/MSF) (DCF) (WWVB/MSF) 0:00 12:00...
-
Seite 12: Manual Settings
3. On normal time mode, Long press “▼/RCC’’ button to enter DCF /WWVB/MSF signal receiving. 4. During DCF reception, press “▼/RCC’’ button to exit RCC receiving. 5. The time will be converted to the current time of corresponding time zone after receiving the RCC .(Except 0 time zone) Remark: It will exit RCC receiving automatically when the alarm is activated during DCF/WWVB/MSF reception , you can repeat step 3 to enter into DCF/WWVB/MSF signal receiving after turning off... - Seite 13 *Tips: press and hold “▲/CH’’ or “▼/RCC’’ button will quickly change the value by 8 steps Remark: There are 7 languages selectable for weekday display: FRE、SPA、ENG、GER、ITA、DUT、DRN German English French Italian Spanish Dutch Denmark Language Sunday Monday Tuesday Wednesday Thursday Friday Saturday 4.
- Seite 14 11. Press “SET’’ to select Date. Press “▲/CH’’ or “▼/RCC’’ button to adjust the value 12. Press “SET’’ to select time display mode. Press “▲/CH’’ or “▼/RCC’’button to select 12hr or 24hr.Default setting : 24hr format (DCF) 12hr format(MSF/WWVB) 13. Press “SET’’ to select Hours. Press“▲/CH’’ or “▼/RCC” button to adjust the value.
-
Seite 15: Snooze Function
3. When alarm rings, the ascending “Bibi”alarm sound will last for 2 minutes if no operation. PLACEMENT INSTRUCTION BALDR sensors are sensitive to surrounding environmental conditions. Proper placement of both the main unit and outdoor sensor are critical to the accuracy and performance of this product. - Seite 16 Important placement guidelines ●The distance between main unit and transmitter should be at least 5~6.5 feet (1.5~2 meters) away from any interfering sources such as computer monitors or TV sets. ●To maximize wireless range, place units away from large metallic items, thick walls, metal surfaces, or other objects that may limit wireless communication ●...
- Seite 17 ● Arrow indication for humidity changes: will display when humidity changes less than 3%RH within one hour or compared with last reading. will display when the reading increase by 3%RH within one hour or compared with last reading. will display when the reading decrease by 3%RH within one hour or compared with last reading.
- Seite 18 5. Press“▼/RCC’’or “▲/CH’’button to turn on/off the low temperature alert function with on/off of the symbol 6. Default setting : High temperature alert value 35℃;Low temperature alert value 10℃. 7. The ascending “Bibi”alarm will ring for 5 seconds per minute with the symbol flashing when the outdoor temperature reaches the alert value and will stop ringing when out of alert range.
-
Seite 19: Backlight Function
" button to switch backlight brightness among 100%, 50% , 10%,3% and off CALIBRATION Baldr weather stations were calibrated precisely at our manufacturing facility, but if you desire the reading of this weather station to keep consistent with the equipment you trust, you can... - Seite 20 2. Press “SET ’’button to select the order, press “▲/CH” or “ ▼/RCC” button to adjust the value. 3. Press and hold “ ” button before powering the weather station to clear the calibration values. TROUBLE SHOOTING Problem Possible Solution Outdoor reading is Flashing of the outdoor reading is generally an flashing or showing...
- Seite 21 LL will temperature display on screen for indication. If your BALDR product does not operate properly after trying the troubleshooting steps, contact the seller on your order page or shoot an email to: service@baldr.com.
- Seite 22 Collection of such waste separately for special treatment is necessary. Warranty BALDR provides a 1-year limited warranty on this product against manufacturing defects in materials and workmanship. Warranty service can only be performed by our authorized service center. The original dated bill of sale must be presented upon request as proof of purchase to us, or our authorized service center.
- Seite 23 MODEL:B0360WST2H2PR-V1 FUNK GESTEUERT WETTERSTATION Wir danken Ihnen hiermit für den Kauf der Baldr Funk Gesteuert Wetterstation . Wir entwickeln und fertigen das Gerät unter Verwendung innovativer Komponenten und Techniken, um die perfekte Anzeige von Temperatur und Luftfeuchtigkeit mit diesem Gerät zu ermöglichen. Es ist außerdem mit Wettervorhersagefunktionen ausgestattet.
-
Seite 24: Produktübersicht
Produkt-Übersicht HAUPTEINHEIT 12.Alarm-Indikator 1. Anzeige des Sensorsignals 2. Außensensor-Kanal 13.Schlummeranzeiger Kanalwechsel von CH1--CH2 --CH3--Kanalabtastung... - Seite 25 3. Aktuelle Außentemperatur 14.Aktuelle Raumluftfeuchtig keit Pfeilsymbol zeigt die Richtung an, Das Pfeilsymbol zeigt die in die sich die Temperatur entwickelt Richtung an, in die sich die 4. Max/Min-Aufzeichnungen für Feuchtigkeit entwickelt Außentemperatur und 15.Max/min Aufzeichnungen für Luftfeuchtigkeit Raumtemperatur und Max/Min Temperatur- und Raumluftfeuchtigkeit Luftfeuchtigkeitsaufzeichnungen...
-
Seite 26: Rückansicht
RÜCKANSICHT 1. Hängende Bohrung 2. Empfindliche Belüftungsöffnungen 3. Batteriefach 4. Ständer-Halterung 5. DC-Bohrung Hintergrundbeleuchtung/Schlummertaste Drücken, um die Helligkeit der Hintergrundbeleuchtung zwischen 100 %, 50 %, 10 %, 3 % und aus zu schalten... -
Seite 27: Seitenansicht
SEITENANSICHT 1. Taste "SET'' Lang drücken, um in die Zeiteinstellung zu gelangen 2. Die Schaltfläche "▲/CH'' Kurz drücken, um den Kanal zu wechseln Lang drücken, um in den Signalempfang einzutreten 3. Die Schaltfläche "▼/RCC" Kurze drücken, um das RCC-Signal zu verlassen Empfangen /RCC Lange drücken, um RCC Signal zu... -
Seite 28: Außensensor
Außensensor 1. Signalleuchte 2. Aufhängeloch 3. Batteriefachabdeckung 4. Kanal 1-2-3 Schalter MERKMALE 1. Misst Innen- und Außentemperatur (C/F) und Luftfeuchtigkeit 2. Innentemperaturbereich:-10℃~50℃(14℉~122℉) 3. Außentemperaturbereich:-40℃~60℃(-40℉~140℉) 4. Luftfeuchtigkeit im Innen- und Außenbereich: 1%-99% 5. Max/Min-Aufzeichnung von Temperatur und Luftfeuchtigkeit (innen und außen) 6. -
Seite 29: Erste Schritte
Folgende Inhalte sind in dem Paket enthalten: : 1xDigitale Wetterstation 1xFernsensor 1xAc-Adapter 1xBenutzerhandbuch ERSTE SCHRITTE BALDR empfiehlt qualitativ hochwertige Alkali- oder Lithiumbatterien für die beste Produktleistung. Hochleistungsbatterien oder wiederaufladbare Batterien werden nicht empfohlen. HAUPTGERÄT-INSTALLATION Stromversorgung über Wechselstromadapter: Schließen Sie das Netzteil mit dem Gleichstromloch an der Seite der... -
Seite 30: Sensor-Einrichtung
Wird mit Batterien betrieben: 1. Entfernen Sie den Batteriefachdeckel. 2. Legen Sie 3x AAA-Batterien mit der richtigen Polarität (+ und -) ein 3. Setzen Sie den Batteriefachdeckel wieder auf SENSOR INSTRALLATION SENSOR-INSTALLATION 1. Entfernen Sie den Batteriefachdeckel 2. Legen Sie 2xAA-Batterien passend zu Polarität(+und-) ein 3. -
Seite 31: Einrichtung Der Haupteinheit
EINRICHTUNG DER HAUPTEINHEIT Beim Einschalten oder Zurücksetzen wird die LCD-Anzeige 3 Sekunden lang mit einem "BI"-Ton voll angezeigt. Der Standardwert ist : Einheit des Einheit des Wöchentliche Wöchentliche Zeit anzeigen Zeit anzeigen Drucks Drucks Sprache Sprache (DCF) (WWVB/MSF) (DCF/MSF) (WWVB) (DCF) (WWVB/MSF) 0:00... -
Seite 32: Manuelle Einstellungen
3. Drücken Sie im normalen Zeitmodus die Taste "▼/RCC", um den DCF-Signalempfang zu aktivieren. 4. Drücken Sie während des DCF-Empfangs die Taste "▼/RCC", um den RCC-Empfang zu beenden. 5. Die Zeit wird nach dem Empfang der RCC in die aktuelle Zeit der entsprechenden Zeitzone umgewandelt (außer Zeitzone 0). - Seite 33 *Tipps: Halten Sie die Taste "▲/CH'' oder "▼/RCC'' gedrückt, um den Wert schnell um 8 Schritte zu ändern Bemerkung: Es sind 7 Sprachen für die Wochentagsanzeige wählbar: FRE、SPA、ENG、GER、ITA、DUT、DRN German English French Italian Spanish Dutch Denmark Language Sunday Monday Tuesday Wednesday Thursday Friday Saturday...
-
Seite 34: Alarmfunktion Alarmzeit Einstellen
9. Drücken Sie "SET '', um Jahr zu wählen. Drücken Sie "▲/CH'' oder "▼/RCC''-Taste, um den Wert einzustellen. 10. Drücken Sie die Taste "SET '' zur Auswahl von Monat. Drücken Sie "▲/CH'' oder "▼/RCC''-Taste, um den Wert einzustellen. 11. Drücken Sie die Taste "SET '' zur Auswahl von Datum. Drücken Sie "▲/CH'' oder "▼/RCC''-Taste, um den Wert einzustellen. -
Seite 35: Ein-/Ausschalten Des Alarms
3. Wenn der Wecker klingelt, dauert der aufsteigende "Bibi"-Alarmton 2 Minuten, wenn keine Bedienung erfolgt. PLATZIERUNGSANWEISUNG BALDR-Sensoren sind empfindlich gegenüber den Umgebungsbedin gungen. Die richtige Platzierung sowohl der Haupteinheit als auch des Außensensors sind entscheidend für die Genauigkeit und Leistung dieses Produkts. -
Seite 36: Temperatur&Feuchtigkeit
ist für den allgemeinen Außeneinsatz konzipiert. Um seine Lebensdauer zu verlängern, sollte der Sensor jedoch in einem vor direkten Witterungs einflüssen geschützten Bereich platziert werden. Die beste Position ist 1,2 bis 2,4 Meter (4 bis 8 Fuß) über dem Boden mit permanentem Schatten und viel frischer Luft, die um den Sensor zirkuliert. -
Seite 37: Temperatur-Alarmfunktion Außentemperatur-Alarm Einstellen
wird angezeigt, wenn sich die Temperatur innerhalb einer Stunde oder im Vergleich zum letzten Messwert um weniger als 1℃ ändert. wird angezeigt, wenn der Messwert von 1℃ innerhalb einer Stunde oder im Vergleich zum letzten Messwert ansteigt. wird angezeigt, wenn der Messwert um 1℃ innerhalb einer Stunde oder im Vergleich zum letzten Messwert abnimmt. -
Seite 38: Maximal- Und Minimaleintrag
3. Drücken Sie die Taste "▲/CH'' oder "▼/RCC'', um die Hochtempe ratur-Alarmfunktion zu aktivieren bzw. zu deaktivieren, mit dem Symbol EIN/AUS 4. Drücken Sie die Taste "ALERTS" erneut, um den Alarmwert für niedrige Temperaturen zu überprüfen. 5. Drücken Sie die Taste "▲/CH'' oder "▼/RCC'', um die Niedrigtempe ratur-Alarmfunktion mit dem Symbol ein/aus zu aktivieren/deaktivier 6. -
Seite 39: Kalibrierung
100 %, 50 %, 10 %, 3 % und aus zu schalten. KALIBRIERUNG Die Wetterstationen von Baldr wurden in unserer Produktionsstätte präzise kalibriert. Wenn Sie jedoch möchten, dass die Anzeige dieser Wetterstation mit der Ausrüstung Ihres Vertrauens übereins timmt, können Sie die Raumtemperatur/-feuchtigkeit und die Barom... - Seite 40 1. Halten Sie im normalen Anzeigemodus die Tasten "MEM" und "ALERTS" gleichzeitig gedrückt, um in den Kalibrierungsmodus für Raumtemperatur und Luftfeuchtigkeit/Barometerwert zu gelangen. 2. Drücken Sie die Taste "SET '', um den Auftrag auszuwählen, drücken Sie die Taste "▲/CH'' oder "▼/RCC'', um den Wert einzustellen. 3.
-
Seite 41: Vorsichtsmaßnahmen
ßentemperatur der Erfassungsbereich, wird LL auf dem Bildsc hirm als Hinweis angezeigt. Wenn Ihr BALDR-Produkt nach dem Ausprobieren der Fehlerbeheb ungsschritte nicht ordnungsgemäß funktioniert, wenden Sie sich an den Verkäufer auf Ihrer Bestellseite oder senden Sie eine E-Mail an: service@baldr.com. - Seite 42 Die getrennte Sammlung solcher Abfälle zur Sonderbehandlung ist notwendig. Garantie BALDR bietet eine 1-jährige beschränkte Garantie auf dieses Produkt gegen Herstellungsfehler bei Material- und Verarbeitungsfehlern. Der Garantieservice kann nur von unserem autorisierten Servicezentrum dur chgeführt werden. Der datierte Original-Kaufbeleg muss uns oder unserem au torisierten Servicezentrum auf Anfrage als Kaufbeleg vorgelegt werden.
- Seite 43 MODEL:B0360WST2H2PR-V1 RADIOCOMMANDÉE STATION MÉTÉO Nous vous remercions d'avoir acheté la station météorologique Baldr RADIOCOMMANDÉE STATION MÉTÉO. Nous concevons et fabriquons l'article en utilisant des composants et des techniques innovants pour permettre l'affichage parfait de la température et de l'humidité par cet appareil.
-
Seite 44: Unité Principale
Aperçu UNITÉ PRINCIPALE 12.Indicateur d'alarme 1. Indication du signal du capteur 2. Canal de capteurs extérieurs 13.Indicateur de veille Changement de chaîne de CH1 --CH2--CH3--Channel scan... - Seite 45 3. Température extérieure actuelle 14.Humidité intérieure actuelle L'icône en forme de flèche indique L'icône en forme de flèche la tendance de la température indique la direction dans 4. Max/min records pour la laquelle l'humidité évolue température et l'humidité 15.Max/min records pour la extérieures température et l'humidité...
- Seite 46 Vue arrière 1. Trou de suspension 2. Évents sensibles 3. Compartiment des piles 4. Support 5. DC Hole Vue de dessus Rétro-éclairage/bouton tactile "Snooze Appuyez sur cette touche pour régler la luminosité du rétroéclairage sur 100 %, 50 %, 10 %, 3 % et éteindre...
- Seite 47 Vue latérale 1. Bouton "SET'' Longue pression pour entrer dans la programmation de l'heure 2. Bouton "▲/CH'' Une courte pression pour changer de chaîne Longue pression pour entrer dans la réception du signal 3. Bouton“▼/RCC’’ Réception de signaux RCC à sortie courte /RCC Réception d 'un signal RCC à...
-
Seite 48: Capteur Extérieur
CAPTEUR EXTÉRIEUR 1. Signal lumineux 2. Trou de suspension 3. Compartiment à piles 4. Commutateur de canal 1-2-3 CARACTERISTIQUES 1. Mesure la température intérieure et extérieure (C/F) et l'humidité 2. Plage de température intérieure:-10℃~50℃(14℉~122℉) 3. Plage de température extérieure:-40℃~60℃(-40℉~140℉) 4. Plage d'humidité intérieure et extérieure : 1 %-99 % 5. -
Seite 49: Prise En Main
1xCapteur à distance 1xAdaptateur secteur 1x Manuel de l'utilisateur PRISE EN MAIN BALDR recommande des piles alcalines ou au lithium de haute qualité pour obtenir les meilleures performances du produit. Les piles lourdes ou rechargeables ne sont pas recommandées. UNITÉ PRINCIPALE D'INSTRUMENTATION Alimenté... - Seite 50 Alimenté par des piles : 1. Retirez le couvercle du compartiment des piles. 2. Insérez 3x piles AAA correspondant à la polarité (+ et) 3. Remettre le couvercle de la pile en place L'INSTRUMENTATION DES CAPTEURS: 1. Retirer le couvercle du compartiment des piles 2.
-
Seite 51: Installation De L'unité Principale
INSTALLATION DE L'UNITÉ PRINCIPALE Lors de la mise sous tension ou de la réinitialisation, l'écran LCD s'affiche à plein écran pendant 3 secondes avec le son "BI". La valeur par défaut est : Unité de Unité de Langue du Langue du Temps d Temps d pression... -
Seite 52: Réglages Manuels
3. En mode heure normale, appuyez sur la touche "RCC" pour accéder à la réception du signal DCF/WWVB/MSF. 4. Pendant la réception DCF/WWVB/MSF, appuyez sur le bouton "RCC" pour quitter la réception RCC. 5.L'heure sera convertie à l'heure actuelle du fuseau horaire correspondant après réception du RCC (sauf fuseau horaire 0). - Seite 53 *Conseils : maintenez la touche "▲/CH" ou "▼/RCC" enfoncée pour modifier rapidement la valeur par 8 étapes. Remarque : Il est possible de sélectionner 7 langues pour l'affichage en semaine : FRE、SPA、ENG、GER、ITA、DUT、DRN Dane anemark Allemand Anglais Français Italien Espagnol mark néerlandais Language Dimanche...
- Seite 54 9. Appuyez sur "SET " pour sélectionner l'année. Appuyez sur "▲/CH" ou "▼/RCC" pour ajuster la valeur 10. Appuyez sur "SET " pour sélectionner le mois. Appuyez sur la touche"▲/CH" ou "▼/RCC" pour ajuster la valeur 11. Appuyez sur "SET " pour sélectionner le date. Appuyez sur la touche "▲/CH"...
-
Seite 55: Activer/Désactiver L'alarme
3. Lorsque l'alarme sonne, le son de l'alarme ascendante "Bibi" dure 2 minutes si elle ne fonctionne pas. INSTRUCTION DE PLACEMENT Les capteurs BALDR sont sensibles aux conditions environnementales environnantes. Le placement correct de l'unité principale et du capteur extérieur est essentiel pour la précision et les performances de ce produit. -
Seite 56: Température Et Humidité
conçu pour une utilisation générale en extérieur, cependant, pour prol onger sa durée de vie, placez le capteur dans une zone protégée des éléments météorologiques directs. Le meilleur emplacement est de 1,2 à 2,4 m è tres au-dessus du sol, avec de l'ombre permanente et beauc oup d'air frais pour circuler autour du capteur. - Seite 57 40-70%HR, la précision est de ±5%HR, si elle est en dehors de cette plage, la précision sera de ±8%HR. ● Indication par des flèches des changements de température : s'affiche lorsque la température change moins que 1℃ dans l'heure qui suit ou par rapport à la dernière lecture. s'affiche lorsque la lecture augmente par 1℃...
- Seite 58 1. La fonction d'alerte de température sera activée après avoir défini les valeurs d'alerte. 2. Appuyez sur le bouton "ALERTS" pour vérifier la valeur d'alerte de température élevée. 3. appuyez sur le bouton "▲/CH" ou "▼/RCC"pour activer/désactiver la fonction d'alerte de température élevée avec activation/désactivation du symbole 4.
- Seite 59 BAROMÈTRE ET PRÉVISIONS MÉTÉOROLOGIQUES L'icône des prévisions météorologiques s'affiche après la mise sous tension. Il existe 5 types de modes météo : Ensoleillé, Ensoleillé à nuageux, Nuageux, Pluvieux, Neige ● L'affichage des icônes météo est basé sur le calcul horaire de la température intérieure/extérieure, de l'humidité...
- Seite 60 1. En mode d'affichage normal, appuyez simultanément sur les boutons "MEM" et "ALERTS" et maintenez-les enfoncés pour passer en mode d'étalonnage des valeurs de température et d'humidité/baromètre intérieures. 2. Appuyez sur la touche "SET " pour sélectionner l'ordre, appuyez sur la touche"▲/CH" ou "▼/RCC" pour ajuster la valeur. 3.
- Seite 61 ; si elle est inférieure à la plage de détection, LL intérieure et/ou s'affiche à l'é extérieure cran pour indication. Si votre produit BALDR ne fonctionne pas correctement après avoir essayé les étapes de dépannage, contactez le vendeur sur votre page de commande ou envoyez un courriel à : service@baldr.com.
- Seite 62 Garantie BALDR offre une garantie limitée d'un an sur ce produit contre les défauts de fabrication des matériaux et de la main-d'œuvre. Le service de garantie ne peut être effectué que par notre centre de service agréé.
- Seite 63 B0360WST2H2PR-V1 RADIOCONTROLLATO STAZIONE METEREOLOGICA Vi ringraziamo per aver acquistato la stazione meteorologica a Baldr Radiocontrollto Stazione Metereologica. È stata progettata e costruita con componenti e tecniche innovative per consentire una visualizzazione perfetta della temperatura e l’umidità. Si prega di leggere attentamente le istruzioni per comprendere le proprietà...
-
Seite 64: Presentazione Del Prodotto
Presentazione del Prodotto UNITÀ PRINCIPALE 12.Indicatore di allarme 1. Indicatore del segnale del sensore 13.Indicatore di Snooze 2. Canale del sensore esterno Cambiare il canale di CH1--CH2 --CH3--Ch3--Channel scan... - Seite 65 3. Temperatura esterna attuale 14.Umidità interna attuale L'icona della freccia indica L'icona della freccia indica l'andamento dell'umidità l'andamento della temperatura 15.Registrazioni di max/min di 4. Registrazione di mx/min di temperatura e umidità interna temperatura e l'umidità esterna Le registrazioni di temperatura Le registrazioni di temperatura e e umidità...
- Seite 66 vista posteriore 1. Foro per appendere 2. Ventilazione del sensore 3. Vano batterie 4. Supporto per il piede 5. Alimentazione elettrica vista dall'alto Pulsante di retroilluminazione/tattile Premere per modificare la luminosità della retroilluminazione tra 100%, 50%, 10%, 3% e spento.
- Seite 67 vista laterale 1. Pulsante "SET " Premi a lungo per entrare nelle impostazioni dell’ora 2. Pulsante"▲/CH'' Premi brevemente per cambiare canale Premi a lungo per entrare nel ricevimento del segnale 3. Pulsante"▼/RCC'' Premere brevemente per uscire dalla ricezione del segnale RCC Premere a lungo per ricevere il segnale RCC /RCC 4.
-
Seite 68: Sensor Exterior
SENSOR EXTERIOR 1. Luce segnaletica 2. Buco appeso 3. Compartimento della batteria 4. Interruttore canale 1-2-3 CARATTERISTICHE 1. Misura la temperatura interna ed esterna (C/F) e l'umidità dell'aria 2. Intervallo di temperatura interna:-10℃~50℃ (14~℉~122℉) 3. Intervallo di temperatura esterna:-40℃~60℃(-40℉~140℉ 4. Umidità interna ed esterna: 1%-99% 5. -
Seite 69: Contenuti Della Confezione
1x adattatore CA 1x Manuale d'uso IMPOSTAZIONI INIZIALI BALDR consiglia di utilizzare batterie alcaline o agli ioni di litio di alta qualità per garantire la massima prestazione del prodotto. Si sconsiglia l'uso di batterie ricaricabili o ad alta resistenza. INSTALLAZIONE DELL’UNITÀ PRINCIPALE Alimentata dall’adattatore CA:... -
Seite 70: Impostazione Del Sensore
Alimentata da batterie: 1. Rimuovere il coperchio del vano batteria. 2. Inserire 3 batterie AAA secondo la polarità (+ e -) 3. Riposizionare il coperchio delle batterie INSTALLAZIONE DEL SENSORE 1. Rimuovere il coperchio del vano batteria. 2. Inserire 2 batterie AA secondo la polarità (+ e -) 3. - Seite 71 IMPOSTAZIONE DELL’UNITÀ PRINCIPALE All'accensione o al ripristino dell'alimentazione, il display LCD mostrerà per 3 secondi il suono "BI". Il valore predefinito è: Unità di Unità di Lingua dei giorni Lingua dei giorni Visualizzazione Visualizzazione pressione pressione della settimana della settimana dell’ora dell’ora (DCF/MSF)
-
Seite 72: Impostazione Manuale
3. Nel modo orario normale, premi il pulsante "▼/RCC'' per entrare nella ricezione del segnale DCF. 4. Durante la ricezione DCF, premi il pulsante"▼/RCC'' per uscire dalla ricezione RCC. 5. L’ora si aggiornerà in quell’attuale della zona oraria rispettiva dopo aver ricevuto RCC. (Con eccezione della zona zona oraria 0) Nota: Uscirà... - Seite 73 *Consigli: premi e tieni premuto “▲/ CH” o "▼/RCC''per cambiare i valori velocemente in passaggi di 8 alla volta. Nota: Si può scegliere tra 7 diverse lingua per visualizzare i giorni della settimana: FRE、SPA、ENG、GER、ITA、DUT、DRN Tedesco Inglese Francese Italiano Spagnolo Olandese Danese Lingua Domenica...
- Seite 74 9. Premi il pulsante “SET ’’ per scegliere l’anno. Premi il pulsante “ ▲/CH’’ o “▼/RCC’’ per aggiustare il valore. 10. Premi il pulsante “SET ’’ per scegliere il mese. Premi il pulsante “▲/CH’’ o “▼/RCC’’ per aggiustare il valore. 11.
-
Seite 75: Funzione Snooze
ISTRUZIONI PER IL POSIZIONAMENTO I sensori BALDR sono sensibili alle condizioni ambientali circostanti. Il corretto posizionamento sia dell'unità principale che del sensore esterno è fondamentale per la precisione e le prestazioni di questo prodotto. - Seite 76 all'aperto, tuttavia, per prolungarne la durata, collocare il sensore in un'area protetta dagli agenti atmosferici diretti. La posizione migliore è da 4 a 8 piedi (da 1,2 a 2,4 metri) dal suolo con ombra permanente e molta aria fresca per circolare intorno al sensore.Quando viene pos izionato tramite foro per appendere, il file la migliore distanza dal muro è...
- Seite 77 di ±8%RH. ● Indicazioni delle variazioni di temperatura con le frecce: si mostrerá quando le variazioni di temperatura siano minori di 1℃ nell’ora successiva o rispetto all’ultima lettura. si mostrerá quando la lettura aumenti di almeno 1℃ nell’ora succ essiva o rispetto all’ultima lettura. si mostrerá...
- Seite 78 1. La funzione di allarme di temperatura sarà accesa dopo aver impo stato i valori di allarme. 2. Premi il pulsante “ALERTS” per controllare il valore di allarme di temperatura alta. 3. Premi il pulsante “▼/RCC’’ o “▲/CH’’ per accendere/spegnere la funzione di allarme di temperatura alta con on/off nel simbolo 4.
- Seite 79 100%, 50% ,10%,3% e spento. CALIBRAZIONE Le stazioni meteorologiche Baldr sono state calibrate con precisione presso il nostro stabilimento di produzione, ma se si desidera che i dati di questo prodotto siano coerenti con la lettura delle apparecc hiature a cui si è...
-
Seite 80: Risoluzione Di Problemi
1. Nel modo normalE, premi e tieni premuti i pulsanti “MEM” e “ALERTS” allo stesso tempo per entrare nel modo di calibrazione dei valori di temperatura, uidità e barometro. 2. Premi il pulsante “SET ’’ per scegliere l’ordine, premi il pulsante “▲/CH’’... - Seite 81 è al di sotto del range di rilevamento, sul tura interna e/o es display verrà visualizzato l'LL. terna Se il tuo prodotto BALDR non funziona correttamente dopo aver provato le fasi di risoluzione dei problemi, contatta il venditore sulla pagina dell'ordine o invia un'e-mail a: service@baldr.com. Precauzioni Non pulire nessuna parte del prodotto con benzene, diluente o altri prodotti chimici solventi.
- Seite 82 È necessario raccogliere questi rifiuti separatamente per un trattamento speciale. Garanzia BALDR offre una garanzia limitata di 1 anno per questo prodotto contro difetti di fabbricazione nei materiali e nella lavorazione. Il servizio di garanzia può essere eseguito solo dal nostro centro di assistenza autorizzato.
- Seite 83 MODELO: B0360WST2H2PR-V1 CONTROLADO POR RADIO ESTACIÓN METEOROLÓGICA Le agradecemos su compra de la estación meteorológica a Baldr Controlado Por Radio Estacion Meteorologica . Ha sido diseñada y fabricada utilizando componentes y técnicas innovadoras para garantizar una visualización perfecta de la temperatura y la humedad. Por favor, lea atentamente las instrucciones para familiarizarse con las propiedades y funciones antes de utilizar la unidad.
-
Seite 84: Presentación Del Producto
Presentación del Producto UNIDAD PRINCIPAL 1. Indicador de la señal del sensor 12.Indicador de alarma 2. Canal de sensor exterior 13.Indicador de dormitar Cambiar el canal de CH1--CH2 --CH3--Exploración de canal... - Seite 85 3. Temperatura exterior actual 14.Humedad interior actual El icono de la flecha indica la El icono de la flecha indica la tendencia de la temperatura tendencia de la humedad 15.Max/min registros de la 4. Max/min registra la temperatura temperatura y la humedad y la humedad exterior interior Los registros de temperatura y...
- Seite 86 vista trasera 1. Agujero para colgar 2. Ventilación del sensor 3. Compartimiento de la batería 4. Soporte de pie 5. Toma de corriente vista superior Luz de fondo/botón táctil Pulse para cambiar el brillo de la luz de fondo entre el 100%, 50%, 10%, 3% y apagado.
- Seite 87 vista lateral 1. Botón "SET " Presiona largo tiempo para entrar en la configuración de la hora 2. Botón "▲/CH'' Presiona brevemente para cambiar de canal Presiona largo tiempo para entrar en la recepción de la señal 3.Botón " ▼/RCC" Presione brevemente para salir de la señal /RCC RCC recepción...
-
Seite 88: Sensore Esterno
SENSORE ESTERNO 1. Luz de señal 2. Orificio para colgar 3. Compartimento de la batería 4. Interruptor de canal 1-2-3 CARACTERÍSTICAS 1. Mide la temperatura interior y exterior (C/F) y la humedad 2. Rango de temperatura interior:-10℃~50℃(14℉~122℉) 3. Rango de temperatura exterior:-40℃~60℃(-40℉~140℉) 4. -
Seite 89: Contenido Del Paquete
1x Adaptador de CA 1x Manual de usuario PRISE EN MAIN BALDR recomienda pilas alcalinas o de litio de alta calidad para obtener un mejor rendimiento del producto. No se recomienda el uso de pilas recargables o de alta potencia. -
Seite 90: Instalación Del Sensor
Alimentada por baterías: 1. Remueva la cubierta del compartimiento para las baterías. 2. Inserte 3 pilas AAA acorde a la polaridad (+ y -) 3. Vuelva a colocar la cubierta de las baterías INSTALACIÓN DEL SENSOR 1. Remueva la cubierta del compartimiento para las baterías. 2. - Seite 91 CONFIGURACIÓN DE LA UNIDAD PRINCIPAL Cuando se encienda o se restablezca, la pantalla LCD se mostrará durante 3 segundos con el sonido "BI". El valor predeterminado es: Unidad de Unidad de Idioma de los Visualización Visualización Idioma de los días de la Presión Presión días de la...
-
Seite 92: Configuración Manual
3. En el modo normal de hora, presiona el botón " ▼/RCC"’ para entrar en la recepción de la señal DCF/WWVB/MSF. 4. Durante la recepción DCF/WWVB/MSF, presiona el botón " ▼/RCC" para salir de la recepción RCC. 4. La hora se convertirá a la hora actual de la zona horaria correspondiente luego de recibir RCC. - Seite 93 *Consejos: presiona y mantén presionado “▲/CH’’ o “▼/RCC’’ para cambiar los valores rápidamente en 8 pasos. Nota: Se puede escoger entre 7 idiomas para mostrar los días de la semana: FRE、SPA、ENG、GER、ITA、DUT、DRN Dane anemark Alemán Anglais Français Italien Espagnol mark néerlandais Idioma Domingo Lunes...
- Seite 94 9. Presiona el botón “SET’’ para seleccionar el año. Presiona el botón “▲/CH’’ o “▼/RCC’’ para ajustar el valor. 10. Presiona el botón “SET ’’ para seleccionar el Mes. Presiona el botón “▲/CH’’ o “▼/RCC’’ para ajustar el valor. 11. Presione "SET" para seleccionar la fecha. Presione el botón "▲...
-
Seite 95: Función De Repetición
"Bibi" durará 2 minutos si no se realiza ninguna operación. INSTRUCCIONES PARA EL POSICIONAMIENTO Los sensores BALDR son sensibles a las condiciones ambientales circundantes. El correcto posicionamiento tanto de la unidad principal como del sensor exterior es crítico para la precisión y el rendimiento de este producto. - Seite 96 general en el exterior, sin embargo, para prolongar su vida útil coloque el sensor en un área protegida de los elementos climáticos directos. La mejor ubicación es de 4 a 8 pies (1,2 a 2,4 metros) sobre el suelo con sombra permanente y mucho aire fresco para que circule alrededor del sensor.Cuando se coloca mediante un orificio para colgar, la mejor distancia de la pared es de más de 1 cm para una mejor ventilación...
- Seite 97 ● Indicaciones de cambios de temperatura con flechas: se mostrará cuando los cambios de temperatura sean menores a 1℃ en la hora siguiente o respecto a la última lectura. se mostrará cuando la lectura aumente al menos 1℃ en la hora siguiente o respecto a la última lectura.
- Seite 98 1. La función de alerta de temperatura estará encendida luego de configurar los valores de alerta. 2. Presiona el botón “ALERTS” para revisar el valor de alerta de alta temperatura. 3. Presiona el botón “▼/RCC’’ o “▲/CH’’ para encender/apagar la función de alerta de alta temperatura con el on/off en el símbolo 4.
- Seite 99 " para cambiar el brillo de la luz de fondo entre 100%, 50% ,10%,3% y apagado. CALIBRACIÓN Las estaciones meteorológicas de Baldr fueron calibradas con precisión en nuestra planta de fabricación, pero si desea que los datos de este producto sean coherentes con la lectura del equipo en el que más confía o al que está...
-
Seite 100: Resolución De Problemas
3. Presiona y mantén presionado el botón “ ” antes de apagar la estación meteorológica para borrar los valores de calibración. RESOLUCIÓN DE PROBLEMAS Problema Posible Solución El parpadeo de la lectura exterior es generalmente La lectura en el una indicación de interferencias inalámbricas. exterior está... - Seite 101 LL en la pantalla. Si tu producto BALDR no funciona correctamente después de intentar los pasos de solución de problemas, ponte en contacto con el vendedor en tu página de pedido o envía un correo electrónico a: service@baldr.com.
- Seite 102 Garantie BALDR ofrece una garantía limitada de 1 año para este producto contra defectos de fabricación en materiales y mano de obra. El servicio de garantía solo puede ser efectuado por nuestro centro de servicio autorizado. La factura de venta original fechada debe ser presentada a petición como prueba de compra a nosotros o a nuestro...