Herunterladen Inhalt Inhalt Diese Seite drucken

Werbung

Verfügbare Sprachen
  • DE

Verfügbare Sprachen

  • DEUTSCH, seite 1
AIRFLEX 360°
Standventilator
Stand Fan
Ventilador de pie
Ventilateur sur pied
Ventilatore verticale
10030415
www.klarstein.com

Werbung

Inhaltsverzeichnis
loading

Inhaltszusammenfassung für Klarstein Airflex 360

  • Seite 1 AIRFLEX 360° Standventilator Stand Fan Ventilador de pie Ventilateur sur pied Ventilatore verticale 10030415 www.klarstein.com...
  • Seite 3: Inhaltsverzeichnis

    Sehr geehrter Kunde, wir gratulieren Ihnen zum Erwerb Ihres Gerätes. Lesen Sie die folgenden Hinweise sorgfältig durch und befolgen Sie diese, um möglichen Schäden vorzubeugen. Für Schäden, die durch Missachtung der Hinweise und unsachgemäßen Gebrauch entstehen, übernehmen wir keine Haftung. Scannen Sie den folgenden QR-Code, um Zugriff auf die aktuellste Bedienungsanleitung und weitere Informationen rund um das Produkt zu erhalten.
  • Seite 4: Sicherheitshinweise

    SICHERHEITSHINWEISE • Kinder könnten sich an den Verpackungsmaterialien und Altgeräten verletzen. Entsorgen Sie das Verpackungsmaterial daher umgehend. • Kinder ab 8 Jahren, psychisch, sensorisch und körperlich eingeschränkte Menschen dürfen das Gerät nur benutzen, wenn sie vorher von einer für sie verantwortlichen Aufsichtsperson ausführlich mit den Funktionen und den Sicherheitsvorkehrungen vertraut gemacht wurden und die damit verbundenen Risiken verstehen.
  • Seite 5 • Achten Sie darauf, dass das Netzkabel nicht über scharfe Kanten oder Oberflächen verläuft. Hängen Sie das Gerät nicht an der Decke oder Wand auf, außer es ist für diesen Betrieb ausgelegt. • Lassen Sie um das Gerät herum genug Platz zu Wänden, Möbeln oder anderen Geräten, um die bestmögliche Leistung zu erzielen.
  • Seite 6: Geräteübersicht

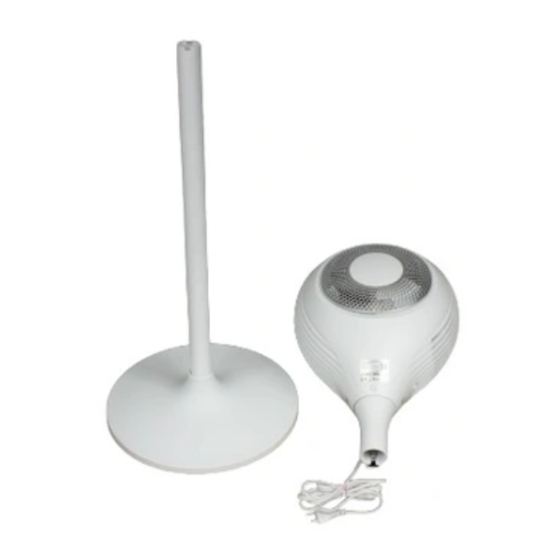
    GERÄTEÜBERSICHT Rechter Lufteinlass Vorderes Gehäuse LED Kontrollleuchte Körper-Sensor Rechte Seitenblende Fernbedienungs-Sensor Bedienfeld Schwenk-Basis Hinteres Gehäuse Fernbedienung Netzkabel Fernbedienugs-Halter Unterstützungs-Mutter Ständer Linker Lufteinlass Basis Dekorative Abdeckung Gewicht Linke Seitenblende...
  • Seite 7 Bedienfeld und Fernbedienung Ein / Aus / Standby Modus Timer Geschwindigkeit Horizontal schwenken / Körper- Sensor-Funktion Vertikal schwenken...
  • Seite 8 Display und Kontrollleuchten Ein/Aus/Standby Hohe Geschwindigkeit Natürlicher Modus Mittlere Geschwindigkeit Schlaf-Modus Niedrige Geschwindigkeit Öko-Modus Schwenkwinkel horizontal Timer Schwenken vertikal...
  • Seite 9: Inbetriebnahme Und Bedienung

    INBETRIEBNAHME UND BEDIENUNG Aufbau Legen Sie sich alle teile zurecht. Ziehen Sie das Netzkabel durch das Loch an der Basis, setzen Sie den Ständer auf die Basis und ziehen Sie ihn mit einer Schraube fest. (Bild 1) Setzen Sie den Ventilator auf den Ständer (Bild 2). Lösen Sie den Gewindestift und befestigen Sie den Ventilator am Ständer (Bild 3).
  • Seite 10 Geschwindigkeit Drücken Sie während des Gerät läuft auf die Taste für die Geschwindigkeit und wählen Sie zwischen niedrig, mittel und hoch. Die entsprechende Kontrollleuchte geht an. Timer Normalerweise ist kein Timer gestellt. Drücken Sie auf die TIMER-Taste, um den Timer in der folgenden Reihenfolge einzustellen: 1 Stunde > 2 Stunden > 4 Stunden >...
  • Seite 11 Funktionen und optionale Einstellungen der einzelnen Modi Normal Hohe Geschwindigkeit Mittlere Geschwindigkeit Niedrige Geschwindigkeit Natürlich Durch Schwenken wird eine natürliche Brise erzeugt (bei hoher, mittlerer und niedriger Geschwindigkeit. Schlaf Hohe Geschwindigkeit: 30 Minuten starker, natürlicher Wind > 30 Minuten mittlerer, natürlicher Wind > Danach läuft das Gerät bei niedriger Geschwindigkeit weiter.
  • Seite 12: Reinigung Und Pflege

    REINIGUNG UND PFLEGE • Ziehen Sie vor der Reinigung immer den Stecker aus der Steckdose, um Stromschläge oder Beschädigungen zu vermeiden. • Wischen Sie alle Teile mit einem weichen Lappen ab. Benutzen Sie keine Mittel wie Benzin oder Verdünner. HINWEISE ZUR ENTSORGUNG Wenn es in Ihrem Land eine gesetzliche Regelung zur Entsorgung von elektrischen und elektronischen Geräten gibt, weist dieses Symbol auf dem Produkt oder...
  • Seite 13: Technical Data

    Dear Customer, Congratulations on purchasing this device. Please read the following instructions carefully and follow them to prevent possible damages. We assume no liability for damage caused by disregard of the instructions and improper use. Scan the QR code to get access to the latest user manual and more product information.
  • Seite 14: Safety Instructions

    SAFETY INSTRUCTIONS • Packaging materials (plastic bags, polystyrene, staples etc.) Must be kept out of the reach of children as they could be hazardous. • Children over the age of 8 and persons with reduced physical, sensory or mental capabilities or those with a lack of experience and knowledge may only use the device if they are instructed on how to do so by a person responsible for their safety, or if they are supervised and understand the hazards associated with the use of the device.
  • Seite 15 • Do not hang the fan on the wall or ceiling unless this type of installation is provided and explained in this manual. • Place the device at a proper distance from the objects or surrounding walls making sure that its functioning will not cause accidental damages. •...
  • Seite 16: Product Description

    PRODUCT DESCRIPTION Right air inlet Front housing LED indicator light Body sensor Right side panel Remote control sensor Control panel Swivel base Rear housing Remote control Power cord Remote control holder Support nut Stand Left air intake Base Decorative cover Weight Left side panel...
  • Seite 17 Control panel and remote control On / Off / Standby Mode Timer Speed Swing horizontally / body sensor function Vertical swing...
  • Seite 18 Display and indicator lights On/Off/Standby High speed Natural Mode Medium speed Sleep Mode Low speed Eco Mode Pivot angle horizontal Timer Swing vertical...
  • Seite 19: Use And Operation

    USE AND OPERATION Installation Take out parts for assembling. Put the power cord through the hole of base, stand the support on the base and fix them tightly by screw (Picture 1). Place the machine body into the tube-shape pillar (Picture 2). Then, take out the grub screw and cross screwdriver to fix the body on the tube-shape pillar (Picture 3).
  • Seite 20 Speed While working, press this button for LOW, MIDDLE and HIGH speed selection. The indicators show on the display accordingly. Timer There is no timer and related display show under the initial conditions. Press the TIMER button, you can set the running time for this fan, Time setting as: 1H > 2H > 4H >...
  • Seite 21 Running conditions for different modes Normal High speed Medium speed Low speed Natural Swing to create a natural breeze (at high, medium and low speed. Sleep High speed: 30 minutes of strong, natural wind > 30 minutes of medium, natural wind > After that, the unit continues to run at low speed.
  • Seite 22: Cleaning And Care

    CLEANING AND CARE • Always remember unplug the fan before cleaning, or may cause electric shock or product damage. • Wipe all parts with a soft cloth. Do not use any of the following as a cleaner: gasoline, thinner, benzine. DISPOSAL CONSIDERATIONS If there is a legal regulation for the disposal of electrical and electronic devices in your country, this symbol on the...
  • Seite 23: Datos Técnicos

    Estimado cliente: Le felicitamos por la adquisición de este producto. Lea atentamente el siguiente manual y siga cuidadosamente las instrucciones de uso con el fin de evitar posibles daños. La empresa no se responsabiliza de los daños ocasionados por un uso indebido del producto o por haber desatendido las indicaciones de seguridad.
  • Seite 24: Indicaciones De Seguridad

    INDICACIONES DE SEGURIDAD • Los niños podrían provocarse lesiones con el material de embalaje y los artículos viejos. Por ello, deseche el material de embalaje inmediatamente. • Los niños mayores de 8 años y las personas con discapacidad física, sensorial o psíquica, o con falta de experiencia y conocimientos pueden utilizar el aparato si han sido previamente instruidos por su tutor o supervisor sobre el funcionamiento del mismo y conocen las funciones, las indicaciones de...
  • Seite 25 • No cuelgue el aparato del techo o de una pared a menos que se haya concebido para ese tipo de instalación. • Deje suficiente espacio alrededor del aparato con respecto a paredes, mobiliario u otros objetos para obtener el mejor rendimiento posible. •...
  • Seite 26: Descripción Del Aparato

    DESCRIPCIÓN DEL APARATO Entrada de aire derecha Carcasa frontal Luz indicadora LED Sensor corporal Panel lateral derecho Sensor remoto Panel de control Base de la panorámica Carcasa trasera Mando a distancia Soporte para el mando a Cable de alimentación distancia Tuerca de soporte Stand Toma de aire izquierda...
  • Seite 27 Panel de control y mando a distancia Encendido / Apagado / Standby Modo Temporizador Velocidad Función de paneo horizontal / sensor de cuerpo Giro vertical...
  • Seite 28 Pantalla e indicadores luminosos Encendido/Apagado/Standby Alta velocidad Modo natural Velocidad media Modo de reposo Baja velocidad Modo Eco Ángulo de giro horizontal Temporizador Pivote vertical...
  • Seite 29: Puesta En Marcha Y Uso

    PUESTA EN MARCHA Y USO Montaje Extraiga todas las partes para montarlas. Pase el cable de alimentación por el orificio de la base, coloque el soporte sobre la base y atorníllelo con un tornillo. (imagen 1) Encaje el ventilador al soporte (imagen 2). Suelte la vara de la rosca y fije el ventilador al soporte (imagen 3).
  • Seite 30 Velocidad Pulse el botón de velocidad con el aparato en marcha y elija la opción baja, media o alta. La luz correspondiente se enciende. Temporizador Normalmente no hay ningún temporizador configurado. Pulse el botón TIMER para configurar el temporizador en el siguiente orden: 1 hora > 2 horas > 4 horas > 8 horas.
  • Seite 31 Funciones y ajustes opciones de cada uno de los modos Normal Velocidad alta Velocidad media Velocidad baja Aire natural Con la oscilación se generará una brisa natural (a velocidad alta, media y baja). Noche Velocidad alta: 30 minutos a velocidad alta, aire natural >...
  • Seite 32: Limpieza Y Cuidado

    LIMPIEZA Y CUIDADO • Desconecte el enchufe antes de limpiar el aparato para evitar descargas eléctricas y averías. • Limpie todas las piezas con un paño suave. No utilice productos como gasolina o disolventes. INDICACIONES SOBRE LA RETIRADA DEL APARATO Si en su país existe una disposición legal relativa a la eliminación de aparatos eléctricos y electrónicos, este símbolo estampado en el producto o en el embalaje...
  • Seite 33: Fiche Technique

    Chère cliente, cher client, Toutes nos félicitations pour l’acquisition de ce nouvel appareil. Veuillez lire attentivement et respecter les instructions de ce mode d’emploi afin d’éviter d’éventuels dommages. Le fabricant ne saurait être tenu pour responsable des dommages dus au non-respect des consignes de sécurité et à la mauvaise utilisation de l’appareil.
  • Seite 34: Consignes De Sécurité

    CONSIGNES DE SÉCURITÉ • Les matériaux d‘emballage et les vieux appareils peuvent blesser les enfants. Jetez le matériel d‘emballage immédiatement. • Les enfants âgés de plus de 8 ans et les personnes ayant des capacités physiques, sensorielles ou mentales réduites ou dénués d‘expérience et de connaissances ne doivent utiliser l‘appareil que si la personne responsable de leur sécurité...
  • Seite 35 • Ne suspendez pas l‘appareil au plafond ou au mur sauf s‘il est conçu pour cette utilisation. • Laissez suffisamment d‘espace entre l‘appareil et les murs, meubles ou tout autre équipement afin d‘obtenir les meilleures performances possibles. • N‘utilisez pas l‘appareil à proximité de cuisinières à gaz ou d‘appareils de chauffage au gaz.
  • Seite 36: Aperçu De L'appareil

    APERÇU DE L’APPAREIL Entrée d'air droite Boîtier avant Indicateur lumineux LED Capteur de corps Panneau latéral droit Capteur à distance Panneau de contrôle Base panoramique Boîtier arrière Télécommande Cordon d'alimentation Support de télécommande Ecrou de soutien Stand Prise d'air gauche Base Couverture décorative Poids...
  • Seite 37 Panneau de commande et télécommande On / Off / Standby Mode Minuterie Vitesse Fonctionnement du capteur panoramique horizontal / du corps Pivotement vertical...
  • Seite 38 Affichage et voyants lumineux On/Off/Standby Haute vitesse Mode naturel Vitesse moyenne Mode veille Basse vitesse Mode Eco Angle de pivotement horizontal Minuterie Pivot vertical...
  • Seite 39: Mise En Marche Et Utilisation

    MISE EN MARCHE ET UTILISATION Montage Disposer toutes les pièces devant soi avant le montage. Faire passer le cordon d’alimentation dans le trou du socle, installer le pied sur le socle et le fixer en le vissant (image 1). Placer le ventilateur sur le pied (image 2). Sortir la tige filetée et fixer le ventilateur au pied (image 3).
  • Seite 40 Vitesse Appuyer sur la touche de vitesse pendant le fonctionnement de l’appareil et faire sa sélection entre bas, moyen et élevé. Le témoin lumineux correspondant s’allume. Minuteur Le minuteur n’est pas activé par défaut. Appuyer sur la touche TIMER pour régler le minuteur selon l’ordre sui- vant : 1 heure >...
  • Seite 41 Fonctions et options de réglage de chaque mode Normal Vitesse élevée Vitesse moyenne Vitesse basse Naturel L’oscillation produit une brise naturelle (à vitesse élevée, moyenne et basse) Sommeil Vitesse élevée : 30 minutes de vent fort, naturel > 30 minutes de vent moyen, naturel > puis l’appareil poursuit à...
  • Seite 42: Nettoyage Et Entretien

    NETTOYAGE ET ENTRETIEN • Toujours débrancher l’appareil avant de le nettoyer pour éviter toute électrocution ou dégât. • Essuyer toutes les pièces avec une éponge douce. Ne pas utiliser de produit comme de l’essence ou du diluant. INFORMATIONS SUR LE RECYCLAGE S‘il existe une réglementation pour l‘élimination ou le recyclage des appareils électriques et électroniques dans votre pays, ce symbole sur le produit ou sur l‘emballage...
  • Seite 43 Gentile cliente, La ringraziamo per aver acquistato il dispositivo. La preghiamo di leggere attentamente le seguenti istruzioni per l’uso e di seguirle per evitare possibili danni tecnici. Non ci assumiamo alcuna responsabilità per danni scaturiti da una mancata osservazione delle avvertenze di sicurezza e da un uso improprio del dispositivo.
  • Seite 44: Avvertenze Di Sicurezza

    AVVERTENZE DI SICUREZZA • I bambini possono ferirsi con materiali d’imballaggio e vecchi dispositivi. Smaltire immediatamente tutti i materiali d’imballaggio. • Questo dispositivo può essere utilizzato dai bambini maggiori di 8 anni e dalle persone con limitate capacità fisiche, sensoriali o mentali o da persone con esperienza e conoscenze insufficienti, solo se sono stati informati sulle funzioni del dispositivo e sono consapevoli dei rischi e dei pericoli connessi.
  • Seite 45 • Non appendere il dispositivo alla parete o al soffitto, a meno che non sia adatto a questo tipo di utilizzo. • Lasciare abbastanza spazio libero tra il dispositivo e pareti, mobili o altri dispositivo, in modo da ottenere le migliori prestazioni possibili. •...
  • Seite 46: Descrizione Del Prodotto

    DESCRIZIONE DEL PRODOTTO Presa d'aria destra Alloggiamento anteriore Indicatore luminoso a LED Sensore del corpo Pannello laterale destro Sensore remoto Pannello di controllo Base di scansione Alloggiamento posteriore Controllo remoto Cavo di alimentazione Supporto per il telecomando Dado di supporto Stand Presa d'aria sinistra Base...
  • Seite 47 Pannello di controllo e telecomando On / Off / Standby Modo Timer Velocità Funzione sensore orizzontale Pan / Body Girevole verticale...
  • Seite 48 Display e spie luminose On/Off/Standby Alta velocità Modo naturale Velocità media Modalità di riposo Bassa velocità Modalità Eco Angolo di rotazione orizzontale Timer Perno verticale...
  • Seite 49: Messa In Funzione E Utilizzo

    MESSA IN FUNZIONE E UTILIZZO Montaggio Rimuovere i componenti dalla confezione per assemblarli. Far passare il cavo di alimentazione attraverso il foro situato sulla base, posizionare l’asta sulla base e fissarla utilizzando una vite. (Figura 1). Posizionare il ventilatore sull’asta (Figura 2). Svitare la vite e fissare il ventilatore sull’asta (Figura 3).
  • Seite 50 Velocità Premere il tasto per la velocità mentre il dispositivo è in funzione e scegliere un livello di velocità (bassa, media e alta). La spia luminosa corrispondente si accende. Timer Il timer non è attivo all’accensione. Premere il tasto TIMER per impostare il timer nella sequenza seguente: 1 ora >...
  • Seite 51 Funzioni e impostazioni opzionali delle singole modalità Normale Velocità alta Velocità media Velocità bassa Naturale L’oscillazione produce una brezza naturale (a velocità alta, media e bassa). Notturna Velocità alta: 30 minuti di flusso d’aria forte, naturale > in seguito il dispositivo funziona a velocità bassa. Velocità...
  • Seite 52: Pulizia E Manutenzione

    PULIZIA E MANUTENZIONE • Prima di eseguire qualsiasi operazione di pulizia, staccare la spina dalla presa per evitare il pericolo di scosse elettriche o di danni. • Pulire tutti i componenti con un panno morbido. Non utilizzare mai benzina o diluenti.

Diese Anleitung auch für:

10030415

Inhaltsverzeichnis