Werbung
Verfügbare Sprachen
Verfügbare Sprachen
Quicklinks
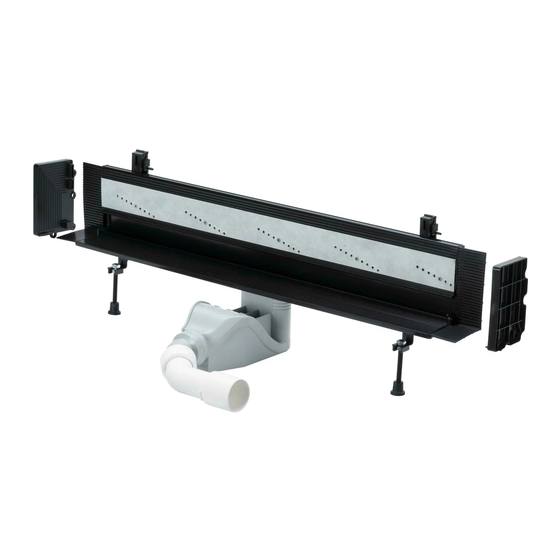
Advantix Vario
Modell 4967.10
A
45
13
40
582049_Advantix_Vario_Wandabl_Grundk.indd 1
A
A
300-1200
45
90-165
85
100
Ø 50
Ø 40
172
Modell
Art.-Nr.
4967.10
736 552
13
113
90-115
85
267
07.0/2015
DE
BE
FR
BE
NL
INT
IT
PL
RU
14.09.2015 10:40:05
Werbung

Verwandte Anleitungen für Viega Advantix Vario 4967.10


Inhaltszusammenfassung für Viega Advantix Vario 4967.10
- Seite 1 Advantix Vario Modell 4967.10 07.0/2015 Modell Art.-Nr. 300-1200 4967.10 736 552 90-165 90-115 Ø 50 Ø 40 582049_Advantix_Vario_Wandabl_Grundk.indd 1 14.09.2015 10:40:05...
- Seite 2 Modell 4967.10 582049_Advantix_Vario_Wandabl_Grundk.indd 2 14.09.2015 10:40:06...
- Seite 3 Modell 4967.10 3,5 cm 582049_Advantix_Vario_Wandabl_Grundk.indd 3 14.09.2015 10:40:09...
- Seite 4 Modell 4967.10 max.1,5 mm 2 mm 2 mm x = 165 – H 95-165 582049_Advantix_Vario_Wandabl_Grundk.indd 4 14.09.2015 10:40:11...
- Seite 5 Modell 4967.10 582049_Advantix_Vario_Wandabl_Grundk.indd 5 14.09.2015 10:40:16...
- Seite 6 Modell 4967.10 12,5 mm 582049_Advantix_Vario_Wandabl_Grundk.indd 6 14.09.2015 10:40:22...
- Seite 7 Modell 4967.10 ca. 8 mm 10 mm 582049_Advantix_Vario_Wandabl_Grundk.indd 7 14.09.2015 10:40:29...
- Seite 8 Modell 4967.10 20 mm 1 0 m 1 0 m 582049_Advantix_Vario_Wandabl_Grundk.indd 8 14.09.2015 10:40:36...
- Seite 9 Modell 4967.10 max.1,5 mm 582049_Advantix_Vario_Wandabl_Grundk.indd 9 14.09.2015 10:40:40...
- Seite 10 Gebrauchsanleitung Advantix Vario-Wandablauf-Grundkörper Bestimmungsgemäße Verwendung Der Einbau des Advantix Vario-Wandablaufs sollte durch Fachfirmen erfolgen unter Berücksichtigung der bautechnischen Vorschriften. Um eine ausreichende Stabilität des Bodenbelags zu gewährleisten ist entweder eine ausreichende Estrichüberdeckung oder eine andere geeignete Alternativlösung zu berücksichtigen. Die Abmessungen von Schlitzen und Aussparungen sind der Norm für Mauerwerksbau DIN 1053 oder ab dem 01.01.2016 der DIN EN 1996 zu entnehmen.
- Seite 11 Gebrauchsanleitung Advantix Vario-Wandablauf-Grundkörper Ermittlung der Rinnenlänge Die Position des Ablaufes ist frei wählbar. Dabei darf das Maß von Mitte Ablauf bis Ende Rinnenprofil 150 mm nicht unterschreiten. Einbauvariante 1 A = abzudichtende Wandfläche Damit kein Schmutzwasser entlang der Wandfuge X = Sägemaß...
- Seite 12 Bei Montage an einer Vorwand oder Leichtbauwand können die Maße annähernd angenommen werden. Systembedingt ist ein Wandaufbau von 25 mm erforderlich, auch bei dem Einsatz von Viega Vorwandsystemen. Die nötige Wandstärke kann durch eine entsprechend starke Beplankung (auch Doppelbeplankung von 2x12,5 mm) oder durch aufbringen einer Putzschicht erreicht werden.
- Seite 13 Gebrauchsanleitung Advantix Vario-Wandablauf-Grundkörper Montage an einer gemauerten Wand Geruchverschluss an das Entwässe- Über die Abstandsverstellung 1 kann Auf richtigen Sitz des Rinnenhalters in rungssystem anschließen. die Duschrinne den Wandverhält- der Nut der Duschrinne achten. Um einen guten Wasserablauf zu nissen angepasst werden.
- Seite 14 Gebrauchsanleitung Advantix Vario-Wandablauf-Grundkörper Montage an einer Leichtbauwand- oder Vorwandkonstruktion Duschrinne in die Gipskartonwand q Duschrinne vollflächig bis Oberkante einarbeiten. Flansch mit Estrich unterfüttern. Die Dabei gilt: Vorderkante Flansch gleich Duschrinne muss starken Belastungen Vorderkante abzudichtende Wand. standhalten. Aufbringen der Flanschabdichtung ...
- Seite 15 Gebrauchsanleitung Advantix Vario-Wandablauf-Grundkörper Montage der Stegroste Hinweis: Stegroste und Abdeckkappen gehören nicht zum Lieferumfang und müssen gesondert bestellt werden! Stegrost mit Montagezubehör und Abdeckkappen in matter Ausführung Art.-Nr. 736 569 Stegrost mit Montagezubehör und Abdeckkappen in glänzender Ausführung Art.-Nr. 736 576 Stegrost mit Montagezubehör und Abdeckkappen in schwarzer Ausführung Art.-Nr.
- Seite 16 Gebrauchsanleitung Advantix Vario-Wandablauf-Grundkörper Designroste Modell Art.-Nr. Produktbeschreibung 4967.30 736 569 Visign SR1-Stegrost, Wandablauf, mit Montagezubehör und Abdeckkappen in matter Ausführung 4967.31 736 576 Visign SR2-Stegrost, Wandablauf, mit Montagezubehör und Abdeckkappen in glänzender Ausführung 4967.32 736 583 Visign SR3-Stegrost, Wandablauf, mit Montagezubehör und Abdeckkappen in schwarzer Ausführung 4967.33 Visign SR4-Stegrost,...
- Seite 17 Komplettset für die Verwendung abgelängter Stegroste, weiße Ausführung 4967.87 738 365 Advantix Vario-Reinigungsbürste, 4967.92 736 712 Advantix Vario-Fliesenschutz und Kontrollwerkzeug, für die Entnahme aller Viega Advantix Roste 4965.90 689 704 Entnahmewerkzeug, für die Entnahme aller Viega Advantix Roste 2043 151 874 Entgrater 582049_Advantix_Vario_Wandabl_Grundk.indd 17...
- Seite 18 Mode d'emploi unité de base pour écoulement mural Advantix Vario Bestimmungsgemäße Verwendung Utilisation conforme Le montage de l'écoulement mural Advantix Vario doit être réalisé par une entreprise spécialisée et répondre aux prescriptions dieser Text..en vigueur du secteur de la technique de construction. En vue de garantir une stabilité...
- Seite 19 Mode d'emploi unité de base pour écoulement mural Advantix Vario Détermination de la longueur de la rigole La position du système d'évacuation est librement sélectionnable. Signalons à cet effet que la distance du centre de l'évacuation jusqu'à la fin du profilé de rigole ne peut pas être inférieure à 150 mm. ...
- Seite 20 En fonction du système, une construction murale de 25 mm peut s'avérer nécessaire, même en cas d'utilisation de systèmes de bâti- support Viega. L'épaisseur murale nécessaire peut être atteinte en utilisant un habillage épais (utilisation possible d'une double plaque de 2x12,5 mm) ou en appliquant une couche d'enduit.
- Seite 21 Mode d'emploi unité de base pour écoulement mural Advantix Vario Montage sur le mur de maçonnerie Raccorder le siphon au système La rigole de douche peut être adaptée S'assurer que le support de rigole est d'évacuation. aux conditions du mur par le biais correctement positionné...
- Seite 22 Mode d'emploi unité de base pour écoulement mural Advantix Vario Montage sur une cloison légère ou en applique Enfoncer la rigole de douche dans la q Caler la rigole de douche à l'aide de la cloison en plaque de plâtre. chape sur toute la surface de la rigole La règle suivante s'applique : bord de douche jusqu'au rebord supérieur...
- Seite 23 Mode d'emploi unité de base pour écoulement mural Advantix Vario Montage des profilés Remarque : Les profilés et capuchons ne sont pas fournis et doivent être commandés séparément ! Le profilé avec les accessoires de montage et les capuchons modèle mat réf. 736 569 Le profilé...
- Seite 24 Mode d'emploi unité de base pour écoulement mural Advantix Vario Profilés design Modèle Réf. Description du produit 4967.30 736 569 Profilé SR1 Visign, écoulement mural, avec accessoires de montage et capuchons de finition mate 4967.31 736 576 Profilé SR2 Visign, écoulement mural, avec accessoires de montage et capuchons de finition brillante...
- Seite 25 738 365 Brosse de nettoyage Advantix Vario 4967.92 736 712 Outil de contrôle et protection des carrelages Advantix Vario pour l'extraction de tous les profilés/grilles Viega Advantix 4965.90 689 704 Outil d'extraction, pour l'extraction de tous les profilés/grilles Viega Advantix...
- Seite 26 Gebruiksaanwijzing Advantix Vario-wandafvoerbasislichaam Bestimmungsgemäße Verwendung Beoogd gebruik De Advantix vario-wandafvoer moet worden ingebouwd door een erkend installatiebedrijf met inachtneming van de bouwtechni- dieser Text..sche voorschriften. Om verzekerd te zijn van een toereikende stabiliteit van de vloerbedekking moet een toereikende estriklaag of een andere geschikte, alternatieve oplossing worden toegepast.
- Seite 27 Gebruiksaanwijzing Advantix Vario-wandafvoerbasislichaam Bepalen van de gootlengte De positie van de afvoer kan vrij worden gekozen. Daarbij mag de maat vanaf midden afvoer tot einde gootprofiel niet kleiner zijn dan 150 mm. Inbouwvariant 1 A = af te dichten wandoppervlak ...
- Seite 28 Bij een montage aan een voorwand of een lichte constructiewand kunnen de maten bij benadering worden aangenomen. Vanwege het systeem is een wandopbouw van 25 mm noodzakelijk, ook bij gebruik van Viega-voorwandsystemen. De noodzakelijke wanddikte kan door een overeenkomstig dikke beplating (ook dubbele beplating van 2 x 12,5 mm) of door het aanbrengen van een stuclaag worden bereikt.
- Seite 29 Gebruiksaanwijzing Advantix Vario-wandafvoerbasislichaam Montage aan een gemetselde muur Sifon op het afvoersysteem aansluiten. Via de afstandsverstelling 1 kan de Let op de juiste bevestiging van de Om een goede waterafvoer mogelijk douchegoot aan de wandsituaties goothouder in de groef van de te maken, moet de douchegoot in alle worden aangepast.
- Seite 30 Gebruiksaanwijzing Advantix Vario-wandafvoerbasislichaam Montage aan een lichte constructiewand of een voorwandconstructie Douchegoot in de gipsplaat q Ruimte onder douchegoot over het hele aanbrengen. oppervlak tot bovenkant flens vullen Daarbij geldt: Voorkant flens gelijk aan met dekvloermortel. De douchegoot voorzijde af te dichten wand. moet bestand zijn tegen sterke belas- tingen.
- Seite 31 Gebruiksaanwijzing Advantix Vario-wandafvoerbasislichaam Montage van de insteekroosters Aanwijzing: Insteekrooster en afdekkappen worden niet meegeleverd en moeten apart worden besteld! Insteekrooster met montagetoebehoren en afdekkappen in matte uitvoering artikelnr. 736 569 Insteekrooster met montagetoebehoren en afdekkappen in glanzende uitvoering artikelnr. 736 576 Insteekrooster met montagetoebehoren en afdekkappen in zwarte uitvoering artikelnr.
- Seite 32 Gebruiksaanwijzing Advantix Vario-wandafvoerbasislichaam Designrooster Model Artikelnr. Productbeschrijving 4967.30 736 569 Visign SR1-insteekrooster, wandafvoer, met montagetoebehoren en afdekkappen in matte uitvoering 4967.31 736 576 Visign SR2-insteekrooster, wandafvoer, met montagetoebehoren en afdekkappen in glanzende uitvoering 4967.32 736 583 Visign SR3-insteekrooster, wandafvoer, met montagetoebehoren en afdekkappen in zwarte uitvoering 4967.33 Visign SR4-insteekrooster,...
- Seite 33 Complete set voor gebruik van ingekorte insteekroosters, witte uitvoering 4967.87 738 365 Advantix Vario-reinigingsborstel 4967.92 736 712 Advantix Vario-tegelbescherming en controlegereedschap, voor het uitnemen van alle Viega Advantix-roosters 4965.90 689 704 Roosterhaak, voor het uitnemen van alle Viega Advantix-roosters 2043 151 874 Ontbramer 582049_Advantix_Vario_Wandabl_Grundk.indd 33...
- Seite 34 Instructions for Use Advantix Vario Wall Drain Base Unit Bestimmungsgemäße Verwendung Intended Use The Advantix Vario wall drain should be installed by specialist companies, taking into account structural and technical regula- dieser Text..tions. To ensure adequate stability of the floor covering, either a sufficient covering of screed or another suitable alternative solution should be observed.
- Seite 35 Instructions for Use Advantix Vario Wall Drain Base Unit Determination of the channel length The drain can be positioned as required. Although, the length from the middle of the drain to the end of the channel profile should not be less than 150mm. ...
- Seite 36 When mounting in the pre-wall or partitions, the dimensions can be approximate. The system requires a wall construction of 25 mm, also with the use of Viega pre-wall systems. The required wall strength can be achieved through a correspondingly thick cladding (also double cladding of 2x12.5mm) or by applying a layer of plaster.
- Seite 37 Instructions for Use Advantix Vario Wall Drain Base Unit Mounting in masonry Connect the odour trap to the drai- The shower channel can be adapted Check the channel holder is sitting in nage system. To allow a good drainage to the wall conditions using the interval the shower channel groove properly.
- Seite 38 Instructions for Use Advantix Vario Wall Drain Base Unit Mounting in a partition or pre-wall construction Work the shower channel into the q Line the full surface of the shower plaster or hard foam panel. channel up to the upper edge of the The following applies: front edge of the flange with screed.
- Seite 39 Instructions for Use Advantix Vario Wall Drain Base Unit Mounting the standing grate Note: Standing grate and sealing caps are not included in the scope of delivery and must be ordered separately! Standing grate with mounting accessories and sealing caps in matt Art.-Nr.
- Seite 40 Instructions for Use Advantix Vario Wall Drain Base Unit Designer grates Model Art.-No. Product description 4967.30 736 569 Visign SR1-standing grate, wall drain, with assembly accessories and sealing caps - in matt 4967.31 736 576 Visign SR2-standing grate, wall drain, with assembly accessories and sealing caps –...
- Seite 41 4967.87 738 365 Advantix Vario cleaning brush, 4967.92 736 712 Advantix tile protection and control tool, for the removal of all Viega Advantix grates 4965.90 689 704 Removal tool, for the removal of all Viega Advantix grates 2043 151 874 Chamfer 582049_Advantix_Vario_Wandabl_Grundk.indd 41...
- Seite 42 Istruzioni per l'uso del corpo base dello scarico a parete Advantix Vario Bestimmungsgemäße Verwendung Impiego previsto Lo scarico a parete Advantix Vario deve essere installato da aziende specializzate, nel rispetto delle normative edili. dieser Text..Per garantire un'adeguata stabilità della pavimentazione, prevedere una sufficiente copertura data dal massetto o una soluzione alternativa adatta.
- Seite 43 Istruzioni per l'uso del corpo base dello scarico a parete Advantix Vario Determinare la lunghezza della Corriacqua La posizione dello scarico può essere scelta a piacere. Prestare solo attenzione a non regolare una distanza inferiore ai 150 mm tra il centro dello scarico e l'estremità finale del profilo della Corriacqua. ...
- Seite 44 In caso di montaggio su controparete o su parete leggera le misure possono essere approssimative. Dato il tipo di sistema, è necessaria una struttura a parete di 25 mm, anche se si utilizzano i sistemi contropareti di Viega. Il necessario spessore di parete si può ottenere attraverso un rivestimento di spessore adeguato (anche doppio rivestimento di 2x12,5 mm) o applicando uno strato di intonaco.
- Seite 45 Istruzioni per l'uso del corpo base dello scarico a parete Advantix Vario Montaggio su una parete in muratura Collegare il sifone alla rete di scarico. Attraverso il dispositivo di regolazione Verificare che il supporto della Corri- Per consentire un buon scarico della distanza 1 è...
- Seite 46 Istruzioni per l'uso del corpo base dello scarico a parete Advantix Vario Montaggio su struttura con parete leggera o costruzione controparete Applicare la Corriacqua nella parete in q Coprire tutta la superficie della Corri- cartongesso. acqua con il massetto fino al bordo Vale quanto segue: bordo anteriore superiore della flangia.
- Seite 47 Istruzioni per l'uso del corpo base dello scarico a parete Advantix Vario Montaggio delle griglie Nota: le griglie e le placche di copertura non sono fornite in dotazione e devono essere ordinate a parte! Griglia con accessori di montaggio e placche di copertura in versione opaca cod.
- Seite 48 Istruzioni per l'uso del corpo base dello scarico a parete Advantix Vario Griglie design Modello Cod. art. Descrizione del prodotto 4967.30 736 569 Griglia Visign SR1, scarico a parete, con accessori di montaggio e placche di copertura in versione opaca 4967.31 736 576 Griglia Visign SR2,...
- Seite 49 4967.87 738 365 Spazzola per pulizia Advantix Vario 4967.92 736 712 Utensile di controllo e protezione piastrelle Advantix Vario, idoneo per prelevare tutte le griglie Viega Advantix 4965.90 689 704 Estrattore, idoneo per prelevare tutte le griglie Viega Advantix 2043...
- Seite 50 Instrukcja obsługi korpusu podstawowego odpływu ściennego Advantix Vario Bestimmungsgemäße Verwendung Zastosowanie zgodnie z przeznaczeniem Montaż odpływu ściennego Advantix Vario należy powierzyć specjalistycznej firmie. Prace montażowe muszą być wykonane dieser Text..zgodnie z przepisami techniczno-budowlanymi. Aby zapewnić niezbędną stabilność okładziny podłogowej, należy zagwarantować wystarczającą grubość wylewki podłogowej lub zastosować...
- Seite 51 Instrukcja obsługi korpusu podstawowego odpływu ściennego Advantix Vario Określenie długości odwodnienia Odpływ można zamontować w dowolnym miejscu. Odległość od środka odpływu do końca profilu odwodnienia musi wynosić co najmniej 150 mm. Sposób A = powierzchnia ściany do wykonania ...
- Seite 52 Przy montażu na ściance zabudowy podtynkowej lub suchej zabudowy można przyjąć zbliżone wymiary. Wymagana grubość ściany wynosi 25 mm, również w przypadku stosowania systemów zabudowy podtynkowej Viega. Niezbędną grubość można osiągnąć poprzez przyklejenie płyty okładzinowej (również z obu stron 2 x 12,5 mm) lub nałożenie warstwy tynku.
- Seite 53 Instrukcja obsługi korpusu podstawowego odpływu ściennego Advantix Vario Montaż w ścianie murowanej Podłączyć syfon do kanalizacji. Za pomocą elementu dystansowego Zwrócić uwagę na prawidłowe osad- Aby zapewnić dobre odprowadzanie 1 odwodnienie prysznicowe można zenie uchwytu odwodnienia prysznico- wody, odwodnienie prysznicowe należy dostosować...
- Seite 54 Instrukcja obsługi korpusu podstawowego odpływu ściennego Advantix Vario Montaż na ścianie wykonanej w systemie suchej zabudowy lub na konstrukcji podtynkowej Odwodnienie prysznicowe osadzić q Przestrzeń pod odwodnieniem pryszni- w ścianie z płyt kartonowo-gipsowych. cowym wypełnić na całej powierzchni Obowiązuje przy tym zasada, iż wylewką...
- Seite 55 Instrukcja obsługi korpusu podstawowego odpływu ściennego Advantix Vario Montaż rusztu Wskazówka: Ruszty i płytki maskujące nie znajdują się w zestawie i trzeba je zamówić osobno! Ruszt z materiałem montażowym i płytkami maskującymi w wersji matowej nr kat. 736 569 Ruszt z materiałem montażowym i płytkami maskującymi w wersji błyszczącej nr kat. 736 576 Ruszt z materiałem montażowym i płytkami maskującymi w kolorze czarnym nr kat.
- Seite 56 Instrukcja obsługi korpusu podstawowego odpływu ściennego Advantix Vario Ruszty ozdobne Wzór Nr kat. Opis produktu 4967.30 736 569 Ruszt Visign SR1, odpływ ścienny, z elementami montażowym i płytkami maskującymi w wersji matowej 4967.31 736 576 Ruszt Visign SR2, odpływ ścienny, z elementami montażowym i płytkami maskującymi w wersji błyszczącej 4967.32...
- Seite 57 Kompletny zestaw przeznaczony do przycinanych rusztów, kolor biały 4967.87 738 365 Szczotka do czyszczenia Advantix Vario 4967.92 736 712 Przyrząd zabezpieczająco-kontrolny Advantix Vario do demontażu wszystkich rusztów Viega Advantix 4965.90 689 704 Narzędzie do wyjmowania, do demontażu wszystkich rusztów Viega Advantix 2043 151 874 Gratownik 582049_Advantix_Vario_Wandabl_Grundk.indd 57...
- Seite 58 Инструкция по монтажу и эксплуатации душевого лотка для встраивания в стену Advantix Vario Bestimmungsgemäße Verwendung Использование по назначению Монтаж душевого лотка для встраивания в стену Advantix Vario должен выполняться специализированными dieser Text..предприятиями с соблюдением строительных норм и правил. Чтобы обеспечить достаточную прочность покрытия пола, требуется достаточное перекрытие стяжки или подходящее альтернативное...
- Seite 59 Инструкция по монтажу и эксплуатации душевого лотка для встраивания в стену Advantix Vario Определение длины лотка Положение слива может быть выбрано произвольно. При этом расстояние от центра слива до конца профиля лотка должно быть не менее 150 мм. Вариант ...
- Seite 60 При монтаже на пристенной конструкции или легкой стеновой панели размеры являются приближенными. В соответствии с конструктивными особенностями требуется толщина стены 25 мм, в том числе при использовании настенных систем Viega. Необходимая толщина стены может быть обеспечена посредством обшивки соответствующего сечения (в том числе и...
- Seite 61 Инструкция по монтажу и эксплуатации душевого лотка для встраивания в стену Advantix Vario Монтаж на кирпичной стене Подсоединить канализационный сифон Регулятор зазора 1 позволяет подо- Обеспечить правильное положение к канализационной системе. гнать душевой лоток в соответствии кронштейна лотка в пазу душевого Чтобы...
- Seite 62 Инструкция по монтажу и эксплуатации душевого лотка для встраивания в стену Advantix Vario Монтаж на легкой стеновой панели или настенной конструкции Заделать душевой лоток в Подложить под душевой лоток гипсокартонную стену. стяжку по всей поверхности до При этом: передняя кромка фланца верхней...
- Seite 63 Инструкция по монтажу и эксплуатации душевого лотка для встраивания в стену Advantix Vario Установка дизайн-вставок Указание: Дизайн-вставки и боковые накладки не входят в комплект поставки и должны быть заказаны отдельно! Дизайн-вставка с принадлежностями для монтажа и боковыми накладками, матовая № арт. 736 569 Дизайн-вставка...
- Seite 64 Инструкция по монтажу и эксплуатации душевого лотка для встраивания в стену Advantix Vario Дизайн-вставки Модель Номер арт. Описание изделия 4967.30 736 569 Дизайн-вставка Visign SR1 для душевого лотка для встраивания в стену с комплектующими для монтажа и боковыми накладками, матовая 4967.31 736 576 Дизайн-вставка...
- Seite 65 4967.87 738 365 Щетка для чистки Advantix Vario 4967.92 736 712 Защитная плиточная планка Advantix Vario и контрольный инструмент, для демонтажа всех решеток Viega Advantix 4965.90 689 704 Демонтажный инструмент, для демонтажа всех решеток Viega Advantix 2043 151 874 Гратосниматель...
- Seite 66 582049_Advantix_Vario_Wandabl_Grundk.indd 66 14.09.2015 10:40:54...
- Seite 67 582049_Advantix_Vario_Wandabl_Grundk.indd 67 14.09.2015 10:40:54...
- Seite 68 582049_Advantix_Vario_Wandabl_Grundk.indd 68 14.09.2015 10:40:54...