PELOTON BIKE Benutzerhandbuch
Inhaltsverzeichnis
Verfügbare Sprachen
Verfügbare Sprachen
Kapitel
Inhaltsverzeichnis

Verwandte Anleitungen für PELOTON BIKE


Inhaltszusammenfassung für PELOTON BIKE
- Seite 1 U S E R M A N U A L B E N U T Z E R H A N D B U C H...
- Seite 19 Alle 15 bis 20 Rides Lenkerhöhe Jährlich Richtige Körperhaltung B I K E-M O N TA G E Ein- und Ausklicken Bike-Teile Anpassung Des Widerstandes Ersatzteile Montage L O S L E G E N Inbetriebnahme G A R A N T I E...
-
Seite 20: S I C H E R H E I T S H I N W E I S E
Leistung und Langlebigkeit Dieses Bike ist nur für den Das Peloton Bike ist nach EN ISO Peloton Interactive UK Limited Training aufhören und einen Arzt zu Fähigkeiten, die eine sichere Nutzung des Produktes zu gewährleisten. -
Seite 21: T E C H N I S C H E D At E N
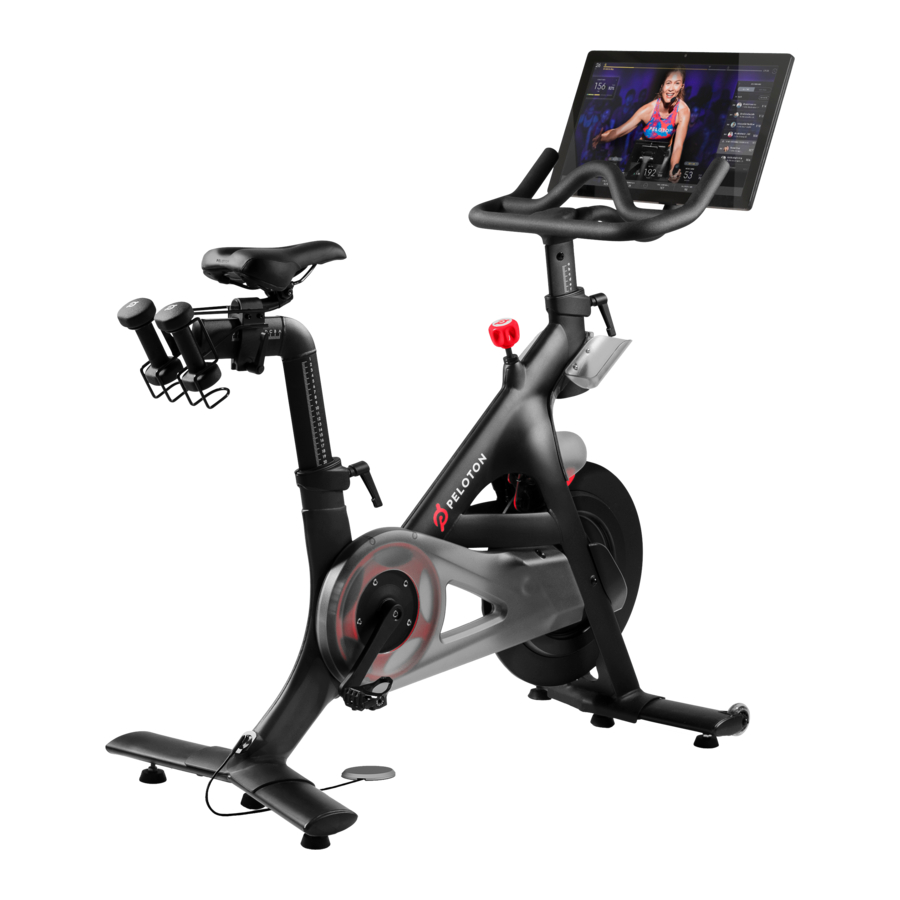
T E C H N I S C H E D A T E N TOUCHSCREEN AN-/AUS-SCHALTER AUDIO-BUCHSE SITZTIEFE L-GRIFF LAUTSTÄRKEREGLER LENKER KENNZAHLEN PORT SATTEL ETHERNET ANSCHLUSS WIDERSTANDS- DREHKNOPF /NOTBREMSE USB-ANSCHLUSS LENKERHÖHE L-GRIFF LEISTUNGSAUFNAHME B I K E T O U C H S C R E E N HANTELHALTER SCHWUNGRAD 120 x 60 cm... -
Seite 22: A U F B A U D E S F I T N E S S B I K E S
Nivellierfuß herunter, bis er fest auf dem 1031029-01 Boden aufliegt Mach dich vor Gebrauch mit allen Warnhinweisen auf dem Bike vertraut. Sollte ein Etikett beschädigt worden oder verloren gegangen sein, wende dich sofort an den Kundenservice, um einen Ersatz zu erhalten. -
Seite 23: Sitzhöhe
Um Verletzungen zu vermeiden, stell Sitz und Lenker immer nach deinen persönlichen Bedürfnissen ein. VO R S I C H T Das Peloton Bike hat ein direkt angetriebenes Schwungrad. Die Pedale bewegen sich weiter, bis das Zieh alle Einstellgriffe fest, bevor du das Peloton Bike benutzt. Vorstehende Einstellgriffe könnten deine Bewegungen Schwungrad stoppt. -
Seite 24: Anpassung Des Widerstandes
Halte den Netzschalter zwei Sekunden lang gedrückt, um das zu erhöhen. Bike einzuschalten. Drehe den Drehknopf nach links, um den Widerstand Nach etwa 20 Minuten Inaktivität schaltet das Bike in den zu verringern. Standby-Modus. Um den Touchscreen wieder anzuschalten, Drücke den Drehknopf nach unten für die Notbremse. -
Seite 25: Einloggen
Um eine Verbindung mit einem kabelgebundenen Netzwerk herzustellen, stecke ein Ethernet-Kabel in den Ethernet-Anschluss auf der Rückseite des Bildschirms und Damit eine andere Person dein Bike verwenden kann, tippe Finde Live-Kurse auf dem Kursplan oder wähle in eine Ethernet-Steckdose oder einen Router an, die von auf das Symbol neben deinem Benutzernamen unten aus den On-Demand-Kursen. -
Seite 26: Wa R T U N G U N D P F L E G E
Schäden geprüft und es müssen regelmäßige Wartungsarbeiten durchgeführt werden. Ersetze LEADERBOARD verschlissene oder beschädigte Teile umgehend. Verwende das Bike erst nach Abschluss der Reparaturen. Es dürfen nur Originalteile von Peloton verwendet werden. Änderungen ZURÜCKGELEGTE STRECKE oder Modifikationen an diesem Gerät, die nicht ausdrücklich von Peloton genehmigt wurden, können zum Erlöschen der... -
Seite 27: Alle 3 Bis 5 Rides
Stillstand kommen. Wenn dies nicht der Fall ist, höre sofort auf, P E D A L E : 15 -mm-Schraubenschlüssel fest. Die Pedale sollten mit einem das Bike zu benutzen und wende dich an den Kundenservice Drehmoment von 34 Nm (25 lb-ft) angezogen werden. Im von Peloton. -
Seite 28: B I K E-M O N Ta G E
Diese Montageanleitung soll geschulte, qualifizierte Installateure beim Zusammenbau des Peloton Bike WA R N U N G Führe eine vollständige Sichtprüfung des Peloton Bike durch und teste alle Funktionalitäten und Merkmale unterstützen. Schäden oder Geräteversagen infolge unsachgemäßer oder fahrlässiger Bike-Montage sind nicht durch die vor dem Einsatz. -
Seite 29: Ersatzteile
B I K E - M O N T A G E F O R T S E T Z U N G E R S A T Z T E I L E Sattel SP-03-1 Kleiner L-Griff SP-06/RP-06 Großer L-Griff SP-07/RP-07 Äußere Riemenabdeckung SP-11-12 Riemen SP-15... -
Seite 30: Montage
Bringe zwei flache Unterlegscheiben und ben. Mit dem 6-mm-Inbusschlüssel zwei Rundkopfschrauben M8×12 an der verschrauben. Vorderseite des Lenkersockels an. Mit Stütze den Bike-Rahmen auf den Lenker dem 5-mm-Inbusschlüssel verschraben. und den vorderen Stabilisator. Bringe zwei flache Unterlegscheiben und Montiere den hinteren Stabilisator mit zwei Rundkopfschrauben M8×10 an den... -
Seite 31: G A R A N T I E
Garantiezeiträume aufgetreten sind, des Peloton-Bikes mit Ausnahme seite des Touchscreens eingesteckt. als “Peloton-Bike” bezeichnet) für den und nur so lange, wie das Peloton-Bike von Pedalen, einschließlich des Verwende den Klettverschluss, um ihn Heimgebrauch in privaten Innenräumen im Besitz des ursprünglichen Käufers Riemenantriebs, des Widerstand- am Monitorarm zu befestigen. -
Seite 32: Weit E Re In F Orm At I On
Abnutzung, nicht genehmigt oder empfohlen sind. oder Verletzungen, die während oder unter support.onepeloton.de wenden. hat oder wenn das Peloton-Bike an einen welcher Zeitraum länger ist übernommen. unsachgemäßer oder fahrlässiger infolge von Bewegungen, Reparaturen Sie werden gebeten, Peloton die Ort außerhalb des Servicebereichs von... -
Seite 33: K U N D E N S E R V I C E
Hilfe benötigst oder Probleme WA S WI R T U N, U M der Bedienungsanleitung durchzuführen, mit deinem Peloton Bike hast, wende GER EC H T F E R T IG T E MÄ N G E L um den ordnungsgemäßen Betrieb des... - Seite 34 Im Studio mit Sam Yo...
- Seite 35 P L - 2 1 | 0 0 0 1 1 - 2 . 0 © Peloton 2021, Peloton Interactive, Inc. All rights reserved. © Peloton 2021, Peloton Interactive, Inc. Alle Rechte vorbehalten. onepeloton.com...