ONKRON G70 Benutzerhandbuch
Vorschau ausblenden
Andere Handbücher für G70:
- Bedienungsanleitung (20 Seiten) ,
- Benutzerhandbuch (44 Seiten)
Inhaltsverzeichnis
Verfügbare Sprachen
Verfügbare Sprachen
Quicklinks
Настольный кронштейн для одного монитора с системой газлифт
Soporte de escritorio brazo móvil (con el resorte de gas) para monitor individual
USER GUIDE
EN
РУКОВОДСТВО ПОЛЬЗОВАТЕЛЯ
RU
BENUTZERHANDBUCH
DE
GUIDE D'INSTALLATION
FR
GUÍA DEL USUARIO
ES
GUIDA UTENTE
IT
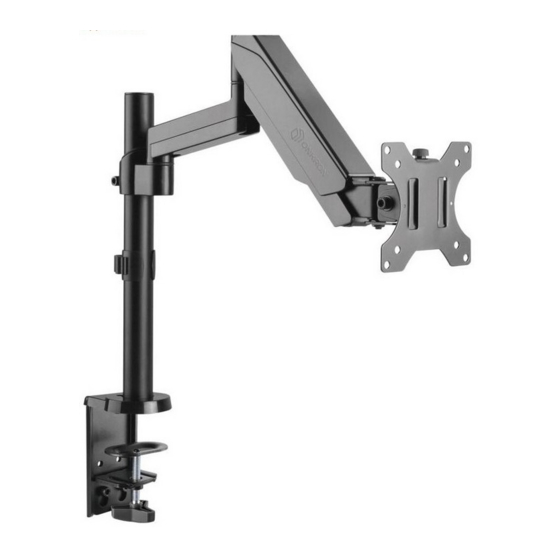
Monitor-Tischhalterung für einen Monitor mit Gaslift-System
Support de bureau à ressort à gaz pour un moniteur
Supporto per monitor da scrivania con molla a gas
Single monitor desk mount with gas lift
G70
Kapitel
Inhaltsverzeichnis

Verwandte Anleitungen für ONKRON G70


Inhaltszusammenfassung für ONKRON G70
- Seite 1 Single monitor desk mount with gas lift Настольный кронштейн для одного монитора с системой газлифт Monitor-Tischhalterung für einen Monitor mit Gaslift-System Support de bureau à ressort à gaz pour un moniteur Soporte de escritorio brazo móvil (con el resorte de gas) para monitor individual Supporto per monitor da scrivania con molla a gas USER GUIDE РУКОВОДСТВО...
-
Seite 9: Bedienung
Sie bitte Ihr Feedback. Wenn Sie irgendwelche Fragen oder Probleme haben, dann können Sie uns jederzeit kontaktieren und wir werden Ihnen helfen: USA: sale@onkron.us / +13159682278 Europa: info@onkron.de / +494029996807 Russland: support@onkron.ru / +78007772176 Lesen Sie diese vollständige Anleitung, bevor Sie mit der Montage und Installation beginnen. -
Seite 10: Bausatz
SEITE INHALT: BAUSATZ.......................10 1. Wählen Sie die Installationsmethode für die Halterung.........11 a) Installation an der Tischkante mit einer Klammer........11 b) Installation durch Loch in den Tisch............12 2. Montage den Halterungsarm...............13 3. Installation die VESA-Platte auf den Bildschirm..........14 4. Installation den Bildschirm.................14 5. -
Seite 11: Wählen Sie Die Installationsmethode Für Die Halterung
1. Wählen Sie die Installationsmethode für die Halterung: a) Installation an der Tischkante mit einer Klammer: Nehmen Sie die Klammer (B), sie besteht aus zwei Teilen, die mit zwei Schrauben befestigt sind. Wenn die Dicke Ihres Tisches 35-80 mm (1.3” – 3.1”) ist, verwenden Sie die beiden unteren Löcher, wenn 10-45 mm (0.3”... -
Seite 12: B) Installation Durch Loch In Den Tisch
b) Installation durch Loch in den Tisch: Demontieren Sie zuerst die Klammer (B) wie in der Abbildung gezeigt ist. Befestigen Sie das Teil (J) mit einer Schraube (H) am Rohr der Halterung (E). Montieren Sie die Kunststoffabdeckung (C). Stecken Sie die Klemmschraube (aus der zerlegten Klammer B) durch die Platte (I) hinein und durch das Loch im Tisch und schrauben Sie dann die Klemmschraube in das Rohr der Halterung (E). -
Seite 13: Montage Den Halterungsarm
2. Montage den Halterungsarm Setzen Sie den Kabelhalter (F) auf das Rohr der Halterung (E) auf. Am Rohr (E) den Arm des Halters (A) auf die gewünschte Höhe bringen und die Schrauben mit dem Schlüssel (L) festziehen. -
Seite 14: Installation Die Vesa-Platte Auf Den Bildschirm
3. Installation die VESA-Platte auf den Bildschirm Installieren Sie das VESA-Panel (D) mit geeigneten Schrauben auf Ihrem Bildschirm. Stellen Sie sicher, dass das VESA-Panel sitzt fest. Weitere Schrauben, Unterlegscheiben (M-E) und Kunststoffdichtungen (M-F) können bei Bedarf verwendet werden. Betrachten Sie die folgende Abbildung sorgfältig: ODER 4. -
Seite 15: Einstellung Des Halterungsarms
5. Einstellung des Halterungsarms Stellen Sie den Gaslift der Halterung ein, indem Sie die Spannung des Mechanismus verstärken (+) oder schwächen ( -). Heben und senken Sie den Bildschirm, um die Spannung zu überprüfen. Der Bildschirm muss in einer der von Ihnen ausgewählten Positionen sicher einrasten. - Seite 44 For notes/Для заметок/ Für NotizenPour les notes/Para notas/Per le note 201005 onkron.com...