Inhaltsverzeichnis
Werbung
Verfügbare Sprachen
Verfügbare Sprachen
Quicklinks
Aero_aH 100
Montage- und Betriebsanleitung
Abluftventilator mit integrierter Entfeuchtungssteuerung zur automatischen
Raum- und Kellerentfeuchtung
Mounting and operating instructions
Exhaust air fan with integrated automatic room and cellar dehumidification
control
Notice de montage et mode d'emploi
Déshumidification automatique des pièces et des caves
ZILA GmbH
Neuer Friedberg 5
98527 Suhl
Tel.: +49 (0) 3681 867300
Fax: +49 (0) 3681 8673099
Web:
www.zila.de
E-Mail:
info@zila.de
Werbung
Kapitel
Inhaltsverzeichnis

Inhaltszusammenfassung für ZILA Aero aH 100
- Seite 1 Exhaust air fan with integrated automatic room and cellar dehumidification control Notice de montage et mode d'emploi Déshumidification automatique des pièces et des caves ZILA GmbH Neuer Friedberg 5 98527 Suhl Tel.: +49 (0) 3681 867300 Fax: +49 (0) 3681 8673099 Web: www.zila.de...
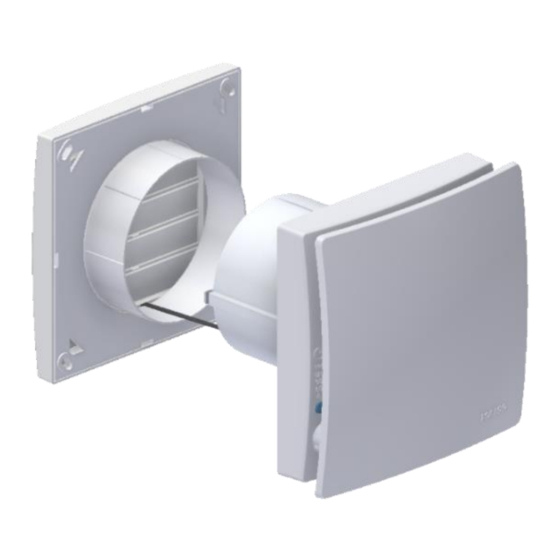
- Seite 2 Abluftventilator Aero_aH 100 mit integrierter Raum- und Kellerentfeuchtungssteuerung Geräteübersicht Abb. A Gehäuse mit Motor / Housing with motor / Boîtier avec moteur Flügelrad / Impeller /Hélice Designabdeckung / Design cover / Cache de protection design Abdeckung / Cover / Cache de protection Innenklimasensor / Indoor climate sensor / Détecteur d'atmosphère intérieure Elektronikabdeckung / Electronics cover / Cache électronique Elektronikplatine / Electronic circuit board / Platine électronique...
-
Seite 3: Inhaltsverzeichnis
Abluftventilator Aero_aH 100 mit integrierter Raum- und Kellerentfeuchtungssteuerung Inhaltsverzeichnis 1. Lieferumfang Lieferumfang ......... 3 • Ventilatoreinheit mit Innensensor Allgemeine Hinweise ......3 • Außenklappe mit Außensensor 2.1. Installationspersonal ......3 • Sensorverbindungskabel 2.2. Verwendete Symbole ......3 • Schaumstoffbänder Produktbeschreibung ......4 •... -
Seite 4: Produktbeschreibung
Abluftventilator Aero_aH 100 mit integrierter Raum- und Kellerentfeuchtungssteuerung wenn die Klimabedingungen eine Entfeuchtung 3. Produktbeschreibung ermöglichen. Der Aero_aH 100 ist ein Kleinraumventilator zum Entfeuchten von Räumen, insbesondere von Kellern und ähnlichen Nebenräumen. Das Gerät besitzt ein feststehendes Innengitter und ist mit einem integrierten Rauminnensensor ausgerüstet. - Seite 5 Abluftventilator Aero_aH 100 mit integrierter Raum- und Kellerentfeuchtungssteuerung *Gleichzeitiges Blinken: Manuelles Lüften – externer Ein gleichmäßiges Blinken von Schalter/Taster: LED 1 oder LED 2 entspricht einer Optional zum Taster 2 kann der Betriebsart bzw. Funktion. Bei manuelle Betrieb mit einem gleichzeitigem Blinken beider LEDs externen Taster oder Schalter liegt eine Störung vor, siehe Kapitel...
-
Seite 6: Bestimmungsgemäße Verwendung
Abluftventilator Aero_aH 100 mit integrierter Raum- und Kellerentfeuchtungssteuerung 4.2. Bestimmungsgemäße 4.3. Vorhersehbare Verwendung Fehlanwendungen Dieses Gerät ausschließlich für ZILA haftet nicht für Schäden durch Hausgebrauch und ähnliche Zwecke vorgesehen. bestimmungswidrigen Gebrauch. Gerät auf keinen Fall einsetzen: Das Gerät dient zur Entfeuchtung von Kellern, Abstell- und Vorratsräumen, Ausstellungsräumen,... -
Seite 7: Sicheres Und Korrektes Verhalten
Abluftventilator Aero_aH 100 mit integrierter Raum- und Kellerentfeuchtungssteuerung Trennung vom Netz mit mind. 3 mm 6. Montagevorbereitung Kontaktöffnung je Pol erforderlich. 6.1. Wand • Gerät nur mit auf Typenschild Vorgeschriebene Mindestabstände angegebener Spannung zur Wand und Decke gemäß Frequenz betreiben. Abbildung einhalten. -
Seite 8: Rohr
Abluftventilator Aero_aH 100 mit integrierter Raum- und Kellerentfeuchtungssteuerung Montagevorbereitungen Kapitel Rasthaken (→ Pfeil) mit Schraubendreher beschrieben vornehmen. entriegeln. Innenklimasensor [5] abziehen. 6.3. Rohr Kanten der Rohrinnenseite entgraten. Montagevorbereitungen wie in Kapitel 6.1 beschrieben vornehmen. 6.4. Außenabdeckung Elektronikabdeckung [6] entfernen. Rasthaken (→ Pfeil) mit Schraubendreher entriegeln. -
Seite 9: Einbau Der Außenabdeckung
Abluftventilator Aero_aH 100 mit integrierter Raum- und Kellerentfeuchtungssteuerung Gehäuse abnehmen, 7.1. Einbau der Außenabdeckung Dübellöcher Ø 6 mm bohren und Dübel Gehäuse der Außenabdeckung [10] in einstecken. einen Wanddurchbruch/Wandhülse Leitungstülle [9] vorsichtig aus dem stecken. Gehäuse drücken und herausnehmen. Gehäuse waagerecht ausrichten und die Dübellöcher markieren. -
Seite 10: Elektrischer Anschluss
Abluftventilator Aero_aH 100 mit integrierter Raum- und Kellerentfeuchtungssteuerung (→ Pfeil) des Ventilatorgehäuses [1] Netzleitung an Federklemme [13] gemäß einbringen. Anschlussschaltbild [14] elektrisch anschließen, siehe auch Schaltbild in Netzleitung so in den Anschlussraum Kapitel 13. führen, dass die Leitungstülle den Leitungsmantel komplett umschließt und nicht zu weit in den Anschluss- raum hineinragt Sitz der Leitungstülle [9] kontrollieren. -
Seite 11: Inbetriebnahme
Abluftventilator Aero_aH 100 mit integrierter Raum- und Kellerentfeuchtungssteuerung Elektronikabdeckung Pfeilpositionen fest in das Gehäuse Lebensgefahr durch Stromschlag drücken Netzsicherung ausschalten. GEFAHR ACHTUNG: Gerätebeschädigung bei falschem Reinigungsmittel. Abdeckung [4] und Design- abdeckung [3] nur mit Wasser reinigen. Keine aggressiven Reinigungsmittel verwenden. Den mitgelieferten Innenraumsensor [5] lagerichtig (→... -
Seite 12: Demontage
T1 – Optionaler Taster zum manuellen Betrieb Z – Anschluss für optionales Zuluftelement, z.B. ECA 11E 14. Gerätesupport Telefon: +49 (0) 3681 86 73 00 E-Mail: support@zila.de ZILA GmbH Neuer Friedberg 5 Abdeckungen entriegeln (→ Pfeil) und 98527 Suhl abnehmen. -
Seite 13: Scope Of Delivery
Exhaust air fan Aero_aH 100 with integrated room and cellar dehumidification control Table of contents 1. Scope of delivery Scope of delivery ......... 13 • Fan unit with indoor sensor General information ......13 • Outer flap with outdoor sensor 2.1. -
Seite 14: Product Description
Exhaust air fan Aero_aH 100 with integrated room and cellar dehumidification control 3. Product description The Aero_aH 100 is a small room fan for dehumidifying rooms, especially cellars, and similar adjoining rooms. The device has a fixed indoor grille and is equipped with an integrated indoor sensor. Controlled dehumidification is achieved by a comparison of the indoor and outdoor climate. - Seite 15 Exhaust air fan Aero_aH 100 with integrated room and cellar dehumidification control * Simultaneous flashing: Manual ventilation – external Simultaneous flashing of LED 1 or button/switch: LED 2 indicates an operating mode Manual operation can optionally be or function. If both LEDs blink done with an external button or simultaneously, an error has switch instead of button 2, see...
-
Seite 16: Intended Use
Exhaust air fan Aero_aH 100 with integrated room and cellar dehumidification control 4.2. Intended use 4.3. Forseeable misuse The device is only intended for domestic use and ZILA does not assume any liability for damage similar purposes. caused by improper use. Do not use the unit under any circumstances:... -
Seite 17: Safe And Correct Handling
Exhaust air fan Aero_aH 100 with integrated room and cellar dehumidification control contact openings of at least 3 mm at each pole. • The unit may only be operated using the voltage and frequency shown on the type plate. • Do not modify the unit in any way. •... -
Seite 18: Outer Cover
Exhaust air fan Aero_aH 100 with integrated room and cellar dehumidification control 6.4. Outer cover Unpack the outer with the outdoor sensor Remove the electronics cover [6]. and remove the cover flap [11]. To release → Unlock the catch ( arrow) with a the cover, unlock the catch, (→... -
Seite 19: Fastening The Cable Of The Outdoor Climate Sensor
Exhaust air fan Aero_aH 100 with integrated room and cellar dehumidification control Insert the cable of the outdoor climate sensor [12] through wall breakthrough/wall sleeve. Press the cover flap [11] onto the housing. ATTENTION: Risk of short circuit and damage to the device. -
Seite 20: Electrical Connection
Exhaust air fan Aero_aH 100 with integrated room and cellar dehumidification control see also wiring diagram in chapter 13. Check position of cable grommet [9]. It must be well sealed. 7.5. Final assembly Insert the housing [1] into the wall opening/wall sleeve and fasten it with two ATTENTION: Danger of short circuits screws. -
Seite 21: Maintenance
Exhaust air fan Aero_aH 100 with integrated room and cellar dehumidification control ATTENTION: Risk of damage to the unit if the wrong cleaning agent is used. Clean cover [4] and design cover [3] with water only. Do not use aggressive cleaning agents. -
Seite 22: Disassembly
T1 – Optional button for manual operation Z – Connection for optional supply air element like ECA 11E 14. Support Phone: +49 (0) 3681 86 73 00 Email: support@zila.de ZILA GmbH Unlock the covers (→ arrow) and remove Neuer Friedberg 5 them. -
Seite 23: Volume De Fourniture
Déshumidification automatique des pièces et des caves Aero_aH 100 Sommaire 2. Remarques générales Volume de fourniture ......23 Lisez attentivement la présente Remarques générales ......23 notice de montage avant d'utiliser 2.1. Personnel d'installation ....... 23 l'Aero_aH100. Suivez les 2.2. -
Seite 24: Caractéristiques Du Produit
Déshumidification automatique des pièces et des caves Aero_aH 100 détecteur d'atmosphère extérieure. Pour renforcer la Bouton 1 Fixer une valeur de déshumidification, l´Aero_aH100 peut commander référence parallèlement un ventilateur d'aération.. Bouton 2 Aération manuelle LED 1 Mode de fonctionnement Caractéristiques du produit LED 2 État déshumidification 4.1. -
Seite 25: Utilisation Conforme
Déshumidification automatique des pièces et des caves Aero_aH 100 Déshumidification accomplie – Ventilation manuelle – bouton bouton 1 / clignotement LED 2: externe/interrupteur: Avec le clignotement de la LED 2, En remplacement du bouton 2, le l'Aero_aH100 signale que la mode manuel peut également être déshumidification a réussi et se solde commandé... -
Seite 26: Erreurs D'application Prévisibles
• Ne jamais utiliser l'appareil sans en cas d'utilisation d'un interrupteur externe. cache électronique [6] et cache de 4.3. Erreurs d'application protection [4]. prévisibles ZILA décline toute responsabilité en cas de 5.2. Comportement sûr et correct dommages découlant d'une utilisation lors du fonctionnement conforme. -
Seite 27: Préparatifs De Montage
Déshumidification automatique des pièces et des caves Aero_aH 100 mise en service, le nettoyage et l'entretien du faisant, faire sortir le câble secteur d'au ventilateur ne pourront être effectués que moins 110 mm du mur par des personnes conscientes des risques Recommandation : utiliser une gaine présentés par ces travaux et en mesure de les murale WH 100. -
Seite 28: Ventilateur
Déshumidification automatique des pièces et des caves Aero_aH 100 Ne pas détacher le câble de raccor- Sur le modèle Aero_aH100, poser dement du détecteur d'atmosphère impérativement le ruban isolant extérieure, il sera connecté au pour que les appareils n'aspirent pas ventilateur à... -
Seite 29: Fixation Du Câble De Raccordement Du Détecteur
Déshumidification automatique des pièces et des caves Aero_aH 100 7.2. Fixation du câble de ATTENTION: Risque de court-circuit et raccordement du détecteur d'endommagement de Tirer le câble de raccordement du l'appareil ! Risque de détecteur [12] à travers le perçage de pénétration d'eau en cas d'insertion cloison / la gaine murale. -
Seite 30: Branchement Électrique
Déshumidification automatique des pièces et des caves Aero_aH 100 Introduire le câble de raccordement du 7.5. Montage final détecteur d'atmosphère extérieure [12] ATTENTION: Avant de poser le dans l'orifice (→ flèche) du boîtier de cache électronique, contrôler la ventilateur [1] prévu à cet effet. position du câble de Placer le boîtier [1] dans le perçage de raccordement du détecteur... -
Seite 31: Mise En Service
Déshumidification automatique des pièces et des caves Aero_aH 100 Veuillez noter que la membrane située sur Nettoyer pièces intérieures le côté plat du boîtier du capteur ne doit ventilateur uniquement avec un chiffon pas être exposée à des contraintes sec. mécaniques. -
Seite 32: Démontage
(3 ergots d'encliquetage). Retirer le câble secteur. Ventilator 13. Support ausbauen. Démonter le ventilateur Téléphone: +49 (0) 3681 86 73 00 Courriel: support@zila.de ZILA GmbH Neuer Friedberg 5 98527 Suhl, Allemagne Téléphone: +49 (0) 3681 867300 Fax: +49 (0) 03681 8673099 Web: www.zila.de...