Joy-it 10.1 Touchscreen Bedienungsanleitung
Verfügbare Sprachen
Verfügbare Sprachen
Inhaltsverzeichnis

Verwandte Anleitungen für Joy-it 10.1 Touchscreen


Inhaltszusammenfassung für Joy-it 10.1 Touchscreen
- Seite 1 JOY-iT 10.1“ Touchscreen-Display Export 01.09.2017 Copyright by Joy-IT...
- Seite 9 JOY-iT 10.1“ Touchscreen-Display Ausgabe 11.08.2017 Copyright by Joy-IT...
- Seite 10 JOY-iT 10.1“ Touchscreen-Display Index Aufbau des Displays 1.1 Montage des Displays 1.2 Montage eines Raspberry Pis Verwendung des Displays 2.1 Installation der Software 2.2 [Profi Abschnitt] Manuelle Installation des Displays 2.3 Verwendung mit einem Windows PC Support Ausgabe 11.08.2017 Copyright by Joy-IT...
-
Seite 11: Aufbau Des Displays
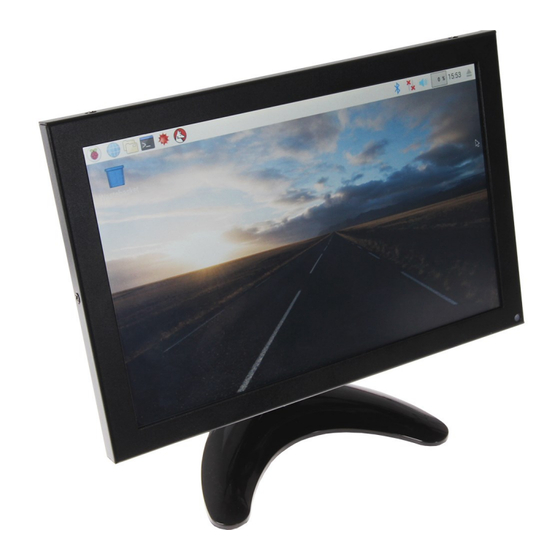
JOY-iT 10.1“ Touchscreen-Display Sehr geehrter Kunde, vielen Dank, dass Sie sich für unser Produkt entschieden haben. Im Folgenden haben wir aufgelistet, was bei der Inbetriebnahme zu beachten ist: Aufbau des Displays Montage des Displays Entnehmen Sie zuerst das Display, den Standfuss und den Sockelhals des Displays. -
Seite 12: Verwendung Des Displays
JOY-iT 10.1“ Touchscreen-Display 2. Verwendung des Displays 2.1 Installation der Software Installieren Sie auf Ihre SD-Karte mit Hilfe des „Win32 Disk Imager“-Programms das FBTFT Image, welches Sie unter den folgenden Links zum Download finden: RB-LCD10-2_Image-Download Ausgabe 11.08.2017 Copyright by Joy-IT... - Seite 13 JOY-iT 10.1“ Touchscreen-Display 2.2 [Profi-Abschnitt] Manuelle Installation des Displays Verbinden Sie sowohl das Display, als auch Ihren Raspberry Pi mit den dafür vorgesehenen Stromkabeln. Für die Bildübertragung zwischen Display und Raspberry Pi, verbinden Sie die beiden Geräte mit dem beiliegenden HDMI-Kabel.
- Seite 14 JOY-iT 10.1“ Touchscreen-Display Anschließend können Sie das Kalibrierungstool starten: xinput_calibrator Sie sehen nun im Display nacheinander 4 Punkte aufleuchten, die gedrückt werden müssen. Danach werden Ihnen im Terminal 4 Werte ausgegeben, die als neue Kalibrierungsdaten verwendet werden müssen. Siehe Beispiel: Section “InputClass“...
- Seite 15 JOY-iT 10.1“ Touchscreen-Display 2.3 Verwendung mit einem Windows PC Verbinden Sie das Display mit dem beiliegendem Stromkabel. Verbinden Sie nun Ihren Computer und das Display, je nach Präferenz, mit einem HDMI– oder VGA-Kabel. Sie können außerdem Ihren Computer mit einem USB Kabel mit der Touch Schnittstelle verbinden, falls eine Bedienung per Touchscreen erwünscht ist.
- Seite 16 JOY-iT 10.1“ Touchscreen-Display Support Wir sind auch nach dem Kauf für Sie da. Sollten noch Fragen offen bleiben oder Probleme auftauchen stehen wir Ihnen auch per E-Mail, Telefon und Ticket-Supportsystem zur Seite. E-Mail: service@joy-it.net Ticket-System: http://support.joy-it.net Telefon: +49 (0)2845 98469 – 66 (11- 18 Uhr) Für weitere Informationen besuchen Sie unsere Website:...