Herunterladen Inhalt Inhalt Diese Seite drucken
Inhaltsverzeichnis

Werbung

Verfügbare Sprachen
  • DE

Verfügbare Sprachen

  • DEUTSCH, seite 49
All manuals and user guides at all-guides.com
ThinkPad eSATA/USB Secure Hard Drive
User Guide

Werbung

Inhaltsverzeichnis
loading

Inhaltszusammenfassung für Lenovo ThinkPad eSATA/USB Secure Hard Drive

  • Seite 1 All manuals and user guides at all-guides.com ThinkPad eSATA/USB Secure Hard Drive User Guide...
  • Seite 2 All manuals and user guides at all-guides.com...
  • Seite 3 All manuals and user guides at all-guides.com ThinkPad eSATA/USB Secure Hard Drive User Guide...
  • Seite 4 All manuals and user guides at all-guides.com Note Before installing the product, be sure to read the information in Appendix B, “Lenovo Limited Warranty,” on page B-1 and “Before you begin the installation” on page Important For tips to help you use your computer safely, go to: http://www.lenovo.com/safety...
  • Seite 5: Inhaltsverzeichnis

    Telephone technical support ..A-1 Installing the secure hard drive ..2-1 Appendix B. Lenovo Limited Warranty B-1 Chapter 3. Using the ThinkPad Warranty Information ..B-4 eSATA/USB Secure Hard Drive .
  • Seite 6 All manuals and user guides at all-guides.com ThinkPad eSATA/USB Secure Hard Drive User Guide...
  • Seite 7: Chapter 1. About The Thinkpad Esata/Usb Secure Hard Drive

    ThinkPad eSATA/USB Secure Hard Drive warranty poster Product description The ThinkPad eSATA/USB Secure Hard Drive (hereafter called the secure hard drive) is a portable, light-weight, eSATA, high-speed USB 2.0 standard option that offers high level data security. You can transfer data through either the USB connector or the eSATA connector on the secure hard drive.
  • Seite 8: Secure Hard Drive Button Panel

    Red: Standby Mode v Blue: Admin Mode v Green: User Mode The indicator light has other display methods to indicate different status of the secure hard drive. Details are provided later in this manual. ThinkPad eSATA/USB Secure Hard Drive User Guide...
  • Seite 9: Chapter 2. Installing The Thinkpad Esata/Usb Secure Hard Drive

    To install the secure hard drive, do the following: 1. Attach one end of the power cable to the secure hard drive, and then attach the other end to an available USB connector on your computer. The indicator light turns red, as shown: © Copyright Lenovo 2010...
  • Seite 10 Note: When you are using the eSATA/USB combo connector, the eSATA data cable functions as a data cable and power cable simultaneously. ThinkPad eSATA/USB Secure Hard Drive User Guide...
  • Seite 11 If you are using the standard eSATA connector on your computer, attach both the USB data cable and the eSATA data cable to the secure hard drive and your computer, as shown: Chapter 2. Installing the ThinkPad eSATA/USB Secure Hard Drive...
  • Seite 12 All manuals and user guides at all-guides.com ThinkPad eSATA/USB Secure Hard Drive User Guide...
  • Seite 13: Chapter 3. Using The Thinkpad Esata/Usb Secure Hard Drive

    All manuals and user guides at all-guides.com Chapter 3. Using the ThinkPad eSATA/USB Secure Hard Drive This chapter provides information about using the secure hard drive. Entering and exiting the Standby Mode, Admin Mode, and User Mode This section provides information about how to enter and exit the Standby Mode, Admin Mode, and User Mode of your secure hard drive.
  • Seite 14: Exiting The User Mode

    You waited longer than 10 seconds before entering a password. v The new password was entered incorrectly. b. If no activity is detected within two minutes in the Admin Mode, the secure hard drive will return to the Standby Mode. ThinkPad eSATA/USB Secure Hard Drive User Guide...
  • Seite 15: Adding A New User Password

    Note: If the indicator light flashes red three times, this indicates that the password is less than 8 digits or more than 16 digits. Enter a password that contains 8–16 digits after the indicator light flashes blue intermittently. Chapter 3. Using the ThinkPad eSATA/USB Secure Hard Drive...
  • Seite 16: Completely Resetting The Secure Hard Drive

    7. Right-click in the blank area under the Unallocated section, and then select New Partition. The Welcome to the New Partition Wizard window opens. 8. Click Next. 9. Select Primary partition and click Next. 1-10 ThinkPad eSATA/USB Secure Hard Drive User Guide...
  • Seite 17: Using The Thinkvantage Rescue And Recovery Program With The Secure Hard Drive

    Attention: To ensure the data integrity of your secure hard drive, be sure to lock or log off your secure hard drive if you are: v away from your computer v using the switching user function by sharing a computer with others 1-11 Chapter 3. Using the ThinkPad eSATA/USB Secure Hard Drive...
  • Seite 18 All manuals and user guides at all-guides.com 1-12 ThinkPad eSATA/USB Secure Hard Drive User Guide...
  • Seite 19: Chapter 4. Troubleshooting

    Q: How do I use the secure hard drive without a password? A: As a full disk encryption product, the secure hard drive can never be used without a password. Q: What encryption algorithm is used in this product? A: AES 256 bits algorithm. 1-13 © Copyright Lenovo 2010...
  • Seite 20 When the secure hard drive is unlocked, the system has already finished the boot process. Therefore, the system could not boot from the secure hard drive. 1-14 ThinkPad eSATA/USB Secure Hard Drive User Guide...
  • Seite 21: Descrição Do Produto

    Pôster de garantia do ThinkPad eSATA/USB Secure Hard Drive Descrição do Produto O ThinkPad eSATA/USB Secure Hard Drive (de agora em diante chamado de disco rígido seguro) é uma opção padrão USB 2.0 de alta velocidade, portátil, leve, eSATA, que oferece segurança de dados de alto nível.
  • Seite 22 Azul: Modo de Administração v Verde: Modo de Usuário O indicador luminoso possui outros métodos de exibição para indicar diferentes status do disco rígido seguro. Os detalhes serão fornecidos posteriormente neste manual. 1-16 ThinkPad eSATA/USB Secure Hard Drive User Guide...
  • Seite 23 Para instalar o disco rígido seguro, faça o seguinte: 1. Conecte uma extremidade do cabo de energia ao disco rígido seguro e, em seguida, conecte a outra extremidade a um conector USB disponível em seu computador. O indicador luminoso fica vermelho, conforme mostrado: 1-17 © Copyright Lenovo 2010...
  • Seite 24 Nota: Ao usar o conector combinado eSATA/USB, o cabo de dados eSATA funciona como um cabo de dados e um cabo de energia simultaneamente. 1-18 ThinkPad eSATA/USB Secure Hard Drive User Guide...
  • Seite 25 Se estiver usando o conector eSATA padrão em seu computador, conecte o cabo de dados USB e o cabo de dados eSATA ao disco rígido seguro em seu computador, conforme mostrado: 1-19 Capítulo 2. Instalando o ThinkPad eSATA/USB Secure Hard Drive...
  • Seite 26 All manuals and user guides at all-guides.com 1-20 ThinkPad eSATA/USB Secure Hard Drive User Guide...
  • Seite 27 All manuals and user guides at all-guides.com Capítulo 3. Usando o ThinkPad eSATA/USB Secure Hard Drive Este capítulo fornece informações sobre como usar o disco rígido seguro. Entrando e Saindo dos Modos de Espera, Administração e Usuário Esta seção fornece informações sobre como entrar e sair do Modo de Espera, Modo de Administração e Modo de Usuário do disco rígido seguro.
  • Seite 28 Senha de Administração é alterada com êxito. Notas: a. Se o indicador luminoso piscar na cor vermelha três vezes e, em seguida, azul intermitentemente, volte para a etapa 3. Isso é devido a uma das condições a seguir: 1-22 ThinkPad eSATA/USB Secure Hard Drive User Guide...
  • Seite 29 Nota: Se o indicador luminoso piscar na cor vermelha intermitentemente, volte para a etapa 2. Isso deve-se a uma das seguintes condições: v Você esperou mais do que 10 segundos antes de digitar uma senha. 1-23 Capítulo 3. Usando o ThinkPad eSATA/USB Secure Hard Drive...
  • Seite 30 Clique com o botão direito em Meu Computador ou Computador e, em seguida, clique em Gerenciar. v Clique em Iniciar, mova o cursor para Meu Computador ou Computador e clique sobre ele com o botão direito e, em seguida, clique em Gerenciar 1-24 ThinkPad eSATA/USB Secure Hard Drive User Guide...
  • Seite 31 Modo de Usuário. É possível usar o disco rígido seguro para resgatar arquivos ou restaurar o seu sistema. Nota: Para obter informações adicionais sobre o programa Rescue and Recovery, vá para: http://www.lenovo.com/support 1-25 Capítulo 3. Usando o ThinkPad eSATA/USB Secure Hard Drive...
  • Seite 32 Aviso: Para assegurar a integridade dos dados de seu disco rígido seguro, certifique-se de bloquear ou efetuar logoff de seu disco rígido seguro se você estiver: v longe de seu computador v utilizando a função de comutação de usuário compartilhando um computador com terceiros 1-26 ThinkPad eSATA/USB Secure Hard Drive User Guide...
  • Seite 33 P: Como uso o disco rígido seguro sem uma senha? R: Como um produto de criptografia completa de disco, o disco rígido seguro nunca pode ser usado sem uma senha. 1-27 © Copyright Lenovo 2010...
  • Seite 34 Quando o disco rígido seguro é desbloqueado, o sistema já concluiu o processo de inicialização. Por essa razão, o sistema não pôde ser inicializado a partir do disco rígido seguro. 1-28 ThinkPad eSATA/USB Secure Hard Drive User Guide...
  • Seite 35: Description Du Produit

    Livret contenant la déclaration de garantie de ThinkPad eSATA/USB Secure Hard Drive Description du produit L’unité ThinkPad eSATA/USB Secure Hard Drive (ci-après appelée unité de disque dur sécurisée) est une unité portable eSATA, légère, à haute vitesse et répondant aux standards USB 2.0 qui offre un niveau de sécurité...
  • Seite 36 Bleu : mode Administrateur v Vert : mode Utilisateur Le voyant peut également signaler différents états de l’unité de disque dur sécurisée. Plus de détails sont fournis plus loin dans le présent document. 1-30 ThinkPad eSATA/USB Secure Hard Drive User Guide...
  • Seite 37 Pour installer l’unité de disque dur sécurisée, procédez comme suit : 1. Branchez l’une des extrémités du cordon d’alimentation sur l’unité de disque dur sécurisée, puis l’autre extrémité surun port USB disponible de l’ordinateur. Le voyant de l’unité devient rouge, comme illustré ci-dessous. 1-31 © Copyright Lenovo 2010...
  • Seite 38 : Remarque : Lorsque vous utilisez le port multifonction eSATA/USB, le câble de transmission de données eSATA fonctionne à la fois comme câble de transmission et comme cordon d’alimentation. 1-32 ThinkPad eSATA/USB Secure Hard Drive User Guide...
  • Seite 39 Si vous utilisez le connecteur eSATA de l’ordinateur, branchez le câble de transmission USB et le câble de transmission eSATA sur l’unité de disque dur sécurisée et sur l’ordinateur, comme illustré ci-dessous : 1-33 Chapitre 2. Installation de l’unité ThinkPad eSATA/USB Secure Hard Drive...
  • Seite 40 All manuals and user guides at all-guides.com 1-34 ThinkPad eSATA/USB Secure Hard Drive User Guide...
  • Seite 41 Aucune activité n’a été détectée pendant deux minutes en mode Administrateur. Sortie du mode Administrateur Pour quitter le mode Administrateur, appuyez sur le bouton jusqu’à ce que le voyant devienne rouge, ce qui signifie que vous êtes passé en mode Veille. 1-35 © Copyright Lenovo 2010...
  • Seite 42 4. Ressaisissez le nouveau mot de passe administrateur et appuyez sur . Le voyant s’allume en vert pendant trois secondes et le mot de passe administrateur est alors modifié. 1-36 ThinkPad eSATA/USB Secure Hard Drive User Guide...
  • Seite 43 3. Entrez le mot de passe utilisateur en cours et appuyez sur . Le voyant devient vert pendant trois secondes, puis clignote en bleu par intermittence. 1-37 Chapitre 3. Utilisation de l’unité ThinkPad eSATA/USB Secure Hard Drive...
  • Seite 44 2. Entrez le mot de passe utilisateur par défaut (12345678) et appuyez sur pour passer en mode Utilisateur. 3. Attendez que le système d’exploitation installe tous les pilotes de périphérique USB pour l’unité de disque dur sécurisée. 1-38 ThinkPad eSATA/USB Secure Hard Drive User Guide...
  • Seite 45 6. Redémarrez l’ordinateur avec l’unité de disque dur sécurisée connectée à l’ordinateur. 7. Appuyez sur le bouton ThinkVantage ou F11 pour accéder à l’espace de travail Rescue and Recovery. 1-39 Chapitre 3. Utilisation de l’unité ThinkPad eSATA/USB Secure Hard Drive...
  • Seite 46 Avertissement : Pour veiller à l’intégrité des données stockées sur l’unité de disque dur sécurisée, verrouillez ou déconnectez l’unité lorsque vous : v n’utilisez pas l’ordinateur et vous en éloignez ; v utilisez la fonction de changement d’utilisateur en partageant un ordinateur avec d’autres personnes. 1-40 ThinkPad eSATA/USB Secure Hard Drive User Guide...
  • Seite 47 Question : Puis-je initialiser et formater l’unité de disque dur sécurisée avec un compte utilisateur Windows ? Réponse : Non, il s’agit d’une restriction Windows. Vous devez utiliser le compte administrateur pour initialiser et formater l’unité de disque dur sécurisée. 1-41 © Copyright Lenovo 2010...
  • Seite 48 Réponse : L’unité est sécurisée ; il faut donc patienter quelques secondes avant de saisir le mot de passe et déverrouiller l’unité. Lorsque l’unité de disque dur sécurisée est déverrouillée, le système a déjà terminé son processus d’initialisation. Par conséquent, le système ne peut pas s’initialiser à partir de l’unité. 1-42 ThinkPad eSATA/USB Secure Hard Drive User Guide...
  • Seite 49: Kapitel 1. Informationen Zum Thinkpad Esata/Usb Secure Hard Drive

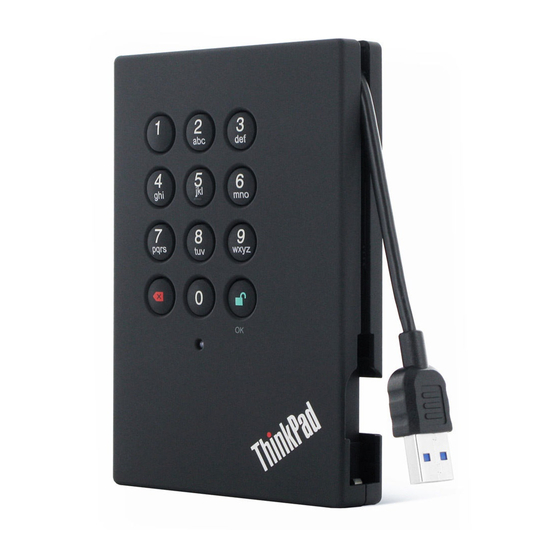
    Garantieposter für ThinkPad eSATA/USB Secure Hard Drive Produktbeschreibung Das ThinkPad eSATA/USB Secure Hard Drive (im Folgenden als ″Sicherheitsfestplattenlaufwerk″ be- zeichnet) ist eine tragbare, leichte eSATA-Hochgeschwindigkeits-USB-2.0-Standardzusatzeinrichtung, die Datensicherheit auf einer hohen Ebene bietet. Sie können Daten entweder über den USB-Anschluss oder über den eSATA-Anschluss auf dem Sicherheitsfestplattenlaufwerk übertragen.
  • Seite 50: Tastenfeld Des Sicherheitsfestplattenlaufwerks

    Die Leuchtanzeige verfügt über folgende Farben, die verschiedene Betriebsmodi anzeigen: v Rot: Bereitschaftsmodus v Blau: Administratormodus v Grün: Benutzermodus Außerdem werden durch die Leuchtanzeige auch noch andere Status des Sicherheitsfestplattenlaufwerks angezeigt. Ausführliche Informationen dazu erhalten Sie im weiteren Verlauf dieses Handbuchs. 1-44 ThinkPad eSATA/USB Secure Hard Drive User Guide...
  • Seite 51: Kapitel 2. Thinkpad Esata/Usb Secure Hard Drive Installieren

    All manuals and user guides at all-guides.com Kapitel 2. ThinkPad eSATA/USB Secure Hard Drive installieren Dieses Kapitel enthält Informationen zur Installation des Sicherheitsfestplattenlaufwerks. Vorbereitung der Installation Lesen Sie die folgenden Informationen, bevor Sie das Sicherheitsfestplattenlaufwerk installieren und ver- wenden. Achtung: Verwenden Sie nur die im Lieferumfang der Zusatzeinrichtung enthaltenen Kabel. Wenn Sie ein Kabel verwenden, das nicht im Lieferumfang der Zusatzeinrichtung enthalten war, könnte das Lauf-...
  • Seite 52 ßen Sie das eine Ende des eSATA-Datenkabels an das Sicherheitsfestplattenlaufwerk und das andere Ende des Kabels an den eSATA/USB-Kombinationsanschluss am Computer an, wie in der folgen- den Abbildung dargestellt: Anmerkung: Wenn Sie den eSATA/USB-Kombinationsanschluss verwenden, funktioniert das eSATA-Kabel als Datenkabel und Netzkabel gleichzeitig. 1-46 ThinkPad eSATA/USB Secure Hard Drive User Guide...
  • Seite 53 Wenn Sie den Standard-eSATA-Anschluss am Computer verwenden, schließen Sie sowohl das USB- Datenkabel als auch das eSATA-Datenkabel an das Sicherheitsfestplattenlaufwerk und den Compu- ter an, wie in der folgenden Abbildung dargestellt: 1-47 Kapitel 2. ThinkPad eSATA/USB Secure Hard Drive installieren...
  • Seite 54 All manuals and user guides at all-guides.com 1-48 ThinkPad eSATA/USB Secure Hard Drive User Guide...
  • Seite 55: Kapitel 3. Thinkpad Esata/Usb Secure Hard Drive Verwenden

    All manuals and user guides at all-guides.com Kapitel 3. ThinkPad eSATA/USB Secure Hard Drive verwenden Dieses Kapitel enthält Informationen zur Verwendung des Sicherheitsfestplattenlaufwerks. Bereitschaftsmodus, Administratormodus und Benutzermodus aktivie- ren und verlassen Dieser Abschnitt enthält Informationen dazu, wie Sie den Bereitschafts-, den Administrator- und den Benutzermodus des Sicherheitsfestplattenlaufwerks aktivieren und wieder verlassen können.
  • Seite 56: Benutzermodus Aktivieren

    + 9″ und halten Sie sie gedrückt, bis die Leuchtanzeige blau blinkt. 3. Geben Sie das neue Kennwort ein (Minimum: 8 Ziffern; Maximum: 16 Ziffern) und drücken Sie die Taste . Die Leuchtanzeige blinkt drei Mal grün. 1-50 ThinkPad eSATA/USB Secure Hard Drive User Guide...
  • Seite 57: Neues Benutzerkennwort Hinzufügen

    ″ ein zweites Mal und halten Sie sie fünf Sekunden lang gedrückt, bis die Leuchtanzeige drei Sekunden lang durchgehend grün und danach wieder blau leuchtet. Dies bedeutet, dass das Benutzerkennwort erfolgreich gelöscht wird. 1-51 Kapitel 3. ThinkPad eSATA/USB Secure Hard Drive verwenden...
  • Seite 58: Benutzerkennwort Ändern

    + 2″ und halten Sie sie 10 Sekunden lang gedrückt, bis die Leuchtanzeige durchgehend blau, anschließend grün und anschließend rot leuchtet. Das Laufwerk muss entfernt und erneut angeschlossen werden, bevor Sie fortfahren. 1-52 ThinkPad eSATA/USB Secure Hard Drive User Guide...
  • Seite 59 12. Erstellen Sie eine Datenträgerbezeichnung, wählen Sie Schnellformatierung durchführen aus und klicken Sie auf Weiter. 13. Klicken Sie auf Fertig stellen. 14. Warten Sie, bis der Formatierungsprozess abgeschlossen ist. Das Sicherheitsfestplattenlaufwerk wird dann erkannt und kann verwendet werden. 1-53 Kapitel 3. ThinkPad eSATA/USB Secure Hard Drive verwenden...
  • Seite 60: Programm "Thinkvantage Rescue And Recovery" Mit Dem Sicherheitsfestplattenlaufwerk Verwenden

    Sicherheitsfestplattenlaufwerk in folgenden Situationen sperren oder abmelden: v Sie befinden sich für längere Zeit nicht in der Nähe Ihres Computers v Sie nutzen den Computer gemeinsam mit anderen Benutzern mit der Möglichkeit eines Benutzer- wechsels über das Betriebssystem 1-54 ThinkPad eSATA/USB Secure Hard Drive User Guide...
  • Seite 61 Laufwerk vollständig zurückgesetzt und den Benutzermodus aktiviert habe? Antwort: Sie müssen das Sicherheitsfestplattenlaufwerk zuerst manuell initialisieren, zuordnen und for- matieren. Weitere Informationen hierzu finden Sie im Abschnitt „Sicherheitsfestplattenlaufwerk nach dem vollständigen Zurücksetzen initialisieren und formatieren” auf Seite 1-53. 1-55 © Copyright Lenovo 2010...
  • Seite 62 Kennwort einzugeben und das Sicherheitsfestplattenlaufwerk zu entsperren. Wenn das Sicher- heitsfestplattenlaufwerk entsperrt ist, hat das System den Bootprozess bereits beendet. Aus diesem Grund konnte das System nicht vom Sicherheitsfestplattenlaufwerk booten. 1-56 ThinkPad eSATA/USB Secure Hard Drive User Guide...
  • Seite 63: Descrizione Del Prodotto

    Poster della garanzia di ThinkPad eSATA/USB Secure Hard Drive Descrizione del prodotto Il prodotto ThinkPad eSATA/USB Secure Hard Drive (d’ora in poi chiamata unità disco fisso sicura) è un’opzione standard portatile USB 2.0 eSATA ad elevata velocità e dal peso contenuto, che offre una sicurezza dei dati di alto livello.
  • Seite 64 Verde: modalità Utente L’indicatore luminoso dispone di altri metodi di visualizzazione per indicare uno stato differente dell’unità disco fisso sicura. Per i dettagli, si rimanda ai paragrafi successivi del presente manuale. 1-58 ThinkPad eSATA/USB Secure Hard Drive User Guide...
  • Seite 65 Per installare l’unità disco fisso sicura, effettuare le seguenti operazioni: 1. Collegare un’estremità del cavo di alimentazione all’unità disco fisso sicura e poi collegare l’altra estremità ad un connettore USB disponibile sul computer. L’indicatore luminoso si accende di colore rosso, come mostrato: 1-59 © Copyright Lenovo 2010...
  • Seite 66 Nota: quando si utilizza il connettore combinato eSATA/USB, il cavo di dati eSATA funziona contemporaneamente sia come cavo di dati che come cavo di alimentazione. 1-60 ThinkPad eSATA/USB Secure Hard Drive User Guide...
  • Seite 67 Se si utilizza il connettore eSATA standard sul computer, collegare sia il cavo di dati USB che il cavo di dati eSATA all’unità disco fisso sicura e al computer, come mostrato: 1-61 Capitolo 2. Installazione di ThinkPad eSATA/USB Secure Hard Drive...
  • Seite 68 All manuals and user guides at all-guides.com 1-62 ThinkPad eSATA/USB Secure Hard Drive User Guide...
  • Seite 69 All manuals and user guides at all-guides.com Capitolo 3. Utilizzo di ThinkPad eSATA/USB Secure Hard Drive Questo capitolo fornisce informazioni sull’utilizzo dell’unità disco fisso sicura. Attivazione e disattivazione della modalità Standby, Admin e Utente Questa sezione fornisce informazioni sulla procedura di attivazione e disattivazione delle modalità...
  • Seite 70 Sono passati più di 10 secondi dalla richiesta di inserimento di una password. v La nuova password immessa non è corretta. b. Se non viene rilevata alcuna attività negli ultimi due minuti nella modalità Admin, l’unità disco fisso sicura tornerà alla modalità Standby. 1-64 ThinkPad eSATA/USB Secure Hard Drive User Guide...
  • Seite 71 16 cifre. Immettere una password che contenga un numero di cifre compreso tra 8 e 16 dopo che l’indicatore luminoso ha lampeggiato a intermittenza di color blu. 1-65 Capitolo 3. Utilizzo di ThinkPad eSATA/USB Secure Hard Drive...
  • Seite 72 Se si apre la finestra Inizializzazione e conversione guidata disco, fare clic su Avanti → Avanti → Fine. v Se la suddetta finestra non si apre, procedere nel modo seguente: a. Fare clic con il tasto destro del mouse su Disco sconosciuto e quindi selezionare Inizializza disco. 1-66 ThinkPad eSATA/USB Secure Hard Drive User Guide...
  • Seite 73 Per scollegare l’unità disco fisso sicura, fare clic sull’icona Rimozione sicura dell’hardware nell’area di notifica del desktop Microsoft Windows e rimuovere l’unità disco fisso sicura dal computer. 1-67 Capitolo 3. Utilizzo di ThinkPad eSATA/USB Secure Hard Drive...
  • Seite 74 Attenzione: per garantire l’integrità dei dati presenti sull’unità disco fisso sicura, accertarsi di bloccare o scollegare tale unità nelle seguenti situazioni: v se ci si allontana dal computer v se si utilizza la funzione di cambio utente in caso di condivisione del computer con altri utenti 1-68 ThinkPad eSATA/USB Secure Hard Drive User Guide...
  • Seite 75 D: come utilizzare l’unità disco fisso sicura senza una password? R: in qualità di prodotto di codifica disco completo, l’unità disco fisso sicura non può mai essere utilizzata senza una password. 1-69 © Copyright Lenovo 2010...
  • Seite 76 R poiché si tratta di un’unità disco fisso sicura, prima di utilizzarla sono necessari diversi secondi per inserire una password e sbloccare l’unità. Quando l’unità viene sbloccata, il sistema ha già terminato il processo di avvio. Quindi, non è possibile avviare il sistema dall’unità disco fisso sicura. 1-70 ThinkPad eSATA/USB Secure Hard Drive User Guide...
  • Seite 77: Chapter 1. Acerca De Thinkpad Esata/Usb Secure Hard Drive

    Póster de garantía ThinkPad eSATA/USB Secure Hard Drive Descripción del producto ThinkPad eSATA/USB Secure Hard Drive (de aquí en adelante, unidad de disco duro segura) es una opción estándar portátil, ligera, eSATA y de alta velocidad USB 2.0 que ofrece un elevado nivel de seguridad para los datos.
  • Seite 78 Azul: modalidad de administrador v Verde: modalidad de usuario La luz del indicador se muestra de diversas maneras para indicar estados diferentes de la unidad de disco duro segura. Se proporcionará información detallada más adelante. 1-72 ThinkPad eSATA/USB Secure Hard Drive User Guide...
  • Seite 79: Chapter 2. Instalación De Thinkpad Esata/Usb Secure Hard Drive

    1. Conecte un extremo del cable de alimentación a la unidad de disco duro segura y a continuación conecte el otro extremo a un conector USB disponible en el sistema. La luz del indicador se vuelve roja, como se muestra: 1-73 © Copyright Lenovo 2010...
  • Seite 80 Note: Cuando utiliza el conector combo eSATA/USB, el cable de datos eSATA funciona como cable de datos y cable de alimentación simultáneamente. 1-74 ThinkPad eSATA/USB Secure Hard Drive User Guide...
  • Seite 81 Si está utilizando el conector estándar eSATA del sistema, conecte el cable de datos USB y el cable de datos eSATA a la unidad de disco duro segura del sistema, como se muestra: 1-75 Chapter 2. Instalación de ThinkPad eSATA/USB Secure Hard Drive...
  • Seite 82 All manuals and user guides at all-guides.com 1-76 ThinkPad eSATA/USB Secure Hard Drive User Guide...
  • Seite 83: Chapter 3. Utilización De Thinkpad Esata/Usb Secure Hard Drive

    Para salir de la modalidad de administrador, pulse el botón en la modalidad de administrador hasta que la luz del indicador pase a ser de color rojo, indicando que está en la modalidad en espera. 1-77 © Copyright Lenovo 2010...
  • Seite 84 Note: Si la luz del indicador parpadea en verde tres veces, indica que la contraseña contiene menos de 8 dígitos o más de 16. Especifique una contraseña que contenga de 8 a 16 dígitos después de que la luz del indicador parpadee en azul de manera intermitente. 1-78 ThinkPad eSATA/USB Secure Hard Drive User Guide...
  • Seite 85 Cambio de la contraseña de usuario Puede cambiar la contraseña de usuario si realiza lo siguiente: 1. Acceda a la modalidad de usuario.Consulte “Cómo entrar a la modalidad de usuario” on page 1-77. 1-79 Chapter 3. Utilización de ThinkPad eSATA/USB Secure Hard Drive...
  • Seite 86 Deberá inicializar y formatear la unidad de disco duro segura. Para inicializar la unidad de disco duro segura, realice lo siguiente: 1. Después de un restablecimiento completo, conecte la unidad de disco duro segura al sistema. 1-80 ThinkPad eSATA/USB Secure Hard Drive User Guide...
  • Seite 87 3. Espere hasta que el sistema operativo reconozca la unidad de disco duro segura. 4. Cree copias de seguridad y almacénelas en la unidad de disco duro segura mediante el programa Rescue and Recovery. 5. Apague el sistema. 1-81 Chapter 3. Utilización de ThinkPad eSATA/USB Secure Hard Drive...
  • Seite 88 1-82 ThinkPad eSATA/USB Secure Hard Drive User Guide...
  • Seite 89: Chapter 4. Resolución De Problemas

    P: ¿Puedo inicializar y formatear la unidad de disco duro con una cuenta de usuario de Windows? R: No, esta es una limitación de Windows. Debe utilizar la cuenta de administrador para inicializar y formatear la unidad de disco duro segura. 1-83 © Copyright Lenovo 2010...
  • Seite 90 Cuando la unidad de disco duro segura esté desbloqueada, el sistema ya habrá finalizado el proceso de arranque. Por eso el sistema no podía arrancar desde la unidad de disco duro segura. 1-84 ThinkPad eSATA/USB Secure Hard Drive User Guide...
  • Seite 91: Popis Produktu

    ThinkPad eSATA/USB Secure Hard Drive Popis produktu Pevný disk ThinkPad eSATA/USB Secure Hard Drive (dále nazývaný bezpečný pevný disk) je přenositelné, lehké zařízení poskytující připojení eSATA či vysokorychlostní USB 2.0 s vysokou úrovní zabezpečení dat. Data lze přenášet přes konektor USB nebo konektor eSATA bezpečného pevného disku.
  • Seite 92 Kontrolka ukazuje aktuální režim těmito barvami: v červená: pohotovostní režim v modrá: administrátorský režim v zelená: uživatelský režim Kontrolka ukazuje dalšími způsoby různé stavy bezpečného pevného disku. Podrobnosti naleznete dále v této příručce. 1-86 ThinkPad eSATA/USB Secure Hard Drive Uživatelská příručka...
  • Seite 93 Instalace bezpečného pevného disku Bezpečný pevný disk instalujte takto: 1. Jeden konec napájecího kabelu připojte k bezpečnému pevnému disku a druhý konec připojte k dostupnému konektoru USB na počítači. Kontrolka se rozsvítí červeně, jak ukazuje obrázek: 1-87 © Copyright Lenovo 2010...
  • Seite 94 SL510, T400s, T410s, T510 a W510), připojte jeden konec datového kabelu eSATA k bezpečnému pevnému disku a druhý konec ke kombinovanému konektoru eSATA/USB combo na počítači podle obrázku: Poznámka: Používáte-li kombinovaný konektor eSATA/USB combo, datový kabel SATA funguje zároveň jako datový i jako napájecí kabel. 1-88 ThinkPad eSATA/USB Secure Hard Drive Uživatelská příručka...
  • Seite 95 All manuals and user guides at all-guides.com v Používáte-li standardní konektor eSATA počítače, připojte datový kabel USB a datový kabel eSATA k bezpečnému pevnému disku a počítači podle obrázku: 1-89 Kapitola 2. Instalace pevného disku ThinkPad eSATA/USB Secure Hard Drive...
  • Seite 96 All manuals and user guides at all-guides.com 1-90 ThinkPad eSATA/USB Secure Hard Drive Uživatelská příručka...
  • Seite 97 2. Zadejte heslo uživatele nebo administrátora a stiskněte tlačítko . Kontrolka se rozsvítí zeleně, což znamená, že disk je v uživatelském režimu. Pokud kontrolka bliká červeně, bylo zadáno špatné heslo. Můžete obnovit původní 1-91 © Copyright Lenovo 2010...
  • Seite 98 Přidání hesla uživatele Nové heslo uživatele přidáte takto: 1. Přepněte do administrátorského režimu. Viz “Přepnutí do administrátorského režimu” na stránce 1-91. 2. Podržte tlačítka + 1 stisknutá, dokud kontrolka nezačne modře blikat. 1-92 ThinkPad eSATA/USB Secure Hard Drive Uživatelská příručka...
  • Seite 99 All manuals and user guides at all-guides.com 3. Zadejte heslo uživatele (nejméně 8 a nejvíce 16 číslic) a stiskněte tlačítko . Kontrolka třikrát zeleně blikne. Poznámka: Pokud kontrolka třikrát blikne červeně, oznamuje, že zadané heslo je kratší než 8 číslic nebo delší než 16 číslic.
  • Seite 100 12. Zadejte jmenovku disku, použijte Provést rychlé formátování a klepněte na Další. 13. Klepněte na tlačítko Dokončit. 14. Počkejte, až proces formátování skončí. Bezpečný pevný disk bude rozpoznaný a přístupný pro používání. 1-94 ThinkPad eSATA/USB Secure Hard Drive Uživatelská příručka...
  • Seite 101 Můžete použít bezpečný pevný disk pro obnovu souborů nebo systému. Poznámka: Další informace o programu Rescue and Recovery naleznete na webové stránce: http://www.lenovo.com/support Hibernace, pozastavení a odhlášení z operačního systému Předtím než převedete operační systém Windows do režimu hibernace, pozastavíte ho nebo se z něj odhlásíte, uložte a uzavřete všechny soubory na bezpečném pevném disku.
  • Seite 102 All manuals and user guides at all-guides.com 1-96 ThinkPad eSATA/USB Secure Hard Drive Uživatelská příručka...
  • Seite 103 účtu administrátora. Otázka: Lze používat bezpečný pevný disk bez hesla? Odpově : Protože je bezpečný pevný disk šifrován, nelze ho bez hesla používat. Otázka: Jaký šifrovací algoritmus tento produkt využívá? Odpově : 256bitový algoritmus AES. 1-97 © Copyright Lenovo 2010...
  • Seite 104 Odpově : Jedná se o bezpečný pevný disk, než jej začnete používat, musíte několik sekund vyčkat a až pak odemknout zadáním hesla. Než dojde k odemčení bezpečného pevného disku, systém již dokončí vlastní zavádění systému. Proto nelze zavádět systém z bezpečného pevného disku. 1-98 ThinkPad eSATA/USB Secure Hard Drive Uživatelská příručka...
  • Seite 105: Opis Produktu

    Leták so záručnými informáciami pre jednotku ThinkPad eSATA/USB Secure Hard Drive Opis produktu Jednotka pevného disku ThinkPad eSATA/USB Secure Hard Drive ( alej nazývaná jednotka pevného disku) je ahký prenosný produkt s podporou eSATA a vysokorýchlostného prenosu USB 2.0, ktorý poskytuje vysokú úroveň...
  • Seite 106 Svetelný indikátor používa tieto farby na označenie rozličných pracovných režimov: v Červená: Pohotovostný režim v Modrá: Režim administrátora v Zelená: Režim užívate a Svetelný indikátor má aj alšie možnosti signalizovania rôznych stavov jednotky pevného disku. Podrobné informácie nájdete v tejto príručke. 1-100 ThinkPad eSATA/USB Secure Hard Drive User Guide...
  • Seite 107 Ak chcete nainštalova jednotku pevného disku, postupujte takto: 1. Pripojte jeden koniec napájacieho kábla k jednotke pevného disku a druhý koniec k vo nému konektoru USB na vašom počítači. Svetelný indikátor sa rozsvieti načerveno, ako je zobrazené na tomto obrázku: 1-101 © Copyright Lenovo 2010...
  • Seite 108 Poznámka: Ak používate kombinovaný konektor eSATA/USB, potom dátový kábel eSATA funguje súčasne ako dátový kábel aj napájací kábel. 1-102 ThinkPad eSATA/USB Secure Hard Drive User Guide...
  • Seite 109 All manuals and user guides at all-guides.com v Ak používate na počítači štandardný konektor eSATA, pripojte pod a priloženého obrázka dátový kábel USB aj dátový kábel eSATA k jednotke pevného disku a k počítaču: 1-103 Kapitola 2. Inštalácia jednotky pevného disku ThinkPad eSATA/USB Secure Hard Drive...
  • Seite 110 All manuals and user guides at all-guides.com 1-104 ThinkPad eSATA/USB Secure Hard Drive User Guide...
  • Seite 111 čo znamená, že ste sa prepli do pohotovostného režimu. Použitie režimu užívate a Ak chcete použi režim užívate a, vykonajte nasledujúce kroky: 1. Pripojte jednotku pevného disku k počítaču. Svetelný indikátor sa rozsvieti na červeno. Jednotka pevného disku sa prepne do pohotovostného režimu. 1-105 © Copyright Lenovo 2010...
  • Seite 112 Pridanie nového hesla užívate a Nové heslo užívate a môžete prida vykonaním nasledujúcich krokov: 1. Prejdite do režimu administrátora. Pozrite si čas “Použitie režimu administrátora” na strane 1-105. 1-106 ThinkPad eSATA/USB Secure Hard Drive User Guide...
  • Seite 113 Poznámka: Ak svetelný indikátor blikne trikrát na červeno, toto značí, že heslo má menej ako 8 číslic alebo viac ako 16. Ke svetelný indikátor začne prerušovane blika na modro, zadajte heslo, ktoré obsahuje 8 – 16 číslic. 1-107 Kapitola 3. Používanie jednotky pevného disku ThinkPad eSATA/USB Secure Hard Drive...
  • Seite 114 7. Kliknite pravým tlačidlom myši na prázdnu oblas v časti Unallocated a vyberte New Partition. Zobrazí sa okno Welcome to the New Partition Wizard. 8. Kliknite na Next. 9. Vyberte Primary partition a kliknite na Next. 1-108 ThinkPad eSATA/USB Secure Hard Drive User Guide...
  • Seite 115 Upozornenie: Aby ste zaistili integritu údajov na jednotke pevného disku, vždy uzamknite alebo sa odhláste z jednotky pevného disku, ke : v ste preč od vášho počítača v používate funkciu na prepínanie užívate ov pri zdie aní počítača s inými užívate mi 1-109 Kapitola 3. Používanie jednotky pevného disku ThinkPad eSATA/USB Secure Hard Drive...
  • Seite 116 All manuals and user guides at all-guides.com 1-110 ThinkPad eSATA/USB Secure Hard Drive User Guide...
  • Seite 117 Otázka: Ako môžem použi jednotku pevného disku bez hesla? Odpove : Ke že jednotka pevného disku je jednotka s úplným šifrovaním, nikdy ju nie je možné použi bez hesla. Otázka: Aký šifrovací algoritmus používa táto jednotka? Odpove : 256-bitový algoritmus AES. 1-111 © Copyright Lenovo 2010...
  • Seite 118 Odpove : Ke že jednotka pevného disku je zabezpečená, budete pred jej použitím potrebova nieko ko sekúnd na zadanie hesla, aby ste ju odomkli. Kým stihnete odomknú jednotku pevného disku, systém dokončí proces bootovania. Z tohto dôvodu systém nemohol nabootova zo zabezpečenej jednotky pevného disku. 1-112 ThinkPad eSATA/USB Secure Hard Drive User Guide...
  • Seite 119: Ürün Tanımı

    ThinkPad eSATA/USB Secure Hard Drive garanti şeması Ürün tanımı ThinkPad eSATA/USB Secure Hard Drive (bundan sonra güvenli sabit sürücü olarak anılacaktır), üst düzeyde veri güvenliği sunan, taşınabilir, hafif, eSATA, yüksek hızlı USB 2.0 standart aksamıdır. Verileri USB ya da eSATA bağlacı...
  • Seite 120 Gösterge ışığı, çeşitli işletim kiplerini göstermek için aşağıdaki renkleri görüntüler: v Kırmızı: Bekleme Kipi v Mavi: Yönetici Kipi v Yeşil: Kullanıcı Kipi Güvenli sabit sürücünün farklı durumlarını göstermek üzere başka gösterge ışığı görüntüleme yöntemleri bulunur. Ayrıntılar, bu elkitabının sonraki sayfalarında sağlanmaktadır. 1-114 ThinkPad eSATA/USB Secure Hard Drive User Guide...
  • Seite 121 All manuals and user guides at all-guides.com Bölüm 2. ThinkPad eSATA/USB Secure Hard Drive ürününün takılması Bu bölümde, güvenli sabit sürücünün takılmasına ilişkin bilgiler sağlanır. Takma işlemine başlamadan önce Güvenli sabit sürücüyü takmaya ve kullanmaya başlamadan önce aşağıdaki bilgileri gözden geçirdiğinizden emin olun.
  • Seite 122 T410s, T510s ve W510 dizüstü bilgisayarlarında bulunur), eSATA veri kablosunun bir ucunu güvenli sabit sürücüye ve daha sonra, diğer ucunu bilgisayarınızdaki eSATA/USB birleşik bağlacına şekilde gösterildiği gibi takın: Not: eSATA/USB birleşik bağlacını kullanırken eSATA veri kablosu, hem veri kablosu hem de güç kablosu işlevini görür. 1-116 ThinkPad eSATA/USB Secure Hard Drive User Guide...
  • Seite 123 All manuals and user guides at all-guides.com v Bilgisayarınızda standart eSATA bağlacı kullanıyorsanız, USB veri kablosunu ve eSATA veri kablosunu güvenli sabit sürücünüze ve bilgisayarınıza şekilde gösterildiği gibi takın: 1-117 Bölüm 2. ThinkPad eSATA/USB Secure Hard Drive ürününün takılması...
  • Seite 124 All manuals and user guides at all-guides.com 1-118 ThinkPad eSATA/USB Secure Hard Drive User Guide...
  • Seite 125 All manuals and user guides at all-guides.com Bölüm 3. ThinkPad eSATA/USB Secure Hard Drive ürününün kullanılması Bu bölümde, güvenli sabit sürücünün kullanılmasına ilişkin bilgiler yer almaktadır. Bekleme Kipi’ne, Yönetici Kipi’ne ve Kullanıcı Kipi’ne girilmesi ve bu kiplerden çıkılması Bu bölümde güvenli sabit sürücünüzün Bekleme Kipi’ne, Yönetici Kipi’ne ve Kullanıcı Kipi’ne nasıl girileceğine ve bu kiplerden nasıl çıkılacağına ilişkin bilgiler sağlanmaktadır.
  • Seite 126 Yönetici Kipi’nde iki dakika içinde etkinlik saptanamazsa, güvenli sabit sürücü Bekleme Kipi’ne döner. Yeni bir Kullanıcı Parolası eklenmesi Aşağıdakileri gerçekleştirerek yeni bir Kullanıcı Parolası ekleyebilirsiniz: 1. Yönetici Kipi’ne girin. Bkz. “Yönetici Kipi’ne girilmesi” sayfa 1-119. 1-120 ThinkPad eSATA/USB Secure Hard Drive User Guide...
  • Seite 127 Not: Gösterge ışığı üç defa kırmızı yanıp sönerse ve sonra aralıksız mavi yanıp sönerse, 4. adıma geri dönün. Bu durum, aşağıdaki koşullardan kaynaklanır: v Parola girmeden önce 10 saniyeden fazla beklediniz. v Yeni parola, yanlış girildi. 1-121 Bölüm 3. ThinkPad eSATA/USB Secure Hard Drive ürününün kullanılması...
  • Seite 128 9. Primary partition (Birincil bölüm) seçeneğini belirleyin ve Next (İleri) seçeneğini tıklatın. 10. Yalnızca bir bölüme gereksinim duyarsanız, varsayılan bölüm boyutunu kabul edin ve Next (İleri) seçeneğini tıklatın. 11. Next (İleri) seçeneğini tıklatın. 1-122 ThinkPad eSATA/USB Secure Hard Drive User Guide...
  • Seite 129 Uyarı: Güvenli sabit sürücünün veri bütünlüğünü sağlamak için, aşağıdaki durumlarda, güvenli sabit sürücüyü kilitlediğinizden ve oturumunu kapattığınızdan emin olun: v Bilgisayarınızdan uzaktaysanız v Bilgisayarı başkalarıyla paylaşırken kullanıcılar arası geçiş işlevini kullanıyorsanız 1-123 Bölüm 3. ThinkPad eSATA/USB Secure Hard Drive ürününün kullanılması...
  • Seite 130 All manuals and user guides at all-guides.com 1-124 ThinkPad eSATA/USB Secure Hard Drive User Guide...
  • Seite 131 Y: Tam bir disk şifrelemesine sahip ürün olarak, güvenli sabit sürücü parolasız kullanılamaz. S: Bu üründe hangi şifreleme algoritması kullanılır? Y: AES 256 bit algoritması. S: Yönetici parolası ile aynı haneye sahip Kullanıcı Parolamı neden değiştiremiyorum? 1-125 © Copyright Lenovo 2010...
  • Seite 132 Y: Bu bir güvenli sabit sürücü olduğundan, kullanmadan önce bir parola girmek ve güvenli sabit sürücünün kilidini açmak için birkaç dakikaya gereksinim duyarsınız. Güvenli sabit sürücünin kilidi açıldığında, sistem, önyükleme sürecini tamamlamış olur. Bu nedenle, sistem güvenli sabit sürücüden önyükleme yapamaz. 1-126 ThinkPad eSATA/USB Secure Hard Drive User Guide...
  • Seite 133 All manuals and user guides at all-guides.com Z 1 B XZ ThinkPad eSATA/USB Secure Hard Drive >Vaa)PX ThinkPad eSATA/USB Secure Hard Drive DE"# >VaD=<?V|,#^E"M(Iyw# ":Z20M9CC!~.0,kqXDAZ 1-129 3D:*<20.0;# C!~|P|(: v ThinkPad eSATA/USB Secure Hard Drive v USB }]gB v USB g4_...
  • Seite 134 All manuals and user guides at all-guides.com 2+2L}/w4|fe 2+2L}/w4|fegBy>: 3 8>F 4|ICZ: v !{10Yw v Zz*@dkKms\kDivB5XAO;= v Kv0\m==1 4|ICZCJ2+2L}/w,9ICwTBYwD7O4|: v dk\k v 7OB\k 8>F(}T>TBU+48>wV;,DYw==: v l+:8C== v 6+:\m== v L+:C'== 8>F99Cd{T>=(4mw2+2L}/wDd{4,#>VaTsaa)`XDj8E"# 1-128 ThinkPad eSATA/USB Secure Hard Drive User Guide...
  • Seite 135 All manuals and user guides at all-guides.com Z 2 B 20 ThinkPad eSATA/USB Secure Hard Drive >Ba)PX202+2L}/wDE"# *<20.0 Z*<20M9C2+2L}/w.0,k7#i4TBE"# /f: ;\9C>!~f=DgB#g{9CG>!~|P|,DgB,G4I\ap5C}/w#>!~ <Z^;wg4JdwDivBTc/==9C#kp+;wg4Jdw,S=C}/w# v *\bp52+2L}/w,k!DYw#ZKd}/wr;9C|1,k+dCZ>!~f=Dc/| v *92+2L}/wT\H(,k7# USB }]gB"USB g4_T0 eSATA }]gB1SS}/w, S=FczD USB SZr9C;wg4D USB /_w#kp+ USB gB,S=;(gD USB /_w...
  • Seite 136 All manuals and user guides at all-guides.com 2. y]zCZ+d}]DSZ,4PTB=h.;: v g{z9CFczOD USB SZ,k+ USB }]gBD;Kk2+2L}/w,S,m;KkFcz Od{ICD USB SZ,S,gBy>: v g{z9CFczOD eSATA/USB iOSZ((#Z ThinkPad SL410"SL510"T400s"T410s"T510 M W510 JG>gTOITR=),k+ eSATA }]gBD;Kk2+2L}/w,S,m;KkF czOD eSATA/USB iOSZ,S,gBy>: ":9C eSATA/USB iOSZ1,eSATA }]gBI,1Cw}]gBMg4gB# 1-130 ThinkPad eSATA/USB Secure Hard Drive User Guide...
  • Seite 137 All manuals and user guides at all-guides.com v g{z}Z9CFczODj< eSATA SZ,k+ USB }]gBM eSATA }]gBk2+2L}/ wMFcz,S,gBy>: 1-131 Z 2 B 20 ThinkPad eSATA/USB Secure Hard Drive...
  • Seite 138 All manuals and user guides at all-guides.com 1-132 ThinkPad eSATA/USB Secure Hard Drive User Guide...
  • Seite 139 All manuals and user guides at all-guides.com Z 3 B 9C ThinkPad eSATA/USB Secure Hard Drive >Ba)PX9C2+2L}/wDE"# xkMKv08C==1"0\m==1M0C'==1 >?Va)PXgNxkMKv2+2L}/wD08C==1"0\m==1M0C'==1DE"# xk08C==1 08C==1G2+2L}/wD1!$w==,b2Gd{$w==DkZ# *xk08C==1,k+2+2L}/w,S=Fcz#}/wT/xk08C==1"R8>Fdl#I CbV==1,2+2L}/w&Zx(4,#K1,2+2L;\;Yw536p,xR;aa);c&\ rS\&\#;x,|Jmzxk0\m==1M0C'==1,"Z|G.dP;# ":*Z0\m==1M0C'==1.dxPP;,zh*WHP;A08C==1,;sxkz!qD= xk0\m==1 ":IC0\m==11,Yw53^(6p2+2L}/w# *xk0\m==1,k4PTB=h: 1. +2+2L}/w,S=Fcz#8>Fadl#2+2L}/wxk08C==1 # 2. 4B + 0 #V 5 kS,1A8>FA8l+#b8>zITdk0\m\k1 # 3. dk0\m\k1,;s4 #1!0\m\k1G 12345678#18>Fd61,2+2L}/wxk0\...
  • Seite 140 # mSBDC'\k zIT4PTB=h4mSBD0C'\k1: 1. xk0\m==1 #kNDZ 1-133 3D:xk0\m==1;# 2. 4B + 1 1A8>Fd*TA86+# 3. dk0C'\k1(nY 8 ;}V,n` 16 ;}V),"4 #8>FA8L+ 3 N# ":g{8>FA8l+ 3 N,G4m>\kYZ 8 ;r_`Z 16 ;}V#Z8>Fd*TA86+s, dk|, 8-16 ;}VD\k# 1-134 ThinkPad eSATA/USB Secure Hard Drive User Guide...
  • Seite 141 ":g{8>FA8l+ 3 N,G4m>\kYZ 8 ;r_`Z 16 ;}V#Z8>Fd*TA86+s, dk|, 8-16 ;}VD\k# 5. XBdkB\k,;s4 #18>F#VL+1,b8>0C'\k1|DI&# ":g{8>FA8l+ 3 N,;sd*TA86+,G45XA=h 4#bGITB3Viv}p: v Zdk\k0QH},} 10 kS# v dkK;}7DB\k# j+XC2+2L}/w g{|GyP0C'\k1r0\m\k1,zIT4Pj+XCT}%yP0C'\k1,"+0\m\ k1V4*1!5 12345678# /f: j+XC2+2L}/w+A}}/wODyP}]#zh*{CEL\m&CLrT2+2L}/ wxPVxMq=/# 1-135 Z 3 B 9C ThinkPad eSATA/USB Secure Hard Drive...
  • Seite 142 + ThinkVantage Rescue and Recovery LrCZ2+2L}/w g{FczO0P ThinkVantage Rescue and Recovery Lr,G4zIT(}2+2L}/wOD USB SZ r eSATA SZ,+2+2L}/wCw8]f"h8# ":C&\;ICZ Windows Vista M Windows 7 Yw53# *9C Rescue and Recovery Lr+2+2L}/wCw8]f"h8,k4PTB=h: 1. +2+2L}/w(}ICD USB SZr eSATA SZ,S=Fcz# 1-136 ThinkPad eSATA/USB Secure Hard Drive User Guide...
  • Seite 143 7. 4 ThinkVantage 4%r F11 Txk Rescue and Recovery $wUd# 8. 12+2L}/wQSgRI)9C1,8>F+d*l+#dk0C'\k1,;s4 Txk0C' ==1 #zIT9C2+2L}/w4lHD~rV453# ":*KbPX Rescue and Recovery LrD|`E",k*A: http://www.lenovo.com/support ]_"}zr"zYw53 Z]_"}zr"z Windows Yw53.0,kqX#f"XU2+2L}/wODyPD~#Z]_"}z r"z530,(izV$"z2+2L}/w#*"z2+2L}/w,k%w Windows @fO(*xrD 2+>}2~<j,;sSFczP>}2+2L}/w# /f: *7#2+2L}/wPD}]j{T,kZTBivBx(r"z2+2L}/w: v 6kFcz1 v Zkd{K2mFczDivB9CP;C'&\1 1-137 Z 3 B 9C ThinkPad eSATA/USB Secure Hard Drive...
  • Seite 144 All manuals and user guides at all-guides.com 1-138 ThinkPad eSATA/USB Secure Hard Drive User Guide...
  • Seite 145 2. >}H0D0C'\k1 #kNDZ 1-135 3D:>}0C'\k1;# 3. 4(BD0C'\k1 #kNDZ 1-134 6 3D:mSBDC'\k;# Jb:|G0\m\k11&CgNv? bp:}j+XC2+2L}/wb,;Pd{=(I 0\m\k1 #Zj+XCs,yP}]<+* ',"Rzh*V$T2+2L}/wxPu</"VdMq=/#;s,IT9C1!0\m\k1 12345678# Jb:ZRj+XCFcz"xk0C'==1s,*NYw53^(6p2+2L}/w? bp:zh*T2+2LxPV$u</"VdMq=/#{Kb|`E",kNDZ 1-136 8 3D:Zj+XC s,T2+2L}/wxPu</Mq=/;# Jb:GqIT9C Windows C'J'T2+2L}/wxPu</Mq=/? bp:;IT,bG Windows D;VV^T#zXk9C\m1J'T2+2L}/wxPu</Mq=/# Jb:gNZ^\kDivB9C2+2L}/w? bp:w*;n+ELS\z7,2+2L}/w;\Z^\kDivB9C# Jb:Cz79C24S\c(? bp:AES 256 ;c(# 1-139 © Copyright Lenovo 2010...
  • Seite 146 All manuals and user guides at all-guides.com Jb:*N^(|D_Pk0\m\k1`,D;}D0C'\k1? bp:z;\Z0\m==1BxP|D#IC0C'==11,^(|Dr>}T0\m==14("_P k0\m\k1`,;}D0C'\k1 # Jb:*N9C ThinkVantage Rescue and Recovery Lr^(4(V4iJ? bp:k7#IT}7CJ2+2L}/w#g{zT^(4(V4iJ,k9CFczD NTFS D~53q =/2+2L}/w,;sXT# Jb:*N^(T2+2L}/wxPu</"Vxrq=/? bp:k7#z_8\m1X(#z;\9C\m1J',T0\m==1T2+2L}/wxPu</"V xrq=/# Jb:*N53^(S2+2L}/wxP}<? bp:Z9CC2+2L}/wT0,zh*}kS4dk\k"bxC2+2L}/w#C2+2L}/w bxs,53MQjI}<}L#rK,53^(S2+2L}/wxP}<# 1-140 ThinkPad eSATA/USB Secure Hard Drive User Guide...
  • Seite 147 ThinkPad eSATA/USB Secure Hard Drive v USB Ω u v USB q u v eSATA Ω u v I] v ThinkPad eSATA/USB Secure Hard Drive OT ú í O@ iΓíBp¼BeSATA ¬t ThinkPad eSATA/USB Secure Hard Drive]HU ∩ t Aú Ѭ Ω w CziHzLw w ΘΩ...
  • Seite 148 T{sKX ⁿ O π UCCΓ ϕ U @ íG v ⌡ΓG R í ΓG z í v ±ΓG í ⁿ O HΣLπ Φk ϕ w w U ¼AC ΓUyß í C 1-142 ThinkPad eSATA/USB Secure Hard Drive User Guide...
  • Seite 149 All manuals and user guides at all-guides.com ThinkPad eSATA/USB Secure Hard Drive ú w w w ÷ΩTC ²\¬UCΩTAA}lw w w C ∩ t H uCpG ∩ t M≤H uAiα law C ∩ t OM ΦKΓaAú AC q πy ]pC úns AC q πy...
  • Seite 150 Xí Y] ú≤ ThinkPad SL410BSL510BT400sBT410sBT510 v pGzbqúW eSATA/USB M W510 ºO¼qú A N eSATA Ω u @ s bw w WAMßNt@ s qú Xí YAp eSATA/USB Xí Y AeSATA Ω u P eΩ Mú qOC eSATA/USB 1-144 ThinkPad eSATA/USB Secure Hard Drive User Guide...
  • Seite 151 All manuals and user guides at all-guides.com v pG qúW YA N USB Ω uM eSATA Ω uús w w MqúAp eSATA...
  • Seite 152 All manuals and user guides at all-guides.com 1-146 ThinkPad eSATA/USB Secure Hard Drive User Guide...
  • Seite 153 All manuals and user guides at all-guides.com ThinkPad eSATA/USB Secure Hard Drive ú ÷ΩTC iJM≈}u R ívBu z ív u ív ú p≤iJM≈}w w u R ívBu z ív u ív ÷ΩTC iJ R í u R ívOw w w]u@ íA]Oq ΣLu@ í JfC YniJu R ívA Nw w s...
  • Seite 154 ⁿ O}lí aH Γ{{C + 1A 3. ΘJu KXv] A h 16 A ÷@U Cⁿ O H±Γ{{T C : pGⁿ OH⌡Γ{{T Aoϕ KX ≤ 8 WL 16 Cϕⁿ O}lí aH Γ{ {ºßA ΘJ]t 8-16 1-148 ThinkPad eSATA/USB Secure Hard Drive User Guide...
  • Seite 155 {ºßA ΘJ]t 8-16 5. ½sΘJs KXA ÷@U CYⁿ O ≥G ±ΓAϕ w Q ≤u KXvC : Yⁿ OH⌡Γ{{T AMßSí aH Γ{{A BJ 4CoO] o FUCΣñ@ ¼ v zÑ WL 10 ϕ ΘJKXC v ΘJ sKXú TC 1-149 ThinkPad eSATA/USB Secure Hard Drive...
  • Seite 156 } uw∩ δFv°íC 8. ÷U@BC 9. ∩ Dn A ÷U@BC 10. pGzu n@ ⁿw] jpA ÷U@BC 11. ÷U@BC A∩ ⌡μ tμí AMß÷U@BC 13. ÷@U ¿C y A²μí Bz{ ¿Cw w ¿iδ BNi 1-150 ThinkPad eSATA/USB Secure Hard Drive User Guide...
  • Seite 157 ²Γ nXw w CYnnXw w A b Windows α ñ÷@U w a úwΘAMßqqú úw w C π A OoΩw nXw w G UC @A FTOw w Ω v ≈}qú v zL ½\α PLH@ qú 1-151 ThinkPad eSATA/USB Secure Hard Drive...
  • Seite 158 All manuals and user guides at all-guides.com 1-152 ThinkPad eSATA/USB Secure Hard Drive User Guide...
  • Seite 159 H ¬Gw w O@M π [Kú A@wn KX α DG ú ≤ [KtΓkH ¬GAES 256 tΓkC D: ≤Lk ≤Pu zKXv KXvH ¬Gu bu z ívU iH ≤Cbu ívñALk ≤ Rúbu z ívU Bπ KXvC 1-153 © Copyright Lenovo 2010...
  • Seite 160 α l]wB μí w w C DG ≤Lkqw w ¬ G] oOw w A Hbz ϕAΘJKXA úw w ΩwCϕw w Ñ úΩw At w ¿ { C] At Lkqw w 1-154 ThinkPad eSATA/USB Secure Hard Drive User Guide...
  • Seite 161 ThinkPad eSATA/USB Secure Hard Drive 8u w:M &0 3m ThinkPad eSATA/USB Secure Hard Drive(LD 8H Oe esLjsm T)B bsH %LM 8H :IG eSATA, mS USB 2.0 %X IG; vxOB f.G ^kk &0TOY. 8H Oe esLj!- USB ?X M GB eSATA ?XM& kX %LM& |[R v V@OY. O] eSATA W USB Oe p:) esLj bI: 0P gkOb ,n p:) O#- VgG5 &xUOY.
  • Seite 162 %Cn: Y=z 0: vs8N YgQ 6[ pe& %CUOY. v !#v: kb pe v Duv: |.Z pe v lv: gkZ pe %Cn: 8H Oe esLjG sB& )/!v %C f}8N *8@OY. Z<Q $8B L 3m-G ^N P!- 3mUOY. 1-156 ThinkPad eSATA/USB Secure Hard Drive User Guide...
  • Seite 163 All manuals and user guides at all-guides.com & 2 e ThinkPad eSATA/USB Secure Hard Drive 3! Y=: 8H Oe esLj 3!! |Q $8TOY. 3!& C[Ob |! 8H Oe esLj& 3!/gkOb |! Y= $8& KdOJC@. fm: L IGz T2 &xGB ILm8 gkOJC@. IG P0v! wTGv J: ILm; gkOi e sLj! UsI v V@OY.
  • Seite 164 T410s, T510 W W510 k.O D;M), Y=z 0L eSATA %LM ILmG Q J !; 8H Oe esLj! ,aOm Y% JG !; D;MG eSATA/USB ^8 ?XM! ,aOJC@. V: eSATA/USB ^8 ?XM& gk _N fl, eSATA %LM ILm: %LM |[ S8 FOs esLj! |x5 x^UOY. 1-158 ThinkPad eSATA/USB Secure Hard Drive User Guide...
  • Seite 165 All manuals and user guides at all-guides.com v D;M!- %X eSATA ?XM& gk _N fl, Y=z 0L USB %LM ILmz eSATA %LM ILm Q pN 8H Oe esLjM D;M! ,aOJC@. 1-159 & 2 e ThinkPad eSATA/USB Secure Hard Drive 3!
  • Seite 166 All manuals and user guides at all-guides.com 1-160 ThinkPad eSATA/USB Secure Hard Drive User Guide...
  • Seite 167 All manuals and user guides at all-guides.com & 3 e ThinkPad eSATA/USB Secure Hard Drive gk L e!-B 8H Oe esLj gk! |Q $8& &xUOY. kb pe, |.Z pe W gkZ pe C[ W >a Y=: 8H Oe esLjG kb pe, |.Z pe W gkZ pe& C[Om >aOB f}! |Q $8 TOY.
  • Seite 168 O#& /fOAi Y=z 0L OJC@. 1. |.Z pe& C[OJC@. 1-161 dLvG :|.Z pe C[;; |mOJC@. 2. %CnL Duv8N tZO 'nv +9& )#JC@. 3. u O#& TBOm(VR 8Z.!- Vk 16Z.) v0; )#JC@. %CnL lv8N < x tZT 1-162 ThinkPad eSATA/USB Secure Hard Drive User Guide...
  • Seite 169 2. |.Z pe!- 2P ;! F+1 0?L (vGv JB fl, 8H Oe esLjB kb peN |/K gkZ O# h& gkZ O#& h&OAi Y=z 0L OJC@. 1. |.Z pe& C[OJC@. 1-161 dLvG :|.Z pe C[;; |mOJC@. 1-163 & 3 e ThinkPad eSATA/USB Secure Hard Drive gk...
  • Seite 170 8H Oe esLj& YC 3$OAi Y=z 0L OJC@. 1. 8H Oe esLj& D;MG gk !IQ USB ?XM, eSATA ?XM GB eSATA/USB ^8 ?X M! ,aOm v0; )#JC@. %CnL Duvz !#v8N x%F !g tZTOY. 1-164 ThinkPad eSATA/USB Secure Hard Drive User Guide...
  • Seite 171 11. Y=; ,/OJC@. 12. <} 9Lm; v$Om |% wK v`; 1CQ D, Y=; ,/OJC@. 13. Oa& ,/OJC@. 14. wK AN<:! OaI 'nv bY.JC@. 8H Oe esLj! NDGm gk !IOT KOY. 1-165 & 3 e ThinkPad eSATA/USB Secure Hard Drive gk...
  • Seite 172 H|OT &E& ,/O) D;M!- 8H Oe esLj& &EOJC@. fm: 8H Oe esLjG %LM +a:; 8eOAi Y=z 0: fl 8H Oe esLj& aWE* NW@AOJC@. v D;M& gkOv JB fl v D;M& Y% gkZM x/O) gkZ |/ bI; gkOB fl 1-166 ThinkPad eSATA/USB Secure Hard Drive User Guide...
  • Seite 173 A: 8H Oe esLj& v?8N Jb-, Rg W wKX_ UOY. Z<Q $8B 1-165 dLvG :8H O e esLj YC 3$ D Jb- W wK;; |mOJC@. Q: Windows gkZ h$; gkO) 8H Oe esLj& Jb- W wKR v V@On? 1-167 © Copyright Lenovo 2010...
  • Seite 174 A: 8H Oe esLj& gkOb |!, O# TB W 8H Oe esLj a] X&! YR C#L JdU OY. 8H Oe esLj! a] X&Gi C:[: C? AN<:& LL OaOT KOY. {s- 8H O e esLj!-B C:[; C?R v x@OY. 1-168 ThinkPad eSATA/USB Secure Hard Drive User Guide...
  • Seite 175 All manuals and user guides at all-guides.com 第 1 章 ThinkPad eSATA/USB Secure Hard Drive について 本書では、ThinkPad eSATA/USB Secure Hard Drive について説明します。 本書の付録には、保証情報と特記事項が含まれています。 注: オプションの取り付けと使用の前には、必ず『 1-171 ページの『取り付けを始める前に』』をお読みくだ さい。 このオプション・パッケージには、次のものが含まれています。 v ThinkPad eSATA/USB Secure Hard Drive v USB データ・ケーブル v USB 電源ケーブル...
  • Seite 176 All manuals and user guides at all-guides.com セキュア・ハードディスク・ドライブのボタン・パネル 以下に、セキュア・ハードディスク・ドライブのボタン・パネルを示します。 ボタン ボタン 3 表示ライト ボタンは、次のような場合に使用します。 v 現在の操作を取り消す v 誤ったパスワードを意図的に入力した前のステップに戻る v 管理者モードを終了する ボタンはセキュア・ハードディスク・ドライブにアクセスする際に使用します。また、次の操作では 「OK」の確認応答としても使用されます。 v パスワードの入力 v 新規パスワードの確認 表示ライトは、次の色を表示して、さまざまなモードの操作を示します。 v 赤: スタンバイ・モード v 青: 管理者モード v 緑: ユーザー・モード また、表示ライトは、セキュア・ハードディスク・ドライブのさまざまな状況を示す表示方式を提供する場 合もあります。詳細については、本書で後述します。 1-170 ThinkPad eSATA/USB Secure Hard Drive User Guide...
  • Seite 177 All manuals and user guides at all-guides.com 第 2 章 ThinkPad eSATA/USB Secure Hard Drive の取り付け 本章では、セキュア・ハードディスク・ドライブの取り付け方法について説明します。 取り付けを始める前に セキュア・ハードディスク・ドライブの取り付けと使用を始める前に、次の情報をよくお読みください。 重要: 本製品に付属のケーブルのみを使用してください。オプション・パッケージに付属されていないケ ーブルを使用すると、ドライブが損傷するおそれがあります。本製品は、AC 電源アダプターを使用せず に、ポータブルでの使用を目的として設計されています。本製品には AC 電源アダプターを接続しないで ください。 v セキュア・ハードディスク・ドライブの損傷を避けるために、取り扱いには十分ご注意ください。ドラ イブを移動したり、使用していないときは、オプションに付属の携帯用ケースに入れてください。 v セキュア・ハードディスク・ドライブの高いパフォーマンスを得るには、USB データ・ケーブル、USB 電源ケーブル、および eSATA データ・ケーブルが、ドライブからコンピューターの USBコネクターに 直接接続されているか、あるいは AC 電源が供給されている USB ハブに接続されていることを確認し...
  • Seite 178 2. データ転送に使用するコネクターに応じて、以下のいずれかを実行します。 v コンピューターの USB コネクターを使用する場合は、USB データ・ケーブルの一方の端をセキュ ア・ハードディスク・ドライブに接続し、もう一方の端をコンピューターの使用可能な別の USB コ ネクターに接続します (下図参照)。 v コンピューターの eSATA/USB コンボ・ コネクター (ThinkPad SL410、SL510、T400s、T410s、T510、および W510 ノートブック・コンピューターに標準装備され ています) を使用する場合は、eSATA データ・ケーブルの一方の端をセキュア・ハードディスク・ド ライブに接続し、もう一方の端をコンピューターの eSATA/USB コンボ・コネクターに接続します (下図参照)。 注: eSATA/USB コンボ・コネクターを使用すると、eSATA データ・ケーブルは、データ・ケーブル および電源コードの両方として同時に機能します。 1-172 ThinkPad eSATA/USB Secure Hard Drive User Guide...
  • Seite 179 All manuals and user guides at all-guides.com v コンピューターの標準の eSATA コネクターを使用する場合は、 USB データ・ケーブルと eSATA データ・ケーブルの両方をセキュア・ハードディスク・ドライブとコンピューターに接続します (下 図参照)。 1-173 第 2 章 ThinkPad eSATA/USB Secure Hard Drive の取り付け...
  • Seite 180 All manuals and user guides at all-guides.com 1-174 ThinkPad eSATA/USB Secure Hard Drive User Guide...
  • Seite 181 All manuals and user guides at all-guides.com 第 3 章 ThinkPad eSATA/USB Secure Hard Drive の使用 本章では、セキュア・ハードディスク・ドライブの使用方法について説明します。 スタンバイ・モード、管理者モード、およびユーザー・モードの開始と終了 このセクションでは、ご使用のセキュア・ハードディスク・ドライブをスタンバイ・モード、管理者モー ド、およびユーザー・モードにする方法とこれらのモードを終了する方法について説明します。 スタンバイ・モードの開始 スタンバイ・モードとは、セキュア・ハードディスク・ドライブのデフォルトの作業モードであり、他の作 業モードへのゲートウェイでもあります。 スタンバイ・モードに入るには、セキュア・ハードディスク・ドライブをコンピューターに接続します。ド ライブは自動的にスタンバイ・モードになり、表示ライトが赤く点灯します。このモードでは、セキュア・ ハードディスク・ドライブはロックされています。セキュア・ハードディスク・ドライブはオペレーティン グ・システムには認識されず、通常の機能や暗号化機能は使用できなくなります。ただし、管理者モードお よびユーザー・モードに入ったり、これらのモードへ切り替えたりすることはできます。 注: 管理者モードおよびユーザー・モードへ切り替えるには、まず、スタンバイ・モードへの切り替えが必 要です。その後、好みのモードに入ることができます。 管理者モードの開始 注: セキュア・ハードディスク・ドライブは、管理者モードではオペレーティング・システムに認識されま せん。 管理者モードに入るには、次のように行います。 1. セキュア・ハードディスク・ドライブをコンピューターに接続します。表示ライトが赤く点灯します。 セキュア・ハードディスク・ドライブがスタンバイ・モードになります。 2. 表示ライトがさらに赤く点滅するまで、...
  • Seite 182 ドディスク・ドライブの完全なリセット』 を参照してください。 ユーザー・モードの終了 ユーザー・モードを終了するには、Microsoft Windows デスクトップの通知領域にある「ハードウェアの安 全な取り外し」アイコンをクリックしてから、コンピューターからセキュア・ハードディスク・ドライブを 取り外します。 パスワードの管理 このセクションでは、管理者モードとユーザー・モードでのパスワードの管理方法について説明します。 管理者パスワードの変更 管理者パスワードは、次のようにして変更することができます。 1. 管理者モードに入ります。 1-175ページの『管理者モードの開始』 を参照してください。 2. 表示ライトが青く点滅するまで + 9 を押し続けます。 3. 新規パスワード (8 桁から 16 桁まで) を入力して、 を押します。表示ライトが 3 度緑色に点滅し ます。 1-176 ThinkPad eSATA/USB Secure Hard Drive User Guide...
  • Seite 183 バイ・モードに戻ります。 ユーザー・パスワードの削除 ユーザー・パスワードは、次のようにして削除することができます。 1. 管理者モードに入ります。 1-175ページの『管理者モードの開始』 を参照してください。 2. 表示ライトが断続的に青く点滅するまで 7 + 8 + を 5 秒間押し続けます。その後、表示ライトが 3 度緑色に点滅してから、断続的に青く点滅します。 3. 表示ライトが 3 秒間緑色のみで点灯してから青色のみに戻るまで、2 回、7 + 8 + を 5 秒間押し 続けます。これにより、ユーザー・パスワードが正常に削除されたことが示されます。 1-177 第 3 章 ThinkPad eSATA/USB Secure Hard Drive の使用...
  • Seite 184 てすべてのユーザー・パスワードを削除してから、管理者パスワードをデフォルトの 12345678 に復元する ことができます。 重要: セキュア・ハードディスク・ドライブを完全にリセットするということは、ドライブ上のすべての データを削除することを意味します。セキュア・ハードディスク・ドライブの区画化とフォーマットには、 ディスク管理アプリケーションが必要です。 セキュア・ハードディスク・ドライブを完全にリセットするには、次のように行います。 1. セキュア・ハードディスク・ドライブを、コンピューターの使用可能な USB コネクター、eSATA コネ クター、または eSATA/USB コンボ・コネクターに接続した状態で ボタンを押したままにしま す。表示ライトが青と赤に交互に点滅します。 注: このステップで 30 秒間何の活動も検出されないと、セキュア・ハードディスク・ドライブはスタ ンバイ・モードに戻ります。 2. 表示ライトが 青のみに点灯してから緑色に点灯し、次に赤の点灯に変わるまで + 2 を 10 秒間押し続けます。続行する前に、ドライブをいったん取り外してから再接続する必要があります。 1-178 ThinkPad eSATA/USB Secure Hard Drive User Guide...
  • Seite 185 の順序にクリックします。 v 「ディスクの初期化と変換ウィザード」ウィンドウが開かない場合は、次のようにします。 a. 「不明のデバイス」を右クリックし、「ディスクの初期化」を選択します。 b. 「ディスクの初期化」ウィンドウで「OK」をクリックします。 7. 未割り当てのセクションの下のブランクの領域を右クリックしてから、「新パーティション」を選択し ます。「新パーティション ウィザードへようこそ」ウィンドウが開きます。 8. 「次へ」をクリックします。 9. 「基本パーティション」をクリックしてから「次へ」をクリックします。 10. 1 つのパーティションしか必要でない場合は、デフォルトの区画サイズを受け入れて「次へ」をクリッ クします。 11. 「次へ」をクリックします。 12. ボリューム・ラベルを作成し、「クイック フォーマットの実行」を選択してから「次へ」をクリック します。 13. 「完了」をクリックします。 14. フォーマット処理が完了するまで待ちます。セキュア・ハードディスク・ドライブが認識され、使用で きるようになります。 1-179 第 3 章 ThinkPad eSATA/USB Secure Hard Drive の使用...
  • Seite 186 7. ThinkVantage ボタンか F11 を押して、Rescue and Recovery ワークスペースに入ります。 8. セキュア・ハードディスク・ドライブに電源が入り、使用可能になると、表示ライトが赤のみに点灯し ます。ユーザー・パスワードを入力して を押し、ユーザー・モードに入ります。セキュア・ハード ディスク・ドライブを使用して、ファイルのレスキューやシステムのリストアを実行できます。 注: Rescue and Recovery の詳細については、以下にアクセスしてください。 http://www.lenovo.com/support オペレーティング・システムからの休止、スタンバイ、またはログオフ Windows オペレーティング・システムから休止、スタンバイあるいはログオフを実行する前に、セキュ ア・ハードディスク・ドライブ上のすべてのファイルが保存され、閉じられていることを確認します。シス テムからの休止、スタンバイ、あるいはログオフを実行する前に、手動でセキュア・ハードディスク・ドラ イブをログオフすることをお勧めします。セキュア・ハードディスク・ドライブをログオフするには、 Windows デスクトップの通知領域にある「ハードウェアの安全な取り外し」をクリックしてから、コンピ ューターからセキュア・ハードディスク・ドライブを取り外します。 重要: セキュア・ハードディスク・ドライブのデータ保全性を確実にするために、以下の場合には必ずセ キュア・ハードディスク・ドライブをロックするか、ログオフするようにしてください。 v コンピューターから離れる。 v ユーザー機能の切り替えを使用して他のユーザーとコンピューターを共有している。 1-180 ThinkPad eSATA/USB Secure Hard Drive User Guide...
  • Seite 187 回答: 新しいユーザー・パスワードを作成できます。新しいユーザー・パスワードを作成するには、次のよ うに行います。 1. 管理者パスワードを使用して管理者モードに入ります。 2. 古いユーザー・パスワードを削除します。 1-177ページの『ユーザー・パスワードの削除』 を参照してく ださい。 3. 新しいユーザー・パスワードを作成します。 1-177ページの『新規ユーザー・パスワードの追加』 を参照 してください。 質問: 管理者パスワードを忘れてしまった場合は、どのようにすればよいですか? 回答: 管理者パスワードは、セキュア・ハードディスク・ドライブの完全なリセット以外に取得し直す方法 はありません。完全なリセットの後は、すべてのデータは消去され、セキュア・ハードディスク・ドライブ を手動で初期化、割り振り、およびフォーマットする必要があります。そうすれば、デフォルトの管理者パ スワード 12345678 を使用できるようになります。 質問: コンピューターを完全にリセットしてユーザー・モードに入った後は、なぜオペレーティング・シス テムがセキュア・ハードディスク・ドライブを認識しなかったのでしょうか? 回答: セキュア・ハードディスク・ドライブを手動で初期化、割り振り、およびフォーマットする必要があ るからです。詳しくは、 1-179 8 ページの『完全なリセット後のセキュア・ハードディスク・ドライブの初期化 とフォーマット』 を参照してください。 1-181 © Copyright Lenovo 2010...
  • Seite 188 質問: なぜ管理者パスワードと同じ桁のユーザー・パスワードを変更できなかったのですか? 回答: 管理者モードでしか変更できないからです。ユーザー・モードでは、管理者モードで作成されたもの と同じ桁のユーザー・パスワードは、変更したり削除したりすることはできません。 質問: なぜ ThinkVantage Rescue and Recovery を使用してリカバリー・メディアを作成できなかったので すか? 回答: セキュア・ハードディスク・ドライブに正しくアクセスされていることを確認してください。それで もリカバリー・メディアを作成できなかった場合は、ご使用のコンピューターのセキュア・ハードディス ク・ドライブを NTFS ファイル・システムでフォーマットし、もう一度作成してみてください。 質問: なぜセキュア・ハードディスク・ドライブを初期化、区画化、あるいはフォーマットできなかったの ですか? 回答: アドミニストレーター権限を持っていることを確認してください。セキュア・ハードディスク・ドラ イブを管理者モードで初期化、区画化、あるいはフォーマットするには、管理者アカウントしか使用できま せん。 質問: なぜセキュア・ハードディスク・ドライブからシステムを起動できなかったのですか? 回答: セキュア・ハードディスク・ドライブの場合は、使用する前に、パスワードの入力とセキュア・ハー ドディスク・ドライブのロック解除に数秒を要します。システムは、セキュア・ハードディスク・ドライブ がロック解除された時点で、すでに起動処理を完了しています。以上の理由から、システムはセキュア・ハ ードディスク・ドライブから起動することができませんでした。 1-182 ThinkPad eSATA/USB Secure Hard Drive User Guide...
  • Seite 189: Appendix A. Service And Support

    Appendix A. Service and Support The following information describes the technical support that is available for your product, during the warranty period or throughout the life of your product. Refer to the Lenovo Limited Warranty for a full explanation of Lenovo warranty terms.
  • Seite 190 ThinkPad (Technical enquiry hotline): 0800-839 (Macau) ThinkPad Service Center: 2871-5399 (Macau) ThinkCentre Commercial PC: 795-9892 (Macau) Multimedia Home PC: 0800-336 (Macau) Colombia Spanish 1-800-912-3021 Costa Rica Spanish 0-800-011-1029 Croatia 0800-0426 Cyprus +357-22-841100 Czech Republic +420-2-7213-1316 ThinkPad eSATA/USB Secure Hard Drive User Guide...
  • Seite 191 All manuals and user guides at all-guides.com Country or Region Language Telephone Number Denmark Danish 7010-5150 (Warranty service and support) Dominican Republic Spanish 1-866-434-2080 Ecuador Spanish 1-800-426911 Egypt +202-35362525 El Salvador Spanish 800-6264 Estonia +372 66 00 800 +372 6776793 Finland Finnish +358-800-1-4260...
  • Seite 192 Swedish 077-117-1040 (Warranty service and support) Switzerland German, 0800-55-54-54 French, (Warranty service and support) Italian Taiwan Mandarin 886-2-8723-9799 0800-000-700 Thailand Thai, 1-800-060-066 (Local number only) English 66 2273 4088 +603 8315 6857 (DID) ThinkPad eSATA/USB Secure Hard Drive User Guide...
  • Seite 193 All manuals and user guides at all-guides.com Country or Region Language Telephone Number Trinidad and Tobago English 1-800-645-3330 Turkey Turkish 00800-4463-2041 United Kingdom English 08705-500-900 (Standard warranty support) United States English 1-800-426-7378 For Aptiva 2270 or NetVista 2276 systems: 1-800-584-9182 Uruguay Spanish 000-411-005-6649...
  • Seite 194 All manuals and user guides at all-guides.com ThinkPad eSATA/USB Secure Hard Drive User Guide...
  • Seite 195 If the product does not function as warranted during the warranty period, you may obtain warranty service by contacting Lenovo or an approved service provider. Each of them is referred to as a ″Service Provider.″ A list of Service Providers and their telephone numbers is available at www.lenovo.com/ support/phone.
  • Seite 196 If your Service Provider determines that it is unable to either repair or replace your product, your sole remedy is to return the product to your place of purchase or to Lenovo for a refund of your purchase price.
  • Seite 197: Appendix B. Lenovo Limited Warranty B

    This warranty is voided by removal or alteration of identification labels on the product or its parts. Limitation of Liability Lenovo is responsible for loss or damage to your product only while it is: 1) in your Service Provider’s possession; or 2) in transit in those cases where the Service Provider is responsible for the transportation.
  • Seite 198: Warranty Information

    Scheduling of service will depend upon the time of your call, parts availability, and other factors. A warranty period of three (3) years on parts and one (1) year on labor means that Lenovo will provide warranty service without charge for: a.
  • Seite 199: Suplemento De Garantía Para México

    Failure to collect the product may result in your Service Provider disposing of the product as it sees fit. For Mail-in Service, the product will be returned to you at Lenovo’s expense, unless your Service Provider specifies otherwise.
  • Seite 200 All manuals and user guides at all-guides.com Manufactured by: Lenovo Centro Tecnológico S. de R.L. de C.V. Boulevar Escobedo #320 Apodaca Technology Park Apodaca, Nuevo León México 66601 Marketing by: Lenovo México S. de R.L. de C.V. Av. Santa Fe 505, Piso 15 Col.
  • Seite 201: Appendix C. Notices

    Consult your local Lenovo representative for information on the products and services currently available in your area. Any reference to a Lenovo product, program, or service is not intended to state or imply that only that Lenovo product, program, or service may be used. Any functionally equivalent product, program, or service that does not infringe any Lenovo intellectual property right may be used instead.
  • Seite 202: Recycling Information

    Collecting and recycling a disused Lenovo computer or monitor If you are a company employee and need to dispose of a Lenovo computer or monitor that is the property of the company, you must do so in accordance with the Law for Promotion of Effective Utilization of Resources.
  • Seite 203: Appendix D. Electronic Emission Notices

    Consult an authorized dealer or service representative for help. Lenovo is not responsible for any radio or television interference caused by using other than specified or recommended cables and connectors or by unauthorized changes or modifications to this equipment.
  • Seite 204 Geräten), bzw. der EMV EG Richtlinie 2004/108/EC (früher 89/336/EWG), für Geräte der Klasse B. Dieses Gerät ist berechtigt, in Übereinstimmung mit dem Deutschen EMVG das EG-Konformitätszeichen - CE - zu führen. Verantwortlich für die Konformitätserklärung nach Paragraf 5 des EMVG ist die Lenovo (Deutschland) GmbH, Gropiusplatz 10, D-70563 Stuttgart.
  • Seite 205 Estados Miembros sobre compatibilidad electromagnética se refiere. Lenovo no puede aceptar responsabilidad alguna si este producto deja de satisfacer dichos requisitos de protección como resultado de una modificación no recomendada del producto, incluyendo el ajuste de tarjetas de opción que no sean Lenovo.
  • Seite 206 All manuals and user guides at all-guides.com ThinkPad eSATA/USB Secure Hard Drive User Guide...
  • Seite 207: Appendix E. Restriction Of Hazardous Substances Directive (Rohs)

    People’s Republic of China. Turkish statement of compliance The Lenovo product meets the requirements of the Republic of Turkey Directive on the Restriction of the Use of Certain Hazardous Substances in Electrical and Electronic Equipment (EEE).
  • Seite 208 All manuals and user guides at all-guides.com ThinkPad eSATA/USB Secure Hard Drive User Guide...
  • Seite 209 All manuals and user guides at all-guides.com...
  • Seite 210 All manuals and user guides at all-guides.com Printed in China...

Diese Anleitung auch für:

57y4400

Inhaltsverzeichnis