DFI NS36-TC Benutzerhandbuch

Verwandte Anleitungen für DFI NS36-TC


Inhaltszusammenfassung für DFI NS36-TC
- Seite 1 NS36-TC NS36-TL Rev. A+ System Board User’s Manual Carte Mère Manuel Pour Utilisateur System-Platine Benutzerhandbuch Tablero Electrónico del Sistema Manual del Usuario 935-NS3601-100 63000232 63000232 1.pmd 9/13/02, 1:35 PM Downloaded from www.Manualslib.com manuals search engine...
-
Seite 2: Trademarks
Copyright This publication contains information that is protected by copyright. No part of it may be reproduced in any form or by any means or used to make any transformation/adaptation without the prior written permission from the copyright holders. This publication is provided for informational purposes only. The manufacturer makes no representations or warranties with respect to the contents or use of this manual and specifically disclaims any express or implied warranties of merchantability or fitness for any... - Seite 3 Battery: • Danger of explosion if battery incorrectly replaced. • Replace only with the same or equivalent type recommend by the manufacturer. • Dispose of used batteries according to the batter y manufacturer’s instructions. Joystick or MIDI port: • Do not use any joystick or MIDI device that requires more than 10A current at 5V DC.
- Seite 4 Chapter 4 Deutsch (German)..........Chapter 5 Español (Spanish)..........Note: This user’s manual is for the NS36-TC and NS36-TL system boards. The only difference between these boards is the NS36-TL system board supports onboard LAN. 63000232 1.pmd 9/13/02, 1:35 PM Downloaded from www.Manualslib.com...
-
Seite 5: Inhaltsverzeichnis
Quick Setup Guide Chapter 1 - Quick Setup Guide Table of Contents 1.1 System Board Layout....................1.2 Jumpers............................. 1.3 Rear Panel I/O Ports....................1.4 I/O Connectors........................ 1.5 Award BIOS Setup Utility..................63000232 1.pmd 9/13/02, 1:35 PM Downloaded from www.Manualslib.com manuals search engine... -
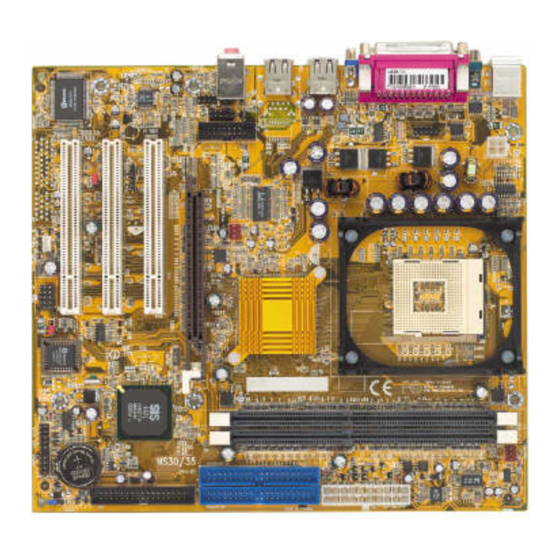
Seite 6: System Board Layout
PCI (JP6) Battery PCI 3 Slot chip BIOS ATX-SW PWR-LED G-SW HD-LED SPEAKER RESET Wake-On-LAN (J23) USB 5 & 6 (J25) Square denotes pin 1 Clear CMOS (JP5) NS36-TC 63000232 1.pmd 9/13/02, 1:35 PM Downloaded from www.Manualslib.com manuals search engine... - Seite 7 Quick Setup Guide +12V power CPU fan (ATXP1) (J1) Socket 478 COM 1 (J4) Parallel (J5) 10 9 COM 2 (J6) DIMM standby power VGA (J7) Front audio (J10) 1615 10 9 Game/MIDI System fan (J13) (J12) DDR SDRAM CD-in DIMM 1 (J16) AGP Slot...
-
Seite 8: Jumpers
Quick Setup Guide 1.2 Jumpers 1.2.1 Clear CMOS Data - JP5 1-2 On: Clear CMOS Data 2-3 On: Normal (default) Clear CMOS (JP5) 1.2.2 Jumper Settings for Selecting the USB 5/6 Power - JP3 1-2 On: Disabled - VCC 2-3 On: Enabled - 5V_DUL (default) Power select... - Seite 9 Quick Setup Guide 1.2.3 Jumper Settings for 3.3VSB Standby for PCI - JP6 On: Default 3.3VSB Standby Power to PCI Slots - PCI 2.2 spec. Off: Non-PCI 2.2 spec. 3.3VSB standby for PCI (JP6) 63000232 1.pmd 9/13/02, 1:35 PM Downloaded from www.Manualslib.com manuals search engine...
-
Seite 10: Rear Panel I/O Ports
ATX Double Deck Ports on NS36-TL PS/2 Parallel Mouse Mic-in USB 2 USB 4 Line-in Line-out PS/2 COM 1 USB 1 USB 3 ATX Double Deck Ports on NS36-TC 63000232 1.pmd 9/13/02, 1:36 PM Downloaded from www.Manualslib.com manuals search engine... - Seite 11 Quick Setup Guide 1.3.1 PS/2 Mouse and PS/2 Keyboard Ports PS/2 Mouse PS/2 Keyboard Make sure to turn off your computer prior to connecting or disconnecting a mouse or keyboard. Failure to do so may damage the system board. 1.3.2 Serial Port COM 1 Serial Port COM 2...
- Seite 12 Quick Setup Guide 1.3.3 Parallel Port Parallel Port 1.3.4 VGA Port VGA Port 63000232 1.pmd 9/13/02, 1:36 PM Downloaded from www.Manualslib.com manuals search engine...
- Seite 13 Quick Setup Guide 1.3.5 Universal Serial Bus Ports USB 2 USB 1 USB 4 USB 3 USB 5 & 6 (J25) Additional USB Ports (USB 5 and USB 6) 1 VCC 6 VCC 11 Ground 2 UP5- 7 UP6- 12 Ground 3 UP5+ 8 UP6+ 13 UP5+...
- Seite 14 Quick Setup Guide 1.3.6 RJ45 Fast-Ethernet Port (NS36-TL only) RJ45 LAN 1.3.7 Audio Jacks Mic-in Line-in Line-out Front audio (J10) Front Audio (J10) Mic+ N.C. Ground N.C. N.C. 4 AuD_Vcc (Avcc) AuD_L_Out AuD_R_Out 10 N.C. 63000232 1.pmd 9/13/02, 1:36 PM Downloaded from www.Manualslib.com manuals search engine...
-
Seite 15: I/O Connectors
Quick Setup Guide 1.4 I/O Connectors 1.4.1 Game/MIDI Port Game/MIDI (J13) 1.4.2 Internal Audio Connectors CD-in / AUX-in 1 Left audio channel 2 Ground 3 Ground 4 Right audio channel CD-in (J16) AUX-in (J15) 63000232 1.pmd 9/13/02, 1:36 PM Downloaded from www.Manualslib.com manuals search engine... - Seite 16 Quick Setup Guide 1.4.3 Floppy and IDE Disk Drive Connectors Secondary Primary IDE (J17) IDE (J18) FDD (J22) If you encountered problems while using an ATAPI CD-ROM drive that is set in Master mode, please set the CD-ROM drive to Slave mode. Some ATAPI CD-ROMs may not be recognized and cannot be used if incorrectly set in Master mode.
- Seite 17 Quick Setup Guide 1.4.5 Fan Connectors CPU fan (J1) CPU Fan 1 Ground 2 Power 3 Sense System Fan System fan (J12) 1 Ground 2 Power 3 Sense 1.4.6 Wake-On-LAN Connector 1 +5VSB 2 Ground 3 WOL Wake-On-LAN (J23) The 5VSB power source of your power supply must support ≥720mA. 63000232 1.pmd 9/13/02, 1:36 PM Downloaded from...
- Seite 18 Quick Setup Guide 1.4.7 DIMM Standby Power LED DIMM standby power LED Lighted LEDs serve as a reminder that you must power-off the system then turn off the power supply’s switch or unplug the power cord prior to installing any memory modules or add-in cards. 63000232 1.pmd 9/13/02, 1:36 PM Downloaded from...
-
Seite 19: Power Connector
Quick Setup Guide 1.4.8 Power Connector +12V power (ATXP1) ATX Power (J8) ATX Main Power Connector +12V Power Connector Function Function Function 3.3V 3.3V Ground 3.3V -12V Ground Ground Ground +12V PS-ON +12V Ground Ground Ground Ground Ground PW-OK 5VSB +12V 63000232 1.pmd 9/13/02, 1:36 PM... - Seite 20 Quick Setup Guide 1.4.9 Front Panel Connectors PWR-LED G-SW ATX-SW HD-LED SPEAKER RESET Pin Assignment HD-LED HDD LED Power (Primary/Secondary IDE LED) Reserved N. C. N. C. ATX-SW PWRBT+ (ATX power switch) PWRBT- G-SW Ground (Green switch) Green switch RESET Ground (Reset switch) H/W Reset...
-
Seite 21: Award Bios Setup Utility
Quick Setup Guide 1.5 Award BIOS Setup Utility 1.5.1 Main Menu Phoenix - AwardBIOS CMOS Setup Utility Standard CMOS Features Frequency/Voltage Control Advanced BIOS Features Load Fail-Safe Defaults Advanced Chipset Features Load Optimized Defaults Integrated Peripherals Set Supervisor Password Power Management Setup Set User Password PnP/PCI Configurations Save &... -
Seite 22: Advanced Bios Features
Quick Setup Guide 1.5.3 Advanced BIOS Features Phoenix - AwardBIOS CMOS Setup Utility Advanced BIOS Features Item Help Virus Warning Disabled CPU L1 & L2 Cache Enabled Menu Level Fast Quick Power On Self Test First Boot Device Floppy Allows you to choose Second Boot Device HDD-0 the VIRUS warning... -
Seite 23: Integrated Peripherals
Quick Setup Guide 1.5.5 Integrated Peripherals Phoenix - AwardBIOS CMOS Setup Utility Integrated Peripherals Item Help SIS OnChip IDE Device Press Enter SIS OnChip PCI Device Press Enter Menu Level Onboard Super IO Device Press Enter IDE HDD Block Mode Disabled Init Display First PCI Slot... -
Seite 24: Pnp/Pci Configurations
Quick Setup Guide 1.5.7 PnP/PCI Configurations Phoenix - AwardBIOS CMOS Setup Utility PnP/PCI Configurations Item Help Reset Configuration Data Disabled Menu Level Resources Controlled By Auto(ESCD) IRQ Resources Press Enter Default is Disabled. Select Enabled to PCI/VGA Palette Snoop Disabled reset Extended System Configuration Data (ESCD) when you exit... -
Seite 25: Frequency/Voltage Control
Quick Setup Guide 1.5.9 Frequency/Voltage Control Phoenix - AwardBIOS CMOS Setup Utility Frequency/Voltage Control Item Help CPU Clock Ratio Auto Detect DIMM/PCI Clk Enabled Menu Level Spread Spectrum Modulated +/- 0.25% CPU Host/SDRAM/PCI Clock Default ↑↓→← Move Enter:Select +/-/PU/PD:Value ESC:Exit F1:General Help F10:Save F5:Previous Values... -
Seite 26: Chapter 2 - English
English Chapter 2 - English Table of Contents 2.1 Features and Specifications..................2.2 Using the Suspend to RAM Function............2.3 Supported Softwares....................2.4 Troubleshooting......................... Package Checklist The system board package contains the following items: The system board A user’s manual One card-edge bracket mounted with 1 serial port and 1 game/MIDI port One IDE cable for ATA/33, ATA/66, ATA/100 or ATA/133 IDE... -
Seite 27: Features And Specifications
English 2.1 Features and Specifications 2.1.1 Features Chipset • SiS 651/962L ® Processor The system board is equipped with Socket 478 for installing a Pentium ® 4 or Celeron ® processor. • Intel ® Pentium ® 4 processor (478-pin) 533MHz system data bus - supports up to 2.53 GHz CPU speed 400MHz system data bus - supports up to 2.4 GHz CPU speed... - Seite 28 English Expansion Slots The system board is equipped with 1 universal AGP slot, 3 PCI slots. AGP is an interface designed to support high performance 3D graphics cards. It utilizes a dedicated pipeline to access system memory for texturing, z-buffering and alpha blending. The universal AGP slot supports AGP 2x with up to 533MB/sec.
- Seite 29 English Rear Panel I/O Ports (PC 99 color-coded connectors) • Four USB 2.0/1.1 ports • One RJ45 LAN port (NS36-TL only) • One NS16C550A-compatible DB-9 serial port • One DB-15 VGA port • One DB-25 parallel port • One mini-DIN-6 PS/2 mouse port •...
- Seite 30 English USB Ports The system board supports 6 USB 2.0/1.1 ports. USB 1.1 supports 12Mb/second bandwidth while USB 2.0 supports 480Mb/second bandwidth providing a marked improvement in device transfer speeds between your computer and a wide range of simultaneously accessible external Plug and Play peripherals. BIOS •...
- Seite 31 English 2.1.3 Intelligence Dual Function Power Button Depending on the setting in the “Soft-Off By PWRBTN” field of the Power Management Setup, this switch will allow the system to enter the Soft-Off or Suspend mode. Wake-On-LAN The Wake-On-LAN function allows the network to remotely wake up a Soft Power Down (Soft-Off) PC.
- Seite 32 English RTC Timer to Power-on the System The RTC installed on the mainboard allows your system to auto- matically power-on on the set date and time. ACPI STR The mainboard is designed to meet the ACPI (Advanced Configura- tion and Power Interface) specification. ACPI has energy saving fea- tures that enables PCs to implement Power Management and Plug- and-Play with operating systems that support OS Direct Power ®...
-
Seite 33: Using The Suspend To Ram Function
English 2.2 Using the Suspend to RAM Function ® ® ® ® ® If you are using the Windows 98 operating system, please follow the steps below. Select “Power Management Setup” in the main menu screen and press <Enter>. In the “ACPI Function” field, select “Enabled”. In the “ACPI Suspend Type”... - Seite 34 English 11. Click the Advanced tab. In the “When I press the power button on my computer” field, select “Standby”. 12. After completing the steps above and you want to power-off the computer, you do not need to go through the process of closing files, applications and operating system.
-
Seite 35: Supported Softwares
English 2.3 Supported Softwares 2.3.1 SiS AGP Driver The SiS AGP driver includes the SIS VxD driver and SiS Miniport driver. To install the AGP driver, please follow the steps below. 1. On the left side of the autorun screen, click the “CHIPSET” icon. 2. - Seite 36 English 2.3.4 SiS USB 2.0 Drivers To install the USB 2.0 driver, please follow the steps below. 1. On the left side of the autorun screen, click the “USB” icon. 2. Click “SiS USB 2.0 Drivers” on the main screen. 3.
- Seite 37 English 2.3.7 Microsoft DirectX 8.1 Driver To install, please follow the steps below. 1. On the left side of the autorun screen, click the “TOOLS” icon. 2. Click “Microsoft DirectX 8.1” on the main screen. 3. Click “Yes” to continue. 4.
-
Seite 38: Hardware Monitor
"Autorun" did not automatically start (which is, the Main Board Utility CD screen did not appear), please go directly to the root directory of the CD and double-click "Setup". 2. Please go to DFI's web site at "http://www.dfi.com/support1/ download2.asp" for the latest version of the drivers or software applications. -
Seite 39: Troubleshooting
English 2.4 Troubleshooting This section of the manual is designed to help you with problems that you may encounter with your personal computer. To efficiently troubleshoot your system, treat each problem individually. This is to ensure an accurate diagnosis of the problem in case a problem has multiple causes. -
Seite 40: Power Supply
English The picture seems to be constantly moving. 1. The monitor has lost its vertical sync. Adjust the monitor’s vertical sync. 2. Move away any objects, such as another monitor or fan, that may be creating a magnetic field around the display. 3. -
Seite 41: Parallel Port
English Hard Drive Hard disk failure. 1. Make sure the correct drive type for the hard disk drive has been entered in the BIOS. 2. If the system is configured with two hard drives, make sure the bootable (first) hard drive is configured as Master and the second hard drive is configured as Slave. -
Seite 42: Mainboard
English serial port that is working and configured correctly. If the serial device does not work, either the cable or the serial device has a problem. If the serial device works, the problem may be due to the onboard I/O or the address setting. 4. - Seite 43 Français (French) Chapter 3 - Français (French) Table des Matières 3.1 Caractéristiques et Spécifications..............3.2 Utilisation de la Fonction de Suspension sur RAM......3.3 Logiciels Supportés......................3.4 Dépannage..........................Liste de Vérification de l’Emballage L’emballage de la carte système contient les éléments suivants: ! La carte système ! Un manuel utilisateur ! Un crochet de bord de carte avec un port série et jues/MIDI...
-
Seite 44: Caractéristiques Et Spécifications
Français (French) 3.1 Caractéristiques et Spécifications 3.1.1 Caractéristiques Chipset • SiS 651/962L ® Processeur La carte est pourvue d’un Socket 478 permettant d’exploiter un processeur Pentium 4 ou processeur Celeron ® ® • Processeur Intel Pentium 4 (478 broches) ® ®... - Seite 45 Français (French) Caractéristiques Graphiques sur Carte ® ® • La solution SiS 315 VGA est integrée dans la puce SiS • Accelerateur graphique intégré Real256TM 2D/3D Pipelines de definition 2 pixels et moteur graphique 3D, 4 texture Technologie Ultra-AGPII delivrant un AGP 4x equivalent à une bande passantede 2GB/s.
- Seite 46 Français (French) I/O Connecteurs • 1 connecteurs pour 2 ports externe USB 2.0/1.1 • 1 connecteur 9 broches pour 1 port série externe • 1 connecteur pour externe jues/MIDI port • 1 connecteur pour prises ligne de sortie et entrée micro externe •...
- Seite 47 Français (French) BIOS ® • Compatible avec Award BIOS, Windows 98/2000/ME/XP Plug and Play • Supporte l’amorçage séquentiel SCSI • EPROM Flash pour une mise à niveau facile du BIOS • Supporte la fonction DMI 2.0 • Mémoire Flash 2Mbit Interface de Gestion de Bureau (DMI) La carte système est livrée avec un DMI 2.0 intégré...
- Seite 48 Français (French) 3.1.2 System Health Monitor Fonctions La carte système est capable de gérer les conditions de “santé système” suivantes. • Gère l’alarme de température et de surchauffe de CPU/système • Gère l’alarme de voltage et d’échec de CPU/3.3V/5V/±12V/ VBAT/5VSB •...
- Seite 49 Français (French) • La source d’alimentation 5VSB de votre boîtier d’alimentation doit supporter ≥ 720mA. Eveil Clavier USB (Wake-On-USB Keyboard/Mouse) La fonction vous permet d’utiliser un appareil clavier USB pour éveiller un système se trouvant en état S3/S4/S5. Important: • Si vous utilisez les fonctions Eveil Clavier USB (Wake-On-USB Keyboard) pour 2 ports USB, la source d’alimentation 5VSB de votre bloc d’alimentation doit supporter ≥...
- Seite 50 Français (French) Aléatoire) lorsque qu’il s’éteint. La session d’utilisation reprendra exactement où vous l’avez laissée la prochaine fois que vous allumerez le système. Important: La source d’alimentation 5VSB de votre boîtier d’alimentation doit supporter ≥ 1A. Récupération après Défaillance d’Alimentation CA Quand l’alimentation revient après une défaillance d’alimentation CA, vous pouvez choisir d’allumer le système manuellement, de laisser le système s’allumer automatiquement ou de retourner à...
-
Seite 51: Utilisation De La Fonction De Suspension Sur Ram
Français (French) 3.2 Utilisation de la Fonction de Suspension sur ® Si vous utilisez le système d’opération Windows 98, veuillez suivre les étapes suivantes. Sélectionnez “Power Management Setup” dans l’écran de programme principal et appuyez sur <Enter>. Dans le champ “ACPI Function”, sélectionnez “Enabled”. Dans le champ “ACPI Suspend Type”, sélectionnez “S3(STR)”. - Seite 52 Français (French) 11. Cliquez sur l’onglet Avancé. Dans le champ “Quand j’appuie sur le bouton d’alimentation de mon ordinateur”, sélectionnez “Mise en Veille”. 12. Après avoir réalisé les étapes ci-dessus et si vous voulez éteindre l’ordinateur, vous n’avez pas besoin de passer par le processus de fermeture des fichiers, des applications et du système d’exploitation.
-
Seite 53: Logiciels Supportés
Français (French) 3.3 Logiciels Supportés 3.3.1 Driver de SiS AGP Le driver SiS AGP comprend le driver SIS VxD et le driver SIS Miniport. Veuillez suivre les étapes ce-dessous pour installer le conduteur AGP : 1. Cliquer l’icône “CHIPSET” du gauche de l’écran d’autorun. 2. - Seite 54 Français (French) 3.3.4 SiS USB 2.0 Drivers Veuillez suivre les étapes ce-dessous pour installer le conduteur USB 2.0 : 1. Cliquer l’icône “USB” du gauche de l’écran d’autorun. 2. Cliquer le “SiS USB 2.0 Drivers” dans l’ écran principal. 3. Cliquer le “Yes” pour continuer. 4.
- Seite 55 Français (French) 3. Suivre les commandes promptes dans l’ écran pour finir l’installation. 4. Redémarrer le système . 3.3.7 Driver de Microsoft DirectX 8.1 Veuillez suivre les étapes ce-dessous pour installer le conduteur DirectX 8.1 : 1. Cliquer l’icône “TOOLS” du gauche de l’écran d’autorun. 2.
- Seite 56 Français (French) 3.3.9 Utilitaire Hardware Monitor La carte système est livrée avec un utilitaire de “Hardware Monitor” contenu dans le CD fourni. Il peut gérer les conditions du système du matériel telle que la température du CPU et du système, le voltage et la vitesse des ventilateurs.
- Seite 57 CD Main Board Utility n’apparaîtra pas), veuillez aller directement au répertoire racine du CD et double cliquez sur “Setup”. 2. Veuillez vous rendre sur le site web de DFI à "http:// www.dfi.com/support1/download2.asp" pour trouver la dernière version des pilotes ou logiciel d’applications.
-
Seite 58: Dépannage
Français (French) 3.4 Dépannage Ce chapitre du manuel est destiné à vous aider résoudre les problèmes éventuels que vous pourriez rencontrer avec votre ordinateur. Pour dépanner efficacement votre système, traitez chaque problème individuellement. Ceci permettra de faire un diagnostique exact du problème dans le cas ou celui-ci aurait des causes multiples. Certains des points les plus courants, à... - Seite 59 Français (French) L’image bouge constamment. 1. Le moniteur a perdu sa synchronisation verticale. Ajustez la synchronisation verticale du moniteur. 2. Eloignez tous les objets, tel qu’un autre moniteur ou un ventilateur, qui pourrait créer un champ magnétique autour de l’affichage. 3.
-
Seite 60: Disque Dur
Français (French) 4. L’espace est insuffisant sur la disquette. Utilisez une autre disquette comportant un espace de stockage adéquat. Disque Dur Défaillance du disque dur. 1. Assurez vous que le type correct de lecteur pour le disque dur a été entré dans le BIOS. 2. -
Seite 61: Port Série
Français (French) Port Série Le périphérique série (modem, imprimante) n’émet aucun caractère ou émet des caractères incohérents. 1. Assurez vous que le périphérique série est allumé et qu’il est en ligne. 2. Vérifiez que le périphérique est branché sur le port série correct au dos de l’ordinateur. - Seite 62 Deutsch (German) Chapter 4 - Deutsch (German) Inhaltsverzeichnis 4.1 Leistungsmerkmale und Technische Daten..........4.2 Anwendung der Funktion “Suspendieren auf RAM”...... 4.3 Unterstützte Software....................4.4 Fehlersuche..........................Verpackungsliste In der Verpackung der Systemplatine sind folgende Artikel enthalten: ! Eine Systemplatine ! Ein Benutzerhandbuch ! Eine Halterung mit Kartenkante und mit einem seriellen Anschluß...
-
Seite 63: Leistungsmerkmale Und Technische Daten
Deutsch (German) 4.1 Leistungsmerkmale und Technische Daten 4.1.1 Leistungsmerkmale Chipset • SiS 651/962L ® Prozessor ® Das Systemboard ist mit Socket 478 zur Installation eines Pentium ® 4-Prozessors ausgerüstet. und Prozessors Celeron ® ® • Intel Pentium 4 Prozessor (478-polige) - 533MHz Systemdatenbus - unterstützt up to 2.53 GHz CPU speed 400MHz Systemdatenbus - unterstützt up to 2.4 GHz CPU... - Seite 64 Deutsch (German) Erweiterungssteckfasssungen Die Hauptplatine ist ausgerüstet mit 1 Universal-AGP-Einbauplatz, 3 PCI-Einbauplätzen. AGP ist eine Schnittstelle, die zum Unterstützen der Hochleistungs- 3D-Grafikkarten bestimmt ist und die für den Zugriff zum Speicher für die Textur, das Z-Puffern und Alpha-Mischen eine dedizierte Leitung verwendet.
- Seite 65 Deutsch (German) Ein-/Ausgabe-Porte an der Rückwand (PC 99 mit farbkodierten Steckverbindungen) • 4 USB2.0/1.1-Anschlüsse • 1 RJ45 LAN-Anschluß (NS36-TL nur für) • 1 serieller DB-9-Anschluß, kompatibel mit NS16C550A • 1 DB-15-VGA-Anschluß • 1 DB-25-Parallelanschluß • 1 Mini-DIN-6-Anschluß für eine PS/2-Maus •...
- Seite 66 Deutsch (German) IrDA-Schnittstelle Die Systemplatine ist mit einem IrDA-Anschluß versehen, durch welche eine kabellose Verbindung zwischen Ihrem Computer und Peripheriegeräten hergestellt werden kann. USB-Anschlüsse USB 1.1 unterstützt 12Megabit/Sekunde Bandbreite, während USB 2.0 480Megabit/Sekunde Bandbreite unterstützt, was eine spürbare Verbesserung der Geräteübertragungs-Geschwindigkeiten zwischen Ihrem Computer und einem breiten Sortiment von simultanzzugreifbaren externen Plug und Play Peripheriegeräten bietet.
-
Seite 67: Intelligente Ausstattungsteile
Deutsch (German) • Überwachung der Spannungen des CPU/3.3V/5V/±12V/VBAT/ 5VSB-Spannungen sowie Warnsignal bei Ausfall • Überwachung der Geschwindigkeit des CPU- und System- Ventilators und sendet ein Warnsignal bei einem Ausfall aus • Automatisches Ein-/Ausschalten der des System-ventilator • Anzeige der Temperatur, Spannung und der Geschwindigkeit des Ventilators 4.1.3 Intelligente Ausstattungsteile Netzschalter mit doppelter Funktion... - Seite 68 Deutsch (German) Wecken bei USB-Tastatur (Wake-On-USB Keyboard) Mit der Funktion können Sie ein System mit einem USB-Tastatur- Gerät aus dem S3/S4/S5-Status aufwecken. Wichtig: • Falls Sie die Wecken bei USB-Tastatur-Funktion für 2 USB- Anschlüsse, unterstützt die 5VSB-Stromquelle Ihres Netzgerätes eine Leistung von ≥ 1.5A. •...
- Seite 69 Deutsch (German) Wichtig: Die 5VSB-Stromquelle Ihres Netzgerätes muß eine Leistung von ≥ 1A unterstützen. Wiederherstellung der Wechselstromversorgung nach einem Ausfall Bei der Wiederherstellung der Stromversorgung nach einem Ausfall kann das System entweder manuell oder automatisch eingeschaltet werden, oder Sie können den Betrieb des Systems an der Stelle fortsetzen, wo der Betrieb durch den Stromausfall unterbrochen wurde.
-
Seite 70: Anwendung Der Funktion "Suspendieren Auf Ram
Deutsch (German) 4.2 Anwendung der Funktion “Suspendieren auf RAM” ® Wenn Sie das Betriebssystem von Windows 98 verwenden, befolgen Sie bitte die Schritte unten. “Power Management Setup” in dem Hauptbildschirm auswählen, und die <Enter> drücken. Im Feld “ACPI Function” wählen Sie “Enabled” aus. Im Feld “ACPI Suspend Type”... - Seite 71 Deutsch (German) 11. Auf das Register “Erweitert” klicken. Im Feld “Beim Drücken der Netztaste des PCs” wählen Sie “Standby” aus. 12. Nachdem Sie die obigen Schritte ausgeführt haben und den PC ausschalten möchten, muß der Vorgang zum Schließen der Dateien, Anwendungen und des Betriebssystems nicht ausgeführt werden.
-
Seite 72: Unterstützte Software
Deutsch (German) 4.3 Unterstützte Software 4.3.1 SiS-AGP-Treiber Der SiS-AGP-Treiber enthält den SIS-VxD-Treiber und den SiS- Miniport-Treiber. Befolgen Sie bitte die Schritte unten, um den AGP Treiber zu installieren: 1. Klicken Sie an der linken Seite des Autoausführungs-Bildschirms das “CHIPSET”-Ikon. 2. Klicken Sie “SiS AGP Drivers” auf dem Hauptbildschirm. 3. -
Seite 73: Sis-Lan-Treibers Für Windows (Ns36-Tl Nur Für)
Deutsch (German) 3. Befolgen Sie die Bereitmeldungen auf dem Bildschirm, um die Installation zu beenden. 4. Starten Sie das System neu. 4.3.4 SiS USB 2.0 Drivers Befolgen Sie bitte die Schritte unten, um den USB 2.0 Treiber zu installieren: 1. Klicken Sie an der linken Seite des Autoausführungs-Bildschirms das “USB”-Ikon. -
Seite 74: Mcafee Virenabtastung-Online
Deutsch (German) 4.3.6 SiS-IDE-Treiber Befolgen Sie bitte die Schritte unten, um den IDE Treiber zu installieren: 1. Klicken Sie an der linken Seite des Autoausführungs-Bildschirms das “TOOLS”-Ikon. 2. Klicken Sie “SiS IDE Drivers for WIN 2000/XP” auf dem Hauptbildschirm. 3. Befolgen Sie die Bereitmeldungen auf dem Bildschirm, um die Installation zu beenden. - Seite 75 Deutsch (German) 2. Klicken Sie “McAfee VirusScan Online” auf dem Hauptbildschirm. 3. Klicken Sie “Ja”, um fortzusetzen. 4. Befolgen Sie die Bereitmeldungen auf dem Bildschirm, um die Installation zu beenden. 5. Starten Sie das System neu. 4.3.9 Hardware Monitor-Dienstprogramm Die Systemplatine wurde mit dem Dienstprogramm für das “Hardware Monitor”...
- Seite 76 CD mit Main Board Utility für die Hauptplatine erscheint nicht), gehen Sie direkt zum Stammverzeichnis der CD und doppelklicken Sie auf “Setup”. 2. Auf der DFI-Webseite "http://www.dfi.com/suppor t1/ download2.asp" finden Sie die neuste Version der Treiber oder Software-Anwendungsprogramme.
-
Seite 77: Fehlersuche
Deutsch (German) 4.4 Fehlersuche In diesem Kapitel finden Sie Hinweise zum Lösen von Problemen, die bei der Benutzung Ihres PCs auftreten können. Für eine erfolgreiche Fehlersuche in Ihrem System behandeln Sie jede Störung einzeln, um eine genaue Diagnose der Störung sicherzustellen, falls eine Störung mehrere Ursachen hat. -
Seite 78: Stromversorgung
Deutsch (German) Das Bild scheint sich ständig zu bewegen. 1. Der Monitor hat seine vertikale Synchronisation verloren. Stellen Sie diese ein. 2. Entfernen Sie sämtliche Gegenstände, wie z.B. einen anderen Monitor oder einen Ventilator, die ein Magnetfeld um den Bildschirm erzeugen können. 3. -
Seite 79: Parallelanschluß
Deutsch (German) 4. Nicht genügend Speicherplatz auf der Diskette. Benutzen Sie eine andere Diskette, auf der genügend Speicherplatz vorhanden ist. Festplattenlaufwerk Ausbleiben der Funktion des Festplattenlaufwerks. 1. Stellen Sie sicher, daß der richtige Laufwerktyp für das Festplattenlaufwerk im BIOS eingegeben wurde. 2. -
Seite 80: Serieller Anschluß
Deutsch (German) Serieller Anschluß Das serielle Gerät (Modem, Drucker) reagiert nicht oder gibt unleserliche Zeichen wieder. 1. Stellen Sie sicher, daß das serielle Gerät eingeschaltet und es online ist. 2. Stellen Sie sicher, daß das Gerät an den richtigen seriellen Anschluß... - Seite 81 Deutsch (German) 5. Falls die Funktion der Platine ausbleibt, legen Sie diese auf eine ebene Oberfläche und lokalisieren sämtliche eingesteckte Komponente. Drücken Sie jede Komponente behutsam in den Steckplatz. 6. Falls Sie die BIOS-Einstellungen abgeändert haben, gehen Sie erneut zum Setup und laden die BIOS-Standardeinstellungen. 63000232 4.pmd 9/10/02, 5:05 PM Downloaded from...
- Seite 82 Español (Spanish) Chapter 5 - Español (Spanish) Tabla de los Contenidos 5.1 Características y Especificaciones............... 5.2 Utilizando la Función de Suspender a RAM.......... 5.3 Softwares Soportados....................5.4 Investigación de Conflictos..................Lista de Chequeo del Paquete El paquete del tablero de sistema contiene los siguientes artículos: ! El tablero de sistema ! Un manual de usuario ! Un sostén de tarjeta-filo con puerto de serie y puerto de juego/...
-
Seite 83: Características Y Especificaciones
Español (Spanish) 5.1 Características y Especificaciones 5.1.1 Características Chipset • SiS 651/962L ® Procesador La tarjeta madre del sistema esta equipada con un zócalo o enchufe 478 para instalar un procesador Pentium ® 4 y procesador Celeron ® • Procesador Intel ®... - Seite 84 Español (Spanish) Ranuras de Expansión La tarjeta maderna está equipado con un slot de AGP universal, 3 slots de PCI. AGP es un interfaz diseñado para apoyar alta ejecución de tarjetas de gráficas de 3D. Este utiliza conducto dedicado para acceder la memoria de sistema para textuarizar, z-tampón y mezcla alfa.
- Seite 85 Español (Spanish) Panel de reverso de conectores de entrada - salida (Conectores de PC 99 color-cifrado) • 4 puertos de USB2.0/1.1 • 1 puertos de RJ45 LAN (NS36-TL sólo) • 1 puerto de serie DB-9 NS16C550A-compatible • 1 puerto de VGA DB-15 •...
- Seite 86 Español (Spanish) Interfaz de IrDA El tablero de sistema es equipado con el conector de IrDA para la conexión de radiotelegráfico entre su computadora y dispositivos de periferia. Puertos de USB USB 1.1 Soportes con ancho banda de 12Md/segundo mientra USB 2.0 soportes con ancho banda 480Mb/segundo proveniente un marca progreso diseñado con una velocidad transferida entre su computador y un rango ancho de enchufe external accesible y juegos periferias...
- Seite 87 Español (Spanish) • Control de encendido/apagado del abanico de system automático • Lea la capacidad de vuelta que presenta la temperatura, voltaje y velocidad del abanico Si usted desea el mensaje de advertencia de extraerse o una alarma de advertencia de sonar cuando ocurre una condición anormal, usted debe instalar la “Hardware Monitor”.
- Seite 88 Español (Spanish) Teclado de USB Activo La función le permite de usar el teclado de USB para activar un sistema que esta en el S3/S4/S5 estado. Importante: • Si usted está utilizando la función de Teclado de USB Activo para los 2 puertos de USB, el origen de poder de 5VSB de su fuente de poder debe soportar ≥...
- Seite 89 Español (Spanish) Importante: El origen de energía de 5VSB de su fuente de alimentación debe soportar ≥ 1A. Recuperación de Fracaso de Energía AC Cuando la energía vuelve después del fracaso de energía AC, usted puede elegir a encender su sistema manualmente, dejar el sistema de encender automáticamente o volver al estado donde usted dejó...
- Seite 90 Español (Spanish) 5.2 Utilizando la Función de Suspender a RAM ® ® ® ® ® Si usted está utilizando el sistema operativo de Windows 98, favor de seguir los pasos de abajo. Selecciona “Power Management Setup” en la pantalla del menú principal y presiona <Enter>.
- Seite 91 Español (Spanish) 12. Después de completar los pasos de arriba y usted desea apagar la computadora, usted no necesita de ir por el proceso de encerrar los archivos, aplicaciones y sistema operativo. Usted puede apagar la computadora una vez por presionando el botón de energía o seleccionando “Preparado”...
- Seite 92 Español (Spanish) 5.3 Softwares Soportados 5.3.1 Driver de SiS AGP El driver de SiS AGP incluido el driver de SIS VxD y el driver de SiS Miniport. Para instalar el programa controladores de AGP, por favor siga los siguientes pasos: 1.
- Seite 93 Español (Spanish) 2. Haga clic en la opción “Realtek Audio Drivers” en la pantalla principal. 3. Siga los avisos en la pantalla para completar la instalación. 4. Encender de nuevo la computadora. 5.3.4 Driver de SiS USB 2.0 Drivers Para instalar el programa controladores de version 2.0 de USB, por favor siga los siguientes pasos: 1.
- Seite 94 Español (Spanish) 5.3.6 Driver de SiS IDE Para instalar el programa controladores de IDE, por favor siga los siguientes pasos: 1. Haga clic en el icono de “TOOLS” en el lado izquierdo de la pantalla de autoejecución 2. Haga clic en la opción “SiS IDE Drivers for WIN 2000/XP” en la pantalla principal.
- Seite 95 Español (Spanish) 5.3.8 McAfee VirusScan Online El McAfee VirusScan Online es la forma más conveniente y confiable de proteger su PC de los virus de ordenadores. Cuando instalar el McAfee VirusScan Online, su ordenador estará protegido pues el lo escudriñará automáticaticamente los virus y los ponerá...
- Seite 96 CD de Main Board Utility), favor de ir directamente al directorio radical del CD y cliquea doblemente el "Setup". 2. Favor de ir al website de DFI’s en "http://www.dfi.com/support1/ download2.asp" para la última versión de los programas instaladores o aplicaciones del software.
- Seite 97 Español (Spanish) 5.4 Investigación de Conflictos Este capítulo del manual se diseña para ayudarlo con problemas que usted puede encontrar con su computadora personal. Para solucionar problemas su sistema eficazmente, trate cada problema individualmente. Algunas de las cosas más comunes para verificar cuando usted encuentra los problemas mientras usando su sistema se listan debajo.
- Seite 98 Español (Spanish) El cuadro constantemente está moviendo. 1. El amonestador ha perdido su sincronización vertical. Ajuste los monitores la sincronización vertical. 2. Márchese cualquier objeto, como otro amonestador o abanica que puede estar creando un campo magnético alrededor del despliegue. 3.
- Seite 99 Español (Spanish) Hard Drive Hard disk fracaso. 1. Asegúrese el tipo del paseo correcto para la unidad de disco duro se ha entrado en la BIOS. 2. Si el sistema se configura con dos unidades de disco duro, asegúrese el inicializadle (primero) la unidad de disco duro se configura como Amo y la segunda unidad de disco duro se configura como la Esclava.
- Seite 100 Español (Spanish) Serial Porta El dispositivo serie (módem, copiadora) el rendimiento de non algo o es los outputting falsificaron los caracteres. 1. Asegúrese que los devices de serie impulsan ha encendido y que el dispositivo es en línea. 2. Verifique que el dispositivo se tapa en el puerto en serie correcto adelante el trasero de la computadora.
- Seite 101 Español (Spanish) Para instalar la utilidad, inserta el CD dentro de la unidad de CD- ROM. Aparecerá la pantalla del autocorrido (Main Board Utility CD). Cliquea el botón de “Hardware Monitor” para instalar la utilidad. Consultar a sus archivos de “readme” para instrucciones en utilizando la utilidad.