Werbung
Quicklinks
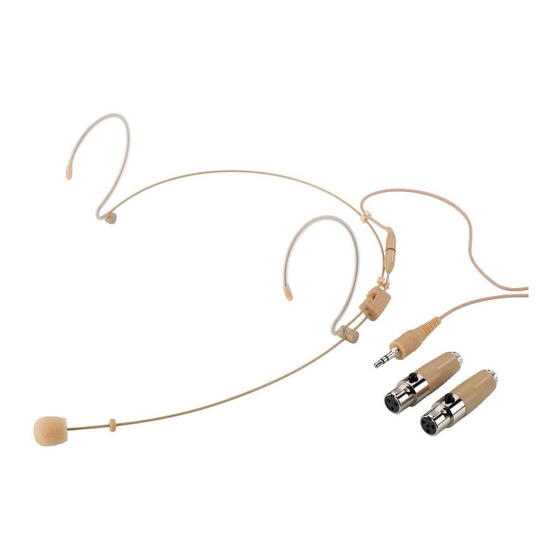
HSE-150A/SK
Best.-Nr. 23.5160
D
A
CH
Kopfbügelmikrofon
Bitte lesen Sie die Anleitung vor dem Be trieb gründlich
durch und heben Sie sie für ein späteres Nachlesen auf.
1 Einsatzmöglichkeiten
Dieses Kopfbügelmi kro fon eig net sich optimal für Ge -
sangs- und Sprachanwen dun gen, die viel Bewegungs-
freiheit erfordern. Für den An schluss an Geräte von „img
Stage Line" (mit 3-pol. Mini-XLR-An schluss) und an
Geräte von JTS (mit 4-pol. Mini-XLR-An schluss) liegen
dem Mikrofon zwei passen de Adapter bei. Für den An -
schluss an Ge räte anderer Hersteller sind als Zubehör
weitere Adap ter erhältlich.
2 Wichtige Hinweise für den Gebrauch
Das Mikrofon entspricht allen erforderlichen Richt li nien
der EU und ist deshalb mit
gekenn zeich net.
G
Setzen Sie das Mikrofon nur im Innenbereich ein und
schützen Sie es vor Feuchtigkeit und Hitze (zulässiger
Einsatz tem pe ratur bereich 0 – 40 °C).
G
Verwenden Sie für die Reinigung nur ein trockenes,
weiches Tuch, niemals Chemikalien oder Was ser.
G
Wird das Mikrofon zweckentfremdet, falsch ange -
schlos sen oder nicht fachgerecht repariert, kann kei ne
Haftung für daraus resultierende Sach- oder Personen-
schäden und keine Ga ran tie für das Mi kro fon über-
nommen werden.
Soll das Mikrofon endgültig aus dem Be trieb ge nom men
werden, über ge ben Sie es zur umweltgerechten Entsor-
gung ei nem ört lichen Recyc ling betrieb.
3 Inbetriebnahme
Für den Betrieb des Mikrofons ist ein Taschen sen der ei -
nes Funk sys tems nötig, der die Mikrofon-Versorgungs-
spannung (→ Kap. 4) bereitstellt. Das Mikrofon kann aber
auch über einen Speiseadapter versorgt werden.
1) Das Mikrofonkabel an die Gewindebuchse des Mikro -
fonarms schrauben und am Kopfbügel festklemmen
[Ersatzkabel HSE-70C (hautfarben) oder HSE-70C/SW
(schwarz) als Zubehör erhältlich].
2) Aus den beiden Adaptern den passenden auswäh len:
– den Adapter mit 3-poliger Mini-XLR-Kupplung:
für den An schluss an einen Taschensender mit
3-po ligem Mini-XLR-An schluss (z. B. TXS-870HSE)
oder an einen entsprechenden Speiseadapter (z. B.
EMA-2) von „img Stage Line"
– den Adapter mit 4-poliger Mini-XLR-Kupplung:
für den An schluss an einen Taschensender PT-...
oder an den Speiseadapter PS-500 von JTS
3) Den Stecker des Mikrofonkabels in die Klinkenkupp-
lung des Adapters schrauben. Die Mini-XLR-Kupplung
des Adapters in die Ein gangs buch se des Sen ders
oder des Speiseadapters stecken. Bei Betrieb mit
einem Speiseadapter diesen an einen Mikro fon ein -
gang des nachfolgenden Geräts (z. B. Mischpult) an -
schließen.
4) Den Windschutz auf das Mikrofon setzen. Den Kopf-
bügel aufsetzen und das Mikrofon dicht vor dem Mund
in eine günstige Sprech po sition bringen. Dazu lässt
sich der Mikrofonarm schwenken und in der Gelenk-
halterung verschieben und dre hen.
4 Technische Daten
Modell
HSE-150A/SK
Mikrofontyp
Back-Elektret
Richtcharakteristik
Kugel
Frequenzbereich
20 – 20 000 Hz
Impedanz
1 kΩ
Empfindlichkeit
8 mV/Pa/1 kHz
Max. Schalldruck
130 dB
Stromversorgung
1,5 – 9 V
Gewicht
7 g
Anschlusskabel
mit 2,5-mm-Stereo-Klinkenstecker
2 Anschlussadapter
2,5-mm-Klinke auf 3-pol. Mini-XLR
1 = Masse
3
1
2 = Signal
2
3 = Stromversorgung
2,5-mm-Klinke auf 4-pol. Mini-XLR
1 = Masse
3
1
2 = Stromversorgung
4
2
3 = Signal
4 = mit Pin 3 verbunden
Änderungen vorbehalten.
®
Copyright
HSE-152A/SK
Best.-Nr. 23.5170
GB
Headband Microphone
Please read these operating instructions carefully prior to
operating the microphone and keep them for later use.
1 Applications
This headband microphone is ideally suited for vocal
sound and speech applications which require much
freedom of movement. For the con nec tion to units from
"img Stage Line" (with 3-pole mini XLR connection) and to
units from JTS (with 4-pole mini XLR connection) the
microphone is supplied with two match ing adapters. For
the connection to units of other manufacturers further
adapters are available as accessories.
2 Important Notes
The microphone corresponds to all required directives of
the EU and is therefore marked with
G
The microphone is suitable for indoor use only. Protect
it against humidity and heat (admissible ambient tem-
perature range 0 – 40 °C).
G
For cleaning only use a dry, soft cloth, by no means
chemicals or water.
G
No guarantee claims for the microphone and no liabil ity
for any resulting personal damage or material damage
will be accepted if the microphone is used for other pur-
poses than originally intended, if it is not correctly
connected, or not repaired in an expert way.
If the microphone is to be put out of operation definitively,
take it to a local recycling plant for a disposal which is not
harmful to the environment.
3 Setting into Operation
For the operation of the microphone a pocket trans mitter
of a wireless system is required which provides the supply
volt age for the microphone (→ chapter 4). How ever, the
mi crophone can also be supplied via a power supply
adapter.
1) Screw the microphone cable to the threaded jack of the
microphone arm, then clamp the cable to the head-
band [replacement cables HSE-70C (skin-coloured)
and HSE-70C/SW (black) available as accessories].
2) Select the matching adapter from the two adapters:
– the adapter with 3-pole mini XLR inline jack:
for connection to a pocket transmitter with 3-pole
mini XLR connection (e. g. TXS-870HSE) or a corre-
spond ing power supply adapter (e. g. EMA-2) from
"img Stage Line"
– the adapter with 4-pole mini XLR inline jack:
for connection to a pocket transmitter PT-... or to the
power supply adapter PS-500 from JTS
3) Screw the plug of the microphone cable to the 2.5 mm
inline jack of the adapter. Connect the mini XLR inline
jack of the adapter to the input of the transmitter or
power supply adapter. When operating the microphone
with a power supply adapter, con nect this unit to a
microphone input of the following unit (e. g. mixer).
4) Place the windscreen onto the microphone. Put on the
headband and place the microphone close to the
mouth into a favourable talk position. For this purpose
the microphone arm can be moved, and be displaced
and turned in the joint support.
4 Specifications
HSE-152A/SK
Model
Microphone type
Niere
Pick-up characteristic
Frequency range
1,5 kΩ
Impedance
1,8 mV/Pa/1 kHz
Sensitivity
SPL max.
Power supply
Weight
Conncection cable
2 adapters
Subject to technical change.
©
by MONACOR INTERNATIONAL GmbH & Co. KG, Bremen, Germany. All rights reserved.
.
HSE-150A/SK
HSE-152A/SK
back electret
omnidirectional
cardioid
20 – 20 000 Hz
1 kΩ
1.5 kΩ
8 mV/Pa/1 kHz
1.8 mV/Pa/1 kHz
130 dB
1,5 – 9 V
7 g
with 2.5 mm stereo plug
2.5 mm jack to 3-pole mini XLR
1 = ground
3
1
2 = signal
2
3 = power supply
2.5 mm jack to 4-pole mini XLR
1 = ground
3
1
2 = power supply
4
2
3 = signal
4 = connected to pin 3
F
B
CH
Microphone serre-tête
Veuillez lire la présente notice avec attention avant le
fonc tionnement et conservez-la pour pouvoir vous y
reporter ultérieurement.
1 Possibilités dʼutilisation
Ce microphone serre-tête est idéalement adapté pour des
applications de discours et de chant requérant une gran -
de liberté de mouvements. Pour le branchement à des ap -
pa reils de "img Stage Line" (avec connexion mini XLR
3 pô les) et à des appareils de JTS (avec branchement mini
XLR 4 pôles), deux adaptateurs sont livrés avec le micro-
phone. Pour le branchement à des ap pareils dʼautres fa -
bricants, dʼautres adaptateurs sont disponibles en option.
2 Conseils dʼutilisation
Le microphone répond à toutes les directives nécessaires
de lʼUnion Européenne et porte donc le symbole
G
Le microphone nʼest conçu que pour une utilisation en
intérieur. Protégez-le de lʼhumidité et de la chaleur
(pla ge de température de fonctionnement autorisée :
0 – 40 °C).
G
Pour le nettoyer, utilisez uniquement un chiffon sec et
doux, en aucun cas de produits chimiques ou dʼeau.
G
Nous déclinons toute responsabilité en cas de domma-
ges matériels ou corporels résultants si le microphone
est utilisé dans un but autre que celui pour lequel il a été
conçu, sʼil nʼest pas correctement branché ou sʼil nʼest
pas réparé par une personne habilitée ; en outre, la
garantie deviendrait caduque.
Lorsque le microphone est définitivement retiré du ser-
vice, vous devez le déposer dans une usine de recyclage
adaptée pour contribuer à son élimination non polluante.
3 Fonctionnement
Pour faire fonctionner le microphone, un émetteur de
poche dʼun système sans fil est nécessaire, il met à dis-
position la tension dʼalimentation du micro (→ chapitre 4).
Le microphone peut également être alimenté par un
adap tateur dʼalimentation.
1) Vissez le cordon micro à la prise filetée du bras du
microphone et fixez-le sur le serre-tête [cordon de rem-
placement HSE-70C (couleur chair) ou HSE-70C/SW
(noir), disponible en option].
2) Parmi les deux adaptateurs, sélectionnez :
– lʼadaptateur avec fiche mini XLR 3 pôles femelle :
pour brancher à un émetteur de poche avec bran-
chement mini XLR 3 pôles (p. ex. TXS-870HSE)
ou à un adaptateur dʼalimentation correspondant
(p. ex. EMA-2) de "img Stage Line".
– lʼadaptateur avec fiche mini XLR 4 pôles :
pour brancher à un émetteur de poche PT-... ou à
lʼa daptateur dʼalimentation PS-500 de JTS.
3) Vissez la fiche du cordon micro à la fiche jack de lʼa -
daptateur. Reliez la fiche mini XLR de lʼadaptateur à la
prise dʼentrée de lʼémetteur ou de lʼadaptateur dʼali-
mentation. Si le microphone fonctionne avec un adap-
tateur dʼalimentation, reliez ce dernier à une entrée
micro de lʼappareil suivant (p. ex. table de mixage).
4) Placez la bonnette de protection sur le micro, placez le
serre-tête et positionnez le microphone juste de vant la
bouche dans une position favorable pour parler. Pour
ce faire, le bras du microphone peut bouger, être
déplacé et tourné dans le support de lʼarticulation.
4 Caractéristiques techniques
Modèle
HSE-150A/SK
Type micro
back-électret
Caractéristiques
omnidirectionnel
Bande passante
20 – 20 000 Hz
Impédance
1 kΩ
Sensibilité
8 mV/Pa/1 kHz
Pression sonore max.
130 dB
Alimentation
1,5 – 9 V
Poids
7 g
Cordon branchement
avec fiche jack 2,5 mâle stéréo
2 adaptateurs de
fiche jack 2,5 sur mini XLR 3 pôles
branchement
1 = masse
3
1
2 = signal
2
3 = alimentation
fiche jack 2,5 sur mini XLR 4 pôles
1 = masse
3
1
2 = alimentation
4
2
3 = signal
4 = relié au pin 3
Tout droit de modification réservé.
A-0653.99.02.12.2007
.
HSE-152A/SK
cardioïde
1,5 kΩ
1,8 mV/Pa/1 kHz
Werbung

Verwandte Anleitungen für IMG STAGELINE HSE-150A/SK


Inhaltszusammenfassung für IMG STAGELINE HSE-150A/SK
- Seite 1 HSE-150A/SK HSE-152A/SK Best.-Nr. 23.5160 Best.-Nr. 23.5170 Kopfbügelmikrofon Headband Microphone Microphone serre-tête Bitte lesen Sie die Anleitung vor dem Be trieb gründlich Please read these operating instructions carefully prior to Veuillez lire la présente notice avec attention avant le durch und heben Sie sie für ein späteres Nachlesen auf.
- Seite 2 HSE-150A/SK HSE-152A/SK Best.-Nr. 23.5160 Best.-Nr. 23.5170 Microfono headset Micrófono de diadema Mikrofon nagłowny Por favor, lea estas instrucciones de funcionamiento Vi preghiamo di leggere attentamente le presenti istru- Przed użyciem urządzenia należy przeczytać uważnie atentamente antes de utilizar el micrófono y consérvelas zioni prima della messa in funzione e di conservarle per instrukcję...