Werbung
Quicklinks
HSE-140/SK
Best.-Nr. 23.5530
D
A
CH
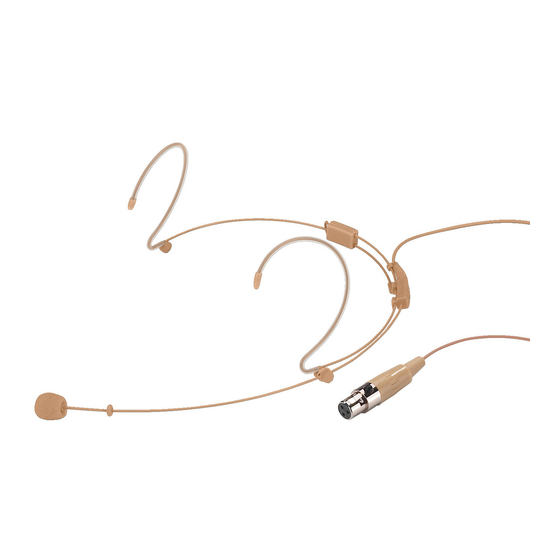
Kopfbügelmikrofon
Bitte lesen Sie diese Bedienungsanleitung vor dem Be-
trieb gründlich durch und heben Sie sie für ein späteres
Nachlesen auf.
1 Einsatzmöglichkeiten
Dieses unauffällige, ultraleichte Kopfbügelmikrofon ist
durch die kleine Bauform des Kopfbügels speziell für
Kinder geeignet. Es lässt sich optimal für Gesangs- und
Sprachanwendungen einsetzen, die viel Bewegungs-
freiheit erfordern, z. B. für Theater- oder Schulauffüh-
rungen. Für den Betrieb ist ein Taschensender eines
Funksystems nötig, der die Mikrofon-Betriebsspannung
bereitstellt (z. B. von „img Stage Line" ein Taschensen-
der TXS-...HSE mit 3-poligem Mini-XLR-Anschluss).
Das Mikrofon kann aber auch über einen Speiseadapter
(z. B. EMA-2 von „img Stage Line") versorgt werden.
2 Wichtige Hinweise für den Gebrauch
Das Mikrofon entspricht allen erforderlichen Richtlinien
der EU und ist deshalb mit
gekennzeichnet.
Setzen Sie das Mikrofon nur im Innenbereich ein und
schützen Sie es vor Feuchtigkeit und Hitze (zulässi-
ger Einsatztemperaturbereich 0 – 40 °C).
Verwenden Sie für die Reinigung nur ein trockenes,
weiches Tuch, niemals Chemikalien oder Wasser.
Wird das Mikrofon zweckentfremdet, falsch ange-
schlossen oder nicht fachgerecht repariert, kann kei-
ne Haftung für daraus resultierende Sach- oder Per-
sonenschäden und keine Garantie für das Mikrofon
übernommen werden.
Soll das Mikrofon endgültig aus dem Betrieb genommen
werden, übergeben Sie es zur umweltgerechten Entsor-
gung einem örtlichen Recyclingbetrieb.
3 Inbetriebnahme
1) Den beiliegenden Wind-/Poppschutz auf das Mikro-
fon stecken.
2) Über den Verstellmechanismus die Kopfbügelweite
an den Kopfumfang anpassen und den Bügel auf-
setzen.
3) Das Mikrofon sollte sich dicht am Mund befinden.
Zum Korrigieren der Mikrofonposition mit dem beilie-
genden Schraubenschlüssel die Achtkantmutter am
Mikrofonarm etwas lösen, den Arm wie gewünscht
verschieben und die Mutter wieder fest anziehen.
Der Arm lässt sich auch rechts anbringen: Dazu
den Arm von seiner Halterung unter dem linken Ohr-
bügel abschrauben und den Kabelhalter vom Kopf-
bügel abnehmen. Dann den Arm an der Halterung
unter dem rechten Ohrbügel festschrauben (vorher
den Kunststoffpfropfen in der Halterung mit einem
dünnen Gegenstand herausdrücken) und den Ka-
belhalter wieder am Kopfbügel festklemmen.
4) Das Mikrofon an den Eingang des Taschensenders
oder des Speiseadapters anschließen. Bei Verwen-
dung eines Speiseadapters diesen an den Mikrofon-
eingang eines Audiogerätes anschließen.
4 Technische Daten
Typ: . . . . . . . . . . . . . . . . . . Back-Elektret
Richtcharakteristik: . . . . . . Kugel
Empfindlichkeit, Impedanz: 8 mV/Pa bei 1 kHz, 1 kΩ
Maximaler Schalldruck: . . . 130 dB
Stromversorgung: . . . . . . . 1,5 – 9 V
Gewicht (ohne Kabel): . . . . 8 g
Anschluss: . . . . . . . . . . . . . 1,2-m-Kabel mit 3-poliger
Mini-XLR-Kupplung
1 = Masse
3
1
2 = Audiosignal
2
3 = Stromversorgung
Änderungen vorbehalten.
0°
330°
30°
300°
60°
Richtcharakteristik
Pick-up pattern
90°
270°
Directivité
240°
120°
210°
150°
180°
®
Copyright
GB
Headband Microphone
Please read these operating instructions carefully prior
to operation and keep them for later use.
1 Applications
Due to the miniature design of its headband, this incon-
spicuous and extra lightweight headband microphone is
ideally suited for children. It is an optimum microphone
for vocal and speech applications requiring much free-
dom of movement, e. g. theatre or school performances.
For operation, a pocket transmitter of a wireless trans-
mission system is required which will deliver the oper-
ating voltage for the microphone (e. g. a pocket trans-
mitter TXS-...HSE with 3-pole mini XLR connection
from "img Stage Line"). However, the microphone can
also be supplied with power via a power supply adapter
(e. g. EMA-2 from "img Stage Line").
2 Important Notes
The microphone corresponds to all required directives
of the EU and is therefore marked with
The microphone is suitable for indoor use only. Pro-
tect it against humidity and heat (admissible ambient
temperature range 0 – 40 °C).
For cleaning only use a dry, soft cloth; never use water
or chemicals.
No guarantee claims for the microphone and no liabil-
ity for any resulting personal damage or material
damage will be accepted if the microphone is used for
other purposes than originally intended, if it is not cor-
rectly connected, or not repaired in an expert way.
If the microphone is to be put out of operation definitively,
take it to a local recycling plant for a disposal which is not
harmful to the environment.
3 Operation
1) Place the windshield/pop shield on the microphone.
2) Via the adjusting mechanism, adjust the size of the
headband to your head and put on the headband.
3) The microphone should be close to your mouth. To
adjust the microphone position, use the supplied
spanner to slightly release the octagon nut at the
microphone boom. Displace the boom as desired,
then retighten the nut.
The boom can also be attached to the right side:
For this purpose, unscrew the boom from its support
below the left ear band and remove the cable support
from the headband. Before screwing the boom to the
support below the right ear band, push out the plastic
stopper in the support by means of a thin object, then
clip the cable support to the headband again.
4) Connect the microphone to the input of the pocket
transmitter or the power supply adapter. If a power
supply adapter is used, connect it to the microphone
input of an audio unit.
4 Specifications
Type: . . . . . . . . . . . . . . . . . . back electret
Pick-up characteristic: . . . . omnidirectional
Sensitivity, impedance: . . . 8 mV/Pa at 1 kHz, 1 kΩ
SPL max.: . . . . . . . . . . . . . 130 dB
Power supply: . . . . . . . . . . 1.5 – 9 V
Weight (without cable): . . . 8 g
Connection: . . . . . . . . . . . . 1.2 m cable with 3-pole
Subject to technical modification.
(dB) 10
0
-10
20
50
100
©
by MONACOR INTERNATIONAL GmbH & Co. KG, Bremen, Germany. All rights reserved.
F
Veuillez lire la présente notice avec attention avant le
fonctionnement et conservez-la pour pouvoir vous y
reporter ultérieurement.
1 Possibilités d'utilisation
Ce microphone serre-tête discret et ultra léger est,
grâce à la forme petite de son serre-tête spécialement
conçu pour les enfants. Il peut être utilisé pour des appli-
cations de chant et de discours nécessitant une grande
liberté de mouvements, par exemple représentations de
théâtre ou à l'école. Un émetteur de poche d'un
système sans fil, fournissant la tension de fonctionne-
ment pour le microphone, est nécessaire pour le faire
fonctionner (par exemple de "img Stage Line" un émet-
teur de poche de la série TXS-...HSE avec connexion
mini XLR 3 pôles). Le microphone peut également être
alimenté par un adaptateur d'alimentation (par exemple
EMA-2 de "img Stage Line").
2 Conseils importants d'utilisation
Le microphone répond à toutes les directives nécessaires
.
de l'Union européenne et porte donc le symbole
Le microphone n'est conçu que pour une utilisation en
intérieur. Protégez-le de l'humidité et de la chaleur
(plage de température de fonctionnement autorisée :
0 – 40 °C).
Pour le nettoyer, utilisez uniquement un chiffon sec et
doux, en aucun cas de produits chimiques ou d'eau.
Nous déclinons toute responsabilité en cas de dom-
mages matériels ou corporels résultants si le micro-
phone est utilisé dans un but autre que celui pour
lequel il a été conçu, s'il n'est pas correctement bran-
ché ou s'il n'est pas réparé par une personne habi-
litée ; en outre, la garantie deviendrait caduque.
3 Fonctionnement
1) Placez la bonnette anti-vent/anti-pop livrée sur le
microphone.
2) Via le mécanisme de réglage, adaptez la largeur du
serre-tête à la tête et positionnez le serre-tête.
3) Le microphone doit se trouver près de la bouche.
Pour corriger la position du microphone, desserrez
un peu l'écrou octogonal sur le bras du micro à l'aide
de la clé livrée, déplacez le bras comme souhaité et
revissez l'écrou.
droit : dévissez le bras de son support sous l'étrier
pour l'oreille gauche et retirez le support de câble du
serre-tête. Ensuite, vissez le bras sur le support sous
l'étrier pour l'oreille droit (sortez au préalable le
bouchon plastique du support avec un objet fin) et
fixez le support de câble à nouveau sur le serre-tête.
4) Connectez le microphone à l'entrée de l'émetteur de
poche ou de l'adaptateur d'alimentation. Si vous uti-
lisez un adaptateur d'alimentation, reliez-le à l'entrée
micro d'un appareil audio.
4 Caractéristiques techniques
Type micro : . . . . . . . . . . . . . back-électret
Caractéristique : . . . . . . . . omnidirectionnel
Sensibilité, impédance : . . 8 mV/Pa à 1 kHz, 1 kΩ
Pression sonore max. : . . . 130 dB
mini XLR inline jack
Alimentation : . . . . . . . . . . . 1,5 – 9 V
1 = ground
Poids (sans câble) : . . . . . . 8 g
3
1
2 = audio signal
2
Connexion : . . . . . . . . . . . . cordon 1,2 m avec fiche
3 = power supply
Tout droit de modification réservé.
200
500
1k
2k
5k
10k
B
CH
Microphone serre-tête
Lorsque le microphone est définitivement retiré du ser-
vice, vous devez le déposer dans une usine de recyclage
adaptée pour contribuer à son élimination non polluante.
Le bras peut également être monté sur le côté
mini XLR femelle 3 pôles
1 = masse
3
1
2 = signal audio
2
3 = alimentation
Frequenzgang
Frequency response
Réponse en fréquences
20k(Hz)
A-0777.99.01.09.2007
.
Werbung

Verwandte Anleitungen für IMG STAGELINE HSE-140/SK


Inhaltszusammenfassung für IMG STAGELINE HSE-140/SK
- Seite 1 HSE-140/SK Best.-Nr. 23.5530 Kopfbügelmikrofon Headband Microphone Microphone serre-tête Bitte lesen Sie diese Bedienungsanleitung vor dem Be- Please read these operating instructions carefully prior Veuillez lire la présente notice avec attention avant le trieb gründlich durch und heben Sie sie für ein späteres to operation and keep them for later use.
- Seite 2 HSE-140/SK Best.-Nr. 23.5530 Mikrofon nagłowny Microfono headset Micrófono de Diadema Vi preghiamo di leggere attentamente le presenti istru- Por favor lea atentamente estas instrucciones de fun- Przed użyciem urządzenia należy zapoznać się z zioni prima dell’uso e di conservarle per un uso futuro.