Herunterladen Inhalt Inhalt Diese Seite drucken
Inhaltsverzeichnis

Werbung

Verfügbare Sprachen
  • DE

Verfügbare Sprachen

  • DEUTSCH, seite 1
V-13
Stereoanlage
Stereo System
Equipo estéreo
Chaîne stéréo
Impianto stereo
10027560 10027561
10027562 10027563

Werbung

Inhaltsverzeichnis
loading

Inhaltszusammenfassung für oneConcept V-13

  • Seite 1 V-13 Stereoanlage Stereo System Equipo estéreo Chaîne stéréo Impianto stereo 10027560 10027561 10027562 10027563...
  • Seite 3: Inhaltsverzeichnis

    Sehr geehrter Kunde, wir gratulieren Ihnen zum Erwerb Ihres Gerätes. Lesen Sie die folgenden Hinweise sorgfältig durch und befolgen Sie diese, um möglichen Schäden vorzubeugen. Für Schäden, die durch Missachtung der Hinweise und unsachgemäßen Gebrauch entstehen, übernehmen wir keine Haftung. Scannen Sie den QR-Code, um Zugriff auf die aktuellste Bedienungsanleitung und weitere Informationen rund um das Produkt zu erhalten.
  • Seite 4: Sicherheitshinweise

    SICHERHEITSHINWEISE Allgemeine Sicherheitshinweise VORSICHT Verletzungsgefahr! Hören Sie nicht mit übermäßig hoher Lautstärke Musik, da dies zu Hörschäden führen kann. • Kinder ab 8 Jahren, psychisch, sensorisch und körperlich eingeschränkte Menschen dürfen das Gerät nur benutzen, wenn sie vorher von einer für sie verantwortlichen Aufsichtsperson ausführlich mit den Funktionen und den Sicherheitsvorkehrungen vertraut gemacht wurden und die damit verbundenen Risiken verstehen.
  • Seite 5 Belüftung • Blockieren oder bedecken Sie keinesfalls die Belüftungsöffnungen, Löcher oder Öffnungen des Geräts, mit Gegenständen wie Teppichen, Tüchern und ähnlichem, da andernfalls die Funktionalität und/oder die Belüftung für eine sicherer Verwendung nicht gewährleistet werden können. • Die Unterseite des Geräts kann warm werden, wenn das Gerät über einen längeren Zeitraum verwendet wird.
  • Seite 6: Bedienelemente

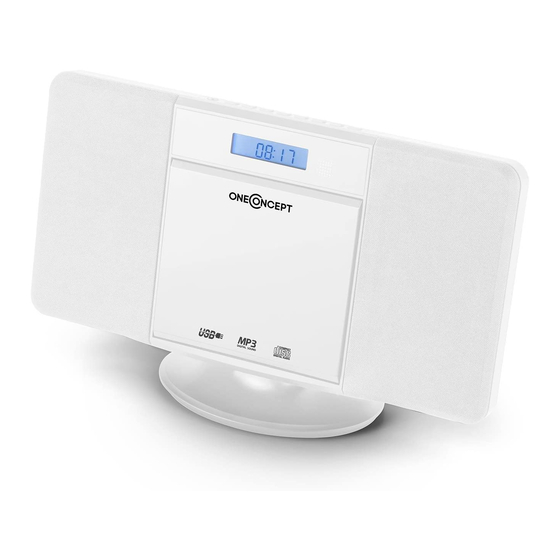
    BEDIENELEMENTE CD-Fach (öffnen/schließen) Display Lautsprecher Lautsprecher Standfuß FM-Antenne IR-Sensor Netzkabel...
  • Seite 7 USB-Anschluss Kopfhörer-Anschluss AUX-IN Memory Standby VOL+ Source VOL- Stop Play / Pause / FM Scan...
  • Seite 8 Gerät ein / aus Uhrzeit Mehrfach drücken zum Wiederholungs- / Einstellen des Sleeptimers Zufallsmodus Mehrfach drücken zur Nächster Titel/Sender Auswahl des Equalizers Play / Pause / FM Scan Senderspeicher / aufrufen Voriger Titel/Sender Ordner-Modus bei MP3 X-Bass ein / aus Stop Zurück / Nach oben Nach rechts / Nach unten...
  • Seite 9: Allgemeine Funktionen

    ALLGEMEINE FUNKTIONEN MUTE Nutzen Sie die MUTE-Taste auf der Fernbedienung zum stummschalten der Anlage. Mit wiederholtem Druck auf MUTE beenden Sie die Stummschaltung wieder. X-BASS Für eine zusätzliche Steigerung der tiefen Frequenzen drücken Sie X-BASS auf der Fernbedienung. Wiederholter Druck schaltet die Bass-Anhebung wieder Die Stereoanlage stellt einige werksseitig voreingestellte Klangformungen (Equalizer) zur Verfügung.
  • Seite 10: Cd-Player

    Gespeicherte Sender aufrufen Wenn Sie sich im Radiomodus befinden, können Sie die gespeicherten Radiosender durch wiederholtes Drücken der Taste PRESET an der Stereoanlage oder auf der Fernbedienung aufrufen. Wenn Sie die gespeicherten Sender zum ersten Mal aufrufen, blinkt [P01] im Display. Hinweis: Die Uhr und die Radiosender müssen bei einer Stromunterbrechung oder einem Stromausfall neu eingestellt werden.
  • Seite 11: Usb

    Programmierte Wiedergabe (Playlist) Sie können bis zu 32 Titel auswählen, diese Titel können Sie in der gewünschten Reihenfolge abspielen. Achtung: die Programmierung kann nur im STOP Modus durchgeführt werden. • Drücken Sie im STOP Modus die Taste MEMORY auf der Fernbedienung um die Programmierung zu beginnen.
  • Seite 12: Audio In

    AUDIO IN Der AUX Anschluss ermöglicht es Ihnen externe Geräte (z. B. MP3 Player, Kassettenspieler) über dieses Gerät wieder zu geben. • Drücken Sie die ON/STANDBY Taste um das Gerät einzuschalten. • Drücken Sie die SOURCE Taste mehrfach um den AUDIO-IN-Modus zu wählen.
  • Seite 13: Timer Einstellen (Nur Per Fernbedienung)

    TIMER EINSTELLEN (NUR PER FERNBEDIENUNG) • Drücken Sie die CLOCK/TIMER Taste einmal um die TIMER Funktion einzuschalten. Die TIMER Anzeige (Uhr-Symbol) ist im DISPLAY zu sehen. • Drücken Sie die CLOCK/TIMER Taste für 2 Sekunden, ON erscheint im DISPLAY. • Drücken Sie , um die Einschaltzeit einzustellen.
  • Seite 14: Bt (Nur 10027562 & 10027563)

    PAIRING-Schriftzug wird auf dem Display erscheinen und blinken. • Aktivieren Sie die BT Funktion auf Ihrem BT-Gerät. • Wählen Sie „OneConcept-V13” auf Ihrem BT-Gerät für die Koppelung aus. Hinweise • Der Abstand zwischen den zu koppelnden Geräten sollte 1 bis 3 Meter betragen •...
  • Seite 15: Wandmontage

    WANDMONTAGE Nutzen Sie die mitgelieferte Bohrschablone, um das Gerät an einer Wand zu montieren. Bitte beachten Sie, dass das Gerät circa 2,5 kg wiegt und somit eine stabile Wand Voraussetzung ist. Gasbeton- oder Rigips-Wände eignen sich nicht. Konsultieren Sie einen qualifizierten Techniker oder Handwerker, wenn Sie sich nicht sicher sind.
  • Seite 16: Hinweise Zur Entsorgung

    HINWEISE ZUR ENTSORGUNG Befi ndet sich die linke Abbildung (durchgestrichene Mülltonne auf Rädern) auf dem Produkt, gilt die Europäische Richtlinie 2012/19/EU. Diese Produkte dürfen nicht mit dem normalen Hausmüll entsorgt werden. Informieren Sie sich über die örtlichen Regelungen zur getrennten Sammlung elektrischer und elektronischer Gerätschaften.
  • Seite 17: Technical Data

    Dear Customer, Congratulations on purchasing this device. Please read the following instructions carefully and follow them to prevent possible damages. We assume no liability for damage caused by disregard of the instructions and improper use. Scan the QR code to get access to the latest user manual and more product information.
  • Seite 18: Safety Instructions

    SAFETY INSTRUCTIONS General safety instructions CAUTION Risk of injury. Do not listen to music at excessive volume as this may result in a loss of hearing. • This device may be only used by children 8 years old or older and persons with limited physical, sensory and mental capabilities and / or lack of experience and knowledge, provided that they have been instructed in use of the device by a responsible person who understands the associated...
  • Seite 19 Ventilation • Do not block or cover the ventilation holes, vents, or openings of the unit with anything, such as carpet, cloth, or similar, as otherwise the openings may not be able to ensure functionality and / or ventilation for safe use. •...
  • Seite 20: Controls

    CONTROLS CD tray (open/close) Display Speaker Speaker Stand Antenna RC sensor Mains cable...
  • Seite 21 USB socket Headphones jack AUX-IN jack Memory Standby VOL+ Source VOL- Stop Play / Pause / FM Scan...
  • Seite 22 Power on /off Clock / Time Sleep (press repeatedly to Play Mode (repeat & random adjust) modes) EQ (press repeatedly for Next track / station preset) Play / Pause / FM Scan Memory (station presets) Folder (toggle folder mode Previous track / station MP3) X-Bass on/off Stop...
  • Seite 23: Global Functions

    GLOBAL FUNCTIONS MUTE The Volume is muted temporarily when pressing the MUTE button on the remote control. Press again to restore the volume. X-BASS When the power is first turned on, the unit will enter the extra bass mode which emphasizes the bass frequencies, and “X-BASS” indicator will appear. To cancel the extra bass mode, press the X-BASS button on the remote control.
  • Seite 24: Cd Player

    Calling up saved stations If you are in radio mode, you can call up the stored radio stations by repeatedly pressing the PRESET key on the stereo system or on the remote control. When you access the preset stations for the first time, [P01] blinks on the display. Note: The clock and the radio stations must be reset if there is a power interruption or power failure.
  • Seite 25: Usb

    Programmed play (Playlist) You can choose up to 32 selections for playback in the order you like. NOTE: Program can only be set in STOP mode. • While in stop mode, press MEMORY on the remote control to enter the programming mode.
  • Seite 26: Audio In

    AUDIO IN • Use a connection lead to connect the portable audio player etc. to the AUDIO IN socket. When using video equipment, connect the audio output to this unit and the video output to a television. • Press the ON/STAND-BY button to turn the power on. •...
  • Seite 27: Timer Operation (Remote Control Only)

    TIMER OPERATION (REMOTE CONTROL ONLY) In this example, the clock is set for the 24-hour (0:00) display. • Press the CLOCK/TIMER Button once to turn the TIME function on. The TIME indicator will appear in the DISPLAY. • Press the CLOCK/TIMER button 2 seconds, Operation again CLOCK/ TIMER button until ”ON”...
  • Seite 28: Bt (Only 10027562 & 10027563)

    Press the SOURCE button (remote control) to select BT function. (PAIRING indicator flashes). • Perform pairing procedure on the source device to detect this unit. “oneConcept-V13” will appear in the detected devices list (if available) in the source device. (Refer the source device operating manual for details). Notes •...
  • Seite 29: Wall Mounting

    WALL MOUNTING Use the supplied pattern, to mount the device to a wall. Please note, the device weights about 2.5 kgs. Make sure the wall is stable enough to hold the weigth. Ask a qualified person for aide, when in doubt. Screws are not supplied.
  • Seite 30: Hints On Disposal

    HINTS ON DISPOSAL According to the European waste regulation 2012/19/EU this symbol on the product or on its packaging indicates that this product may not be treated as household waste. Instead it should be taken to the appropriate collection point for the recycling of electrical and electronic equipment.
  • Seite 31: Fiche Technique

    Cher client, Toutes nos félicitations pour l’acquisition de ce nouvel appareil. Veuillez lire attentivement les instructions suivantes de branchement et d’utilisation afin d’éviter d’éventuels dommages. Le fabricant ne saurait être tenu pour responsable des dommages dus au non-respect des consignes de sécurité et à la mauvaise utilisation de l’appareil.
  • Seite 32: Consignes De Sécurité

    CONSIGNES DE SÉCURITÉ Consignes générales de sécurité ATTENTION Risque de blessures ! n‘écoutez pas de musique à trop fort volume, car cela peut endommager votre audition. • Cet appareil peut être utilisé par des enfants de 8 ans ou plus et des personnes ayant des capacités physiques, sensorielles et mentales limitées et / ou dénuées d‘expérience et de connaissances, à...
  • Seite 33 Ventilation • Ne pas obstruer ni couvrir les ouvertures de ventilation, les trous ou les ouvertures de l‘appareil avec des objets tels que des tapis, tissus et similaires, car la fonctionnalité et/ou la ventilation en toute sécurité ne pourraient pas être garanties. •...
  • Seite 34: Eléments De Commande

    ELÉMENTS DE COMMANDE Compartiment CD Ecran Haut-parleur Haut-parleur Socle Antenne souple Capteur IR Câble d'alimentation...
  • Seite 35 Entrée USB Entrée casque Entrée AUX Mémoire Standby Ecran Source Haut-parleur Stop Play / Pause / FM Scan...
  • Seite 36 Power on / off Horloge Sleep Mode de lecture Sauvegarder et rappeler une Play / Pause / FM Scan station de radio Fichier MP3 X-Bass on / off Stop Retour / haut Naviguer vers la droite / le bas Mode silencieux VOL- Choix de fonction VOL+...
  • Seite 37: Fonctions Générales

    FONCTIONS GÉNÉRALES MUTE Utiliser la touche MUTE de la télécommande pour couper le son de la chaîne stéréo. Une nou- velle pression de la touche rétablit le son. X-BASS Pour augmenter la présence sonore des basses fréquences, utiliser la touche X-BASS de la té- lécommande, appuyer à...
  • Seite 38: Lecteur Cd

    Rappel des stations stockées En mode radio, vous pouvez accéder aux stations de radio préréglées en appuyant plusieurs fois sur la touche PRESET de la chaîne stéréo ou de la télécommande. Lorsque vous accédez aux stations préréglées pour la première fois, [P01] clignote sur l‘écran. Note : L‘horloge et les stations de radio doivent être réinitialisées en cas de coupure de courant ou de panne de courant.
  • Seite 39: Usb

    Lecture programmée (liste de lecture) Il est possible de sélectionner jusqu’à 32 titres, diffusables dans l’ordre souhaité. Attention : la programmation d’une liste de lecture ne peut s’effectuer qu’en mode STOP. • En mode STOP, appuyer sur la touche MEMORY de la télécommande pour commencer la programmation.
  • Seite 40: Audio In

    AUDIO IN La prise AUX permet de brancher un périphérique (ex. : lecteur MP3, lecteur de cassette, etc.) à cet appareil. • Appuyer sur la touche ON/STANDBY pour allumer l’appareil. • Appuyer plusieurs fois sur la touche SOURCE pour sélectionner le mode AUDIO-IN.
  • Seite 41: Réglage Du Minuteur (Seulement Depuis La Télécommande)

    RÉGLAGE DU MINUTEUR (SEULEMENT DEPUIS LA TÉLÉCOMMANDE) • Appuyer une fois sur la touche CLOCK/TIMER pour activer la fonction TIMER. Le symbole du TIMER (symbole d’une horloge) s’affiche à l’écran. • Appuyer sur la touche CLOCK/TIMER pendant 2 secondes, ON s’affiche à l’écran.
  • Seite 42: Bt (Uniquement 10027562 & 10027563)

    à l’écran et clignote. • Activer la fonction BT sur l’appareil BT. • Sélectionner « oneConcept-V13 » sur l’appareil BT pour effectuer le couplage. Remarques • La distance entre les appareils couplés doit être comprise entre 1 et 3 mètres.
  • Seite 43: Montage Mural

    MONTAGE MURAL Utiliser le patron avec les trous pour monter l‘appareil sur le mur. Noter que l‘appareil pèse environ 2,5 kg et nécessite donc un mur solide pour la fixation. Le béton léger ou le placo ne sont pas adaptés. Consulter un maçon ou un technicien en cas de doute.
  • Seite 44: Conseils Pour Le Recyclage

    CONSEILS POUR LE RECYCLAGE Le pictogramme ci-contre apposé sur le produit signifi e que la directive européenne 2012/19/UE s‘applique (poubelle à roues barrée d’une croix). Ces produits ne peuvent être jetés dans les poubelles domestiques courantes. Renseignez-vous concernant les règles appliquées pour la collecte d’appareils électriques et électroniques.
  • Seite 45: Dati Tecnici

    Gentile cliente, La ringraziamo per aver acquistato il dispositivo. La preghiamo di leggere attentamente le seguenti istruzioni per l’uso e di seguirle per evitare possibili danni tecnici. Non ci assumiamo alcuna responsabilità per danni scaturiti da una mancata osservazione delle avvertenze di sicurezza e da un uso improprio del dispositivo.
  • Seite 46: Avvertenze Di Sicurezza

    AVVERTENZE DI SICUREZZA Avvertenze di sicurezza generiche ATTENZIONE Pericolo di lesione! Non ascoltare la musica a volume eccessivamente altro, in quanto può provocare danni all’udito. • Questo dispositivo può essere utilizzato da bambini a partire da 8 anni e da persone con limitate capacità fi siche e psichiche o con conoscenza ed esperienza limitate, solo se sono stati istruiti sulle modalità...
  • Seite 47 Ventilazione • Non bloccare in nessun caso le fessure di ventilazione, i fori o le aperture del dispositivo con oggetti, come tappeti, teli e similari, altrimenti non possono essere garantite funzionalità e/o ventilazione per un utilizzo sicuro. • Il lato inferiore del dispositivo può diventare caldo dopo utilizzi prolungati.
  • Seite 48: Componenti

    COMPONENTI CD cassetto (open/close) Display Altoparlante Altoparlante Supporto Antenna RC sensore Cavo di alimentazione...
  • Seite 49 Presa USB Presa per cuffie AUX–IN Memoria Standby VOL + Source VOL - Stop Play / Pause / FM Scan...
  • Seite 50 Power on/off Clock/Time Sleep Play Mode Play / Pause / FM Scan Memory Folder X-Bass on/off Stop Indietro / Su A destra / Giù Mute VOL- Source VOL+ Mono/St.
  • Seite 51: Funzioni Generali

    FUNZIONI GENERALI MUTE Il volume viene silenziato temporaneamente quando si preme il pulsante MUTE sul teleco- mando. Premere nuovamente per ripristinare il volume. X-BASS Quando si accende la prima volta, il dispositivo viene sintonizzato sulla modalità toni bassi in basso, che sottolinea le frequenze basse, e viene visualizzato l’indicatore “X –...
  • Seite 52: Lettore Cd

    Richiamo delle stazioni memorizzate In modalità radio, è possibile accedere alle stazioni radio preimpostate premendo ripetutamente il tasto PRESET dell‘impianto stereo o del telecomando. Quando si accede alle stazioni preimpostate per la prima volta, sul display lampeggia [P01]. Nota: L‘orologio e le stazioni radio devono essere resettati in caso di interruzione dell‘alimentazione o di mancanza di corrente.
  • Seite 53: Usb

    Riproduzione programmata (Playlist) È possibile scegliere sino a 32 tracce, sulla base dell’ordine desiderato. Attenzione : la programmazione di una playlist non viene eseguita in modalità STOP. • Premere per selezionare il titolo desiderato.. • Premere MEMORY per salvare il numero della traccia. È possibile programmare sino a 32 tracce.
  • Seite 54: Audio In

    AUDIO IN La presa AUX consente di collegare una periferica (es. : lettore MP3, audio cassette, etc..) a questo apparecchio. • Premere il tasto ON/STAND- BY per accendere il dispositivo. • Premere diverse volte il tasto SOURCE per selezionare la modalità AUDIO –...
  • Seite 55: Impostazione Dei Minuti (Solo Dal Telecomando)

    IMPOSTAZIONE DEI MINUTI (SOLO DAL TELECOMANDO) • Premere una volta il tasto CLOCK /TIMER per attivare la funzione TIMER. Sul display verrà visualizzato il simbolo TIMER (simbolo dell’orologio). • Premere il pulsante CLOCK / TIMER per due secondi, sullo schermo verrà visualizzato ON.
  • Seite 56: Bt (Solo 10027562 & 10027563)

    • Attivare la funzione BT sul dispositivo LV. • Selezionare “oneConcept – V13” sul dispositivo BT per eseguire l’accoppiamento. Osservazioni • La distanza tra i dispositivi accoppiati deve essere compresa tra 1 e 3 metri, •...
  • Seite 57: Montaggio A Parete

    MONTAGGIO A PARETE Utilizzare il modello con i fori per montare il dispositivo sulla parete. Si prega di notare come l’apparecchio pesi circa 2, 5 kg e pertanto richieda una parete solida per il fissaggio. Il calce- struzzo leggero o il placo non sono adatti. Consultare un muratore o un tecnico nel caso in cui si presentino dei dubbi.
  • Seite 58: Smaltimento

    SMALTIMENTO Se sul prodotto è presente la fi gura a sinistra (il cassonetto dei rifi uti mobile sbarrato), si applica la direttiva europea 2012/19/UE. Questi prodotti non possono essere smaltiti con i rifi uti normali. Informarsi sulle disposizioni vigenti in merito alla raccolta separata di dispositivi elettrici ed elettronici.
  • Seite 59: Datos Técnicos

    Estimado cliente: Le felicitamos por la adquisición de este producto. Lea atentamente el siguiente manual y siga cuidadosamente las instrucciones de uso con el fin de evitar posibles daños. La empresa no se responsabiliza de los daños ocasionados por un uso indebido del producto o por haber desatendido las indicaciones de seguridad.
  • Seite 60: Indicaciones De Seguridad

    INDICACIONES DE SEGURIDAD Advertencias generales de seguridad ATENCIÓN Riesgo de lesiones. No escuche la música a un volumen demasiado alto, pues podría provocar daños auditivos. • Este aparato puede ser utilizado por niños mayores de 8 años y personas con discapacidades físicas, sensoriales y mentales y/o con falta de experiencia y conocimientos, siempre y cuando hayan sido instruidos sobre el uso del aparato y comprendan los peligros y riesgos asociados.
  • Seite 61 Ventilación • Nunca bloquee ni tape los orifi cios de ventilación, agujeros o aperturas del aparato con objetos como alfombras, paños o similares, pues podrían poner en riesgo su funcionalidad y/o ventilación en cuanto a un uso seguro. • La parte inferior del aparato puede calentarse si se utiliza durante un periodo de tiempo prolongado.
  • Seite 62: Elementos De Control

    ELEMENTOS DE CONTROL Abrir/Cerrar la unidad lectora Display de CD Altavoz Altavoz Pie de apoyo Antena FM Sensor IR Cable de alimentación...
  • Seite 63 Conexión USB Conexión para auriculares Entrada AUX Memoria Standby VOL+ Fuente VOL- Detener Play / Pause / FM Scan...
  • Seite 64 ON/OFF Hora Sleep (Temporizador de Modo repetición/aleatorio apagado) EQ (Ecualizador) Próximo título/estación Acceder a las emisoras Play / Pause / FM Scan guardadas Pista/Emisora anterior Modo Carpeta en MP3 X-Bass ON/OFF Detener Atrás/hacia arriba A la derecha/hacia abajo Mute (Función Silencio ON/ VOL- OFF) Fuente...
  • Seite 65: Funciones Generales

    FUNCIONES GENERALES MUTE Pulse el botón MUTE en el mando a distancia para silenciar el sonido de la cadena estéreo. Vuelva a pulsar el botón MUTE para reestablecer el sonido. X-BASS Si desea enfatizar las frecuencias bajas, pulse el botón X-BASS en el mando a distancia.
  • Seite 66: Cd-Player

    Recuperar las estaciones almacenadas En el modo de radio, puede acceder a las emisoras de radio preseleccionadas pulsando repetidamente el botón PRESET del equipo de sonido o del mando a distancia. Cuando se accede a las emisoras preseleccionadas por primera vez, [P01] parpadea en la pantalla.
  • Seite 67: Usb

    Reproducción programada (Lista de reproducción) Puede elegir hasta 32 pistas que se reproducirán en el orden que usted desea. Atención: solo se puede crear la lista en modo STOP. • En modo STOP, pulse el botón MEMORY en el mando a distancia para crear la lista de re- producción.
  • Seite 68: Entrada De Audio

    ENTRADA DE AUDIO La conexión AUX permite reproducir dispositivos externos (p. ej.: reproductor MP3, casetera, etc.) a través de la cadena estéreo. • Pulse el botón ON/STANDBY para encender el aparato. • Pulse varias veces el botón SOURCE para elegir el modo AUDIO IN. •...
  • Seite 69: Configurar El Temporizador (Solo Vía Mando A Distancia)

    CONFIGURAR EL TEMPORIZADOR (SOLO VÍA MANDO A DISTANCIA) • Pulse el botón CLOCK/TIMER una vez para activar la función TIMER. El símbolo TIMER (sím- bolo de reloj) aparecerá en el display. • Mantenga pulsado el botón CLOCK/TIMER durante 2 segundos, en el display aparecerá...
  • Seite 70: Bt (Solo 10027562 & 10027563)

    PAIRING. • Active la función BT en su dispositivo BT. • Seleccione «oneConcept-V13» en su dispositivo BT para iniciar el emparejamiento. Observaciones • La distancia entre los dispositivos que desea acoplar debe ser de 1 a 3 metros.
  • Seite 71: Montaje En Pared

    MONTAJE EN PARED Utilice la plantilla de orificios suministrada para montar el aparato en la pared. Tenga en cuenta que la cadena estéreo pesa aprox. 2,5 kg y, por ello, es necesario montarla en una pared sólida. No se recomienda fijar el aparato en una pared de hormigón esponjoso o de yeso.
  • Seite 72: Retirada Del Aparato

    RETIRADA DEL APARATO Si el aparato lleva adherida la ilustración de la izquierda (el contenedor de basura tachado) entonces rige la normativa europea, directiva 2012/19/UE. Este producto no debe arrojarse a un contenedor de basura común. Infórmese sobre las leyes territoriales que regulan la recogida separada de aparatos eléctricos y electrónicos.

Diese Anleitung auch für:

10027560100275611002756210027563

Inhaltsverzeichnis