Herunterladen Inhalt Inhalt Diese Seite drucken

Werbung

Verfügbare Sprachen

Verfügbare Sprachen

Vertical 90 - Stereoanlage
10026865 10026866

Werbung

Inhaltsverzeichnis
loading

Inhaltszusammenfassung für oneConcept Vertical 90

  • Seite 1 Vertical 90 - Stereoanlage 10026865 10026866...
  • Seite 2: Sicherheitshinweise Und Gewährleistung

    Sehr geehrter Kunde, zunächst möchten wir Ihnen zum Erwerb Ihres Gerätes gratulieren. Bitte lesen Sie die folgenden Anschluss- und Anwendungshinweise sorgfältig durch und befol- gen Sie diese um möglichen technischen Schäden vorzubeugen. Sicherheitshinweise und Gewährleistung • Diese Bedienungsanleitung dient dazu, Sie mit der Funktionsweise dieses Produktes ver- traut zu machen.
  • Seite 3: Technische Daten

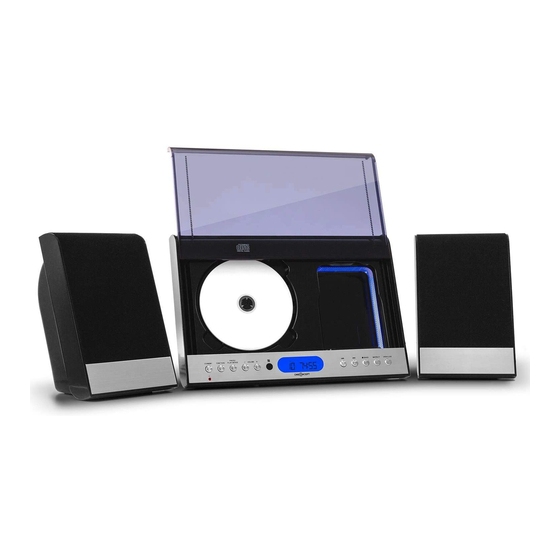
    Technische Daten Artikelnummer 10026865, 10026866 Anschlüsse USB-Port, SD-Slot, AUX-Eingang, Kopfhörer-Ausgang Unterstützte Formate CD, CD-R, CD-RW, MP3 Stromversorgung AC 220-240 V, 50-60 Hz oder DC 5,8V Maße Haupteinheit ca. 28,5 x 20 x 9,5 cm (BxHxT), 1,2kg Maße Lautsprecher ca. 12 x 20 x 9,5 cm (BxHxT), 0,5kg Länge Lautsprecherkabel ca 1,6m Haupteinheit, 2x Lautsprecher, Fernbedienung, Netzteil, Lieferumfang...
  • Seite 4 Anschluss für Lautsprecher (R) Netzteilanschluss 5,8V 1A Anschluss für Lautsprecher (L) Antennenanschluss kopfhöreranschluss Haken zur Wandmontage AUX-IN Tischfuß (auziehbar) CD-Fach Display Power/Standby SKIP- / TUNE- STANDBY LED SKIP+ / TUNE+ FUNCTION (CD/Tuner/AUX/USB/SD) STOP / BAND PROG / PLAY / MODE PLAY/PAUSE / ST/MONO VOLUME –...
  • Seite 5 Fernbedienung: Ein / Aus (FUNKTION) Modus Taste (CD-TUNER-AUX-USB-SD) (REPEAT) wählen zwischen REAPT ONE (Wiederholen des aktuellen Titels) und REPEAT ALL (Wiederholen aller Titel) (SLEEP) Ein / Aus schalten der Abschaltautomatic (OPEN / CLOSE) öffnen / schliessen des CD Faches (BAND) Radio: wechsel zw. UKW / MW (FM ST) wechsle zw.
  • Seite 6: Erste Schritte

    Erste Schritte Anschluss der Lautsprecher • Schliessen sie die Lautsprecher an, bevor Sie das Gerät an die Steckdose anschliessen • Schliessen Sie das schwarze Kabel ers an die Anschlußbuchse mit der Makierung L auf der Rückseite des Haauptgerätes an. • Schliessen Sie das rote Kabel an die Anschlußbuchse mit der Makierung R auf der Rück- seite des Hauptgerätes an.
  • Seite 7: Titelprogrammierung

    Titelprogrammierung Audio CD: • Drücken Sie STOP, um sicher zu sein dass die Wiedergabe gestoppt ist. • Drücken Sie PROGRAM,um die Titelprogrammierung zu beginnen. Im LCD Display sehen Sie (P01) und es blinken (00),(MEMORY). • Während (00) blinkt, drücken Sie , um einen Titel zu wählen.
  • Seite 8: Aux-Anschluss

    Radiosender speichern • Drücken Sie PROGRAM/PLAY-MODE am Gerät. • Drücken Sie FOLDER + oder FOLDER–, um den Speicherplatz für den aktuellen Sender zu wählen. • Drücken Sie Titelsprung Vor/Zurück, um den gewünschten Sender zu wählen. • Drücken Sie PROGRAM/PLAY-MODE, um den Sender zu speichern. •...
  • Seite 9: Weitere Funktionen

    Weitere Funktionen • Equalizer: Drücken Sie die EQ Taste um folgende Einstellungen auszuwählen: Flat – Rock – Classic – Pop- Jazz • BASS: Drücken Sie die BASS Taste, um die Bassanhebung ein- oder aus zu schalten. • ID3: Um die Titelinformation im Display anzuzeigen, drücken Sie die Taste ID3 auf der Fernbedienung.
  • Seite 10: Important Safety Advice

    Dear Customer, Congratulations on purchasing this product. Please read and follow these instructions, in order to avoid damaging the item. We do not cover any damages that may arise from improper use of the item or the disregard of the safety instructions. Important Safety Advice •...
  • Seite 11: Technical Data

    Technical Data Item # 10026865, 10026866 Connections USB-Port, SD-Slot, AUX-Eingang, Kopfhörer-Ausgang Supported formats CD, CD-R, CD-RW, MP3 Power supply DC 5,8V (mains adapter) Dimensions main body 28,5 x 20 x 9,5 cm (WxHxD), 1.2kg Dimensions speakers 12 x 20 x 9,5 cm (WxHxD), 0.5kg Speaker cables 1.6m Included Main device, 2x speaker, RC, power adapter, user manual Overview...
  • Seite 12 Speaker terminal (R) DC IN (5.8V 1A) Speaker terminal (L) Antenna jack Headphones jack Wall mount hooks AUX-IN Stand CD lid Display Power/Standby SKIP- / TUNE- STANDBY LED SKIP+ / TUNE+ FUNCTION (CD/Tuner/AUX/USB/SD) STOP / BAND PROG / PLAY / MODE PLAY/PAUSE / ST/MONO VOLUME –...
  • Seite 13 Fernbedienung: On/Standby (FUNCTION) function toggle (CD-TUNER-AUX-USB-SD) (REPEAT) ) (SLEEP) (OPEN / CLOSE) (BAND) Radio: toggle UKW / MW (FM ST) toggle UKW Stereo / Mono (INTRO) (RANDOM) (TRACK -10) (TRACK +10) (FOLDER UP/M+) next station / folder |<< skip back (ID3) show ID3 information >>| skip track (FOLDER UP/M+) previous station/folder...
  • Seite 14: Getting Started

    Getting Started Speaker Connections • Always connect the speakers before connceting the power supply. • Connect the black wire of to the terminal marked „L“ on the rear of the main united. • Connect the red wire to the terminal marked „R“ on the rear of the main united. AUX Connection •...
  • Seite 15 Progam Play Audio CD: • Press STOP to make sure playback is stopped, then press PROGRAM/PLAY-MODE. The LCD screen will display (P01) flashing (00),(MEMORY). • While (00) is blinking, press PREVIOS or NEXT to select a track number, press PROGRAM/ PLAY-MODE to store it in memory.
  • Seite 16 Saving radio stations • Press PROGRAM/PLAY-MODE on the unit • Press FOLDER UP or FOLDER DOWN to select a memory channel for the current radio station. • Press PREVIOS or NEXT to select your desired station • Press PROGRAM/PLAY MODE button to confirm it •...
  • Seite 17: Additional Functions

    Additional Functions • Equalizer: Press EQ button to cycle through the equalizer preset options: Flat – Rock – Classic – Pop- Jazz • BASS: Press BASS to enable or disable the bass enhancement eff ect. • ID3: Um die Titelinformation im Display anzuzeigen, drücken Sie die Taste ID3 auf der Fernbedienung.
  • Seite 18 Cher client, Toutes nos félicitations pour l‘acquisition de ce nouvel appareil. Veuillez lire attentivement et suivre les instructions de branchement et d‘utilisation suivantes afin d‘éviter d‘éventuels dommages. Consignes de sécurité et garantie • Ce mode d‘emploi a pour objectif de vous familiariser avec les fonctions de ce produit. Conservez bien ce guide d‘utilisation afin de pouvoir vous y référer à...
  • Seite 19: Fiche Technique

    Fiche technique Numéro d’article 10026865, 10026866 Connectivité Port USB, lecteur de carte SD, Entrée AUX, Sortie casque Format lus CD, CD-R, CD-RW, MP3 Alimentation AC 220-240 V, 50-60 Hz ou DC 5,8V Dimensions de l’unité principale env. 28,5 x 20 x 9,5 cm (LxHxP), 1,2kg Dimension des enceintes env.
  • Seite 20 Branchement pour enceinte (R) Adaptateur secteur 5,8V 1A Branchement pour enceinte (L) Prise d’antenne Prise casque Crochet de fixation murale AUX-IN Pied de table (amovible) Lecteur CD Écran Power/Standby SKIP- / TUNE- LED STANDBY SKIP+ / TUNE+ FONCTION (CD/Tuner/AUX/USB/SD) STOP / BAND PROG / PLAY / MODE PLAY/PAUSE / ST/MONO VOLUME –...
  • Seite 21 4 Télécommande : Marche / Arrêt (FONCTION) touche mode (CD-TUNER-AUX-USB-SD) (REPEAT) choisir entre REAPT ONE (relire le titre en cours) et REPEAT ALL (tout relire) (SLEEP) marche / arrêt mise en route de l’arrêt automatique (OPEN / CLOSE) ouvrir / fermer le lecteur CD (BAND) Radio: changer de bande FM / MW (FM ST) passer de FM Stéréo à...
  • Seite 22: Premiers Pas

    Premiers pas Branchement des enceintes • Branchez les enceintes avant de relier l’appareil au secteur • Branchez d’abord le câble noir à sa prise spécifique marquée L au dos de l’appareil principal. • Branchez le câble rouge sur sa prise marquée R au dos de l’appareil principal. Branchement à...
  • Seite 23: Programmation De Titres

    Programmation de titres CD Audio : • Appuyez sur STOP pour vous assurer que la lecture est arrêtée. • Appuyez sur PROGRAM pour commencer la programmation des titres. Sur l’écran LCD vous pouvez lire (P01), et (00) et (MEMORY) clignotent. •...
  • Seite 24 Mémorisation de stations • Appuyez sur PROGRAM/PLAY-MODE sur l‘appareil. • Appuyez sur FOLDER + ou FOLDER– pour sélectionner la position de mémorisation de la station en cours d‘écoute. • Appuyez sur saut de titre avant/arrière pour choisir la station désirée. •...
  • Seite 25: Autres Fonctions

    Autres fonctions • Égaliseur : Appuyez sur la touche EQ pour choisir parmi les réglages suivants : Flat – Rock – Classic – Pop- Jazz • BASS : Appuyez sur la die BASS pour activer ou désactiver l’amplifi cation des basses. •...

Inhaltsverzeichnis