Herunterladen Inhalt Inhalt Diese Seite drucken

Werbung

Verfügbare Sprachen
  • DE

Verfügbare Sprachen

  • DEUTSCH, seite 14
IMPORTANT NOTE: Electric products must not be put into household waste. Please bring them to a recycling centre. Ask your local authorities or
your dealer about the way to proceed.
NOTE IMPORTANTE : Les produits électriques ne doivent pas être mis au rebut avec les ordures ménagères. Veuillez les faire recycler là où il existe
des centres pour cela. Consultez les autorités locales ou votre revendeur sur la façon de les recycler.
WICHTIGER HINWEIS: Elektrogeräte gehören nicht in den Hausmüll. Sie müssen in speziellen Betrieben recycelt werden. Bringen Sie sie zu einer
speziellen Entsorgungsstelle für Elektrokleingeräte (Wertstoffhof)!
BELANGRIJK: De elektrische producten mogen niet naast het huisvuil geplaatst worden. Gelieve deze te laten recycleren daar waar er centra's hiervoor voorzien
is. Raadpleeg de plaatselijke autoriteiten of uw verkoper ivm de manier van recycleren.
NOTA IMPORTANTE: Produtos eléctricos não deverão ser postos em contentores de lixo caseiros. Por favor, deposite-os em contentores para reciclagem.
Questione as autoridades locais ou onde adquiriu o produto sobre como deverá proceder.
NOTA IMPORTANTE: Produtos eléctricos não deverão ser postos em contentores de lixo caseiros. Por favor, deposite-os em contentores para reciclagem.
Questione as autoridades locais ou onde adquiriu o produto sobre como deverá proceder.
WAŻNA UWAGA: Elektryczne produkty nie mogą być wyrzucane wraz z odpadami domowymi. Prosimy o przyniesienie ich do centrum recyklingu. Zapytaj
sprzedawcę o sposób postępowania.
NOTA IMPORTANTA: Deseurile care provin de la produsele electrice si electronice nu se vor pune la gunoiul menajer. Dezafectarea acestora trebuie sa se faca la
centrele de colectare special amenajate. Contactati autoritatile locale pentru informatii privind procedura de dezafectare a deseurilor electrice si electronice.
©Copyright LOTRONIC 2017
R
E
C
H
A
R
G
R
E
C
H
A
R
3
x
4
3
x
4
USER MANUAL
MANUEL D'UTILISATION
BEDIENUNGSANLEITUNG
NAVODILA ZA UPORABO
MANUEL DE INSTRUCCIONES
E
A
B
L
E
G
E
A
B
L
E
W
R
G
B
W
W
R
G
B
W
Ref.: PAR-TRUSS-BAT (15-1459)
HANDLEIDING
PAR-TRUSS-BAT
T
R
U
S
S
P
T
R
U
S
S
P
4
-
I
N
-
1
4
-
I
N
-
1
A
R
A
R
Page 1

Werbung

Inhaltsverzeichnis
loading

Inhaltszusammenfassung für IBIZA LIGHT RECHARGEABLE TRUSS PAR 3 x 4W RGBW 4-IN-1

  • Seite 1 Ref.: PAR-TRUSS-BAT (15-1459) USER MANUAL MANUEL D’UTILISATION BEDIENUNGSANLEITUNG NAVODILA ZA UPORABO HANDLEIDING MANUEL DE INSTRUCCIONES IMPORTANT NOTE: Electric products must not be put into household waste. Please bring them to a recycling centre. Ask your local authorities or your dealer about the way to proceed. NOTE IMPORTANTE : Les produits électriques ne doivent pas être mis au rebut avec les ordures ménagères.
  • Seite 2: Safety Instructions

    Unpacking Instructions Immediately upon receiving a fixture, carefully unpack the carton, check the contents to ensure that all parts are present and have been received in good condition. Notify the freight company immediately and retain packing material for inspection if any parts appear to be damaged from shipping or the carton itself shows signs of mishandling.
  • Seite 3: Cable Connectors

    3. SETUP Disconnect the power cord before replacing a fuse and always replace with the same type fuse. Fuse Replacement With a flat head screwdriver wedge the fuse holder out of its housing. Remove the damaged fuse from its holder and replace with exactly the same type of fuse. Insert the fuse holder back in its place and reconnect power.
  • Seite 4 2. Connect the end of the cable coming from the first fixture which will have a (female) 3 pin connecter to the input connecter of the next fixture consisting of a (male) 3 pin connecter. Then, proceed to connect from the output as stated above to the input of the following fixture and so on Often, the set up for Master-Slave and Stand-alone operation requires that the first fixture in the chain be initialized for this purpose via either settings in the control panel or DIP-switches.
  • Seite 5 4.2 Menu map Press the <MODE/ESC> button repeatedly until you reach the desired menu function. Use the <UP> and <DOWN> buttons to navigate the menu options. Press the <ENTER> button to select the menu function currently displayed or to enable a menu option. To return to the previous option or menu without changing the value, press the <MODE/ESC>...
  • Seite 6 8-Channel DIMMER STROBE PROGRAM SPEED GREEN BLUE WHITE Function Function Value Value Value Value Value Value Value Value CH4~8 NO USE 0~255 0~255 0~255 0~255 0~14 Color01 15~29 Color02 30~44 Color03 45~59 Color04 60~74 Color05 Program1 1~35 75~89 Color06 90~104 Color07 0~255 0~255...
  • Seite 7: Manual Mode

    8. IR controller BLACK OUT Mode 1. Press BLACK OUT to switch the light off or on. AUTO Mode Press to enter the built-in show mode. Press <+> or <–> to select one of the built-in programs. SOUND Mode When the unit is in show mode, press this button to set the speed from SP01-SP99 via the <+>...
  • Seite 8 Déballage Dès réception de l’appareil, ouvrez le carton et vérifiez que le contenu est complet et en bon état. Sinon, prévenez immédiatement le transporteur et conservez l’emballage s’il montre des signes de mauvais traitements. Conservez le carton et tous les matériaux d’emballage afin de pouvoir transporter l’appareil en toute sécurité. Consignes de sécurité...
  • Seite 9: Installation

    3. INSTALLATION Débranchez le cordon d’alimentation avant de remplacer le fusible et utilisez toujours un fusible ayant les mêmes caractéristiques que l’ancien. Remplacement du fusible Sortez le porte-fusible de son logement à l’aide d’un tournevis à lame plate. Sortez le fusible grillé et remplacez-le par un autre en tous points identiques. Remettez le porte-fusible dans son logement et rebranchez l’appareil sur le secteur.
  • Seite 10: Montage

    2. Connectez l’extrémité du câble provenant du contrôleur qui aura une fiche femelle à 3 broches, sur la fiche d’entrée de l’appareil suivant qui est un connecteur mâle à 3 broches 3. Ensuite, branchez la sortie comme indiqué ci-dessus sur l’entrée de l’appareil suivant, etc. Branchement Maître/Esclave 1.
  • Seite 11 1. LED 7. Touche d’entrée 13. Interrupteur M/A 2. Afficheur 8. Capteur IR de la télécommande 14. Indicateur du niveau de batterie 3. Micro interne 9. Point d’ancrage de la chaîne de sécurité 15. Points de fixation 4. Touche MENU 10.
  • Seite 12 BLEU 0~255 BLANC 0~255 8-Canaux DIMMER STROBE PROGRAM SPEED GREEN BLUE WHITE Function Function Value Value Value Value Value Value Value Value CH4~8 NO USE 0~255 0~255 0~255 0~255 0~14 Color01 15~29 Color02 30~44 Color03 45~59 Color04 60~74 Color05 Program1 1~35 75~89 Color06...
  • Seite 13 7. Mode SET Appuyez sur la touche MENU jusqu’à ce que Colr s’affiche. Appuyez sur ENTER. L’utilisateur peut active ou désactiver la télécommande. Lorsque REMOTE s’affiche, appuyez sur ENTER et sélectionnez ON ou OFF avec les touches UP/DOWN. 8. Télécommande à Infrarouge BLACK OUT 1.
  • Seite 14: Sicherheitshinweise

    Auspacken Sofort nach Empfang vorsichtig den Karton auspacken und den Inhalt überprüfen. Alle Teile müssen vollzählig und in einwandfreiem Zustand sein. Sofort die Transportfirma benachrichtigen und das Verpackungsmaterial aufbewahren, wenn Teile Transportschäden aufweisen. Verpackungsmaterial auch für späteren Transport des Geräts aufbewahren. Sicherheitshinweise Diese Anleitung sorgfältig vor der ersten Inbetriebnahme lesen.
  • Seite 15 3. AUFBAU Vor Auswechseln der Sicherung Gerät vom Netz trennen. Nur eine identische Sicherung benutzen. Auswechseln der Sicherung Mit einem flachen Schraubendreher den Sicherungshalter aus seinem Gehäuse entfernen. Die durchgebrannte Sicherung aus dem Halter nehmen und durch eine identische Sicherung ersetzen. Den Sicherungshalter zurück ins Gehäuse setzen und Netz wieder anschließen.
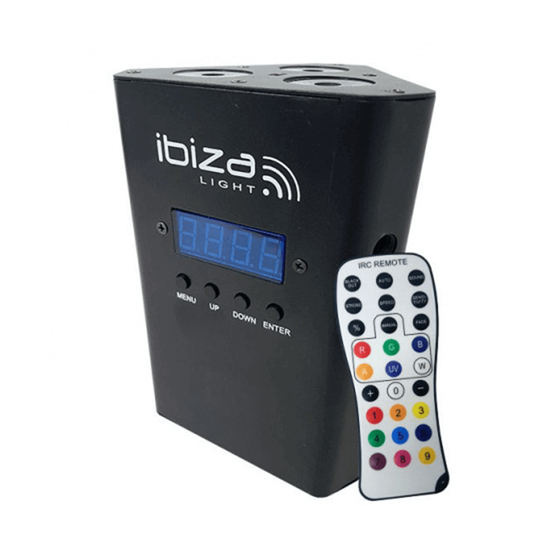
  • Seite 16: Menu Taste

    4. BEDIENUNGSANLEITUNG 4.1 Beschreibung des Bedienfelds Die Funktionen sind über die vier Tasten unterhalb des Displays zugänglich. Taste Funktion <MODE/ESC> Gibt Zugang zum Menü oder schaltet zurück zum vorigen Menü <UP> Durchlauf durch die Optionen in aufsteigender oder <DOWN> rückläufiger Reihenfolge <ENTER>...
  • Seite 17 Sh01 RGBW allmählicher Farbwechsel einzelner Farben Sh02 Allmählicher Farbwechsel bunt Sh03 Effekt 1 Sh04 Effekt 2 Sh05 RGBW plötzlicher Farbwechsel einzelner Farben Sh06 Plötzlicher Farbwechsel bunt 3. Soud Betrieb MENU Taste drücken bis Soud erscheint. ENTER drücken. Im musikgesteuerten Betrieb folgt das Gerät dem Rhythmus der Musik.
  • Seite 18 Program1 1~35 75~89 Color06 90~104 Color07 0~255 0~255 105~119 Color08 120~134 Color09 Slow NO USE NO USE NO USE NO USE 135~149 Color10 -> 150~164 Color11 Fast 165~179 Color12 180~194 Color13 195~209 Color14 210~224 Color15 225~239 Color16 240~254 Color17 Color18 Program2 36~71 Program3...
  • Seite 19 1. <STROBE> auf der Fernbedienung drücken. 2. Mit <+> oder <–> die Geschwindigkeit des Programms erhöhen oder verringern. 3. Erneut <STROBE> drücken, um den Stroskopeffekt auszuschalten. SENSITIVITY Einstellung der Empfindlichkeit im musikgesteuerten Betrieb 1. <SENSITIVITY> drücken. 2. Mit <+> bzw.r <–> die Klangempfindlichkeit erhöhen oder verringern. Schnelleinstellung verschiedener Werte.
  • Seite 20: Varnostna Navodila

    Navodila za razpakiranje Takoj po prejemu paketa, pazljivo razpakirajte škatlo, preverite vsebino, da seprepričate, da je vsebina kompletna in da je naprava v dobrem stanju.V primeru če ugotovite poškodbena škatli, ali pomanjkljivosti glede vsebine škatle,takoj obvestite dostavitelja. Hranite škatlo za primer da se naprava mora vrniti proizvajalcu, pomembno je da se vrne v originalni embalaži.
  • Seite 21 3. NASTAVITEV Odklopite napajalni kabel, preden zamenjate varovalko in vedno zamenjajte z varovalko istega tipa. Zamenjava varovalke S ploščatim izvijačem sprostie nosilec varovalke iz ohišja. Odstranite poškodovano varovalko iz držala in nadomestiti s povsem enakim tipom varovalke. Vstavite zadnji nosilec varovalke na njeno mesto in priključite napravo na izvor napajanja. Povezovanje naprave Za povezavo ene ali več...
  • Seite 22: Navodila Za Delovanje

    Slave (sledenje)nastavitev. Prosimo, preberite navodila za uporabo'' »Odstavek v tem priročniku za vsemi navodili za tovrstno namestitev in konfiguracijo. 4. NAVODILA ZA DELOVANJE 4.1 Navigacija prek nadzorne plošče Nadzorna plošča deluje s pomočjo štirih gumbov na plošči, ki se nahajajo neposredno pod LCD zaslonom. Gumb Funkcija <MODE/ESC>...
  • Seite 23 1. AUTO način Pritisnite gumb MENU da se prikaže AUTO. Pritisnite ENTER. Naprava deluje preko vgrajenih programov. Lahko nastavite hitrost in strobe vrednost v Show načinu. 2. Shou način Pritisnite gumb MENU da se prikaže Shou. Pritisnite ENTER. Naprava vsebuje 6 vgrajenih programov Sh01 ~ Sh06 ki jih izberete tako da pritisnete tipke UP ali DOWN.
  • Seite 24 8-kanalov DIMER STROBO PROGRAM HITROST RDEČA ZELENA MODRA BELA Funkcija Funkcij vrednos vrednos vrednos vrednos vrednost vrednost vrednost vrednost CH4~8 SE NE UPORABLJA 0~255 0~255 0~255 0~255 0~14 Barva 15~29 Barva 30~44 Barva Program 1~35 45~59 Barva 0~255 0~255 60~74 Barva počasi SE NE...
  • Seite 25 > hitro Program 108~14 Program 144~17 Program 180~21 Program 216~25 Sound 252~25 SE NE UPORABLJA 5. SLAU način Pritisnite gumb MENU da se prikaže SLAU. Enota je zdaj v SLAVE načinu in bo sledila glavni enoti s katero je povezana. 6.
  • Seite 26 npr., pritisnite %->R->123->%. Vrednost svetilnosti rdeče barve je zdaj nastavljena na r123. Opomba: Vrednosti morajo biti v območju nastavljanja drugače bodo neveljavne. MANUAL način 1. Pritisnite <MANUAL> na IRC. 2. Pritisnite <R>, <G>, <B>, <W> (rdeča, zelena, modra, bela) da spremenite vašo barvo. 3.
  • Seite 27: Veiligheidsinstructies

    Uitpakken Onmiddellijk naar de aankoop van het toestel, verwijder voorzichtig de verpakking en wees zeker dat het toestel in geode toestand is. Breng direct uw dealer op de hoogte en bewaar het verpakkingsmateriaal indien onderdelen of het karton door het transport beschadigd zijn. Bewaar het karton en alle verpakkingsmaterialen. Indien het toestel moet gerepareerd worden is het belangrijk het toestel in zijn originele verpakking te versturen.
  • Seite 28 3. INSTALLATIE Trek de voedingskabel uit het stopcontact alvorens U de zekering vervangt. Gebruik alleen een zekering met dezelfde specificaties Vervanging van de zekering Verwijder de zekeringshouder d.m.v. een platte schroevendraaier uit de behuizing. Verwijder de oude zekering en zet een nieuwe zekering met dezelfde specificaties in. Plaats de zekeringshouder terug in zijn behuizing en sluit de voedingskabel op een stopcontact aan.
  • Seite 29 controle paneel of DIP schakelaars moet geïnitieerd worden. De andere toestellen moeten op slave werking ingesteld worden. Zie het hoofdstuk “Bediening” in deze handleiding om verdere informaties voor installatie en configuratie te vinden. 4. BEDIENING 4.1 Navigatie door het controle paneel Gebruik de vier knoppen direct beneden het LCD display.
  • Seite 30 3. Auto Modus Druk de MENU toets totdat AUTO verschijnt. Druk ENTER. Het toestel spelt de ingebouwde programm’s af. U kunt de snelheid en stroboscoop waarde in SHOU modus instellen. 4. Shou Modus Druk de MENU toets totdat Shou verschijnt. Druk ENTER. Het toestel bevat 6 ingebouwde programma’s Sh01 ~ Sh06 die d.m.v.
  • Seite 31 0~14 Color01 15~29 Color02 30~44 Color03 45~59 Color04 60~74 Color05 Program1 1~35 75~89 Color06 90~104 Color07 0~255 0~255 105~119 Color08 120~134 Color09 Slow NO USE NO USE NO USE NO USE 135~149 Color10 -> 150~164 Color11 Fast 165~179 Color12 180~194 Color13 195~209 Color14...
  • Seite 32: Manual Modus

    SOUND Modus Als het toestel in show modus staat, druk deze toets om de snelheid van SP01-SP99 via de <+> of <–> toets in te stellen. STROBE Modus Instelling van de strobe snelheid in geluidsgeactiveerde modus. 1. Druk <STROBE> op de afstandsbediening. 2.
  • Seite 33 Instrucciones de seguridad • A la recepción del equipo, abra el embalaje y verifique que el contenido este completo y en buen estado. • Asegúrese de que la tensión del enchufe es la correcta para este equipo. No se exceda de la tensión indicada en el equipo.
  • Seite 34 equipo. Conexionado de más equipos Usted necesitara un cable de datos en serie para hacer funcionar más unidades del este equipo mediante una consola DMX512 o para hacer funcionar dos o más en modo Maestro/Esclavo. El número combinado de canales requeridos por todos los dispositivos en un cable de datos en serie define el número de dispositivos que el cable de datos puede soportar.
  • Seite 35 Funcionamiento Apriete repetidamente en <MODE/ESC> hasta que llegue a la función deseada. Utilice los botones <UP> y <DOWN> para navegar por las opciones de menú. Apriete en la tecla <ENTER> para selewccionar la función que se muestra en el el indicador o para activar una función dentro del menú.
  • Seite 36 3. Modo Soud Apriete en la trecla MENU hasta que se muestre Soud. Apriete en ENTER. En modo audio, el equipo sigue el ritmo de la música. Apriete en ENTER y ajuste la sensibilidad del micro de Sen ~ Sen9. 4.
  • Seite 37 195~209 Color14 210~224 Color15 225~239 Color16 240~254 Color17 Color18 Programa2 36~71 Programa3 72~107 0~255 Lento -> Program4 108~143 Rápido Programa5 144~179 Programa6 180~215 Programa7 216~251 Sonido 252~255 NO USADO 5. Modo SLAU Apriete en la tecla MENU hasta que se muestre SLAU. Apriete en ENTER. El equipo se mantendrá en modo esclavo y seguirá...
  • Seite 38 Tecla de ajuste rápido: Para ajustar por ejemplo la velocidad, apriete en %->SPEED->55->%. La velocidad esta ajustada a SP55. Idem para los colores: %->R->123->%. El Rojo está ajustado a r123. Atención: El valor debe situarse en el interior del rango de ajuste MANUAL 1.

Diese Anleitung auch für:

Par-truss-bat

Inhaltsverzeichnis