Inhaltsverzeichnis
Werbung
Verfügbare Sprachen
Verfügbare Sprachen
Quicklinks
Werbung
Inhaltsverzeichnis

Verwandte Anleitungen für KODA KODA1305


Inhaltszusammenfassung für KODA KODA1305
- Seite 1 POWER AMPLIFIER AMPLIFICATEUR DE PUISSANCE LEISTUNGSVERSTÄRKER VERMOGENSVERSTERKER AMPLIFICADOR AMPLIFICATOR DE PUTERE OJAČEVALEC KODA1305 Instruction Manual Manuel d’Utilisation Bedienungsanleitung Handleiding Manual de Instruções Manual de utilizare Navodila za uporabo ©Copyright LOTRONIC 2012...
-
Seite 2: Safety Instructions
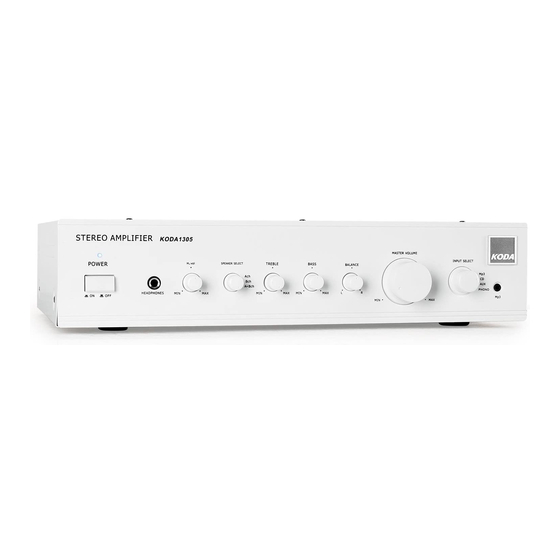
Congratulations to the purchase of your new amplifier. Please read the manual prior to using the unit and keep it for future reference. Warnings: The triangle containing a lightning symbol is intended to alert the user to the presence of uninsulated dangerous voltages within the product’s enclosure that me be of sufficient magnitude to constitute a risqué... - Seite 3 Front and Rear panel description 1. Power switch 2. Headphone output 3. Headphone volume control 4. Speaker output select 5. Treble control 6. Bass control 7. Balance control 8. Master volume control 9. Input selector switch (AUX1/AUX2/CD/MP3) 10. MP3 input jack 11.
-
Seite 4: Troubleshooting
Turn the input selector switch to the correct position and power the unit on. A few seconds later, the unit has reached normal working condition. Adjust the volume according to your taste. If the fuse blows, please contact a technician to replace the fuse by a new one that is identical to the original one. - Seite 5 Specifications Output power (RMS) ............2 x 140W @ 4 Ohms ..................2 x 100W @ 8 Ohms THD ..................<2% (30-20kHz) Frequency response ..............30Hz – 20kHz Signal to noise ratio ............>77dB (A-weighted) Rated input level/impedance..............500mV Rated load impedance ................4 Ohms Power consumption ................
-
Seite 6: Consignes De Securite
Nous vous félicitons pour l’achat de ce nouvel amplificateur. Lire attentivement le mode d’emploi avant la première mise en service et conserver pour référence ultérieure. Avertissement: ATTENTION ! AFIN DE REDUIRE LE RISQUE D’INCENDIE OU D’ELECTROCUTION, NE PAS EXPOSER L’APPAREIL A LA PLUIE OU A L’HUMIDITE. NE PAS OUVRIR LE BOITIER (OU L’ARRIERE). - Seite 7 Description de la façade et de l’arrière 1. Interrupteur général 2. Sortie casque 3. Contrôle de volume du casque 4. Sélecteur d’enceintes 5. Réglage des aigus 6. Réglage des graves 7. Contrôle de Balance 8. Contrôle de volume général 9. Sélecteur d’entrée (AUX1/AUX2/CD/MP3) 10.
- Seite 8 Réglez le sélecteur d’entrée sur la bonne source et mettez l’amplificateur sous tension. Quelques secondes plus tard, l’amplificateur a atteint l’état de fonctionnement normal. Réglez le volume selon votre goût. Le fusible ne peut être replace que par un technicien. Le nouveau fusible doit être en tous points identique au fusible d’origine.
- Seite 9 Caractéristiques techniques Puissance de sortie (RMS) ..........2 x 140W sous 4 Ohms ..................2 x 100W sous 8 Ohms THD ..................<2% (30-20kHz) Bande passante ................30Hz – 20kHz Rapport S/B ................. >77dB (pondéré A) Niveau/impédance d’entrée nominale ..........500mV Impédance de charge nominale ............
-
Seite 10: Sicherheitshinweise
Herzlichen Glückwunsch zum Kauf Ihres neuen Verstärkers. Bitte lesen Sie die Anleitung vor der ersten Inbetriebnahme durch und bewahren Sie sie für spätere Bezugnahme auf. Warnhinweise: Der Blitz im Dreieck weist den Bediener auf gefährliche, unisolierte Spannungen im Gehäuseinneren hin, die stark genug sind, um einen elektrischen Schlag zu verursachen. - Seite 11 Beschreibung der Front- und Rückseite 1. Hauptschalter 2. Kopfhörerausgang 3. Lautstärkeregler des Kopfhörers 4. Kanalwahlschalter 5. Treble Regler 6. Bass Regler 7. Balance Regler 8. Master Lautstärkeregler 9. Eingangswahlschalter (AUX1/AUX2/CD/MP3) 10. MP3 Eingangsbuchse 11. AUX1 Eingangsbuchse 12. AUX2 Eingangsbuchse 13. CD Eingangsbuchse 14.
- Seite 12 Nach einigen Sekunden ist das Gerät voll betriebsbereit. Stellen sie die Lautstärke nach Ihren Wünschen ein. Falls einmal die Sicherung durchbrennt, wenden Sie sich an einen erfahrenen Techniker. Die neue Sicherung muss der alten in jeder Hinsicht entsprechen. Wenn die LED beim Einschalten des Verstärkers nicht aufleuchtet, liegt ein Fehler vor.
- Seite 13 Technische Daten Ausgangleistung (RMS) ............2 x 140W @ 4 Ohm ................... 2 x 100W @ 8 Ohm THD ..................<2% (30-20kHz) Frequenzgang................30Hz – 20kHz Störabstand ...............>77dB (A-gewichtet) Nom. Eingangspegel/-impedanz ............500mV Nom. Lastimpedanz ................4 Ohm Verbrauch ....................<140W Versorgungsspannung ............
-
Seite 14: Veiligheidsinstructies
Gefeliciteerd voor de aankoop van uw nieuwe versterker. Lees deze handleiding aandachtig door alvorens U de versterker gebruikt en bewaar ze voor latere raadpleging op. Waarschuwingen: De bliksem in de driehoek vestigt de aandacht van de gebruiker op een elektrische schokrisico. De driehoek met het uitroepteken vestigt de aandacht van de gebruiker op belangrijke gebruik- of onderhoudinstructies. - Seite 15 Voor- en achterzijde 1. Aan/uit 2. Hoofdtelefoon uitgang 3. Hoofdtelefoon volume controle 4. Keuze van de luidspreker uitgang 5. Treble controle 6. Bass controle 7. Balance controle 8. Master volume controle 9. Ingangskeuze schakelaar (AUX1/AUX2/CD/MP3) 10. MP3 ingang 11. AUX ingang 12.
- Seite 16 toestel aan. Na enkele seconden heeft het toestel de normale werkconditie bereikt. Stel het volume na uw wensen in. Indien de zekering doorbrandt laat ze door een technicus door een identieke vervangen. Indien de LED niet oplicht wanneer de versterker ingeschakeld wordt heeft de versterker een probleem.
- Seite 17 Specificaties Uitgangsvermogen (RMS) ..........2 x 140W @ 4 Ohm ................... 2 x 100W @ 8 Ohm THD ..................<2% (30-20kHz) Frequentiebereik ................. 30Hz – 20kHz Signaal ruis verhouding ............. >77dB (A-weighted) Ingangsniveau/impedantie ..............500mV Lastimpedantie ..................4 Ohm Opgenomen vermogen ................<140W Voeding ................
-
Seite 18: Instruções De Segurança
Obrigado por adquirir este novo amplificador. Por favor, leia o manual antes de usar o aparelho e guarde-o para referência futura. Avisos: O triângulo contendo um símbolo de um raio é destinado a alertar o utilizador sobre a presença de voltagens perigosas não isoladas dentro da estrutura do produto, que possui magnitude suficiente para constituir um risco de choque eléctrico para as pessoas. - Seite 19 Descrição do Painel Frontal e Traseiro 1. Interruptor ON/OFF 2. Saída de auscultadores 3. Controlo de volume de auscultadores 4. Selecção de saída de coluna 5. Controlo de Treble 6. Controlo de Bass 7. Controlo de Balance 8. Controlo de volume Master 9.
- Seite 20 depois, a unidade chegou a condição de trabalho normal. Ajuste o volume de acordo com a sua preferência. Se o fusível queimar, entre em contacto com um técnico para substituir o fusível por um novo, que é idêntico ao original. Se o LED não acender quando o amplificador é...
- Seite 21 Especificações Potência de Saída (RMS) ........... 2 x 140W @ 4 Ohms ..................2 x 100W @ 8 Ohms THD ..................<2% (30-20kHz) Frequência ................... 30Hz – 20kHz Sinal / ruido Nominal ............>77dB (A-weighted) Nível de entrada/impedância Nominal ..........500mV Carga de impedância Nominal ..............
-
Seite 22: Instructiuni De Siguranta
Multumim pentru achizitionarea noului amplificator. Va rugam sa cititi manualul inainte de a utiliza amplificatorul si pastrati-l pentru referinte ulterioare. Avertisment: Simbolul unui fulger in interiorul unui triunghi echilateral, avertizeaza utilizatorul asupra prezentei unei tensiuni potential periculoase, suficient de mari astfel incat sa prezinte risc de electrocutare pentru utilizator. - Seite 23 Descriere panoului frontal si panoului din spate 1. Comutator pornire 2. Iesire casti 3. Control volum casti 4. Selectare iesire difuzor 5. Control sunete inalte 6. Control bass 7. Control balans 8. Control volum principal 9. Comutator intrare (AUX/AUX2/CD/MP3) 10. Mufa intrare MP3 11.
- Seite 24 Rotiti comutatorul de selectare a intrarii in pozitia corecta si porniti amplificatorul. Reglati volumul in functie de nivelul dorit. Daca siguranta se arde, va rugam sa contactati un tehnician pentru a o inlocui cu una noua, care sa aibe aceleasi caracteristici cu cea originala. Daca LED-ul nu se aprinde atunci cand amplificatorul este pornit, inseamna ca exista o defectiune.
- Seite 25 Specificatii Putere de iesire (RMS) ............2 x 140 W @ 4 Ohmi ..................2 x 100 W @ 8 Ohmi THD ..................<2% (30-20 kHz) Raspuns in frecventa ..............30 Hz – 20 kHz Raport S/N ................ >77dB (A-weighted) Nivel intrare nominala/impedanta ............500 mV Impedanta sarcina nominala ..............
-
Seite 26: Varnostna Navodila
Čestitamo vam za nakup vašega novega ojačevalca. Prosimo, preberite navodila pred uporabo naprave in jih shranite za poznejšo uporabo. Opozorila: Trikotnik, ki vsebuje simbol strele je namenjena za opozarjanje uporabnika na prisotnost neizolirane nevarne napetosti v ohišju izdelka, ki je dovolj visoka, da predstavlja nevarnost električnega udara. - Seite 27 Opis sprednje in zadnje plošče 1. Stikalo za vklop 2. Izhod za slušalke 3. Glasnost slušalk 4. Izhod za zvočnike - izbira 5. Kontrola visokih tonov 6. Kontrola nizkih tonov 7. Kontrola ravnovesja 8. Kontrola glasnosti 9. Vhodi - izbira (AUX/AUX2/CD/MP3) 10.
- Seite 28 Obrnite stikalo za izbiro vhoda v pravilen položaj in moč aparata. Nekaj sekund kasneje enota doseže normalne delovne pogoje. Nastavite glasnost po vašem okusu. Če varovalka pregori, se obrnite na serviserja, da zamenjajte varovalko z novo, ki je enaka originalu. Če LED ne zasveti, ko je ojačevalnik vklopljen, to pomeni, da je napaka.
- Seite 29 Tehnični podatki Moč (RMS) ................ 2 x 140W @ 4 Ohms ..................2 x 100W @ 8 Ohms Popačenje ................<2% (30-20kHz) Frekvenčni Razpon ............... 30Hz – 20kHz Razmerje Signal / Šum ............>77dB (A-weighted) Rated input level/impedance..............500mV Impendanca ..................4 Ohms Poraba ....................