Herunterladen Inhalt Inhalt Diese Seite drucken
Oregon Scientific AW133 Benutzerhandbuch
Vorschau ausblenden Andere Handbücher für AW133:
Inhaltsverzeichnis

Werbung

Verfügbare Sprachen
  • DE

Verfügbare Sprachen

  • DEUTSCH, seite 33
Grill Right Bluetooth BBQ Thermometer
Model: AW133
USER MANUAL

Werbung

Inhaltsverzeichnis
loading

Inhaltszusammenfassung für Oregon Scientific AW133

  • Seite 1 Grill Right Bluetooth BBQ Thermometer Model: AW133 USER MANUAL...
  • Seite 2: Inhaltsverzeichnis

    Reset ................. 8 Accessory-Metal Probe ........... 2 Specification ............9 Overview ..............2 Precautions .............. 9 Display Unit - Front View ........2 About Oregon Scientific ........10 Display Unit - Rear View ........3 EU-Declaration of Conformity ......10 Metal Probe ............4 FCC Statement ............10 Getting Started ............4 Battery Installation ..........
  • Seite 3: Packaging Contents

    visit our website at www.oregonscientific.com for more INSTRUCTION details.* Thank you for selecting Oregon Scientific™ Grill Right • Metal Probe (AWP133) Bluetooth BBQ Thermometer. Simply program your choice of meat type, target temperature or cooking time OVERVIEW either on the touch-key display unit or your smart device via the corresponding app. When your grill is cooked to DISPLAY UNIT - FRONT VIEW perfection, the thermometer will alert you via color-coded indicator and your smart device. You do not need to wait by the grill to monitor the cooking status. This saves you time and leaves you free to attend to your guests. Best of all, the app allows you to share your successful recipes and even text-integrating photos of dishes on social community.
  • Seite 4: Display Unit - Rear View

    3. Current temperature; DISPLAY UNIT - REAR VIEW °C/°F: temperature measurement unit 4. %: Cooking progress; Cooking timer; Target temperature & indicator; HR/MIN/SEC: hour/minute/second indicator : Channel one/channel two; : Alerts for channel one/two; : Meat profile mode indicator : Target temperature indicator; : Timer mode indicator; : Low battery indicator : Pairing indicator 1. Silicon cap : Enter mode set-up; confirm setting; press and 2. Channel one jack hold to power off. 3. Channel two jack : Decrease value of the setting. 4. °C/°F: temperature measurement unit slide button : Increase value of the setting. 5. LIGHT: backlight slide button : Start /stop the program or manually start/ 6. RESET button stop time counting; press and hold for 5 seconds to remove cooking history. 7. Sliding stand 8. Battery compartment...
  • Seite 5: Metal Probe

    3. Return the battery compartment cover. METAL PROBE CONNECTING THE PROBE You can use two probes at the same time. To order an extra probe, please visit our website www.oregonscientific.com. To connect the probe with the display unit: • Carefully pull out the rubber cap and then plug the meat probe into the socket. 1. Metal probe tip The top socket is for channel one, the bottom socket 2. Metal probe connector wire is for channel two. GETTING STARTED PLACEMENT BATTERY INSTALLATION To place display unit: Please press RESET You can place the touch-key display unit on table or slide after battery installation...
  • Seite 6: Settings

    The wire of the probe is about 1 meter length and made of heat-resistant material, but it cannot be heated by a direct fire source. SETTINGS You have three options to select your desired mode for your grill. They are • Meat profile mode • Target temperature mode • Timer mode SELECT CHANNEL After battery installation of your first use, select a channel for your plugged probe. You need to set the program for each channel individually. 1. Tap -/+ to toggle between CH1/CH2, CH1/CH2 is To place metal probe: blinking during setup. 2. CH1/CH2 will become stable when program is running. TEMPERATURE MEASUREMENT UNIT To select Fahrenheit (°F ) or Celsius (°C) as your temperature measurement unit, slide °C/°F, located in the battery compartment.
  • Seite 7: Meat Profile Mode

    MEAT PROFILE MODE Fish In Meat Profile mode, you can select food type which has been programmed to grill in a pre-set temperature Hamburger duration. Select food type: 1. After selecting a channel, tap SET to set up, tap -/+ to Select doneness level: select Meat Profile mode ( ). Tap SET again and You can also set the doneness level through the continue setting for your food type. application on your mobile device. Set the major four levels (RARE/MEDIUM RARE/MEDIUM/WELL DONE) 2. Tap -/+ to select among different food types in the on the display unit, you can customize doneness level following sequence, which the food type icon and...
  • Seite 8: Timer Mode

    TIMER MODE START/STOP If you want to switch among different cooking modes, In Timer mode ( ), you can directly set a timer program you need to stop the current one, and then redo settings. for your grilled food. Once the timer starts, the time will be counted down. However, if you do not stop the timer, Start program: it will continue counting up until you stop it. After setting is done, press START to start the Set timer: measurement program. 1. Tap -/+ to select a timer format: HH:MM (hour:minute) Stop setting: or MM:SS (minute: second). Tap SET to confirm • During any setting, press START to interrupt the setting.
  • Seite 9: Operation

    OPERATION TIMER MODE Once you activate this mode, MEAT PROFILE MODE you can view the cooking status, Before you start this mode, current food temperature and please ensure the probe tip is counting down timer at the correctly inserted into the food. same time. Start your mode If the food is over-cooked, NOTE • Tap START to activate the timer will continue working but the mode. When it starts counting up with alert beep sounds.
  • Seite 10: Specification

    SPECIFICATION PRECAUTIONS • Do not subject the unit to excessive force, shock, TYPE DESCRIPTION dust, temperature or humidity. DISPLAY UNIT • Do not cover the ventilation holes with any items 90 x 90 x 30.5 mm such as newspapers, curtains etc. L x W x H 3.54 x 3.54 x 1.20 in • Do not immerse the unit in water. If you spill liquid 146 g ( 5.15 ounces) over it, dry it immediately with a soft, lint-free cloth.
  • Seite 11: About Oregon Scientific

    EU-DECLARATION OF CONFORMITY battery safety strip. Remove the strip from the battery Hereby, Oregon Scientific, declares that Grill Right compartment before fi rst use. Bluetooth BBQ Thermometer (model: AW133) is in The technical specifications for this product NOTE compliance with the essential requirements and other and the contents of the user manual are subject to relevant provisions of Directive 1999/5/EC. A copy of the...
  • Seite 12: Declaration Of Conformity

    If this equipment does cause harmful Or 97062 USA interference to radio or television reception, which can Telephone No.: 1-800-853-8883 be determined by turning the equipment off and on, the user is encouraged to try to correct the interference by declare that the product one or more of the following measures: Product No. AW133 • Reorient or relocate the receiving antenna. Product Name: Grill Right Bluetooth • Increase the separation between the equipment BBQ Thermometer and receiver. Manufacturer: IDT Technology Limited • Connect the equipment into an outlet on a circuit...
  • Seite 13 Accessorio-Sonda In Metallo ........2 Specifiche Tecniche ..........9 Panoramica ............... 2 Precauzioni ............... 9 Display - Vista Anteriore ........2 Informazioni Su Oregon Scientific ......9 Display - Vista Posteriore ........3 Dichiarazione Di Conformita’ue ......10 Sonda In Metallo ........... 4 Per Iniziare ..............4 Installazione Delle Batterie ........4 Collegamento Della Sonda ........
  • Seite 14: Istruzione

    ISTRUZIONE ACCESSORIO-SONDA IN METALLO Grazie per aver scelto il termometro Oregon Scientific™ I l ter momet ro BB Q è in grado di f unzionare Grill Right Bluetooth BBQ. L’utilizzo è semplice, basta contemporaneamente con due sonde in metallo. Per programmare la scelta del tipo di carne, la temperatura ordinare un’altra sonda in metallo, visitare il nostro sito desiderata o il tempo di cottura, direttamente sul display del Web all’indirizzo www.oregonscientific.com per ulteriori termometro oppure sull’app scaricabile sul tuo dispositivo informazioni.* mobile. Quando la grigliata è cotta alla perfezione, il • Sonda in metallo (AWP133)
  • Seite 15: Display - Vista Posteriore

    DISPLAY - VISTA POSTERIORE 1. Icone profilo carne 2. Modalità profilo carne; nome del cibo; livello di cottura; stato della cottura. 3. Temperatura corrente; °C/°F: unità di misurazione della temperatura 4. %: avanzamento della cottura; Timer cottura; temperatura desiderata e indicatore HR/MIN/SEC: indicatore ore/minuti/secondi : canale uno/canale due; : avvisi sul livello di cottura per il canale uno/due; : indicatore modalità profilo carne : indicatore temperatura desiderata; : indicatore modalità timer; 1. Cappuccio in silicone : indicatore batteria in esaurimento 2. Presa jack canale uno : indicatore di abbinamento 3. Presa jack canale due : accedere all’impostazione modalità; confermare 4. °C/°F: pulsante a scorrimento unità di misurazione della l’impostazione; premere e tenere premuto per spegnere.
  • Seite 16: Sonda In Metallo

    SONDA IN METALLO COLLEGAMENTO DELLA SONDA È possibile usare contemporaneamente due sonde. Per ordinare un’altra sonda, visitare il nostro sito Web all’indirizzo www.oregonscientific.com. Collegare la sonda al display: • Estrarre il cappuccio in gomma facendo attenzione, quindi inserire la sonda della carne nella presa. La presa superiore è per il canale uno, quella inferiore per il canale due. 1. Punta della sonda in metallo POSIZIONAMENTO 2. Cavo connettore della sonda in metallo Posizionare il display: PER INIZIARE È possibile posizionare il display sul tavolo e regolare l’inclinazione del display utilizzando il supporto a INSTALLAZIONE DELLE BATTERIE scomparsa.
  • Seite 17: Impostazioni

    IMPOSTAZIONI Sono disponibili tre opzioni per selezionare la modalità desiderata per la grigliata. Esse sono • Modalità profilo carne • Modalità temperatura desiderata • Modalità timer SELEZIONE CANALE Una volta installate le batterie per il primo utilizzo, selezionare un canale per la sonda collegata. Impostare il programma singolarmente per ogni canale. 1. Premere -/+ per passare da e viceversa; lampeggia durante l’impostazione. Posizionare la sonda in metallo: diventerà stabile durante l’esecuzione del programma. UNITÀ DI MISURAZIONE DELLA TEMPERATURA Per selezionare Fahrenheit (°F) o Celsius (°C) quale unità di misurazione della temperatura, aprire il vano batterie e selezionare l’unità di misura desiderata.
  • Seite 18: Modalità Temperatura Desiderata

    Selezionare il tipo di cib: Selezionare il livello di cottura: 1. Una volta selezionato un canale, premere SET e, È anche possibile impostare il livello di cottura attraverso successivamente, premere -/+ per selezionare la l’applicazione nel dispositivo mobile. Selezionare i quattro modalità Profilo carne ( ). Premere nuovamente SET livelli principali (RARE/MEDIUM RARE/MEDIUM/WELL e proseguire con l’impostazione del tipo di cibo. DONE) /(AL SANGUE/MEDIA AL SANGUE/MEDIA/ BEN COTTA) nel display; è possibile personalizzare 2. Premere -/+ per il tipo di carne desiderata; sul display il livello di cottura (RARE/MEDIUM RARE/MEDIUM/ appariranno contemporaneamente l’icona e il nome del...
  • Seite 19: Modalità Timer

    MODALITÀ TIMER AVVIO/INTERRUZIONE Se si desidera passare tra le varie modalità di cottura, Nella modalità Timer ( ), è possibile impostare occorre interrompere quella corrente ed eseguire direttamente un programma timer per la grigliata. Una nuovamente le impostazioni. volta avviato il timer, il tempo restante sarà conteggiato alla rovescia. Tuttavia, se non si interrompe il timer, esso Avvio programma: continuerà a contare in senso crescente fino a quando Una volta terminata l’impostazione, premere START per non lo si spegne. avviare il programma di misurazione. Imposta timer: Interruzione impostazione: 1. Premere -/+ per selezionare un formato timer: HH:MM • Durante un’impostazione, premere START per interrompere (ore:minuti) o MM:SS (minuti: secondi). Premere SET per l’impostazione e tornare alla modalità di inattività.
  • Seite 20: Funzionamento

    MODALITÀ TIMER FUNZIONAMENTO Una volta attivata questa modalità, è possibile MODALITÀ PROFILO CARNE visualizzare contemporaneamente lo stato della cottura, Prima di avviare questa modalità, accertarsi che la punta la temperatura del cibo corrente e il timer di conto alla della sonda sia inserita correttamente nel cibo. rovescia. Avviare la modalità Se il cibo è troppo cotto, N.B. il timer continuerà a funzionare • Premere START per attivare ma conterà in senso crescente la modalità. Quando il funzionamento è avviato, è emettendo dei suoni di avviso. possibile visualizzare nello Non occorre inserire N.B.
  • Seite 21: Specifiche Tecniche

    SPECIFICHE TECNICHE PRECAUZIONI • Non sottoporre il prodotto a forza eccessiva, urti, TIPO DESCRIZIONE polvere, sbalzi di temperatura o umidità. DISPLAY • Non otturare i fori di aerazione con oggetti come 3,54 x 3,54 x 1,20 pollici giornali, tende, etc. L x W x H 90 x 90 x 30.5 mm • Non immergere l’unità in acqua. Se si versa del liquido 146 g ( 5,15 once) senza sul prodotto, asciugarlo immediatamente con un panno Peso batterie morbido e liscio. Intervallo di misurazione Da 0°C a 300°C • Non pulire l’unità con materiali abrasivi o corrosivi.
  • Seite 22: Informazioni Su Oregon Scientific

    Caratteristiche e accessori non disponibili in tutti NOTA disponibile, su richiesta, tramite il servizio clienti della i paesi. Per ulteriori informazioni, rivolgersi al proprio Oregon Scientific. rivenditore. INFORMAZIONI SU OREGON SCIENTIFIC Per ulteriori informazioni sui prodotti Oregon Scientific, visitate il nostro sito web www.oregonscientific.com. Per richiedere informazioni, contattate il nostro Servizio Clienti all’indirizzo info@oregonscientific.it PAESI CONFORMI ALLA DIRETTIVA R&TTE...
  • Seite 23 Vue D’ensemble ............2 Caracteristiques ............9 Unite D’affichage - Vue Avant........ 2 Precautions ............... 9 Unite D’affichage - Vue Arriere ......3 À Propos D’oregon Scientific ........9 Sonde Metallique ..........4 EU – Déclaration De Conformité ......10 Demarrage ..............4 Installation Des Piles ..........4 Branchement De La Sonde ........4 Mise En Place ............
  • Seite 24: Instructions

    INSTRUCTIONS ACCESSOIRE - SONDE METALLIQUE Merci d’avoir choisi le thermomètre BBQ Bluetooth de Le thermomètre BBQ peut fonctionner avec deux sondes Oregon Scientific™. Il suffit de programmer votre choix de métalliques simultanément. Pour commander une sonde type de viande, la température cible ou le temps de cuisson métallique supplémentaire, visitez notre site Web à soit sur l’unité d’affichage tactile ou sur votre smart phone l’adresse www.oregonscientific.fr pour plus de détails.* ou tablette l’application correspondante. Lorsque l’aliment • Sonde métallique (AWP133) sur votre barbecue est cuit à la perfection, le thermomètre vous alertera via un indicateur de code couleur et via VUE D’ENSEMBLE votre appareil mobile. Nul besoin de patienter près du barbecue pour surveiller la cuisson. Cela vous permet...
  • Seite 25: Unite D'affichage - Vue Arriere

    1. icônes des profils de viande UNITE D’AFFICHAGE - VUE ARRIERE 2. Mode profil de viande ; nom de l’aliment ; degré de cuisson ; état de la cuisson 3. Température actuelle; °C/°F: unité de mesure de la température 4. %: Progression de la cuisson; Minuteur de cuisine ; Température de consigne et indicateur ; HR/MIN/SEC: indicateur de heure / minute / seconde : Canal un / canal deux ; : Alerte de degré de cuisson canal un / deux ; : Indicateur du mode profil de viande : Indicateur de température de consigne; 1. Bouchon en silicone : Indicateur du mode minuteur; 2. Prise du canal un : Indicateur de pile faible 3. Prise du canal deux : Indicateur de connexion 4. °C/°F: bouton coulissant de l’unité de mesure de la : Entrez dans le réglage du mode ; confirmez le température réglage, appuyez et maintenez pour éteindre.
  • Seite 26: Sonde Metallique

    3. Remettez le couvercle du compartiment des piles . SONDE METALLIQUE BRANCHEMENT DE LA SONDE Vous pouvez utiliser deux sondes en même temps. P o u r c o m m a n d e r u n e sonde supplémentaire, visitez notre site Web à l’adresse suivante : www.
  • Seite 27: Reglages

    REGLAGES Vous disposez de trois options pour sélectionner le mode désiré pour votre barbecue. Il s’agit de : • Mode Profil de viande • Mode température de consigne • Mode Minuteur SELECTIONNER LE CANAL Après installation des piles de votre première utilisation, sélectionnez un canal où brancher votre sonde. Vous devez configurer le programme pour chaque canal individuellement. 1. Appuyez sur -/+ pour alterner entre Pour installer la sonde métallique: clignote lors de l’installation. : arrêtera de clignoter lorsque le programme sera en cours d’exécution. UNITE DE MESURE DE LA TEMPERATURE Pour sélectionner Fahrenheit (°F) ou Celsius (°C) comme unité de mesure de la température, faites glisser le bouton vers °C/°F, situé dans le compartiment des piles.
  • Seite 28: Mode Temperature De Consigne

    Sélectionnez le type d’aliment : Sélectionner le degré de cuisson: 1. Après avoir sélectionné un canal, appuyez sur SET Vous pouvez également définir le degré de cuisson (RÉGLER) pour configurer, puis appuyez sur -/+ pour grâce à l’application sur votre appareil mobile. Définissez les quatre principaux degrés (RARE/MEDIUM RARE/ sélectionner le mode Profil de viande ( ). Appuyez à...
  • Seite 29: Mode Minuteur

    MODE MINUTEUR MARCHE/ARRET Si vous souhaitez basculer entre différents modes de Dans le mode Minuteur ( ), vous pouvez directement cuisson, vous devez arrêter le mode actuel, puis effectuez définir un programme de minuterie pour votre grillade. à nouveau les réglages. Une fois que le minuteur démarre, le temps est décompté. Toutefois, si vous n’arrêtez pas le minuteur, il continuera Démarrage du programme: de compter jusqu’à ce que vous l’arrêtiez. Lorsque le réglage est terminé, appuyez sur START Régler le minuteur: (DÉMARRER) pour lancer le programme de mesure. 1. Appuyez sur -/+ pour sélectionner un format du minuteur Arrêt du réglage: : HH:MM (heure:minute) ou MM:SS (minute: seconde). • Pendant tout réglage, appuyez sur START (DÉMARRER) pour Appuyez sur SET (RÉGLER) pour confirmer le réglage.
  • Seite 30: Fonctionnement

    MODE MINUTEUR FONCTIONNEMENT Une fois que vous activez ce mode, vous pourrez MODE PROFIL DE VIANDE visualiser l’état de cuisson, la température actuelle des Avant de commencer ce mode, assurez-vous que aliments et le compte à rebours au même moment. la pointe de la sonde est correctement insérée dans REMARQUE Si l’aliment l’aliment. est trop cuit, le minuteur Lancer votre mode continuera de fonctionner mais en comptant avec des...
  • Seite 31: Caracteristiques

    CARACTERISTIQUES PRECAUTIONS • Ne pas soumettre le produit à une force excessive, au TYPE DESCRIPTION choc, à la poussière, aux changements de température UNITÉ D’AFFICHAGE ou à l’humidité. 3,54 x 3,54 x 1,20 po • Ne pas couvrir les trous de ventilation avec des L x l x h 90 x 90 x 30.5 mm journaux, rideaux etc... • Ne pas immerger le produit dans l’eau. Si vous renversez Poids 146 g (5,15 onces) sans piles du liquide sur l’appareil, séchez-le immédiatement avec un tissu doux. Plage de mesure de la 0°C à 300°C (32°F à 572°F) température • Ne pas nettoyer l’appareil avec des matériaux corrosifs ou abrasifs. Unité de température °C / °F • Ne pas trafiquer les composants internes. Cela Puissance Piles de 2 x UM-3 (AA) 1,5V invalidera votre garantie.
  • Seite 32: À Propos D'oregon Scientific

    Ne pas jeter les piles usagées dans les containers EU – DÉCLARATION DE CONFORMITÉ municipaux non adaptés. Veuillez effectuer le tri de ces Par la présente Oregon Scientific déclare que le ordures pour un traitement adapté si nécessaire. Thermomètre BBQ Bluetooth (Modèle : AW133) est • Veuillez remarquer que certains appareils sont conforme aux exigences essentielles et aux autres équipés d’une bande de sécurité. Retirez la bande du dispositions pertinentes de la directive 999/5/CE. Une...
  • Seite 33 Rückstellung ............. 8 Überblick ..............2 Technische Daten ............. 9 Vorderansicht Des Anzeigegerätes ....... 2 Vorsichtsmassnahmen ..........9 Rückansicht Des Gerätes ........3 Über Oregon Scientific .......... 10 Metallsonde ............4 EU-Konformitätserklärung ........10 Inbetriebnahme ............4 Einbau Der Batterie ..........4 Anschluss Der Sonde ..........4 Platzierung ............
  • Seite 34: Anleitung

    ANLEITUNG ZUBEHÖR: METALLSONDE Danke, dass Sie das Oregon ScientificTM Grill Right Das BBQ Thermometer kann gleichzeitig mit zwei Bluetooth BBQ Thermometer ausgewählt haben. Metallsonden arbeiten. Zur Bestellung einer weiteren Programmieren Sie einfach Ihr Grillgut, die gewünschte Sonde besuchen Sie bitte unseren Webshop unter Te m p e r a t u r o d e r K o c h z e i t e n t w e d e r a u f d e r www.oregonscientific.com für weitere Einzelheiten* Sensortastenanzeige oder mit Hilfe der entsprechenden • Metallsonde (AWP133)
  • Seite 35: Rückansicht Des Gerätes

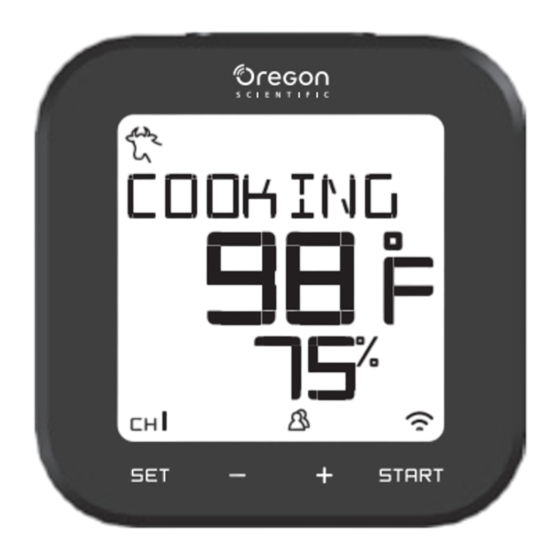
    1. Symbole der Fleischarten RÜCKANSICHT DES GERÄTES 2. Fleischprofilmodus; Name des Speise; Zubereitungsstufe; Kochstatus 3. Gegenwärtige Kochtemperatur; °C/°F: Temperaturmesseinheiten 4. %: Kochfortschritt; Kochtimer; Zieltemperatur & Anzeige HR/MIN/SEC: Stunden-/Minuten-/Sekunden-Anzeige : Kanal 1, Kanal 2; : Alarm über den Zubereitungsstand für Kanal 1 und 2; : Fleischprofilmodusanzeige : Zieltemperaturanzeige; : Schaltuhranzeige; 1. Silikonabdeckung : Anzeige der fast leeren Batterie 2. Buchse zu Kanal 1 : Paarungsanzeige 3. Buchse zu Kanal 2 : Den Modus set-up einstellen und Einstellung bestätigen; zum Abschalten drücken und halten. 4. °C/°F: Schiebeknopf zur Temperaturmesseinheit : Einstellwert verkleinern. 5. Light /Licht: Schiebeknopf zur Hintergrundbeleuchtung : Einstellwert erhöhen.
  • Seite 36: Metallsonde

    METALLSONDE ANSCHLUSS DER SONDE Sie können gleichzeitig 2 Sonden verwenden. Zur Bestellung einer weiteren Sonde besuchen Sie bitte unseren Webshop unter www.oregonscientific.com. Anschluss der Sonde zur Anzeigeeinheit: • Gummikappe sorgfältig herausziehen und dann Fleischsonde in die Buchse einführen. Die obere Buchse ist für Kanal 1, die untere Buchse für Kanal 2 bestimmt. 1. Spitze der Metallsonde 2. Verbindungsdraht der Metallsonde PLATZIERUNG Platzierung des Anzeigegeräts: INBETRIEBNAHME...
  • Seite 37: Programm-Einstellung

    PROGRAMM-EINSTELLUNG Sie haben drei Möglichkeiten, Ihre gewünschte Grillweise zu wählen, nämlich • nach Speiseart • nach Zieltemperatur • nach Zeit KANALWAHL Nach der Installation der Batterien für den ersten Gebrauch wählen Sie einen Kanal für Ihre eingeführte Sonde. Das Programm ist für jeden Kanal gesondert einzugeben. 1. +/- leicht antippen, um zwischen zu schalten. Benutzung der Metallsonde: Während des Einrichtens blinkt 2. wird sich stabilisieren, wenn das Programm angelaufen ist. TEMPERATURMESSEINHEIT Zur Wahl von Celsius (°C) oder Fahrenheit (°F), als Ihre bevorzugte Wärmemesseinheit, benutzen Sie den °C/°F Schieber, der sich im Batteriefach befindet. Zum genauen Ablesen der Temperatur Ihres Grillgut ist PRODUKTPROFIL-MODUS die Spitze der Metallsonde so nahe wie möglich in die...
  • Seite 38: Zieltemperatur-Modus

    Wahl des Produkts: Garstufe wählen: 1. Nach der Wahl eines Kanals, leicht auf SET tippen, Sie können die Garstufe auch über die Anwendung an Ihrem Mobilgerät einstellen. Setzen Sie die vier +/- drücken, um das Produktprofil zu wählen ( ). SET hauptsächlichen Stufen: erneut wählen und mit der Einstellung Ihrer Produktsorte weitermachen. RARE/blutig oder englisch, MEDIUM RARE/halb durch 2. Zur Wahl zwischen verschiedenen Produkten in bzw. halbgar, MEDIUM WELL/fast durch, WELL DONE/ der folgenden Reihenfolge wählen, auf +/- drücken;...
  • Seite 39: Timer-Modus

    TIMER-MODUS START/STOP Wenn Sie zwischen verschiedenen Kocharten wechseln Im Timer-Modus ( ) lässt sich direkt ein Timer- möchten, muss der gegenwärtig eingegebene Modus Programm für Ihre Grillspeise einsetzen. Wenn die angehalten und dann der neue Modus eingegeben Zeituhr beginnt, wird die Zeit rückwärts gezählt. Wenn werden. Sie aber den Timer nicht anhalten, wird er so lange weiterzählen, bis Sie ihn stoppen.
  • Seite 40: Betrieb

    TIMER-MODUS BETRIEB Nach Aktivierung dieses Modus ist gleichzeitig PRODUKTPROFIL-MODUS Kochstatus, gegenwärtige Wärme der Speise und Bevor Sie diesen Modus beginnen, versichern Sie sich, Rückzählung des Timers zu sehen. dass die Spitze der Sonde korrekt in das Fleischstück HINWEIS Wenn die Speise eingeführt ist. überkocht ist, wird der Timer Ihren Modus beginnen weiterhin funktionieren, aber mit Vorwärtszählen und • Zur Aktivierung des Signalon. Modus START drücken. Nach Funktionsbeginn HINWEIS Führen Sie die...
  • Seite 41: Technische Daten

    TECHNISCHE DATEN VORSICHTSMASSNAHMEN • Setzen Sie das Gerät keiner extremen Gewalteinwirkung BESCHREIBUNG und keinen Stößen aus, und halten Sie es von Anzeige-Einheit übermäßigem Staub, Hitze oder Feuchtigkeit fern. • Sie dürfen die Belüftungsöffnungen nicht mit Länge x Breite x Höhe 90 x 90 x 30.5 mm Gegenständen abdecken, wie z.B. Zeitungen, Vorhänge, usw. Gewicht 146 g ohne Batterie • Tauchen Sie das Gerät niemals in Wasser. Falls Sie eine Flüssigkeit über das Gerät verschütten, trocknen Temperaturmessbereich 0°C bis 300°...
  • Seite 42: Über Oregon Scientific

    Verbrauchte Batterien gehören nicht in den Hausmüll. EU-KONFORMITÄTSERKLÄRUNG Bitte geben Sie sie bei einer Sammelstelle für Hiermit erklärt Oregon Scientific, Grill Right Bluetooth Altbatterien bzw. Sondermüll ab. BBQ Thermometer(Modell: AW133) oder mit den • Bitte beachten Sie, dass manche Geräte mit einem grundlegenden Anforderungen und anderen relevanten Batterieunterbrechungsstreifen bestückt sind. Vor dem Vorschriften der Richtlinie 999/5/EG übereinstimmt. Eine...
  • Seite 43 Descripción General ..........2 Especificación ............9 Unidad De Pantalla - Vista Frontal ......2 Precaución ..............9 Unidad De Pantalla - Vista Trasera ......3 Sobre Oregon Scientific ........10 Sonda Metálica ............4 EU - Declaración De Conformidad ......10 Inicio ................4 Instalación De Las Pilas .......... 4 Conexión De La Sonda .......... 4 Colocación .............
  • Seite 44: Instrucciones

    INSTRUCCIONES ACCESORIO-SONDA METÁLICA Gracias por elegir el Termómetro para parrilla derecho con El termómetro de la parrilla puede funcionar con Bluetooth de Oregon Scientific™. Basta con programar dos sondas metálicas a la vez. Para solicitar una el tipo de carne, la temperatura deseada o el tiempo de sonda metálica adicional, por favor visite nuestra cocción, ya sea en la unidad de pantalla táctil o desde web en www.oregonscientific.com para más detalles. * el dispositivo a través de la aplicación correspondiente. • Sonda metálica (AWP133) Cuando la parrilla está preparada a la perfección, el termómetro le avisará a través de indicadores con códigos DESCRIPCIÓN GENERAL de color y del dispositivo. No tendrá que esperar junto...
  • Seite 45: Unidad De Pantalla - Vista Trasera

    1. Iconos del tipo de carne UNIDAD DE PANTALLA - VISTA TRASERA 2. Modo tipo de carne; nombre de los alimentos; nivel cocción; estado de cocción 3. Temperatura actual; °C/°F: Unidad de medida de la temperatura 4. %: Progreso de cocción; temporizador de cocina; temperatura e indicador; HR/MIN/SEC: indicador de hora/minuto/segundo : Canal 1/canal 2; : Alertas de grado de cocción para el canal 1 / 2; : Indicador del modo tipo de carne : Indicador de temperatura; : Indicador del modo temporizador; : Indicador de bactería baja : Indicador de conexión 1. Tapa de silicona : Entre en el modo de configuración; confirme 2. Clavija del canal de uno la configuración, presione y mantenga presionado 3. Clavija del canal de dos hasta que se apague. 4. °C/°F: botón deslizante de unidad de medida de : Disminuya el valor del ajuste.
  • Seite 46: Sonda Metálica

    CONEXIÓN DE LA SONDA SONDA METÁLICA Pueden utilizarse dos sondas a la vez. Para pedir una sonda adicional, por favor visite nuestra web www.oregonscientific.com. Para conectar la sonda c o n l a u n i d a d d e visualización: • Extraiga con cuidado la tapa de goma y luego conecte la sonda de la carne en el enchufe.
  • Seite 47: Ajustes

    El cable de la sonda es de 1 metro de longitud aproximadamente y está hecho de un material resistente al calor, pero no puede exponerse a una fuente de calor directa. AJUSTES Estas son las tres opciones para seleccionar el modo deseado para su parrilla: • Modo perfil de la carne • Modo temperatura • Modo temporizador SELECCIONAR EL CANAL Después de la instalación de la pila en su primer uso, seleccione un canal para la sonda conectada. Es necesario configurar el programa para cada canal de...
  • Seite 48: Modo Perfil Carne

    MODO PERFIL CARNE Pescado En el modo de perfil carne, puede seleccionar el tipo de alimento que ha sido programado para la parrilla en una Hamburguesa duración de temperatura predeterminada. Selección del tipo de alimento: Seleccione el nivel del punto de cocción: 1. Tras seleccionar un canal, pulse SET (CONFIGURAR) para configurar, pulse - / + para seleccionar el modo También puede configurar el nivel de cocción a través de la aplicación en su dispositivo móvil. Establezca los de carne ( ). Marque SET (CONFIGURAR) de nuevo cuatro niveles principales (RARE / MEDIUM RARE / y continúe con la configuración para el tipo de alimentos.
  • Seite 49: Modo Temporizador

    Set target temperature: Cocción Pre-alerta Listo Pasado 1. Tap -/+ to adjust the temperature value. Parpadeo 2. Tap SET to confirm the setting. Color LED Amarillo Ambar Rojo en rojo 4 pitidos / 8 pitidos / Alerta 4 pitidos MODO TEMPORIZADOR segundo segundo En el modo temporizador ( ), puede configurar directamente unprograma de tiempo para su comida a la INICIAR/DETENER parrilla. Una vez que el temporizador se ponga en marcha, Si desea cambiar entre los diferentes modos de cocción, comenzará la cuenta atrás. De todos modos, hasta que es necesario detener el actual y, a continuación, volver usted no detenga el temporizador, este seguirá contando. a la configuración.
  • Seite 50: Operación

    Mantenga pulsado - y + al mismo tiempo para activar el modo de MODO TEMPORIZADOR conexión. El progreso de conectividad tarda hasta 30 segundos, Una vez que se activa este parpadeará durante la conectividad, y se encenderá modo, puedrá ver el estado cuando la conexión se haya realizado correctamente. de cocción, la temperatura actual de los alimentos y la OPERACIÓN cuenta atrás del temporizador al mismo tiempo. MODO PERFIL DE CARNE Si la comida se pasa, NOTA A n t e s d e i n i c i a r e s t e...
  • Seite 51: Especificación

    ESPECIFICACIÓN PRECAUCIÓN • No exponga el producto a fuerza extrema, descargas, TIPO DESCRIPCIÓN polvo, fluctuaciones de temperatura o humedad. UNIDAD DE PANTALLA • No cubra los orificios de ventilación con objetos como 90 x 90 x 30.5 mm periódicos, cortinas, etc. L x P x C 3.54 x 3.54 x 1.20 pulgadas • No sumerja el dispositivo en agua. Si se vertiera líquido en la unidad, límpiela con un paño suave y sin Peso 146 g ( 5,15 oz) sin pilas electricidad estática. Rango de medición de De 0°C a 300°C • No limpie la unidad con materiales abrasivos o corrosivos. temperatura (32°F a 572°F) • No manipule los componentes internos. De hacerlo se Unidad de temperatura °C / °F invalidaría la garantía.
  • Seite 52: Sobre Oregon Scientific

    Por medio de la presente Oregon Scientific cinta de compartimento para pilas antes de usarlo por primera vez. declara que el Termómetro para parrilla recto con Bluetooth (Modelo: AW133) cumple con los requisitos NOTA La ficha técnica de este producto y los contenidos de este manual de usuario pueden esenciales y cualesquiera otras disposiciones aplica- cambiarse sin aviso.
  • Seite 53 Sonda Metálica Suplementar ......... 2 Reconfigurar ............. 9 Aspecto Geral ............2 Especificações ............9 Tela De Visualização - Vista De Frente....2 Precauções ............... 9 Tela De Visualização - Vista De Trás ..... 3 Sobre A Oregon Scientific ........10 Sonda Metálica ............4 CE – Declaração De Conformidade ...... 10 Iniciar ................. 4 Instalação Da Pilha ..........4 Ligação Da Sonda ..........4 Colocação .............. 4 Configurações ............
  • Seite 54: Introdução

    INTRODUÇÃO SONDA METÁlICA SUPlEMENTAR Agradecemos a sua preferência pelo Termômetro O Termômetro para barbecue pode funcionar com duas Bluetooth Grill Right da Oregon Scientific™. Basta sondas metálicas em simultâneo. Para encomendar programar o tipo de carne que vai usar, a temperatura uma sonda metálica suplementar, por favor vá ao nosso pretendida ou tempo de cozedura no tela ou no seu website, em www.oregonscientific.com, para obter mais dispositivo móvel, usando o aplicativo correspondente.
  • Seite 55: Tela De Visualização - Vista De Trás

    1. Ícones de tipo de carne TElA DE vISUAlIzAÇÃO - vISTA DE TRÁS 2. Modo de tipo de carne; nome do alimento; nível de consistência; estado de cozedura 3. Temperatura atual; °C/°F: unidade de medida de temperatura 4. %: Evolução da cozedura; Temporizador de cozedura; Temperatura pretendida & indicador; HR/MIN/SEC: indicador de : Canal um/canal dois; : Alertas de nível de consistência para canal um/dois; : Indicador de modo de tipo de carne; : Indicador de temperatura pretendida; : Indicador de modo de temporizador; 1. Tampa de silício : Indicador de pilha com pouca carga; 2. Entrada do canal um : Pareamento de indicador 3. Entrada do canal dois : inserir modo de configuração; confirmar 4. lIGHT: botão deslizante de retroiluminação configuração, pressionar continuamente para desligar.
  • Seite 56: Sonda Metálica

    3. Volte a colocar a tampa do compartimento das SONDA METÁlICA pilhas. lIGAÇÃO DA SONDA Pode usar duas sondas ao mesmo tempo. Para encomendar uma sonda suplementar, vá ao nosso website, em www.oregonscientific.com. ligar a sonda ao tela de visualização: • Retire cuidadosamente a tampa de borracha e ligue 1. Ponta da sonda metálica a sonda à tomada. 2. Fio de ligação da sonda metálica A tomada de cima é para o canal um, a tomada de baixo é para o canal dois.
  • Seite 57: Configurações

    O fio da sonda tem cerca de 1 metro de comprimento e é feito de material resistente ao calor, mas não pode entrar em contato direto com uma fonte de calor. CONFIGURAÇÕES Pode selecionar 3 opções para os seus grelhados, que são • Modo de tipo de carne • Modo de temperatura pretendida • Modo de temporizador SElECIONAR CANAl Depois de instalar as pilhas para a primeira utilização, selecione um canal para a sonda. Vai ter de configurar o programa para cada canal separadamente. 1. Toque em -/+ para alternar entre / Colocar a sonda metálica: pisca durante a configuração. fica estável quando o programa está em funcionamento. UNIDADE DE MEDIDA DE TEMPERATURA Para selecionar Fahrenheit (°F ) ou Celsius (°C) como unidade de medida de temperatura, faça deslizar o botão para °C/°F, no compartimento das pilhas.
  • Seite 58: Modo De Tipo De Carne

    MODO DE TIPO DE CARNE Peru INo modo de tipo de carne, pode selecionar o tipo de alimento que foi programado para ser grelhado e uma Peixe temperatura pré-definida. Selecionar tipo de alimento: Hambúrguer 1. Depois de selecionar um canal, toque em SET para configurar, toque em -/+ para selecionar o modo de Selecionar nível de consistência: tipo de carne ( ). Toque em SET novamente e continue a configuração do tipo de alimento. Também pode definir o nível de consistência através do aplicativo no seu dispositivo móvel. Defina os quatro 2. Toque em -/+ para selecionar entre os diferentes níveis principais (RARE/MEDIUM RARE/MEDIUM/...
  • Seite 59: Modo De Temperatura Pretendida

    MODO DE TEMPERATURA PRETENDIDA SOM DE AlERTA & lUz lED DE ESTADO Há quatro tipos de retroiluminação LED apresentados Em modo de temperatura pretendida ( ), pode no tela para cada nível de cozedura dos seus grelhados. definir diretamente a temperatura desejada para os Se não quiser ter nenhuma luz LED ligada, desligue o seus grelhados. botão light no compartimento das pilhas. Definir temperatura pretendida: A coz- Terminou 1. Toque em -/+ para ajustar o valor a temperatura.
  • Seite 60: Emparelhamento Bluetooth

    EMPARElHAMENTO BlUETOOTH MODO DE TEMPERATURA PRETENDIDA Pode descarregar um aplicativo e controlar e ver o Uma vez ativado este modo, Termômetro para barbecue através da tecnologia pode ver simultaneamente o Bluetooth®v4.0. estado de cozedura, temperatura atual dos alimentos, temperatura Prima continuamente e ao mesmo tempo – e + para pretendida para a cozedura e ativar o modo de emparelhamento. O emparelhamento dados de evolução (%).
  • Seite 61: Eliminar Configurações De Cozedura Anteriores

    ElIMINAR CONFIGURAÇÕES DE SONDA METÁlICA COzEDURA ANTERIORES Comprimento 175 mm (7 pol) Prima continuamente START durante 5 segundos para eliminar a última configuração de modo de cozedura. Peso 62 g (2,22 onças) Resistência da Cerca de 380 °C (716 °F) RECONFIGURAR sonda metálica ao calor Pressione RESET no compartimento das pilhas com 0°C até 300°C Amplitude térmica um objeto pontiagudo, como por exemplo a ponta de (32°F até 572°F) um clipe para papéis. ESPECIFICAÇÕES PRECAUÇÕES TIPO DESCRIÇÃO • Não submeta a unidade a forças excessivas, impactos, poeiras, oscilações de temperatura ou umidade. Tela DE vISUAlIzAÇÃO • Não obstrua as aberturas de ventilação com itens como 90 x 90 x 30.5 mm C x L x A jornais, cortinas, etc. 3.54 x 3.54 x 1.20 pol • Não mergulhe a unidade na água. Se respingar líquido Peso 146 g (5,15 onças) sem pilhas...
  • Seite 62: Sobre A Oregon Scientific

    CE – DEClARAÇÃO DE CONFORMIDADE de maneira separada para tratamento especial. Oregon Scientific declara que este(a) Termômetro • Observe que algumas unidades estão equipadas com Bluetooth para Barbecu Grill Right (Modelo: AW133) uma tira de segurança da bateria. Remova a tira do está conforme com os requisitos essenciais e outras compartimento de bateria antes do primeiro uso. provisões da Diretriz 1999/5/CE. Uma cópia assinada e NOTA As especificações técnicas deste produto e...
  • Seite 63 Reset ................9 Overzicht ..............2 Specificaties ............. 9 Display Eenheid - Vooraanzicht ......2 Waarschuwingen ............9 Display Eenheid - Achter Aanzicht ......3 Over Oregon Scientific .......... 10 Metalen Thermometer ..........4 EU Conformiteits Verklaring ........10 Om Te Beginnen ............4 Plaatsing Van De Batterijen ........4 Aansluiten Van De Thermometer ......4 Plaatsing ..............
  • Seite 64: Aanwijzingen

    AANWIJZINGEN ACCESSOIRES-METALEN THERMOMETER Dank u voor uw keuze voor de Oregon Scientific™ De BBQ thermometer kan met twee metalen Grill Right Bluetooth BBQ thermometer. Programmeer thermometers tegelijk werken. Om een e xtra metalen eenvoudig uw keuze van het type vlees, de gewenste thermometer te bestellen, kunt u onze website bezoeken temperatuur of kooktijd, hetzij op de touch-key display-unit op www.oregonscientific.com voor meer informatie. * of uw smartphone via de bijbehorende app. Wanneer uw • Metalen thermometer (AWP133)
  • Seite 65: Display Eenheid - Achter Aanzicht

    1. Vleesprofielikonen DISPLAy EENHEID - ACHTER AANZICHT 2. Vleesprofielmode; naam van het voedsel; garingsniveau; kookstatus 3. Huidige temperatuur; °C/°F: temperatuurmeeteenheid 4. %: Kookvoortgang; Kooktimer; Gewenste temperatuur & indicator; HR/MIN/SEC: uur/minuut/seconde indicator : Kanaal een/kanaal twee; / : Waarschuwingen garingsniveau voor kanaal een/twee; : Indicator vleesprofielmode : Indicator gewenste temperatuur; 1. Siliconen kap : Indicator Timer mode; : Indicator lage batterijspanning 2. Kanaal een connector : Pairingindicator 3. Kanaal twee connector : ga naar mode-instelling; bevestig instelling;...
  • Seite 66: Metalen Thermometer

    AANSLUITEN VAN DE THERMOMETER METALEN THERMOMETER U kunt twee thermometers tegelijkertijd gebruiken. Om een extra thermometer te bestellen, kunt u terecht op onze website www.oregonscientific.com. Om de thermometer verbinden beeldscherm: • Trek voorzichtig de rubberen kap weg en steek de vleesthermometer in de connector. 1. Punt van metalen thermometer De bovenste connector is voor kanaal een, de onderste voor kanaal twee. 2. Aansluitsnoer metalen thermometer PLAATSING OM TE BEGINNEN Om de displayeenheid te plaatsen: PLAATSING VAN DE BATTERIJEN U kunt het aanraakscherm op tafel leggen of schuif de Druk op RESET nadat de...
  • Seite 67: Instellingen

    De draad van de thermometer is ongeveer 1 meter lang en vervaardigd van hittebestendig materiaal, maar hij mag niet door een directe warmtebron worden verwarmd. INSTELLINGEN Er zijn drie opties om de gewenste modus voor uw grill te selecteren. Deze zijn • Vleesprofielmode • Gewenstetemperatuur-mode • Timer mode SELECTEER kANAAL Na de batterij-installatie voorafgaande aan uw eerste gebruik, selecteer een kanaal voor uw aangesloten thermometer. U moet het programma voor elk kanaal afzonderlijk instellen.
  • Seite 68: Vleesprofielmode

    VLEESPROFIELMODE Turkey (Kalkoen) In de vleesprofielmode kunt u het type gerecht selecteren dat is geprogrammeerd om een vooraf ingestelde tijd te Fish (Vis) grillen op een vooraf ingestelde temperatuur. Selecteer type gerecht: Hamburger 1. Na de keuze van een kanaal, tik op SET om in te stellen, tik op -/+ om vleesprofielmode te selecteren Selecteer garingsniveau: ). Tik opnieuw op SET en ga door met de instelling voor uw type gerecht. U kunt ook het garingsniveau via de app op uw mobiele apparaat instellen. Stel de belangrijkste vier niveaus 2. Tik op -/+ om te selecteren tussen verschillende (RARE/MEDIUM RARE/MEDIUM/WELL DONE) op typen gerecht uit de volgende reeks, waarbij het...
  • Seite 69: Timer Mode

    Stel de gewenste temperatuur in: Overcook 1. Tik op -/+ om de temperatuur in te stellen. (over- Pre-alert Cooking Ready (Voor- schreden 2. Tik op SET om de instelling te bevestigen. (koken) (klaar) waarschuwing) garing- stijd) TIMER MODE Rood knip- LED Kleur Geel Amber Rood perend In de Timer mode ( ), kunt u direct een timerprogramma Waarschu- voor uw gegrillde gerecht instellen. Zodra de timer start, 4 piepjes/ 8 piepjes/ wings 4 beeps wordt de tijd afgeteld. Echter, als u de timer niet stopt, seconde seconde -geluid zal de tijd weer oplopen totdat u hem stopt.
  • Seite 70: Bluetooth Pairing

    BLUETOOTH PAIRING GEWENSTETEMPERATUUR-MODE U kunt een toepassing downloaden en de BBQ thermometer Z o d r a u d e z e m o d u s instellen en bekijken met behulp van Bluetooth ® v4.0- activeert, kunt u tegelijkertijd technologie. de kookstatus, de actuele g e r e c h t t e m p e r a t u u r, d e Houd - en + tegelijkertijd ingedrukt om de koppeling-modus gewenste temperatuur en...
  • Seite 71: Verwijder Kookhistorie

    VERWIJDER kOOkHISTORIE METALEN THERMOMETER Houd START 5 seconden ingedrukt om de laatste Lengte 175 mm (7 in) kookstandmode-instelling te verwijderen. Gewicht 62 g RESET Hitte weerstand voor Ongeveer 380 °C (716 °F) metalen thermometer Druk op RESET in het batterijvak met behulp van een puntig object zoals een paperclip. 0 °C tot 300 °C Temperatuurbereik (32 °F tot 572 °F) SPECIFICATIES TyPE OMSCHRIJVING WAARSCHUWINGEN DISPLAy EENHEID • Stel het apparaat niet bloot aan extreme klappen, 90 x 90 x 30.5 mm schokken, stof, temperatuur of vochtigheid.
  • Seite 72: Over Oregon Scientific

    Bij deze verklaart Oregon Scientific dat deze (model: • Gooi lege batterijen niet bij het huisvuil. Dergelijk afval moet gescheiden verwerkt worden. AW133) voldoet aan de essentiële eisen en aan de • Let op, sommige apparaten zijn voorzien van een overige relevante bepalingen van Richtlijn 1999/5/EC. batterijstrip. Verwijder deze strip uit het batterijvak Een kopie van de getekende en gedateerde Conformiteits alvorens het apparaat te gebruiken.
  • Seite 73 Bluetooth-aktiverad grilltermometer timerläge ..............7 Ljudsignal och led-statusljus ........7 Modell: AW133 Start/stopp ..............7 Användarmanual Bluetooth-länkning ..........7 Användning ............7 INNEHÅLL köttprofilsläge ............7 Instruktion ............2 måltemperatursläge ..........8 förpackningens innehåll ......2 timerläge ..............8 Tillbehör – metallsensor ......
  • Seite 74: Instruktion

    INsTrUkTION du besöka vår webbplats på www.oregonscientific.com för närmare uppgifter.* tack för att du har valt den Bluetooth-aktiverade • Metallsensor (AWP133) grilltermometern Grill Right Bluetooth BBQ thermometer från Oregon Scientific™. programmera ditt val av köttyp, måltemperatur eller tillagningstid antingen på...
  • Seite 75: Visa Komponenter - Bakifrån

    3. Aktuell temperatur; VIsA kOMpONENTEr - BAkIfrÅN °c/°f: måttenhet för temperatur 4. %: Tillagningens förlopp; tillagningstimer; måltemperatur och indikator; HR/miN/SEC: indikator för timme/minut/sekund : Kanal ett/kanal två; : aviseringar om tillagningsgrad för kanal ett och två; :Indikator för köttprofilsläge : Mål temperatursindikator; : Indikator för timerläge;...
  • Seite 76: Metallsensor

    METALLsENsOr ANsLUTA sENsOrN Du kan använda två sensorer samtidigt. Om du vill beställa en extra sensor kan du besöka vår webbplats, www.oregonscientific.com. för att ansluta sensorn till visningsenheten: • Dra försiktigt av gummihatten och anslut sedan köttsensorn till uttaget. Det övre uttaget är till för kanal ett och det undre uttaget för kanal två.
  • Seite 77: Inställningar

    INsTäLLNINgAr Du har tre valmöjligheter för att välja önskat läge för din grillmat. De är: • Köttprofilsläge • Måltemperatursläge • Timerläge VäLJ kANAL När du har satt i batterierna för din första användning ska du välja en kanal för den anslutna sensorn. Du måste ställa in programmet individuellt för varje kanal.
  • Seite 78: Måltemperatursläge

    Välj tillagningsgrad: för att göra inställningar och sedan på -/+ för att välja Du kan även ange tillagningsgraden med hjälp av köttprofilsläge ( ). Tryck på sET igen och fortsätt applikationen på din mobila enhet. ange de fyra att göra inställningar för din mattyp. huvudsakliga tillagningsgraderna –...
  • Seite 79: Timerläge

    TIMErLägE sTArT/sTOpp Om du vill växla mellan olika tillagningslägen måste du I timerläget ( ), kan du direkt sätta ett timerprogram först stoppa det nuvarande läget och sedan göra om för din grillmat. När timern startar börjar tiden att räknas inställningarna.
  • Seite 80: Måltemperatursläge

    starta ditt läge Sensorn behöver inte vara instucken innan OBs! • Tryck på sTArT för att aktivera programmet startar. läget. När läget börjar arbeta kan du se tillagningens status, TA BOrT TILLAgNINgsHIsTOrIk vald tillagningsgrad, köttyp, tryck och håll in sTArT i 5 sekunder om du vill ta bort aktuell temperatur samt det senast inställda tillagningsläget.
  • Seite 81: Försiktighetsåtgärder

    Om du har några frågor är du välkommen att kontakta vår och nya batterier. kundtjänst på info@oregonscientific.com. • Bilder i manualen kan skilja sig från verkligheten. Oregon Scientific Global Distribution Limited reserverar • Denna produkt skall vid kassering sorteras som sig rätten att redigera och uttolka innehåll, terminologi och elektronikskrot.
  • Seite 82: Eu-Försäkran Om Överensstämmelse

    H ä r m e d i n t y g a r O r e g o n S c i e n t i f i c a t t d e n n a Bluetooth-aktiverad grilltermometer (AW133) står i överensstämmelse med de väsentliga egenskapskrav och...
  • Seite 83 Grill Right 藍牙燒烤溫度計 聲音提示及LED狀態指示燈 .......... 7 開啟/停止 ..............7 AW133 型號 : 藍牙配對 ................ 7 操作 ................. 7 用戶手册 肉類模式 ..............7 目標溫度模式 ..............7 目录 時間制模式 ..............8 消除過往烹飪記錄 ............8 簡介 ................2 重置按鈕 ................8 包裝內容 ..............2 規格...
  • Seite 84: 包裝內容

    簡介 概述 感謝您選用Oregon Scientific™ Grill Right藍牙燒烤溫度 顯示組件-正面圖 計。您只需操作觸碰鍵或智能裝置上的應用程式,即能以 選擇肉類、設定目標溫度或者烹調時間。倘若您的燒烤已 熟,溫度計將通過彩色指示燈以及您的智能裝置來提點 您。您無需在烤架旁等候烤肉的烹調情況。因此,這款溫 度計可爲您節約時間,從而讓您盡情招待客人。更好的 是,應用程式更可以讓您分享自己的燒烤秘訣,甚至可以 將佳餚的圖文上傳至社交網站。 包装内容 包裝內容 AA 電池 x 2 金屬探針 x 1 觸摸鍵顯屏 x 1 1. 肉類圖示 配件-金屬探針 2. 肉類模式; 食物名稱; 烤熟程度; 烹飪狀況 此款燒烤溫度計可以同時使用兩支金屬探針。如需額外訂 3. 當時溫度; 購一支探針,欲瞭解更多詳情,請瀏覽我們的網站*: °C/°F: 溫度量度單位...
  • Seite 85: 顯示組件-背面圖

    4. %: 烹飪進度; 顯示組件——背面圖 烹調時間制; 目標溫度及指示圖; HR/MIN/SEC: 小時/分鐘/秒指示圖 : 頻道1/頻道2; : 頻道1/2烤熟程度提示; : 肉類模式指示圖; : 目標溫度指示圖; : 時間制模式指示圖; : 低電量指示圖 : 配對指示圖 : 進入設置模式; 確定設置; 持續按下可關閉電源 : 减少设置值。 : 减少設置值。 : 開始/停止程序或手動開始/停止計時; 持續 1. 矽膠蓋 按下5秒可删除過去烹飪記錄。 2. 頻道1插孔 3. 頻道2插孔 4.
  • Seite 86: 金屬探針

    金屬探針 連接探針 您可以同時使用兩支探針。如需額外訂購一支探針,請 瀏覽我們的網站:www.oregonscientific.com. 請將探針與顯示器組件相連: • 小心將矽膠蓋拉出,然後將 探針插頭插入插孔。 上插孔爲頻道1,下插孔爲 頻道2。 1. 金屬探針針頭 2. 金屬探針連接綫 放置方式 放置顯示組件: 您可以將觸摸屏顯示組件放置在餐桌上,或者推出滑動 準備開始 架,調整適當角度,然後將其放置在桌面上。 安裝電池 電池安裝或更換完畢之後,請按RESET鍵。 1. 向上滑動,卸下電池盒後蓋。 2. 將兩枚AA電池按照正負 (+/-)極指示裝入電池盒。 3. 重新裝上電池盒背蓋。...
  • Seite 87: 選擇頻道

    設置 您可以從三種烤架模式中任意選擇一種: • 肉類模式 • 目標溫度模式 • 時間制模式 選擇頻道 首次使用時,先安裝電池,然後爲您插入的探針選擇一 個頻道。您需要爲每一個頻道設定程序。 1. 輕觸-/+可在 (頻道1/2)之間切換, 在設置時會閃爍。 2. 當所設程序開始運行時, 將不再閃爍。 溫度量度單位 安放金屬探針: 您可以爲溫度測量組件選擇華氏溫度(°F ) 或攝氏溫度 (°C) 滑動選擇電池盒上的°C/°F鍵。 肉類模式 在肉類模式中,您可以選擇已經預設燒烤溫度和時間的 食物類型。 選擇食物類型: 1. 選擇頻道之後,輕觸SET鍵開始設置,輕觸-/+選擇 肉類模式 ( )。再次輕觸SET,繼續設置您的食物 爲了準確讀出您的食物溫度,您需要將金屬探針的針尖 類型。 儘量插入食物中間。 2. 輕觸-/+,按下列順序選擇不同的食物類型,食物類 探針電綫約1米長,採用耐熱材料製作而成,但請勿將 型圖標及名稱亦將同時顯示。...
  • Seite 88: 目標溫度模式

    三分熟 四分熟 半熟 全熟 序號 食物類型圖標 食物名稱 牛肉 57°C (135°F) 63°C (145°F) 71°C (160°F) 77°C (170°F) 小牛肉 每種烤熟程度的預設溫度均符合USDA部標準。 注 羊肉 目標溫度模式 在目標溫度模式( )中,您可以直接設置您需要的烤架溫度。 猪肉 設定目標溫度: 鶏肉 1. 輕觸-/+調節溫度值。 2. 輕觸SET確定溫度設置。 火鶏肉 時間制模式 魚肉 在時間制模式 ( )中,您可以直接爲烤架上的食物設 置一個時間程序。一旦時間制啟動,便開始倒數計時。 漢堡 然而,若果您不主動停止該時間制,它將持續計時,直 至您將其停止。 設置時間制: 1.
  • Seite 89 同時按住 – 和 + ,以進行配對模式。配對過程最多耗時30 聲音提示及LED狀態指示燈 秒,配對期間, 保持閃爍,每次配對成功連接時, 顯示屏備有四種LED背景燈,可以爲您顯示燒烤食物的 將開啟。 不同烹飪程度。 您若不希望LED燈長亮,可關閉電池盒內的Light按鈕。 操作 肉類模式 烹飪中 預警 烹飪完成 烹飪過度 開啟該模式之前,確保探針針尖 黃色 紅色 紅色急閃 LED顔色 已正確插入食物中。 琥珀色 啟動您的模式 提示聲 無 一次4聲 4聲蜂鳴/秒 8聲蜂鳴/秒 • 輕觸START以啟動該模式。 當溫度計開始工作後,您可以在 開啟/停止 顯示屏上看見烹飪狀況、所選烤 若您希望選擇不同的烹飪模式,您必須停止當時模式, 熟程度、烤肉類型、當時溫度和 方能重新設置。 烹飪進度(%)。 啟動程序:...
  • Seite 90 時間制模式 重量 146克(5.15 盎司)不包電池 啟動該模式之後,您可以在顯示 屏上同時看見烹飪狀況、當時食 0°C 至 300°C 測溫範圍 (32°F 至 572°F) 物溫度和倒數時間。 溫度單位 °C / °F 電池 2 x UM-3 (AA) 1.5V 電池 倘若食物烹飪過度,時間制 注 繼續工作,但會向上計時,同時 傳送器/桌架耐熱性能 約 60°C (140°F) 伴有蜂鳴聲。 量度周期 6 秒 金屬探針 消除過往烹飪記錄 長度 持續按住START 5秒,可清除上次烹飪模式設置。 175 毫米...
  • Seite 91 Oregon Scientific Global Distribution Limited 保留權利, • 不得使用磨損或腐蝕性的物質清潔機體。 隨時行使獨立裁決權,於未事前通知情況下詮釋和解釋 • 不得以硬物刮液晶體顯示屏,此舉可能導致顯示屏的損壞。 本用戶手冊之任何內容、條款與條件並修該之。若英語 • 不要干擾機體的內部零件。此舉將使保證失效。 版本與任何其它語言版本有任何不一致處,將以英語版 • 必須使用新電池。請勿混合使用新舊電池。 本為準。 • 本指南所示圖像也許與實物不同。 • 棄置本產品時,確認已個別將之回收。 • 把產品放在某些木材表面可能會損壞其塗層。我們對此 等損壞概不負責。請諮詢傢具製造商,了解保養傢具的 資訊。 • 未經製造商的許可,不可複製手冊中的任何內容。丟棄舊 電池時,不得視之為不必分類的都市廢棄 丟棄舊電池 時,不得視之為不必分類的都市廢棄物。必須以特別方式 另行處理此等廢棄物。 • 請注意,部份機體配備電池安全繫帶。首次使用前,請將 之從電池格中拆下。 我們有權更改本產品的技術規格和本使用指南之內 注 容,而無需另行通知。 關於歐西亞 瀏覽我們的網站 www.oregonscientific.com 瞭解更多...
  • Seite 92 声音提示及LED状态指示灯 .......... 7 Grill Right 蓝牙烧烤温度计 开启/停止 ..............7 型号:AW133 蓝牙配对 ................ 7 操作 ................. 7 用户手册 肉类模式 ..............7 目录 目标温度模式 ..............7 定时器模式 ..............8 简介 ................2 消除过往烹饪记录 ............8 包裝內容 ..............2 重置按钮 ................8 配件-金属探针 ..............2 规格...
  • Seite 93 简介 概述 显示组件-前视图 感谢您选用Oregon Scientific™ Grill Right蓝牙烧烤温度 计。您仅需操作触摸屏显示组件或智能设备上的应用软 件,就可以选择肉类、设定目标温度或者烹饪时间。倘若 您的烧烤已熟,温度计将通过彩色指示灯以及您的智能设 备及时提醒您。您无需守在烤架旁紧盯烤肉是否成熟。因 此,这款温度计可为您节约时间,从而让您尽情招待客 人。最妙的是,应用软件还可以让您分享自己的烧烤秘 诀,您甚至还可以将菜肴图文上传至社交网站上。 包裝內容 AA 电池 x 2 金属探针 x 1 触摸显示屏 x 1 1. 肉类图标; 配件-金属探针 2. 肉类模式; 食物名称; 烤熟程度; 烹饪状态 3. 当前温度; 此款烧烤温度计可以同时运行两根金属探针。如需额外订 °C/°F: 温度测量单位 购一根探针,如需了解更多详情,请访问我们的网站*: www.oregonscientific.com 4.
  • Seite 94 显示组件——后视图 : 频道1/频道2; : 频道1/2烤熟程度警报; : 肉类模式指示; : 目标温度指示符; : 定时器模式指示符; : 低电量指示符; : 配对指示符; : 进入设置模式; 确定设置; 按住并保持可关闭电 源。 : 减少设置值。 : 增加设置值。 : 开始/停止程序或手动开始/停止计时; 按住 并保持5秒可删除过往烹饪记录。 1. 硅胶盖 2. 频道1插孔 3. 频道2插孔 4. LIGHt: 背光滑动键 5. °C/°F: 温度测量组件滑动键 6.
  • Seite 95 金属探针 连接探针 您可以同时使用两根探针。如需额外订购一根探针, 请访问我们的网站:www.oregonscientific.com. 请将探针与显示器组件相连: • 小心将橡胶帽拉出,然后 将探针插头插入插孔。 上插孔为频道1,下插孔 为频道2。 1. 金属探针针头 放置方式 2. 金属探针连接线 放置显示组件: 您可以将触摸屏显示组件放置在餐桌上,或者推出滑撑, 调整适当角度,然后将其放置在桌面上。 准备开始 安装电池 电池安装或更换完毕之后,请按RESEt键。 1. 向上滑动,卸下电池盒后盖。 2. 将两节AA电池按正负(+/-)极 指示装入电池盒。 3. 重新装上电池盒后盖。...
  • Seite 96 设置 您可以从三种烤架模式任意选择一种: • 肉类模式 • 目标温度模式 • 定时器模式 选择频道 首次使用时,先安装电池,然后为您插入的探针选择一 个频道。您需要为每一个频道设定程序。 (频道1/2)之间切换, 1. 轻触-/+可在 在设置时会闪烁。 2. 当所设程序开始运行时, 将不再闪烁。 温度测量单位 安放金属探针: 您可以为温度测量单位选择华氏温度(°F )或摄氏温度 (°C)滑动选择电池盒上的°C/°F键。 肉类模式 在肉类模式中,您可以选择已经预设烧烤温度和时长的 食物类型。 选择食物类型: 1. 选择频道之后,轻触SEt键开始设置,轻触-/+选择肉 为了准确读出您的烤架温度,您需要将金属探针的针尖 尽量插入食物中间。 )。再次轻触SEt,继续设置您的食物类型。 类模式( 探针导线大约1米长,采用耐热材料制作而成,但请勿将 2. 轻触-/+,按下列顺序选择不同的食物类型,食物类型 其在火源上直接加热。 图标及名称亦将同时显示。...
  • Seite 97 序号 食物类型图标 食物名称 三分熟 四分熟 半熟 全熟 牛肉 57°C (135°F) 63°C (145°F) 71°C (160°F) 77°C (170°F) 小牛肉 注 每种烤熟程度的默认温度设置符合美国农业部标准。 目标温度模式 羊肉 在目标温度模式( )中,您可以直接设置您需要的烤架 猪肉 温度。 设定目标温度: 鸡肉 1. 轻触-/+调节温度值。 2. 轻触SEt确定温度设置。 火鸡肉 定时器模式 鱼肉 在定时器模式( )中,您可以直接为烤架上的食物设置 一个定时程序。一旦定时启动,定时器便开始倒计时。然 而,倘若您不主动停止该定时器,它将持续计时,直至 汉堡 您将其停止。 设置定时器: 选择烤熟程度: 1.
  • Seite 98 同时按住–和+并保持,以激活配对模式。配对进程最多 声音提示及LED状态指示灯 耗时30秒,配对期间, 保持闪烁,每次配对成功并 显示屏备有四种LED背景灯,可以为您显示烧烤食物的 连接上时 将开启。 不同烹饪程度。 您若不希望LED灯长亮,可关闭电池盒内的Light按钮。 操作 肉类模式 烹饪中 预警 烹饪完成 烹饪过度 开启该模式之前,确保探针针 LED颜色 黄色 琥珀色 红色 红色急闪 尖已正确插入食物中。 启动您的模式 警报声 无 4声蜂鸣 4声蜂鸣/秒 8声蜂鸣/秒 • 轻触START激活该模式。当 温度计开始工作后,您可以在 开启/停止 显示屏上看见烹饪状态、所选 若您希望选择不同的烹饪模式,您必须停止当前模式, 烤熟程度、烤肉类型、当前温 方能重新设置。 度和烹饪进度(%)。 启动程序: 设置完成之后,轻按START即可启动温度测量程序。 目标温度模式 停止设置: 激活该模式之后,您可以在显...
  • Seite 99 定时器模式 温度组件 °C / °F 激活该模式之后,您可以在显示 电池 2 x UM-3 (AA) 1.5V 电池 屏上同时看见烹饪状态、当前食 发送器/桌架耐热性能 约 60°C (140°F) 物温度和倒计时定时器。 注 倘若食物烹饪过度,定时器将 测量周期 6 秒 继续工作,但会向上计时,同时 金属探针 伴有蜂鸣声。 注 请勿在启动程序之前插入探针。 长度 175 毫米 (7 英寸) 消除过往烹饪记录 重量 62 克 (2.22 盎司) 按住START并保持5秒,可消除上次烹饪模式设置。...
  • Seite 100 • 本手册所示图像可能与实物有所不同。 • 弃置本产品时,确保妥当回收以备处置。 • 把产品放在某些木材表面可能会损坏其涂层,对此类损 坏我们恕不负责。请咨询家具制造商,了解有关家具保养 的详细信息。 • 未经制造商许可,不可复制本手册中的任何内容丢弃旧 电池时,不得将其视为不可分类废弃物,而必须以特别方 式另行处理。 • 请注意,部份机体配备电池安全系带。首次使用前,请将 其从电池格中拆下。 注 我们保留权限随时变更本产品的技术规格和本使用手 册内容,恕不另行通知。 关于欧西亚 浏览我们的网站 www.oregonscientific.com.cn了解更多 关于欧西亚的产品。 如有任何疑问,请联络我们的客户服务 enquiry@oregonscientific.com.cn。 Oregon Scientific Global Distribution Limited 保留权 利,随时行使独立裁决权,于未事前通知情况下诠释和 解释本用户手册之任何内容、条款与条件并修改之。若 英语版本与任何其他语言版本有任何不一致处,将以英 语版本为准。...
  • Seite 101 © 2014 Oregon Scientific. All rights reserved. P/N.: 300103633-00002-10...

Inhaltsverzeichnis