Inhaltsverzeichnis
Werbung
Verfügbare Sprachen
Verfügbare Sprachen
Quicklinks
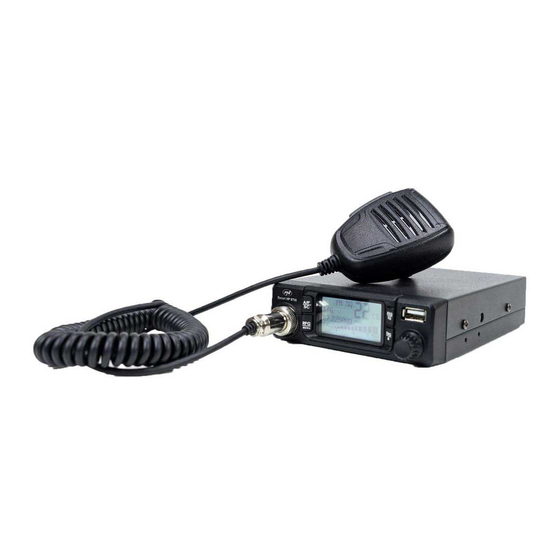
PNI ESCORT HP 9700
CB Radio/ CB-Radio / Radio CB / Statie radio CB
User manual .............................................
Benutzerhandbuch ...................................
Manual de usuario ....................................
Manuel utilisateur .....................................
Használati utasítás ...................................
Manuale utente ........................................
Instrukcja obsługi .....................................
Manual de utilizare ...................................
3
15
27
39
91
63
75
87
Werbung
Inhaltsverzeichnis

Verwandte Anleitungen für PNI ESCORT HP 9700


Inhaltszusammenfassung für PNI ESCORT HP 9700
-
Seite 1: Inhaltsverzeichnis
PNI ESCORT HP 9700 CB Radio/ CB-Radio / Radio CB / Statie radio CB User manual ..........Benutzerhandbuch ........Manual de usuario ........Manuel utilisateur ........Használati utasítás ........Manuale utente ........Instrukcja obsługi ........Manual de utilizare ........ -
Seite 3: Special Warnings
Special warnings Read the warnings below to prevent fire, personal injury, or damages to the CB radio or to the CB antenna. Do not try to operate the radio while driving. Doing so expose yourself to the risk of road accidents. This radio is designed for 12V DC power supply. -
Seite 4: Key Features
terminals, internal components that are not covered by the warranty. There are no components of the radio that can be repaired by the user. For repairs, contact an authorized service center. To prevent the risk of fire, use a suitable power supply. Key features •... - Seite 5 WARNING: If the fuse burns, do not replace it with a higher value one. The one in the factory has 2A. The installation of the antenna To use the radio you need an antenna that operates in the frequency 26- 28MHz.
- Seite 6 Radio’s front panel Nr. Name Short press function Long press function 6 pin connector Change AM/FM Activare scan AF/SC modulation function Activate RF Gain RFG/MENU Access the menu fucntion Enter SQ/ASQ level setting mode (use Switch between SQ ASQ/SQ UP/DOWN keys on and ASQ microphone) Automatically go to...
-
Seite 7: Basic Operations
Basic operations Tunr the radio on/off and adjust the volume 1. Turn the main button [8] clockwise to turn on the radio. The current channel, current frequency, norm, modulation and active functions will appear on the screen. 2. Continue to turn the main button clockwise to adjust the volume to the desired level. - Seite 8 Enable automatic squelch (ASQ) and level setting 1. Long press the ASQ/SQ key [4]. The AQ icon and the current squelch level will flash on the screen. 2. Briefly press the UP and DOWN keys on the microphone to change the level.
-
Seite 9: Channel Scan
Channel Scan 1. Long press the key AF/SC [2] to enable the scan function. 2. The channels and the SQ icon will be displayed successively on the screen. The number of channels depends on the set norm. 3. Use the UP and DOWN keys on the microphone to change the scanning direction. - Seite 10 EMG (emergency channels) 1. Shortly press EMG/Lock key [5]. 2. The radio will automatically switch to channel 09. The EMG icon will flash on the screen. 3. Briefly press the EMG/Lock key again to switch to channel 19. 4. Briefly press the EMG/Lock key again to return to normal operation. The EMG icon will disappear from the screen.
- Seite 11 Menu Options: RFGAIN, BRIGHT, CONTRAST, ANC Long press the RFG/MENU key to access the menu. Briefly press the RFG/MENU key to navigate through the options. 1. RFGAIN • The current RF Gain level will flash on the screen. • Briefly press the UP and DOWN keys on the microphone to change the level.
- Seite 12 3. CONTRAST • The current contrast level will flash on the screen. • Briefly press the UP and DOWN keys on the microphone to change the level. 6 levels are available, from 1 (brightest) to 6 (darkest). 4. ANC (Automatic Noise Cancelling) •...
-
Seite 13: Standard Setting
Standard setting 1. Turn off the radio. 2. Turn back on the radio while holding down the PTT and DOWN keys on the microphone. 3. Use the UP and DOWN keys on the microphone to change the norm. 4. Turn off and back on the radio. Available standards Standard Channel Frequenc range... -
Seite 14: Technical Specifications
Technical specifications Channels 40 AM/FM Frequency range 26.965 – 27.405 MHz Power supply 13.2V Dimensions/weight 115 x 150 x 38 mm/0.8 kg Operating temperature -26° - +60°C Reception Sensitivity > 1µV Frequency error ≤300Hz Current consumption 200 mA in stand-by Emission Maximum output power 4W FM at 13.2V... -
Seite 15: Besondere Warnungen
Besondere Warnungen Lesen Sie die folgenden Warnungen, um Feuer, Verletzungen, Radios- oder Antennenschäden zu vermeiden. Versuchen Sie nicht, die Radio während der Fahrt einzustellen. Dadurch sind Sie dem Risiko von Verkehrsunfällen ausgesetzt. Diese Radio ist für eine 12-V-Gleichstromversorgung ausgelegt. Verwenden Sie keine höhere Spannung als die empfohlene. Stellen Sie die Radio nicht auf eine übermäßig staubige, feuchte oder instabile Oberfläche. -
Seite 16: Andere Warnungen
Andere Warnungen: Lesen Sie die Gebrauchsanweisung sorgfältig durch, bevor Sie dieses Produkt anschließen oder verwenden. Bewahren Sie dieses Handbuch zum späteren Nachschlagen auf. Schließen Sie die Antenne an, bevor Sie die Radio verwenden. Überprüfen Sie das SWR vor der Ausstellung. Zu viel SWR kann zur Zerstörung der Radiosenden führen, interner Komponenten, die nicht unter die Garantie fallen. -
Seite 17: Testen Des Betriebs Der Radio
Stromversorgung der Radio Stellen Sie vor dem Einschalten der Radio sicher, dass der Netzschalter maximal nach links gedreht ist. Das Netzkabel der Radio enthält eine Schutzsicherung (am roten Kabel). Die Radio ist mit einem Zigarettenanzünderstecker ausgestattet. Stecken Sie den Zigarettenanzünderstecker in den dafür vorgesehenen Steckplatz unter Ihrem Auto, um die Radio mit Strom zu versorgen.. -
Seite 18: Beschreibung Frontale Tafel
Mikrofon. Hinweis: In Rumänien wird Kanal 22 verwendet • Stellen Sie den Squelch-Pegel auf den Grenzbereich ein, in dem das Hintergrundgeräusch verschwindet. (Anweisungen zum Aktivieren und Anpassen der ASQ / SQ-Funktion finden Sie auf der Seite 20) • Drücken Sie die PTT-Taste am Mikrofon, um es auszugeben, und lassen Sie es los, um es zu empfangen •... - Seite 19 Tastensperre Automatisches (Ausnahme die EMG/Lock Wechseln auf die Taste PTT auf dem Notfall-Sender(9/19) Mikrophon) Bildschirm LCD Port USB Potentiometer Einschalten/ Ausschalten Funkgerät und Lausstärke Anpassung Grundoperationen Einschalten/Ausschalten Funkgerät und Lautstärke Anpassung 1. Drehen Sie den Potentiometer [8] im Uhrzeigersinn um das Funkgerät einzuschalten.
-
Seite 20: Beschreibung Funktionen
Beschreibung Funktionen SQ/ASQ Aktivieren Sie manuell den Squelch (SQ) und Einstellung Niveau 1. Drücken Sie lang die Taste ASQ/SQ [4]. Auf dem Bildschirm blinkt das Ikon SQ und das aktuelle Squelch Niveau. 2. Drücken Sie kurz die Tasten UP und DOWN auf dem Mikrophon um das Niveau zu wechseln. - Seite 21 Modulation AM/FM 1. Drücken Sie kurz die Taste AF/SC [2] um zwischen AM und FM zu wechseln. Hinweis: wenn das Funkgerät auf eine Norm eingestellt ist, die keine AM unterstützt, hat das Drücken der Taste A/F keine Wirkung. Auf dem Bildschirm wird FM weiter angezeigt.
- Seite 22 RF Gain Drücken Sie kurz die Taste RFG/MENU [3] um die Funktion RF Gain zu aktivieren/deaktivieren. Niveau Einstellung RF Gain 1. Drücken Sie lang die Taste RFG/MENU, um das Menü abzurufen. 2. Drücken Sie kurz die Taste RFG/MENU um ins Menü RFGAIN zu kommen.
- Seite 23 Lock (Tastensperre) 1. Drücken Sie lang die Taste EMG/Lock [5] um die Funktion Lock zu aktivieren. 2. Auf dem Bildschirm erscheint das Symbol „Schloss“ 3. Alle Tasten sind gesperrt mit der Ausnahme der Taste PTT. 4. Drücken Sie lang die Taste EMG/Lock um die Funktion Lock zu deaktivieren.
- Seite 24 Niveau zu ändern. Es gibt 9 verfügbare Niveaus. 2. BRIGHT (Lichtstärke Bildschirm) • Auf dem Bildschirm blinkt die aktuelle Lichtstärke. • Drücken Sie kurz die Tasten UP und DOWN auf dem Mikrophon um das Niveau zu ändern. Es gibt 5 verfügbare Niveaus, von 1 (das dunkelste) bis 5 (das hellste).
- Seite 25 • Option: ON (aktiviert) /OFF (deaktiviert) • Drücken Sie kurz die Tasten UP und DOWN auf dem Mikrophon um zwischen den 2 Optionen zu wechseln. • Wenn diese Funktion aktiv ist, blinkt auf dem Bildschirm NC. Norm ändern 1. Schalten Sie das Funkgerät aus. 2.
-
Seite 26: Technische Spezifikationen
Deutschland FM: 26.965-27.405/26.565-26.955 40FM/40AM AM: 27.005-27.135 Deutschland FM: 26.965-27.405 40FM/40AM AM: 27.005-27.135 Deutschland 26.965-27.405MHZ 40FM/40AM Deutschland 80FM 26.565-26.955MHZ Technische Spezifikationen Sender 40 AM/FM Frequenz 26.965 – 27.405 MHz Versorgung 13.2V Dimensionen/Gewicht 115 x 150 x 38 mm/0.8 kg Temperatur -26° - +60°C Empfang Sensibilität >... - Seite 27 Mises en garde spéciales Lisez les avertissements ci-dessous pour éviter les incendies, les blessures corporelles, les dommages à la radio ou à l’antenne. N’essayez pas de régler la radio en conduisant. Cela vous expose au risque d’accidents de la route. Cette radio est conçue pour une alimentation 12V DC.
-
Seite 28: Principales Caractéristiques
Autres avertissements: Avant de connecter ou d’utiliser ce produit, veuillez lire attentivement les instructions d’utilisation. Conservez ce manuel pour référence future. Avant d’utiliser la radio, connectez l’antenne. Vérifiez le SWR avant d’émettre. Trop de SWR peut entraîner la destruction des extrémités de la radio, des composants internes non couverts par la garantie. - Seite 29 Alimenter la radio Avant de mettre la radio sous tension, assurez-vous que le bouton d’alimentation est tourné au maximum vers la gauche. Le cordon d’alimentation de la radio comprend un fusible de protection (sur le fil rouge). La radio est équipée d’une prise allume-cigare. Pour alimenter la radio, insérez la fiche de l’allume-cigare dans la fente dédiée sous votre voiture..
-
Seite 30: Description Du Panneau Frontal
• Vérifiez le niveau du signal émis / reçu via les barres de signal sur le panneau avant de la radio Description du panneau frontal Fonction par un Fonction par un appui court appui long Connecteur 6 prises / microphone Changement de la Activer la fonction de AF/SC... -
Seite 31: Opérations De Base
Potentiomètre démarrage / arrêt de la radio et réglage du volume Opérations de base Démarrage / arrêt de la radio et réglage du volume 1. Tournez le potentiomètre [8] dans le sens horaire pour démarrer la radio. Sur l’écran seront affichées la chaîne courante, la féquence courante, la norme, la modulation et les fonctions actives. - Seite 32 3. Appuyez courtement sur la touche ASQ/SQ pour rentrer au mode normale de fonctionnement. Activer le squelch automatique (ASQ) et réglage du niveau 1. Appuyez longuement sur la touche ASQ/SQ [4]. Sur l’écran le pictogramme AQ et le niveau courant du squelch vont clignoter. 2.
- Seite 33 Scan (Scanner les chaînes) 1. Appuyez longuement sur la touche AF/SC [2] pour activer la fonction de scanner les chaînes. 2. Sur l’écran les chaînes et le pictogramme SQ seront affichés. Le nombre des chaînes dépends de la norme réglée. 3.
- Seite 34 3. Appuyez courtement sur les touches UP et DOWN du microphone pour changer le niveau. Il y a 9 niveaux disponibles. 4. Appuyez sur la touche PTT du microphone pour quitter le menu. EMG (Les chaînes d’urgence) 1. Appuyez courtement sur la touche EMG/Lock [5]. 2.
- Seite 35 4. Appuyez longuement sur la touche EMG/Lock pour désactiver la fonction Lock. Le pictogramme qui corresponds à la fonction ne sera plus affiché sur l’écran. Le menu Options: RFGAIN, BRIGHT, CONTRAST, ANC Appuyez longuement sur la touche RFG/MENU pour accéder au menu. Appuyez courtement sur la touche RFG/MENU pour naviguer parmi les options.
- Seite 36 3. CONTRAST • Sur l’écran le niveau courant du contraste va clignoter. • Appuyez courtement sur les touches UP et DOWN du microphone pour changer le niveau. Il y a 6 niveaux disponibles, du 1-er (le plus clair) au 6-ème (le plus obscur). 4.
- Seite 37 Changer la norme 1. Arrêtez la radio. 2. Rédémarrez la radio en appuyant sur les touches PTT et DOWN du microphone. 3. Utilisez les touches UP et DOWN du microphone pour changer la norme. 4. Arrêtez et rédémarrez la radio. Les normes disponibles Les chaînes L'intervalle de fréquence...
-
Seite 38: Spécifications Techniques
Spécifications techniques Les chaînes 40 AM/FM La bande de fréquence 26.965 – 27.405 MHz Alimentation 13.2V Dimensions / Poids 115 x 150 x 38 mm/0.8 kg Temperature de fonctionnement -26° - +60°C Réception Sensibilité > 1µV Erreur de fréquence ≤300Hz Consommation de courant 200 mA in stand-by Emission... -
Seite 39: Advertencias Especiales
Advertencias especiales Lea las advertencias a continuación para evitar incendios, lesiones personales, daños a la estación o la antena. No intente ajustar la estación mientras conduce. Hacerlo lo expone al riesgo de accidentes de tráfico. Esta estación está diseñada para una fuente de alimentación de 12V CC. No utilice un voltaje superior al recomendado. -
Seite 40: Otras Advertencias
Otras advertencias: Antes de conectar o utilizar este producto, lea atentamente las instrucciones de uso. Conserve este manual para consultarlo en el futuro. Antes de usar la estación, conecte la antena. Verifique el SWR antes de emitir. Demasiado SWR puede provocar la destrucción de los extremos de la estación, componentes internos que no están cubiertos por la garantía. - Seite 41 Encendiendo la estacióni Antes de encender la estación, asegúrese de que el botón de encendido esté girado hacia la izquierda al máximo. El cable de alimentación de la estación incluye un fusible de protección (en el cable rojo). La estación está equipada con un enchufe para encendedor de cigarrillos.
-
Seite 42: Descripción Del Panel Frontal
• Verifique el nivel de la señal transmitida / recibida a través de las barras de señal en el panel frontal de la estación. Descripción del panel frontal Función mediante Función mediante Nombre presión corta presión larga Conector 6 pines micrófono Cambiar la Activar la función de... -
Seite 43: Descripción De Funciones
Potenciómetro apagar/encender la emisora y control de volumen Operacionesa Encendido / apagado emisora y control de volumen 1. Gire el potenciómetro [8] en el sentido de las agujas del reloj para encender la emisora. El canal actual, la frecuencia actual, la norma, la modulación y las funciones activas aparecerán en la pantalla. - Seite 44 fuertes). Nota: el nivel del squelch está relacionado con la longitud de la antena y las condiciones ambientales. 3. Toque brevemente la tecla ASQ/SQ para volver al modo de funcionamiento normal. Activación automática de squelch (ASQ) y ajuste de nivel 1.
- Seite 45 Scan (Escaneo de canales) 1. Mantenga tocada la tecla AF/SC [2] para activar la función de escaneo de canales. 2. Los canales y el icono SQ se mostrarán sucesivamente en la pantalla. El número de canales depende de la norma configurada. 3.
- Seite 46 para cambiar el nivel. 9 niveles están disponibles. 4. Toque la tecla PTT del micrófono para salir del menú. EMG (Canales de emergencia) 1. Toque brevemente la tecla EMG/Lock [5]. 2. La emisora cambiará automáticamente al canal 09. El icono EMG parpadeará...
- Seite 47 Menú Opciones: RFGAIN, BRIGHT, CONTRAST, ANC Mantenga tocada la tecla RFG/MENU para acceder al menú. Toque brevemente la tecla RFG/MENU para navegar por las opciones. 1. RFGAIN • El nivel actual de RF Gain parpadeará en la pantalla. • Toque brevemente las teclas UP arriba y DOWN abajo del micrófono para cambiar el nivel.
- Seite 48 3. CONTRAST • • En la pantalla parpadeará el nivel actual de contraste. • • Toque brevemente las teclas UP arriba y DOWN abajo del micrófono para cambiar el nivel. 6 niveles están disponibles, que van desde 1 (más brillante) a 6 (más oscuro). 4.
- Seite 49 Cambiar la norma 1. Cierre la emisora. 2. Reinicie la emisora manteniendo tocadas las teclas PTT y DOWN del micrófono. 3. Toque brevemente las teclas UP arriba y DOWN abajo del micrófono para cambiar la norma. 4. Apague y reinicie la emisora. Estándares disponibles Estándar Canales...
-
Seite 50: Especificaciones Técnicas
Especificaciones técnicas Canales 40 AM/FM Banda de frecuencia 26.965 – 27.405 MHz Alimentación 13.2V Dimensiones / peso 115 x 150 x 38 mm/0.8 kg Temperatura de funcionamiento -26° - +60°C Recepción Sensibilidad > 1µV Error de frecuencia ≤300Hz Consumo de corriente 200 mA in stand-by Emisión Potencia máxima... -
Seite 51: Hu Használati Utasítás
Különleges figyelmeztetések Olvassa el az alábbi figyelmeztetéseket a tűz, személyi sérülések, az állomás vagy az antenna károsodásának elkerülése érdekében. Ne próbáljon vezetés közben beállítani az állomást. Ezzel kiteszi a közúti balesetek kockázatát. Ezt az állomást 12 V DC tápellátásra tervezték. Ne használjon az ajánlottnál magasabb feszültséget. -
Seite 52: Telepítési Útmutató
ellenőrizze az SWR-t. A túl sok SWR vezethet az állomás végeinek, a belső alkatrészek megsemmisüléséhez, amelyekre nem vonatkozik a garancia. Az állomásnak nincs olyan alkatrésze, amelyet a felhasználó megjavíthatna. Javításért forduljon egy hivatalos szervizhez. A tűzveszély megelőzése érdekében használjon megfelelő tápegységet. Főbb jellemzők •... - Seite 53 helyezze be a szivargyújtó csatlakozóját az autója alatti erre szolgáló nyílásba.. FIGYELMEZTETÉS: Ha a biztosíték kiég, ne helyettesítse nagyobb értékű biztosítékkal. A gyárilag behelyezett biztosíték 2A értékű. Az Antenna telepítése Ezen rádió eszköz használatához egy olyan antennára van szüksége, ami 26- 28MHz frekvenciaértékek között működik.
- Seite 54 A rádió előlapja Hosszú Rövid gombnyomás Szám Funkció Neve gombnyomás általi általi funkció funkció 6 pin csatlakozó AM és FM moduláció A keresés funkció AF/SC váltás aktiválása RF Jelerősség RFG/MENU Menü megnyitása funkció használata SQ/ASQ szint SQ és ASQ közötti módosítása(használja ASQ/SQ funkció...
-
Seite 55: Alapvető Műveletek
Alapvető műveletek A rádió ki – és bekapcsolása, a hangerő módosítása 1. Fordítsa el a főgombot [8] óramutató járásával megegyező irányban. A jelenlegi csatorna, frekvencia, norma, modulációs és aktív funkciók jelennek meg a képernyőn. 2. Forgassa tovább a gombot a kívánt beállítás módosítás megnyitásához. 3. - Seite 56 Automatikus Némahangolás engedélyezése és beállítása (ASQ) 1. Nyomja meg hosszan az ASQ/SQ gombot[4]. Az AQ ikon és a jelenlegi némahangolás szint megjelenik a képernyőn. 2. Nyomja meg röviden az UP/Fel és a DOWN/Le gombokat a mikrofonon a szint megváltoztatásához. Az eszközön 5 szint elérhető 01 szinttől egészen 05 szintig (csak a legerősebb jel hallható).
- Seite 57 Scan (Csatorna Keresése) 1. Nyomja meg hosszan az AF/SC [2] gombot a funkció eléréshez. 2. A csatornák és az SQ ikon megjelenik a képernyőn. A csatornák száma a beállított normák értékétől függ, azaz a beállított érzékenységi szintektől. 3. Használja az UP/Fel és a DOWN/Le gombokat a mikrofonon a keresési irány beállításához.
- Seite 58 3. Nyomja meg röviden az UP/Fel és a DOWN/Le gombokat a mikrofonon a jelerősségi szint megváltoztatásához. 9 elérhető szint közül választhat. 4. Nyomja meg a PTT gombot a mikrofonon a menüből történő kilépéshez. EMG (Segélyhívó csatornák) 1. Nyomja meg röviden az EMG/Lock gombot [5]. 2.
- Seite 59 Menü Beállítások: RF GAIN/RF Jelerősség, BRIGHT/Fényerő, CONTRAST/ Kontraszt, ANC/Automatikus Zajszűrő Nyomja meg hosszan az RFG/MENU gombot a menü megnyitásához. Nyomja meg röviden az RFG/MENU gombot a beállítási lehetőségek közötti navigáláshoz. 1. RFGAIN • A jelenlegi RF jelerősség RF Gain szint jelenik meg a képernyőn. •...
- Seite 60 3. CONTRAST • A jelenlegi kontraszt szín fog villogni a képernyőn. • Nyomja meg röviden az UP/Fel meg a DOWN/Le gombokat a mikrofonon a fényerő kontraszt beállításához. Az eszközön 6 szint elérhető 1-től (nagyon világos), 6-ig (nagyon sötét). 4. ANC (Automatic Noise Cancelling) •...
- Seite 61 Sztenderd beállítások 1. Kapcsolja ki a rádiót. 1. A PTT és a LE/DOWN mikrofonon található gombok megnyomásával ismét kapcsolja be a rádiót. 2. Használja a mikrofonon található FEL/UP és LE/DOWN gombokat a beállítások megváltoztatásához. 3. Kapcsolja ki, majd kapcsolja újra be a rádiót. Az elérhető...
- Seite 62 További tulajdonságok Csatornák 40 AM/FM Frekvenciatartomány 26.965 – 27.405 MHz Áramellátás 13.2V Méretek/Az eszköz súlya 115 x 150 x 38 mm/0.8 kg Üzemhőmérséklet -26° - +60°C Jelfogadás Érzékenység > 1µV Frekvenciahiba ≤300Hz Áramerősség fogyasztás 200 mA in stand-by Jelsugárzás Maximális kimeneti feszültség 4W FM @ 13.2V 70% - 90% (AM) Moduláció...
-
Seite 63: It Manuale Utente
Avvertenze Leggere le seguenti avvertenze per prevenire incendi, lesioni personali o danni alla radio. Non tentare di regolare la radio durante la guida, poiché potrebbe mettere in pericolo la sua vita e degli altri passeggeri. Questa radio è progettata per l’alimentazione a 12V DC. Non utilizzare una tensione superiore a quella consigliata. -
Seite 64: Altre Avvertenze
Altre avvertenze: Prima di collegare o utilizzare questo prodotto, leggere attentamente le seguenti istruzioni per l’uso. Conservare questo manuale per uso futuro. Prima di utilizzare la radio, collegare l’antenna. Controllare il SWR prima di trasmettere. Un SWR troppo elevato può portare alla distruzione dei componenti interni della radio, che non sono coperti da garanzia. - Seite 65 L’alimentazione della radio Prima di accendere la radio, assicurarsi che il pulsante di accensione sia ruotato al massimo a sinistra. Il cavo di alimentazione della radio include un fusibile di protezione (sul filo rosso). La radio è dotata di presa accendisigari. Per alimentare la radio, inserire la spina dell’accendisigari nell’apposito connettore.
- Seite 66 Il pannello frontale della radio Funzione attraverso Funzione attraverso Nr. Nome pressione breve pressione lunga Connettore 6 pin per microfono Cambio modulazione Attivazione funzione AF/SC AM/FM Scan Attivazione funzione Accedere al menu RFG/MENU RF Gain delle impostazioni Accedere alla modalità di impostazione del Cambiare tra SQ e ASQ/SQ...
-
Seite 67: Operazioni Di Base
Operazioni di base Avviamento/spegnimento della radio e regolazione del volume 1. Ruotare la manopola [8] in senso orario per avviare la radio. Sullo schermo appariranno il canale corrente, la frequenza corrente, la norma, la modulazione e le funzioni attive. 2. Continuare a ruotare la manopola in senso orario per regolare il volume al livello desiderato. - Seite 68 Attivazione squelch automatico (ASQ) e impostazione del livello 1. Premere a lungo il tasto ASQ/SQ [4]. L’icona AQ e il livello di squelch corrente lampeggeranno sullo schermo. 2. Premere brevemente i tasti SU e GIÙ sul microfono per modificare il livello.
- Seite 69 Scan (scansione dei canali) 1. Premere a lungo il tasto AF/SC [2] per attivare la funzione di ricerca dei canali. 2. I canali e l’icona SQ verranno visualizzati in successione sullo schermo. Il numero dei canali dipende dalla norma impostata. 3.
- Seite 70 3. Premere brevemente i tasti SU e GIÙ sul microfono per modificare il livello. Sono disponibili 9 livelli. 4. Premere il tasto PTT sul microfono per uscire dal menu. EMG (canali di emergenza) 1. Premere brevemente il tasto EMG/Lock [5]. 2.
- Seite 71 Il menu Opzioni: RFGAIN, BRIGHT, CONTRAST, ANC Premere a lungo il tasto RFG/MENU per accedere al menu. Premere brevemente il tasto RFG/MENU per navigare tra le opzioni. 1. RFGAIN • Il livello di guadagno RF corrente lampeggerà sullo schermo. Premere brevemente i tasti SU e GIÙ sul microfono per modificare il •...
- Seite 72 3. CONTRAST • Il livello di contrasto corrente lampeggerà sullo schermo. • Premere brevemente i tasti SU e GIÙ sul microfono per modificare il livello. Sono disponibili 6 livelli, da 1 (più luminoso) a 6 (più scuro). 4. ANC (Automatic Noise Cancelling) •...
- Seite 73 Cambiare la norma 1. Spegnere la radio. 2. Riavviare la radio tenendo premuti i tasti PTT e GIÙ sul microfono. 3. Utilizzare i tasti SU e GIÙ del microfono per modificare la norma. 4. Chiudere e riavviare la radio. Le norme disponibili Norma Canale Intervallo di frequenza Europa...
-
Seite 74: Specifiche Tecniche
Specifiche tecniche Canali 40 AM/FM Banda di frequenza 26.965 – 27.405 MHz Alimentazione 13.2V Dimensioni/peso 115 x 150 x 38 mm/0.8 kg Temperatura di esercizio -26° - +60°C Ricezione Sensibilità > 1µV Errore di frequenza ≤300Hz Consumo attuale 200 mA in stand-by Emissione Potenza massima 4W FM @ 13.2V... -
Seite 75: Pl Instrukcja Obsługi
Specjalne ostrzeżenia Przeczytaj poniższe ostrzeżenia, aby zapobiec pożarowi, obrażeniom ciała, zniszczeniu radio lub anteny. Nie próbuj regulować radio podczas jazdy. Takie postępowanie naraża Cię na ryzyko wypadków drogowych. Ta stacja jest przystosowana do zasilania 12V DC. Nie używaj napięcia wyższego niż zalecane. Nie stawiaj radio na nadmiernie zakurzonej, wilgotnej lub niestabilnej powierzchni. -
Seite 76: Instrukcje Instalacji
Inne ostrzeżenia: Przed podłączeniem lub użyciem tego produktu należy uważnie przeczytać instrukcję obsługi. Zachowaj tę instrukcję na przyszłość. Przed użyciem radio podłącz antenę. Sprawdź SWR przed wydaniem. Zbyt duży SWR może doprowadzić do zniszczenia końcówek radio, elementów wewnętrznych, które nie są objęte gwarancją. Nie ma elementów radio, które mogą... - Seite 77 Zasilanie radio Przed włączeniem radio upewnij się, że przycisk zasilania jest maksymalnie obrócony w lewo. W kablu zasilającym radio znajduje się bezpiecznik ochronny (na przewodzie czerwonym). Stacja wyposażona jest we wtyczkę do zapalniczki. Aby zasilić stację, włóż wtyczkę zapalniczki do dedykowanego gniazda pod samochodem. UWAGA: Jeśli bezpiecznik się...
- Seite 78 Opis panelu przedniego Funkcja krótkiego Funkcja długiego Nr. Imię naciśnięcia naciśnięcia 6-pinowe złącze mikrofonu Zmiana modulacji Włącz funkcję AF/SC AM / FM skanowania kanałów Aktywuj funkcję RF Wejdź do menu RFG/MENU Gain ustawień Wejdź do trybu ustawiania poziomu Przełączaj się między ASQ/SQ SQ / ASQ (użyj SQ i ASQ...
-
Seite 79: Podstawowe Operacje
Podstawowe operacje Włączanie / wyłączanie radio i regulacja głośności 1. Obróć potencjometr [8] w prawo, aby uruchomić stację. Aktualny kanał, aktualna częstotliwość, norma, modulacja i aktywne funkcje pojawią się na ekranie. 2. Kontynuuj obracanie potencjometru zgodnie z ruchem wskazówek zegara, aby ustawić... - Seite 80 Włącz automatyczną blokadę szumów (ASQ) i ustawienie poziomu 1. Długo naciśnij klawisz ASQ / SQ [4]. Ikona AQ i aktualny poziom blokady szumów będą migać na ekranie. 2. Krótko naciśnij klawisze UP i DOWN na mikrofonie, aby zmienić poziom. Dostępnych jest 5 poziomów, od poziomu 01 do poziomu 05 (słychać tylko najsilniejsze sygnały).
- Seite 81 Scan (Skanuj kanał) 1. Naciśnij długo klawisz AF / SC [2], aby aktywować funkcję skanowania kanałów. 2. Kanały i ikona SQ będą kolejno wyświetlane na ekranie. Liczba kanałów zależy od ustalonej normy. 3. Użyj klawiszy W GÓRĘ i W DÓŁ na mikrofonie, aby zmienić kierunek skanowania.
- Seite 82 EMG (Kanały alarmowe) 1. Krótko naciśnij klawisz EMG / Lock [5]. 2. Stacja automatycznie przełączy się na kanał 09. Ikona EMG będzie migać na ekranie 3. Ponownie krótko naciśnij klawisz EMG / Lock, aby przełączyć na kanał 19. 4. Ponownie krótko naciśnij klawisz EMG / Lock, aby powrócić do normalnego działania.
- Seite 83 Menu Opcje: RFGAIN, BRIGHT, CONTRAST, ANC Długo naciśnij przycisk RFG / MENU, aby uzyskać dostęp do menu. Krótko naciśnij przycisk RFG / MENU, aby poruszać się po opcjach. 1. RFGAIN • Aktualny poziom wzmocnienia RF będzie migał na ekranie. Krótko naciśnij klawisze W GÓRĘ i W DÓŁ na mikrofonie, aby zmienić •...
- Seite 84 3. CONTRAST • Aktualny poziom kontrastu będzie migał na ekranie. • Krótko naciśnij klawisze W GÓRĘ i W DÓŁ na mikrofonie, aby zmienić poziom. Dostępnych jest 6 poziomów, od 1 (najjaśniejszy) do 6 (najciemniejszy). 4. ANC (Automatic Noise Cancelling) • Aktywna opcja będzie migać...
- Seite 85 Zmień regułę 1. Wyłącz radio. 2. Włącz ponownie radio, trzymając wciśnięte klawisze PTT i DÓŁ na mikrofonie. 3. Użyj klawiszy GÓRA i DÓŁ na mikrofonie, aby zmienić normę. 4. Wyłącz i włącz ponownie radio. Dostępne standardy Standardy Kanały Zakres częstotliwości Europa 26.965-27.405MHZ 40FM/40AM...
-
Seite 86: Specyfikacja Techniczna
Specyfikacja techniczna Kanały 40 AM/FM Pasmo częstotliwości 26.965 – 27.405 MHz Karmienie 13.2V Rozmiar waga 115 x 150 x 38 mm/0.8 kg Temperatura robocza -26° - +60°C Przyjęcie Wrażliwość > 1µV Błąd częstotliwości ≤300Hz Obecne zużycie 200 mA in stand-by Nadawanie Maksymalna moc 4W FM @ 13.2V... -
Seite 87: Ro Manual De Utilizare
Atentionari speciale Cititi atentionarile de mai jos pentru a preveni incendiile, ranirea personala, distrugerea statiei sau a antenei. Nu incercati sa reglati statia in timp ce conduceti. Procedand astfel va expuneti riscului de producere a accidentelor stradale. Aceasta statie este conceputa pentru o alimentare la 12V DC. Nu utilizati o tensiune mai mare decat cea recomandata. - Seite 88 de a emite. Un SWR prea mare poate duce la distrugerea finalilor statiei, componente interne care nu sunt acoperite de garantie. Nu exista componente ale statiei care pot fi reparate de utilizator. Pentru reparatii, adresati-va unui service autorizat. Pentru a preveni riscul de incendiu, utilizati o sursa de alimentare corespunzatoare.
- Seite 89 Statia este prevazuta cu mufa de bricheta. Pentru a alimenta statia, introduceti mufa de bricheta a statiei in locasul dedicat de sub bordul masinii dvs. ATENTIE: In cazul arderii sigurantei nu o inlocuiti cu una de valoare mai mare. Cea din fabrica are 2A.
- Seite 90 Descriere panou frontal Functie prin Functie prin Nr. Nume apasare scurta apasare lunga Conector 6 pini microfon Schimbare modulatie Activare functie AF/SC AM/FM scanare canale Activare functie RF Accesare meniu RFG/MENU Gain setari Intrati in modul de setare a nivelului de Schimbati intre SQ si ASQ/SQ SQ/ASQ (folositi...
- Seite 91 Operatiuni de baza Pornire/Oprire statie si Reglare volum 1. Rotiti potentiometrul [8] in sensul acelor de ceasornic pentru a porni statia. Pe ecran vor aparea canalul curent, frecventa curenta, norma, modulatia si functiile active. 2. Continuati sa rotiti potentiometrul spre dreapta pentru a regla volumul la nivelul dorit.
- Seite 92 Activare squelch automat (ASQ) si setare nivel 1. Apasati lung tasta ASQ/SQ [4]. Pe ecran va clipi pictograma AQ si nivelul curent al squelch-ului. 2. Apasati scurt tastele UP si DOWN de pe microfon pentru a schimba nivelul de sensibilitate a squelck-ului. Sunt disponibile 5 niveluri, de la nivelul 01 pana la nivelul 05 (doar semnalele cele mai puternice vor mai putea fi auzite).
- Seite 93 Scan (Scanare canale) 1. Apasati lung tasta AF/SC [2] pentru a activa functia de scanare canale. 2. Pe ecran vor fi afisate succesiv canalele si pictograma SQ. Numarul canalelor depinde de norma setata. 3. Folositi tastele UP si DOWN de pe microfon pentru a schimba directia de scanare.
- Seite 94 4. Apasati tasta PTT de pe microfon pentru a iesi din meniu. Nota: Recomandam setarea RF Gain-ului pe nivelul 6 de sensibilitate. EMG (Canale de urgenta) 1. Apasati scurt tasta EMG/Lock [5]. 2. Statia va trece automat pe canalul 09. Pe ecran va clipi pictograma EMG 3.
- Seite 95 Meniu Optiuni: RFGAIN, BRIGHT, CONTRAST, ANC Apasati lung tasta RFG/MENU pentru a accesa meniul. Apasati scurt tasta RFG/MENU pentru a naviga printre optiuni. 1. RFGAIN • Pe ecran va clipi nivelul curent al RF Gain-ului. Apasati scurt tastele UP si DOWN de pe microfon pentru a schimba •...
- Seite 96 3. CONTRAST • Pe ecran va clipi nivelul curent de contrast. • Apasati scurt tastele UP si DOWN de pe microfon pentru a schimba nivelul. Sunt disponibile 6 niveluri, ce la 1 (cel mai luminos) la 6 (cel mai intunecat).. 4.
- Seite 97 Schimbare norma 1. Inchideti statia. 2. Reporniti statia tinand apasate tastele PTT si DOWN de pe microfon. 3. Folositi tastele tastele UP si DOWN de pe microfon pentru a schimba norma. 4. Inchideti si reporniti statia. Norme disponibile Norma Canale Interval frecventa Europa 26.965-27.405MHZ...
-
Seite 98: Specificatii Tehnice
Specificatii tehnice Canale 40 AM/FM Banda de frecventa 26.965 – 27.405 MHz Alimentare 13.2V Dimensiuni/greutate 115 x 150 x 38 mm/0.8 kg Temperatura de functionare -26° - +60°C Receptie Sensibilitate > 1µV Eroare frecventa ≤300Hz Consum curent 200 mA in stand-by Emisie Putere maxima 4W FM @ 13.2V... - Seite 99 Internet suivante: https://www.mypni.eu/products/7591/download/certifications Egyszerűsített EU Megfelelési Közlemény SC ONLINESHOP SRL kijelenti azt, hogy a CB rádió PNI Escort HP 9700 megfelel az EMC 2014/30/EU és RED 2014/53/UE irányelvnek. Az EU-megfelelőségi nyilatkozat teljes szövege a következő internetes címen érhető el: https://www.mypni.eu/products/7591/download/certifications...