Herunterladen Inhalt Inhalt Diese Seite drucken

Werbung

Verfügbare Sprachen

Verfügbare Sprachen

CH-Import & Distribution exklusiv durch:
Jumbo-Markt AG,
Industriestrasse 34, 8305 Dietlikon
STANDVENTILATOR 360º
VENTILATEUR SUR PIED 360º
VENTILATORE A PIANTANA 360°
360° STAND FAN
GEBRAUCHSANWEISUNG I MANUEL D'UTILISATION I
MANUALE D'ISTRUZIONI I ORIGINAL INSTRUCTIONS
V181018

Werbung

Inhaltsverzeichnis
loading

Inhaltszusammenfassung für Ayce DF-EF16912

  • Seite 1 STANDVENTILATOR 360º VENTILATEUR SUR PIED 360º VENTILATORE A PIANTANA 360° 360° STAND FAN CH-Import & Distribution exklusiv durch: GEBRAUCHSANWEISUNG I MANUEL D'UTILISATION I Jumbo-Markt AG, MANUALE D'ISTRUZIONI I ORIGINAL INSTRUCTIONS V181018 Industriestrasse 34, 8305 Dietlikon...
  • Seite 2: Erläuterung Der Symbole

    02 | 03 ERLÄUTERUNG DER SYMBOLE WARNHINWEIS Entspricht den Europäischen Normen. Lesen Sie diese Informationen vor der Installation oder Verwendung des Produkts durch. Bewahren Sie das Handbuch mit dem Produkt zum späteren Nachschlagen gut auf. ACHTUNG Schutzklasse II: Dieses Produkt ist schutzisoliert. Ein Anschluss Es besteht eine Gefahr von Feuer, Stromschlag, Verletzung an die Erdung ist daher nicht notwendig.
  • Seite 3 04 | 05 einem von ihm beauftragten Dienstleister oder einer ähnlich Lassen Sie das Gerät niemals in der Nähe von Vorhängen, ● qualifizierten Person ersetzt werden, um Gefahren zu Gardinen, Pflanzen usw. stehen. vermeiden. Achten Sie darauf, es nicht in Bereichen einzusetzen, in ●...
  • Seite 4: Installation

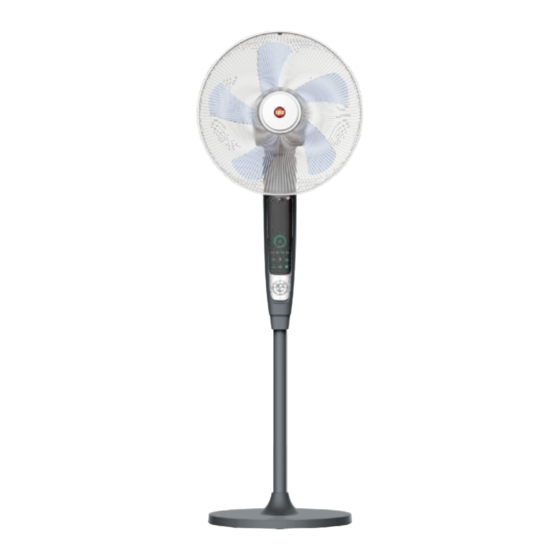
    06 | 07 Montieren Sie den Ventilator entsprechend den nachfolgenden TEILEBEZEICHNUNG Anweisungen. Abb. 1 Abb. 2 Stecken Sie das Stativrohr durch das Loch im Standfuss und fixieren Sie es mit der Rohrschraube (Abb. 1). Setzen Sie den Ventilator-Korpus auf das Stativrohr und fixieren Sie ihn mit der Stellschraube (Abb.
  • Seite 5 08 | 09 BEDIENUNGSANLEITUNG Bringen Sie das vordere Gitter und den Gitterring am hin- teren Gitter an. Befestigen Sie das Gitter mit der Schraube Alle Funktionen können durch Betätigen der Tasten am an der Gitterklemme (Abb. 5). Steuerfeld aktiviert werden. Beim ersten Anschliessen an den Stellen Sie den Ventilator nach der Montage aufrecht hin Strom erzeugt der Ventilator einen Warnton (Piep, Piep), dann und stecken Sie das Kabel in die Steckdose.
  • Seite 6 10 | 11 GESCHWINDIGKEIT Hohe Geschwindigkeit Hohe Mittlere Geschwindigkeit Drücken Sie die Taste « », um die Windgeschwindigkeit in der Niedrige Geschwindigkeit Reihenfolge --Niedrig--Mittel--Hoch--Niedrig usw. einzustel- Halt T=90S len und die LED-Anzeige ändert sich entsprechend. Hohe Geschwindigkeit Mittlere Mittlere Geschwindigkeit Niedrige Geschwindigkeit SCHWENKEN Halt...
  • Seite 7: Beibehalten Der Funktion

    12 | 13 HINWEIS: Die Zeiteinstellung erfolgt in der Reihenfolge: 1 Std., 2 Std., 4 Std., 8 Std., keine Zeiteinstellung, 1 Std. usw. und die LED- Die Anode und Kathode der Batterien müssen den Ken- Anzeige wechselt entsprechend. Wenn die Dauer eingestellt nzeichnungen "+"...
  • Seite 8: Einlagerung Des Produktes

    0.32 in Bereitschaft chen Geruch abgibt, so schalten Sie ihn unverzüglich ab und informieren Sie ein Servicezentrum zwecks Reparatur. Saisonaler 17.70 kWh/a Stromverbrauch TECHNISCHE DATEN Modell DF-EF16912 Schallleistungspegel 61.20 dB(A) Leistung 65 W des Ventilators Nennspannung (V/Hz) 220-240V~50/60Hz Geschwindigkeiten Maximale 3.37...
  • Seite 9 Garantiezeit sind in allen Fällen von Ihnen zu bezahlen. Die Garantie betrifft nicht Ihr gesetzliches Recht auf Gewährleistung. Zusatzhinweis Servicestelle: Während der Garantiezeit können mängelaufweisende Geräte in jeder Jumbo Filiale zurückgebracht werden. Nach Ablauf der Garantiefrist werden die ayce Produkte in NOTIZEN jeder Jumbo Filiale angenommen, damit das Produkt entsprechend geprüft werden kann.
  • Seite 10: Technische Zeichnung

    18 | 19 TECHNISCHE ZEICHNUNG...
  • Seite 11 20 | 21 TECHNISCHE ZEICHNUNG...
  • Seite 12 22 | 23 ERSATZTEILLISTE Teilebezeichnung Teilebezeichnung Teilebezeichnung Teilebezeichnung Leitungscode Hintere Abdeckung OSC-schalter von vordergrill Schraube Vordergrill Flügelmutter Schraube Stromkabel Stromkabel Schraube Gitterringklemme Positionierungsblech Lüfterflügel Gitterring Mutternhalterung Flügelschraube Halterung für elektrische Bürste Gittermutter Hintere Abdeckung Schraube Schraube vordere Abdeckung von Motor Kabelführung Elektrische Bürste Schraube...
  • Seite 13: Description Des Symboles

    24 | 25 DESCRIPTION DES SYMBOLES AVERTISSEMENT Conforme aux réglementations européennes applicables. Lisez attentivement ces informations avant l'installation ou l'utilisation de ce produit. Conservez ce manuel avec le produit pour référence ultérieure. Classe de protection II : Ce symbole indique que votre appareil ATTENTION dispose d’une double isolation.
  • Seite 14 26 | 27 Ne laissez jamais cet appareil à proximité de rideaux, ten- N’utilisez jamais le cordon ni la prise électrique s'ils sont ● ● tures, plantes, etc. endommagés. Assurez-vous d’éviter de l’utiliser dans des lieux (une cui- Seuls les représentants de service qualifiés peuvent ●...
  • Seite 15: Identification Des Composants

    28 | 29 Installez le ventilateur selon les instructions ci-dessous. IDENTIFICATION DES COMPOSANTS figure 1 figure 2 Placez le tube de la colonne dans le trou de la base et fixez-le solidement à l'aide d'une vis (figure 1). Placez le corps du ventilateur sur le tube de la colonne et fixez-le à...
  • Seite 16: Panneau De Commande

    30 | 31 MODE D’EMPLOI Montez la grille avant et l'anneau de la grille sur la grille arrière. Fixez la grille avec la vis sur la fixation de la grille Toutes les fonctions peuvent être commandées en appuyant (figure 5). sur les touches du panneau de commande.
  • Seite 17 32 | 33 OSCILLATION Haute vitesse Haute Vitesse moyenne Oscillation verticale manuelle : -8°, 0°, 10°, 20°, 30°, 40°, 50°, Basse vitesse 60°, 70°, 80°, 90°selon les préférences de l'utilisateur. Arrêtez T=90S L'oscillation horizontale peut être réglée manuellement sur Haute vitesse n'importe quel angle de 0 à...
  • Seite 18: Nettoyage Et Entretien

    34 | 35 signes de « + » et de « - » sur la télécommande. le système commence le compte à rebours et fonctionne Si l'unité ne sera pas utilisée pour une durée prolongée, jusqu'à ce que l'appareil s'éteigne. retirez les piles.
  • Seite 19: Entretien

    Puissance du ventilateur anormale, coupez immédiatement l'alimentation et avertissez le centre de service de l'entreprise pour la réparation. 1.11 (m3/min)/W Valeur de service (SV) SPÉCIFICATIONS TECHNIQUES Modèle DF-EF16912 Consommation d'électricité en 0.32 Puissance 65 W mode «veille» (PSB) Tension nominale (V/Hz) 220-240V~50/60Hz...
  • Seite 20: Certificat De Garantie

    Prénom Nom de famille Notre engagement de qualité inclut également notre service de réparation. Jumbo offre un excellent service de réparation, pour tous les produits ayce. Rue/N° Téléphone Si, contre toute attente, vous rencontrez un problème dû à un défaut...
  • Seite 21: Schéma Technique

    40 | 41 SCHÉMA TECHNIQUE...
  • Seite 22 42 | 43 SCHÉMA TECHNIQUE...
  • Seite 23 44 | 45 ERSATZTEILLISTE Dénomination Dénomination Dénomination Dénomination Boîtier décoratif De Grille avant Code de ligne Couvercle arrière Grille avant Écrou de pale Cordon D’alimentation Verrouillage de l'anneau de la grille Plaque fixe Écrou Pales Anneau de la grille Support d'écrou Vis papillon Écrou de la grille Couvercle arrière...
  • Seite 24: Descrizione Dei Simboli

    46 | 47 DESCRIZIONE DEI SIMBOLI AVVERTENZA Conforme alle direttive europee applicabili a questo prodotto. Leggi queste informazioni con cura prima di installare o usare il prodotto. Conserva questo manuale insieme al prodotto per consultazioni future. Simbolo di classe II: questo apparecchio è progettato con un ATTENZIONE doppio materiale isolante.
  • Seite 25 48 | 49 Solo rappresentanti qualificati del servizio d'assistenza Assicurati di non usarlo in luoghi (es. la cucina) in cui olio ● ● possono effettuare interventi di riparazione e manutenzione. caldo potrebbe schizzare sulle parti di plastica. Il contatto con l’olio causa sempre danni e deterioramento. Questo dispositivo può...
  • Seite 26: Installazione

    50 | 51 IDENTIFICAZIONE DELLE COMPONENTI figure 1 figure 2 Inserire la colonna tubolare nel foro della base e unire saldamente le due parti con l’apposita vite (figura 1). Posizionare il corpo del ventilatore sulla colonna tubolare e stringere la vite di regolazione (figura 2). figure 3 figure 4 Copertura decorativa...
  • Seite 27: Pannello Di Controllo

    52 | 53 Assemblare la griglia frontale e l’anello della griglia alla ISTRUZIONI OPERATIVE griglia posteriore. Fissare la griglia con la vite al rispettivo Tutte le funzioni si attivano agendo sui pulsanti presenti sul fermo. (Figura 5) pannello di comando.All’inserimento della spina nella presa di Porre il ventilatore in posizione verticale e, una volta assemb- corrente l’apparecchio emette un beep per segnalare che la lato, inserire la spina nella presa di corrente.
  • Seite 28 54 | 55 Oscillazione Velocità alta Alta Velocità media Manuale - oscillazione verticale: regolazione a: -8°, 0°, 10°, Velocità bassa 20°, 30°, 40°, 50°, 60°, 70°, 80°, 90°a seconda delle esigenze. Stop T=90S È possibile regolare manualmente l’angolo di oscillazione a Velocità...
  • Seite 29 56 | 57 Durante lunghi tempi di mancato utilizzo, rimuovere le spie accese. Allo scadere del tempo impostato si attiva il conto batterie. alla rovescia al termine del quale l’apparecchio si spegne. Per prevenire l’inquinamento ambientale, rimuovi le batte- rie usate e gettale in modo sicuro e appropriato. CONSERVAZIONE DELLE FUNZIONI: Quando l’apparecchio entra in modalità...
  • Seite 30: Manutenzione

    54.20 erlo immediatamente e contattare il centro assistenza del ventilatore produttore per la necessaria riparazione. 1.11 (m3/min)/W Valori di esercizio SPECIFICHE TECNICHE Modello DF-EF16912 Consumo di potenza 0.32 Potenza 65 W in standby Voltaggio Nominale(V/Hz) 220-240V~50/60Hz Velocità Consumo di energia 17.70...
  • Seite 31: Certificato Di Garanzia

    Durante il periodo di garanzia, gli apparecchi difettosi possono essere restituiti presso qualsiasi punto vendita jumbo. Dopo la scandenza del periodo di garanzia i prodotti Ayce vengono accettati presso tutte le filiali jumbo, affinché il prodotto possa essere di nuovo...
  • Seite 32 62 | 63 SCHEMA TECNICO...
  • Seite 33 64 | 65 SCHEMA TECNICO...
  • Seite 34 66 | 67 LISTA DELLE COMPONENTI Nome dell'articolo Nome dell'articolo Nome dell'articolo Nome dell'articolo Copertura decorativa di griglia anteriore Vite Codice linea Copertura posteriore Dado della pala Vite Cavo di alimentazione Griglia anteriore Vite Fermo anello griglia Piastra fissa Dado Lama Anello della griglia Staffa del dado...
  • Seite 35: Description Of The Symbols

    68 | 69 DESCRIPTION OF THE SYMBOLS WARNING In accordance with European directives applicable to this Read this information carefully before installation or use of product. this product. Keep this manual with the product for future reference. CAUTION Fire, electric shock, physical injury and material damage hazards. Class II symbol: this appliance is designed with double insula- To use the appliance, always follow the instructions for tion.
  • Seite 36 70 | 71 causes damage and deterioration. This appliance can be used by children aged from 8 years ● and above and persons with reduced physical, sensory or mental capabilities or lack of experience and knowledge if they have been given supervision or instruction concerning use of the appliance in a safe way and understand the haz- ards involved.
  • Seite 37: Identification Of Parts

    72 | 73 Install the fan according to below instructions. IDENTIFICATION OF PARTS Figure 1 Figure 2 Put the column tube through the hole of base and fix them tightly by pipe screw (Figure 1). Put the fan body on to the column tube, and fix by the adjustment screw (Figure2).
  • Seite 38: Control Panel

    74 | 75 Assemble front grill and grill ring to the rear grid. Fix the OPERATING INSTRUCTION grill with the crew on grill buckle. (Figure 5). All functions can be operated by tickling the buttons on the Put the fan stand up after assembled and plug in, use control panel.
  • Seite 39 76 | 77 as the rule of 0(stop horizontal oscillation), 60°, 90°, 180°, Sleeping wind 360°, 0(stop oscillation)…, and led light changes accordingly. High speed: 30mins’ High speed Normal wind→30mins’ with Medium speed Natural wind→ Low speed Natural wind. MODE Medium speed: 30min with Medium speed Natural wind →...
  • Seite 40: Technical Specifications

    To operate the air fan, aim the Remote controller at the signal TECHNICAL SPECIFICATIONS receptor. The remote controller at distance of up to 5m when Model DF-EF16912 pointing at signal receptor of the air fan. Power 65 W CLEAN & MAINTENANCE...
  • Seite 41: Warranty Certificate

    Fan sound power level Additional Note Service Center: Defect products can be returned to every jumbo store during the warranty period. After the warranty period, the ayce products are accepted in any jumbo store, so the product may be tested in accordance. 3.37...
  • Seite 42: Warranty Card

    82 | 83 WARRANTY CARD Last name First name Street/No. Telephone Mobil Postal Code City Item-number Barcode(EAN) Warranty (please mark with a cross) Sales receipt number/Date (please also attach a copy of the sales receipt) Purchased at Jumbo store Which error occurred (please specify) (Please describe the problem or malfunction of your device as accurately as possible.
  • Seite 43: Technical Drawing

    84 | 85 TECHNICAL DRAWING...
  • Seite 44 86 | 87 TECHNICAL DRAWING...
  • Seite 45: Spare Parts List

    88 | 89 SPARE PARTS LIST DESCRIPTION DESCRIPTION DESCRIPTION DESCRIPTION Decoration cover of front grill Screw Line code Rear cover Blade nut Screw Power cord Front grill Screw Grill ring buckle Positioning sheet Blade Grill ring Nut bracket Butterfly screw Grill nut Rear cover Screw...

Inhaltsverzeichnis