Inhaltsverzeichnis
Werbung
Verfügbare Sprachen
Verfügbare Sprachen
Quicklinks
Werbung
Inhaltsverzeichnis
Fehlerbehebung

Inhaltszusammenfassung für Zenit PRX 200/6/1/285
- Seite 1 better together PROPELLER Manuale d’uso e manutenzione User and maintenance manual Manuel d’utilisation et de maintenance Benutzer und Wartungshandbuch Manual de uso y mantenimiento Руководство по эксплуатации...
- Seite 2 Le immagini sono puramente indicative e potrebbero non corrispondere all’aspetto reale del prodotto. I dati riportati potrebbero differire da quelli reali. Zenit si riserva la facoltà di apportare modifiche al prodotto senza alcun preavviso. Per ulteriori informazioni consultare il sito www.zenit.com.
-
Seite 3: Garanzia
GARANZIA Tutti i prodotti ZENIT sono costruiti con materiali selezionati seguendo rigorose procedure produttive. Ogni singola macchina supera rigidi test di qualità prima di lasciare la fabbrica. Durante tutta la durata della garanzia – 12 mesi a partire dalla data di fatturazione – sarà gratuitamente rimediato a tutti gli eventuali difetti di fabbrica o di materiali. -
Seite 4: Beanstandung Und Garantiebestimmungen
Innerhalb der Beanstandungsfrist von 12 Monaten ab Rechnungsdatum werden eventuelle Material- und Herstellungsfehler kostenlos behoben, wenn die Arbeit in der normalen Arbeitszeit ausgeführt wird. Wenden Sie sich bei Beanstandungen bitte an ZENIT, den Lieferanten oder an das nächste ZENIT- Servicecenter nach eigener Wahl. Jedoch ist folgende Voraussetzung zu beachten: - Die Beanstandung ist gleich nach Feststellung des Fehlers zu melden oder spätestens 12 Monate nach dem Rechnungsdatum des Verkäufers... - Seite 5 PROPELLER better together DICHIARAZIONE CE DI CONFORMITA’ DECLARATION OF COMPLIANCE DECLARATION CE DE CONFORMITE EG-ÜBEREINSTIMMUNGSERKLÄRUNG DECLARACIÓN CE DE CONFORMIDAD ДЕКЛАРАЦИЯ О СООТВЕТСТВИИ CE Produttore: Lind Jensens Maskinfabrik A/S Kroghusvej 7, Højmark 6940 Lem - Danimarca Tel.: +45 97 34 32 00 Fax: +45 96 74 42 98 Marca: LJM Macchina: Agitatore...
- Seite 6 PROPELLER - Istruzioni originali better together Questo simbolo indica le istruzioni relative alla sicurezza degli operatori e del miscelatore. Questo simbolo indica le istruzioni relative ai rischi di tipo elettrico. Questo simbolo riguarda il corretto utilizzo dell’apparecchiatura e di altri dispositivi. Il mancato rispetto potrebbe causare danni all’appa- recchiatura o ad altri dispositivi.
-
Seite 7: Installazione
Verificare visivamente l’imballo e il contenuto per accertare l’assenza di danni. In presenza di segni di danno notevole rivolgersi immediatamente a Zenit. Verificare che le specifiche indicate sulla targhetta dati corrispondano a quanto richiesto. 4.2 STOCCAGGIO La macchina viene assemblata e imballata in fabbrica, pronta per la spedizione. -
Seite 8: Montaggio Accessori
Il punto di installazione deve sempre essere stabilito previa consultazione con Zenit. Fig. 2 NOTA: Per poter ruotare la macchina sopra il parapetto è necessario disporre di 1,2 m di gioco libero tra l’estremità superiore del parapetto e quella del punto di sollevamento della gru. -
Seite 9: Installazione Della Macchina
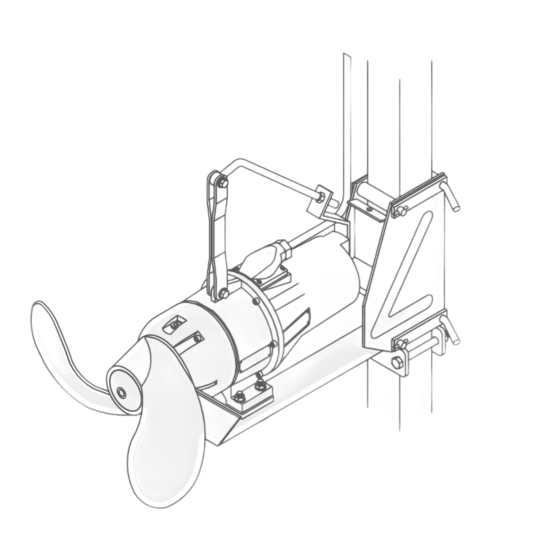
PROPELLER - Istruzioni originali better together 4. Serrare il supporto motore/fine corsa (Fig. 4a-b-c) sul palo. Fig. 4a Fig. 4b Fig. 4c Fig. 4d Supporto per staffa motore Supporto per staffa motore Blocco fine corsa Staffa a pavimento 4.5 INSTALLAZIONE DELLA BANDIERA (FIG. 5-6) 5. - Seite 10 PROPELLER - Istruzioni originali better together DOPO IL MONTAGGIO DELLA MACCHINA IN SERBATOIO CHIUSO, L’ACCESSO ALLA VASCA DEVE ESSERE PROTETTO CON- TRO LE CADUTE. NON LASCIARE MAI L’ACCESSO ALLA VASCA SCOPERTO O PRIVO DI ALTRA PROTEZIONE. A) SCHEMA CON BANDIERA FISSA (Fig. 5) 1- Bandiera 1.1 - Braccio della bandiera 1.2 - Perno per fissare il braccio...
-
Seite 11: Caratteristiche Elettriche
PROPELLER - Istruzioni originali better together 5. CARATTERISTICHE ELETTRICHE ALL'INSTALLAZIONE DELLA MACCHINA DISINSERIRE SEMPRE L’ALIMENTAZIONE ELETTRICA E ASSICURARSI CONTRO EVENTUALI INSERIMENTI INVOLONTARI. Fig. 7a Fig. 7b Fig. 7c 7G_ mm 7G_+ 3x1 mm 7G_ mm 2x 4G_+ 3x1 mm 4G_+3x1 mm TP TP S NC NC 7G4 + 3x1.5 mm 22.5 mm... - Seite 12 PROPELLER - Istruzioni originali better together (L= Controllo delle infiltrazioni Fig. 7a – 7c) Il controllo delle infiltrazioni è collegato al conduttore numero 12 e al cavo di terra (giallo / verde). NB: Attenersi scrupolosamente ai collegamenti indicati nello shema del quadro elettrico 5.5 APPARECCHIATURA DI AVVIAMENTO / ARRESTO AUTOMATICO TOGLIENDO LA MACCHINA DAL PUNTO DI LAVORO ACCERTARSI CHE IL MOTORE SIA STATO COMPLETAMENTE DISINSERITO, E CHE L’INTERRUTTORE DI SICUREZZA SIA FISSATO CONTRO INVOLONTARIO RE-INSERIMENTO.
- Seite 13 Se l’olio contiene troppa acqua (olio bianco con molta acqua, raccolto sul fondo) o se manca più del 20% di olio, verificare la tenuta meccanica e sostituire la guarnizione se necessario. Le riparazioni devono essere eseguite sempre da ZENIT o da altro centro di assistenza qualificato. Tipo di olio: OIL PINNACLE EP 220 Texaco o tipo equivalente.
- Seite 14 PROPELLER - Istruzioni originali better together 6.6 SENSO DI ROTAZIONE (FIG. 10) L’elica deve girare verso destra (in senso orario) vista dal lato motore. Il liquido deve essere spinto anteriormente alla macchina. 6.7 COME TOGLIERE/MONTARE L’ELICA (FIG. 11) L’elica danneggiata o usurata deve sempre essere sostituita immediatamente. L’elica danneggiata risulta sbilanciata e può...
-
Seite 15: Individuazione Guasti
PROPELLER - Istruzioni originali better together 6.8 SCHEMA DI MANUTENZIONE IN CASO DI MANUTENZIONE DELLA MACCHINA DISINSERIRE SEMPRE LA CORRENTE E BLOCCARE L’INTERRUTTORE GENERA- LE CONTRO INVOLONTARIO INSERIMENTO Frequenza Una volta all'anno Una volta ogni 3 anni Cambio olio/controllo olio La macchina non è... - Seite 16 PROPELLER - Istruzioni originali better together LA MACCHINA NON SI FERMA PER VERIFICA E INTERVENTO RIVOLGERSI ESCLUSIVAMENTE A UN ELETTRICISTA QUALIFICATO Possibile causa Verifica e rimedio Guasto del dispositivo di arresto Verificare tutti i collegamenti. Serrare nuovamente i collegamenti e sostituire tutti i particolari difettosi. Guasto dell'apparecchiatura automatica Verificare l’apparecchiatura automatica, es.
- Seite 17 PROPELLER - Istruzioni originali better together 8. DIMENSIONI Fig. 12 Fig. 12A PRX 200/6/1/285 PRO 100/6/7/620 PRX 300/6/1/325 PRO 150/6/7/660 PRX 400/6/1/360 PRO 200/6/7/700 PRX 200/8/1/380 PRO 300/6/7/750 PRX 350/8/1/440 PRO 400/6/7/800 1005 PRO 150/4/46/1900 1144 1241 1900 PRO 200/4/46/2000...
-
Seite 18: Technical Characteristics
PROPELLER - Translation of the original instructions better together This symbol denotes instructions concerning the safety of operators and of the mixer. This symbol denotes instructions concerning risks of an electrical nature. This symbol concern correct treatment of the unit and other equipment. A non compliance could lead to damage of the unit or other equipment. -
Seite 19: Installation
Make a visual inspection of the packing and its contents to ensure that no damage has occurred. If there is any sign of significant damage, contact Zenit without delay. Check that the specifications indicated on the data plate are as required. - Seite 20 The mentioned way of mounting with a drill point is absolutely an emergency solution and may only be used in consultation and according to agre- ement with ZENIT. In case of insufficient anchoring of the bottom steering, any kind of liability on the part of the manufacturer shall be excluded.
-
Seite 21: Machine Installation
PROPELLER - Translation of the original instructions better together 4. Tighten the support for bracket or the stop fitting (4c) on the mast in proper level. Fig. 4a Fig. 4b Fig. 4c Fig. 4d Support for motor bracket Support for motor bracket Stop fitting Bottom guide for anchoring 4.5 CRANE INSTALLATION (FIG. - Seite 22 PROPELLER - Translation of the original instructions better together A) ELEVATION WITH MOVEABLE CRANE (Fig. 5) 1 - Moveable crane 1.1 - Crane jib 1.2 - Spike for fixing of jib 1.3 - Parking chain with hook 1.4 - Winch 1.5 - Wire with shackle 1.6 - Spike for fixing of mast (This applies only to turnable mast) 2 - Motor bracket...
-
Seite 23: Electrical Specifications
PROPELLER - Translation of the original instructions better together 5. ELECTRICAL SPECIFICATIONS BY INSTALLATION OF MACHINE ALWAYS SWITCH OFF THE CURRENT AND SECURE RELAY BOX AGAINST UNINTENTIO- NAL SWITCHING ON. Fig. 7a Fig. 7b Fig. 7c 7G_ mm 7G_+ 3x1 mm 7G_ mm 4G_+3x1 mm 2x 4G_+ 3x1 mm... -
Seite 24: Safety Cutout
PROPELLER - Translation of the original instructions better together As standard the machine is equipped with device for leakage control. (L= Leakage control Fig. 7a – 7c) The leakage control is connected with conductor number 12 and earth (yellow / green). NB. - Seite 25 If water contents of the oil is too big (white oil with a lot of water, collected on the bottom), or more than 20% oil missing, control the mechanical seal and replace it if necessary. Repair is always to be done by ZENIT or another qualified service centre. Oil type: OIL PINNACLE EP 220 from Texaco or equivalent quality.
-
Seite 26: Direction Of Rotation
PROPELLER - Translation of the original instructions better together 6.6 DIRECTION OF ROTATION The propeller must rotate right about turn (clockwise) seen from motor side. The medium must move away from the machine. 6.7 REMOVAL / MOUNTING OF PROPELLER (FIG. 11) A damaged or worn propeller must always be replaced immediately. -
Seite 27: Troubleshooting
PROPELLER - Translation of the original instructions better together 6.8 CHART OF MAINTENANCE IN CASE OF MACHINE MAINTENANCE ALWAYS SWITCH OFF THE CURRENT AND SECURE RELAY BOX AGAINST UNINTENTIONAL SWITCHING ON. FREQUENCY Every 12. month Every 36. month Oil change/ oil control The machine is not provided with active leak The machine is provided with active leak control control:... - Seite 28 PROPELLER - Translation of the original instructions better together THE MACHINE DOES NOT STOP CONTROL AND REMEDY MUST ONLY BE CARRIED OUT BY QUALIFIED ELECTRICIAN Possible cause Control and remedy Fault on stop equipment Check all connections. Re-tighten connections and replace all defective parts. Fault on automatic equipment Check automatic equipment such as timer etc THE MACHINE STARTS BUT MOTOR CUTOUT DISCONNECTS IMMEDIATELY...
- Seite 29 PROPELLER - Translation of the original instructions better together 8. DIMENSIONS Fig. 12 Fig. 12A PRX 200/6/1/285 PRO 100/6/7/620 PRX 300/6/1/325 PRO 150/6/7/660 PRX 400/6/1/360 PRO 200/6/7/700 PRX 200/8/1/380 PRO 300/6/7/750 PRX 350/8/1/440 PRO 400/6/7/800 1005 PRO 150/4/46/1900 1144 1241...
-
Seite 30: Caractéristiques Techniques
PROPELLER - Traduction des instructions originales better together Ce symbole concerne les instructions relatives à la sécurité des opérateurs et du mélangeur. Ce symbole concerne les instructions relatives aux risques de type électrique. Ce symbole concerne l’emploi correct de l’équipement et des autres dispositifs. Le non-respect pourrait entraîner des dommages à l’équipement ou aux autres dispositifs. - Seite 31 Contrôler visuellement l’emballage et son contenu pour s’assurer qu’ils ne soient pas endommagés. En présence de signes évidents de domma- ges, contacter immédiatement Zenit. Vérifier si les spécifications indiquées sur la plaque des données correspondent à ce qui a été demandé.
-
Seite 32: Montage Des Accessoires
NE PAS OUBLIER de protéger correctement le sommet de l’arbre pour éviter qu’il ne se déforme. Ce procédé représente une solution de nécessité absolue et ne peut être appliqué qu’après avoir consulté ZENIT. Le fabricant exclut toute responsabilité en cas d’ancrage insuffisant du bridage de rotation à la base. -
Seite 33: Installation De La Machine
PROPELLER - Traduction des instructions originales better together 4. Serrer le support de la tablette ou de l’accessoire d’arrêt (4c). Fig. 4a Fig. 4b Fig. 4c Fig. 4d Bride moteur Bride moteur Blocage Glissière de base pour ancrage 4.5 INSTALLATION DE LA GRUE (FIG. 5-6) 5. - Seite 34 PROPELLER - Traduction des instructions originales better together APRÈS AVOIR MONTÉ LA MACHINE DANS LE RÉSERVOIR FERMÉ, L’ACCÈS AU RESERVOIR DOIT ÊTRE BLOQUÉ POUR PROTÉGER DES PRÉCIPITATIONS. PERSONNE NE DOIT JAMAIS AVOIR ACCÈS AU RÉSERVOIR LORSQU’IL EST DÉCOUVERT OU SANS AUTRE PROTECTION. A) MONTÉE AVEC GRUE MOBILE (Fig.
-
Seite 35: Caractéristiques Électriques
PROPELLER - Traduction des instructions originales better together 5. CARACTÉRISTIQUES ÉLECTRIQUES LORS DE L’INSTALLATION DE LA MACHINE, DÉBRANCHER TOUJOURS LE COURANT ÉLECTRIQUE ET S’ASSURER CONTRE TOUT RISQUE D’ACTIVATION INVOLONTAIRE. Fig. 7a Fig. 7b Fig. 7c 7G_ mm 7G_+ 3x1 mm 7G_ mm 4G_+3x1 mm 2x 4G_+ 3x1 mm... -
Seite 36: Interrupteur De Sécurité
PROPELLER - Traduction des instructions originales better together (L= Contrôle des infiltrations Fig. 7a – 7c) Le contrôle des infiltrations est relié au conducteur numéro 12 et au câble de terre (jaune / vert). NB: Respecter scrupuleusement les raccordements indiqués dans le schéma du tableau électrique 5.5 UNITÉ... - Seite 37 Si l’huile contient trop d’eau (huile blanche sur le fond avec une grande quantité d’eau) ou s’il manque plus de 20% d’huile, contrôler la tenue mécanique et remplacer le joint, si nécessaire. Les réparations doivent toujours être effectuées par ZENIT ou par un centre d’assistance agréé. Type d’huile: OIL PINNACLE EP 220 Texaco ou type équivalent.
-
Seite 38: Sens De Rotation
PROPELLER - Traduction des instructions originales better together 6.6 SENS DE ROTATION L’hélice doit tourner vers la droite (dans le sens des aiguilles d’une montre) vue du côté moteur. Le produit doit être poussé à l’avant de la machine 6.7 COMMENT RETIRER/MONTER L’HÉLICE (FIG. 11) L’hélice endommagée ou usée doit toujours être immédiatement remplacée. -
Seite 39: La Machine Ne Se Met Pas En Marche
PROPELLER - Traduction des instructions originales better together 6.8 SCHÉMA D’ENTRETIEN EN CAS D’ENTRETIEN DE LA MACHINE, ENLEVER TOUJOURS LE COURANT ET BLOQUER L’INTERRUPTEUR GÉNÉRAL POUR EMPÊCHER TOUTE ACTIVATION INVOLONTAIRE Fréquence Une fois par an Une fois tous les 3 ans Changement huile/contrôle huile La machine n’est pas dotée d’un contrôle de La machine est dotée d’un contrôle de pertes... - Seite 40 PROPELLER - Traduction des instructions originales better together EN CAS DE DÉPLACEMENT OU DE REPARATION DE LA MACHINE, COUPER TOUJOURS L’ALIMENTATION ET BLOQUER L’INTER- RUPTEUR GÉNÉRALPOUR EMPÊCHER TOUTE ACTIVATION INVOLONTAIRE . Cause possible Vérification et solution Panne du dispositif d’arrêt Vérifier tous les branchements.
- Seite 41 PROPELLER - Traduction des instructions originales better together 8. DIMENSIONS Fig. 12A Fig. 12 PRX 200/6/1/285 PRO 100/6/7/620 PRX 300/6/1/325 PRO 150/6/7/660 PRX 400/6/1/360 PRO 200/6/7/700 PRX 200/8/1/380 PRO 300/6/7/750 PRX 350/8/1/440 PRO 400/6/7/800 1005 PRO 150/4/46/1900 1144 1241 1900...
-
Seite 42: Allgemeine Sicherheitsbestimmungen
PROPELLER - Übersetzung der originalen Gebrauchsanweisungen better together Mit diesem Symbol wird auf die Anweisungen hinsichtlich der Sicherheit der Bediener sowie des Rührwerks hingewiesen. Mit diesem Symbol wird auf die Anweisungen hinsichtlich elektrische Risiken hingewiesen. Mit diesem Symbol wird auf die Anweisungen hinsichtlich der korrekten Nutzung der Ausrüstung und der anderen Geräte hingewiesen. Die Nichteinhaltung der Anweisungen könnte zu Schäden an der Ausrüstung oder den anderen Geräten führen. - Seite 43 Griff oder der Hebehaken verwendet werden. Nehmen Sie eine Sichtkontrolle der Verpackung und des Inhaltes auf eventuelle Schäden vor. Sollten beträchtliche Schäden vorliegen, wenden Sie sich umgehend an die Zenit. Überprüfen Sie, dass die auf dem Datenschild gegebenen Informationen mit den beantragten übereinstimmen.
- Seite 44 Maschine bei der Montage und der späteren Wartung mit einem Hub- und Drehmittel über den Rand des Tankes oder des Geländers gehoben werden muss. Der In- stallationspunkt muss immer mit der Zenit abgesprochen werden. ANMERKUNG! Um die Maschine über dem Geländer drehen zu können muss 1,2 m Spielraum zwischen dem oberen Teil des Geländers und dem oberen Hebepunkt des Krans...
-
Seite 45: Installation Der Maschine
Bei dieser zuletzt beschriebenen Installationsweise handelt es sich um eine Notlösung, die nur nach vorheriger Absprache mit der ZENIT an- gewendet werden darf. Im Fall einer ungenügenden Verankerung der Rotationsbindung mit dem Unterbau, weist der Hersteller jegliche Verant- wortung diesbezüglich von sich. -
Seite 46: Anheben Mit Mobilem Kran (Abb. 5)
PROPELLER - Übersetzung der originalen Gebrauchsanweisungen better together Wenn das Seil der Winde mit Haken ausgestattet ist, ist es nützlich das Seil mit einem dafür vorgesehenen Band zu kennzeichnen, um später die korrekte Tiefe für die Rollenzüge festlegen zu können. VOR DER INBETRIEBSETZUNG MÜSSEN DIE OBEN STEHENDEN PUNKTE IMMER KONTROLLIERT WERDEN: DIE SCHRAUBE DREHT VOM STÄNDER AUS GESEHEN NACH RECHTS (UHRZEIGERSINN). -
Seite 47: Elektrische Merkmale
PROPELLER - Übersetzung der originalen Gebrauchsanweisungen better together 5. ELEKTRISCHE MERKMALE BEI INSTALLATION DER MASCHINE MUSS DIE STROMZUFUHR IMMER UNTERBROCHEN WERDEN. SICHERSTELLEN, DASS DIE STROMZUFUHR NICHT UNGEWOLLT WIEDER HERGESTELLT WIRD. Abb. 7a Abb. 7b Abb. 7c 7G_ mm 7G_ mm 7G_+ 3x1 mm 4G_+3x1 mm 2x 4G_+ 3x1 mm... -
Seite 48: Sicherheitsschalter
PROPELLER - Übersetzung der originalen Gebrauchsanweisungen better together Gemisch unter 30 kΩ sinkt. Die Standardversion der Maschine ist mit Infiltrationskontrolle versehen. (L= Infiltrationskontrolle Abb. 7a – 7c) Die Infiltrationskontrolle ist mit der Leiter Nummer 12 und dem Massekabel (gelb / grün) verbunden. NB: Die auf dem Plan der Schalttafel angegebenen Verbindungen müssen strengstens eingehalten werden. - Seite 49 Wenn zu viel Wasser im Öl vorhanden ist (auf dem Boden sammelt sich weißes Öl mit hohem Wassergehalt an) oder wenn mehr als 20% Öl fehlt, muss die mechanische Dichtung überprüft werden und die Dichtung eventuell ausgewechselt werden. Die Reparaturen müssen immer von ZENIT oder einem anderen qualifizierten Servicezentrum durchgeführt werden. Öltyp: OIL PINNACLE EP 220 Texaco oder gleichwertiges Ölmenge: s.
-
Seite 50: Abbau Der Schraube (Abb. 11)
PROPELLER - Übersetzung der originalen Gebrauchsanweisungen better together Mit der korrekten Menge des geeigneten Öltyps füllen. Die Verschlussstopfen mit folgendem Anzugsmoment anziehen: M16x1.5 = 34 Nm M20x1.5 = 50 Nm Abb. 9 Abb.9a 6.6 DREHRICHTUNG Die Schraube muss - vom Motor aus gesehen - nach rechts (Uhrzeigersinn) drehen. Die Flüs- sigkeit muss vor die Maschine gedrückt werden. -
Seite 51: Störungssuche
PROPELLER - Übersetzung der originalen Gebrauchsanweisungen better together Um eine ausreichende Spannung zu erhalten und die Ausreibung zwischen Welle und Nabe bei dem Auseinanderbau zu vermeiden, müssen die Teile sorgfältig geschmiert werden. 4. Die Schraube auf das Ende der Welle montieren. Sicherstellen, dass der Keil sich in korrekter Position zwischen Welle und Nabe befindet, während die Schraube auf die Welle gedrückt wird. - Seite 52 PROPELLER - Übersetzung der originalen Gebrauchsanweisungen better together Bruch des Motorkabels Sichtkontrolle durchführen. Kontrollieren, ob das Kabel und die anderen Verbindungen intakt sind. Wenden Sie sich an einen qualifizierten Elektriker zur Überprüfung. Blockierte Schraube Kontrollieren, ob die Schraube sauber ist und unbehindert dreht. Die Schraube reinigen und das Räderwerkgehäuse kontrollieren.
- Seite 53 PROPELLER - Übersetzung der originalen Gebrauchsanweisungen better together 8. ABMESSUNGEN Abb. 12 Abb. 12A PRX 200/6/1/285 PRO 100/6/7/620 PRX 300/6/1/325 PRO 150/6/7/660 PRX 400/6/1/360 PRO 200/6/7/700 PRX 200/8/1/380 PRO 300/6/7/750 PRX 350/8/1/440 PRO 400/6/7/800 1005 PRO 150/4/46/1900 1144 1241 1900...
-
Seite 54: Normas Generales De Seguridad
PROPELLER - Traducción de las instrucciones generales better together Este símbolo indica las instrucciones relativas a la seguridad de los operadores y del mezclador. Este símbolo indica las instrucciones relativas a los riesgos de naturaleza eléctrica. Este símbolo se refiere a la correcta utilización de la instrumentación y de otros dispositivos. El no respetarlo podría causar daños a la instrumentación o a otros dispositivos. -
Seite 55: Instalación
Controlar visualmente el embalaje y el contenido para asegurarse que no hayan sufrido daños. En caso de detectar marcas de daños notables ponerse en contacto inmediatamente con la empresa Zenit. Controlar que las especificaciones indicadas en la placa de los datos correspondan a lo requerido. -
Seite 56: Montaje De Los Accesorios
El punto de instalación deve establecerse siempre previa consulta a Zenit. Fig. 2 ¡NOTA! Para poder girar la máquina sobre el parapeto deberemos disponer de 1,2 m de juego libre entre la extremidad superior del parapeto y la del punto de levantamiento de la grúa. -
Seite 57: Instalación De La Máquina
Esta última modalidad de instalación representa una solución de absoluta emergencia y puede aplicarse solamente con previo acuerdo y consul- ta a ZENIT. En caso de anclaje insuficiente del vínculo de rotación en la base, el fabricante queda eximido de cualquier responsabilidad a este respeto. - Seite 58 PROPELLER - Traducción de las instrucciones generales better together CONTROLAR SIEMPRE TODO LO ANTERIORMENTE EXPUESTO ANTES DE LA PUESTA EN MARCHA. EL SENTIDO DE ROTACIÓN ES HACIA LA DERECHA (EN EL SENTIDO DE LAS AGUJAS DEL RELOJ) VISTA DESDE EL MON- TANTE.
-
Seite 59: Características Eléctricas
PROPELLER - Traducción de las instrucciones generales better together 5. CARACTERÍSTICAS ELÉCTRICAS PARA EFECTUAR LA INSTALACIÓN DE LA MÁQUINA CORTAR SIEMPRE LA ALIMENTACIÓN ELÉCTRICA Y ASEGURARSE QUE NO SE PRODUZCAN ACTIVACIONES INVOLUNTARIAS. Fig. 7a Fig. 7b Fig. 7c 7G_ mm 7G_+ 3x1 mm 7G_ mm 4G_+3x1 mm... - Seite 60 PROPELLER - Traducción de las instrucciones generales better together (L= Control de las infiltraciones Fig. 7a – 7c) El control de las infiltraciones está conectado al conductor número 2 y al cable de tierra (amarillo / verde). NB Respetar rigurosamente las conexiones indicadas en el esquema del cuadro eléctrico. 5.5 INSTRUMENTACIÓN DE PUESTA EN MARCHA / PARADA AUTOMÁTICA AL QUITAR LA MÁQUINA DEL PUNTO DE TRABAJO ASEGURARSE QUE EL MOTOR ESTÉ...
- Seite 61 Se el aceite contiene demasiada agua (aceite de color blanco con demasiada agua, recogido en el fondo) o si falta más del 20% de aceite, controlar la estanqueidad mecánica y sustituir la junta si es necesario. Las reparaciones deben ser siempre efectuadas por ZENIT o por otro centro de asistencia cualificado. Tipo de aceite: OIL PINNACLE EP 220 Texaco o un tipo equivalente.
-
Seite 62: Sentido De Rotación
PROPELLER - Traducción de las instrucciones generales better together 6.6 SENTIDO DE ROTACIÓN La hélice debe dar vueltas hacia la derecha (en el sentido de las agujas del reloj) vista por el lado del motor. El líquido debe empujarse hacia la parte delantera de la máquina. 6.7 CÓMO QUITAR/MONTAR LA HÉLICE (FIG. -
Seite 63: Identificación De Las Averías
PROPELLER - Traducción de las instrucciones generales better together 6.8 ESQUEMA DE MANTENIMIENTO PARA EFECTUAR EL MANTENIMIENTO DE LA MÁQUINA CORTAR SIEMPRE LA CORRIENTE Y BLOQUEAR EL INTERRUPTOR GENE- RAL CONTRA ACTIVACIONES INVOLUNTARIAS Frecuencia Una vez al año Una vez cada 3 años Cambio del aceite/control del aceite La máquina no está... - Seite 64 PROPELLER - Traducción de las instrucciones generales better together LA MÁQUINA NO SE PARA. PARA COMPROBACIONES E INTERVENCIONES CONTACTAR EXCLUSIVAMENTE A UN ELECTRICISTA CUALIFICADO Posible causa Comprobación y solución Avería en el dispositivo de parada Controlar todas las conexiones. Apretar de nuevo las conexiones y sustituir todas las partes defectuosas. Avería en la instrumentación automática Controlar la instrumentación automática, ej.
- Seite 65 PROPELLER - Traducción de las instrucciones generales better together 8. DIMENSIONES Fig. 12 Fig. 12A PRX 200/6/1/285 PRO 100/6/7/620 PRX 300/6/1/325 PRO 150/6/7/660 PRX 400/6/1/360 PRO 200/6/7/700 PRX 200/8/1/380 PRO 300/6/7/750 PRX 350/8/1/440 PRO 400/6/7/800 1005 PRO 150/4/46/1900 1144 1241...
- Seite 66 PROPELLER - Перевод оригинальной инструкции. better together Этот символ указывает на инструкции, относящиеся к безопасности операторов и смесителя Этот символ указывает на инструкции, относящиеся к риску электрического типа Этот символ относится к правильному использованию устройства и других приборов. Недостаточное внимание может привести...
- Seite 67 НИКОГДА НЕ использовать электрический провод или плавучие верёвки для поднятия или перемещения устройства. Использовать специальный поручень или подъёмный крюк. Проверить упаковку и содержание, чтобы увериться в отсутствии повреждений. При присутствии заметных признаков повреждения, обратиться сразу к фирме Zenit. Проверить, что свойства указанные на табличке соответствуют требованиям. 4.2 ХРАНЕНИЕ...
-
Seite 68: Монтаж Принадлежностей
НЕ ЗАБЫТЬ защитить должным образом вершину оси, во избежание деформации. Этот способ установки является выходом из положения в абсолютно чрезвычайных ситуациях и может быть использован только при согласии и после консультации с фирмой Zenit. В случае недостаточного крепления блокировки базового вращения, производитель отказывается от любой ответственности по этому поводу. -
Seite 69: Установка Устройства
PROPELLER - Перевод оригинальной инструкции. better together Фиг. 4a Фиг. 4b Фиг. 4c Фиг. 4d Опора для кронштейна мотора Опора для кронштейна мотора Блокировка конца пробега Базовое руководство по креплению 4.5 УСТАНОВКА КРАНА (ФИГ. 5-6) 5. Установить кронштейн крана, если он присутствует, креплениями М16. Убедиться, что кронштейн перпендикулярен, прежде чем... - Seite 70 PROPELLER - Перевод оригинальной инструкции. better together ПОСЛЕ УСТАНОВКИ УСТРОЙСТВА В ЗАКРЫТОЙ ЁМКОСТИ, ДОСТУП К ЁМКОСТИ ДОЛЖЕН БЫТЬ ЗАЩИЩЁН ВО ИЗБЕЖАНИЕ ПАДЕНИЙ. НЕ ОСТАВЛЯТЬ НИКОГДА ДОСТУП К ЁМКОСТИ ОТКРЫТЫМ ИЛИ БЕЗ ПРЕДОХРАНЕНИЯ. A) ПОДЪЁМ ПЕРЕДВИЖНЫМ КРАНОМ (Фиг.4) 1- Передвижной кран 1.1- Кронштейн...
-
Seite 71: Электрические Характеристики
PROPELLER - Перевод оригинальной инструкции. better together 5. ЭЛЕКТРИЧЕСКИЕ ХАРАКТЕРИСТИКИ ПРИ УСТАНОВКИ УСТРОЙСТВА ВСЕГДА ОТКЛЮЧАТЬ ЭЛЕКТРИЧЕСКОЕ ПИТАНИЕ И ЗАСТРАХОВАТЬСЯ ОТ ВОЗМОЖНОГО НЕПРОИЗВОЛЬНОГО ВКЛЮЧЕНИЯ Фиг. 7a Фиг. 7b Фиг. 7c 7G_ mm 7G_+ 3x1 mm 7G_ mm 4G_+3x1 mm 2x 4G_+ 3x1 mm TP TP S NC NC 4G_+3x1 mm 7G4 + 3x1.5 mm... - Seite 72 PROPELLER - Перевод оригинальной инструкции. better together ( L = Контроль инфильтраций Фиг. 7а- 7c) Контроль инфильтраций подсоединён к проводу номер 12 и к проводу заземления (жёлтый/зелёный). Внимание: Строго придерживаться соединениям указанным в схеме электрической панели управления 5.5 ПРИБОРЫ ДЛЯ ЗАПУСКА/ АВТОМАТИЧЕСКАЯ ОСТАНОВКА ПЕРЕМЕЩАЯ...
-
Seite 73: Режимы Работы
Если смазка содержит слишком много воды (белое масло с большим количеством воды, собранное на дне) или если не хватает более 20% смазки, проверить механическое уплотнение и заменить уплотнитель, если необходимо. Ремонт должен быть всегда выполнен фирмой ZENIT или другим квалифицированным центром обслуживания. Тип масла: OIL PINNACLE EP 220 Texaco или эквивалентный тип. -
Seite 74: Направление Вращения
PROPELLER - Перевод оригинальной инструкции. better together 6.6 НАПРАВЛЕНИЕ ВРАЩЕНИЯ Спираль должна вращаться направо (по часовой стрелке) смотря со стороны мотора. Жидкость должна выталкиваться спереди устройства. 6.7 КАК СНЯТЬ/ УСТАНОВИТЬ СПИРАЛЬ (ФИГ. 11) Повреждённая или изношенная спираль должна быть немедленно заменена. Повреждённая спираль... - Seite 75 PROPELLER - Перевод оригинальной инструкции. better together 6.8 СХЕМА ТЕХНИЧЕСКОГО ОБСЛУЖИВАНИЯ В СЛУЧАЕ ТЕХНИЧЕСКОГО ОБСЛУЖИВАНИЯ УСТРОЙСТВА, ВСЕГДА ОТКЛЮЧАТЬ ПИТАНИЕ И БЛОКИРОВАТЬ ГЛАВНЫЙ ВЫКЛЮЧАТЕЛЬ ВО ИЗБЕЖАНИЕ НЕПРОИЗВОЛЬНОГО ВКЛЮЧЕНИЯ ЧАСТОТА Раз в год Раз в 3 года Смена смазки/контроль масла Устройство не снабжено активным контролем Устройство...
- Seite 76 PROPELLER - Перевод оригинальной инструкции. better together УСТРОЙСТВО НЕ ВЫКЛЮЧАЕТСЯ ДЛЯ ПРОВЕРКИ И РЕМОНТА ОБРАЩАТЬСЯ ИСКЛЮЧИТЕЛЬНО К КВАЛИФИЦИРОВАННОМУ ЭЛЕКТРИКУ Возможная причина Проверка и починка Поломка прибора выключения Проверить все соединения. Закрепить заново все соединения и заменить дефектные детали. Поломка автоматических приборов Проверить...
- Seite 77 PROPELLER - Перевод оригинальной инструкции. better together 8. РАЗМЕРЫ Фиг. 12 Фиг. 12A PRX 200/6/1/285 PRO 100/6/7/620 PRX 300/6/1/325 PRO 150/6/7/660 PRX 400/6/1/360 PRO 200/6/7/700 PRX 200/8/1/380 PRO 300/6/7/750 PRX 350/8/1/440 PRO 400/6/7/800 1005 PRO 150/4/46/1900 1144 1241 1900 PRO 200/4/46/2000...
- Seite 78 PROPELLER better together...
- Seite 80 Cod. 0904#1004240 zenit.com Rev. 7 - 01/12/16 better together...