
Verwandte Anleitungen für k'nex Lava Launch Coaster 50050


Inhaltszusammenfassung für k'nex Lava Launch Coaster 50050
-
Seite 2: Battery Information
Do not dispose of batteries in a fire; they could leak or explode and cause injury. • Share the K'NEX experience with your • Remove all batteries if the toy will not be used for child and make building with K'NEX a long period of time. - Seite 3 BUILDING BASICS Connectors There are blue and gray connectors with special long slots. They slide together as you see in the pictures. Push these parts together until you hear a “click. ” Start Building Motor To begin your model, find the and follow Car will go in the direction of the arrows on top of the motor.
- Seite 7 Did you install 3 C (or LR14) batteries in the motor? Est-ce que tu as installé 3 C (ou LR14) dans le moteur ? ¿Instalaste 3 pilas C (o LR14) en el motor? Heb je 3 C (of LR14) batterijen gestoken in de motor? Hai installato 3 batterie C (o LR14) nel motore? Foram instaladas as pilhas 3 C (ou LR14) no motor? Heb je er 3 C (of LR14) batterijen ingestoken?
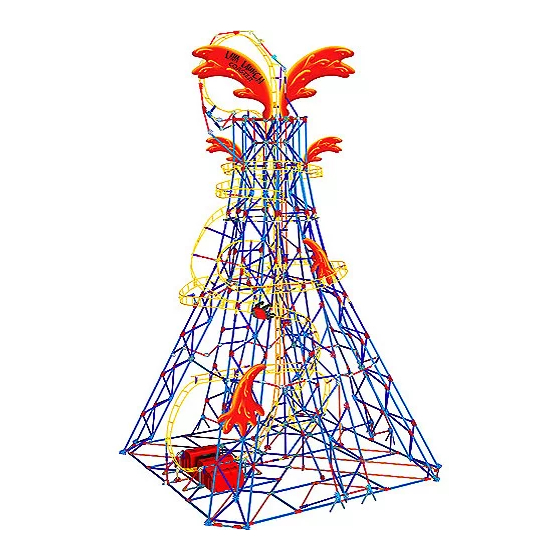
- Seite 11 Always join this end of the track to the previous track piece first, then connect the rest of the track to the tower. Connecte toujours le côté supérieur du circuit contre le côté supérieur tout au long de la construction. Al construir, conecta siempre la pista de lado superior a lado superior.
- Seite 37 Always join this end of the track to the previous track piece first, then connect the rest of the track to the tower. Connecte toujours le côté supérieur du circuit contre le côté supérieur tout au long de la construction. Al construir, conecta siempre la pista de lado superior a lado superior.
- Seite 44 Always join this end of the track to the previous track piece first, then connect the rest of the track to the tower. Connecte toujours le côté supérieur du circuit contre le côté supérieur tout au long de la construction. Al construir, conecta siempre la pista de lado superior a lado superior.
- Seite 64 Attaching Graphic Panels Remove the purple rod and insert it into the graphic. Enlever la tige pourpre et l'insérer dans le graphique. Quitar la barra púrpura e insertarla en el gráfico. Die purpurrote Stange entfernen und sie in die Grafik einsetzen.
-
Seite 66: Tips & Troubleshooting
To attach the car, slide onto an Attaching open end of the track. If the car Coaster Car gets stuck on the way down, make sure it is not hitting any K’NEX parts. • The motor is designed for use only in the direction If a car gets stuck on the track: shown. - Seite 67 Car must travel in the direction shown. L UNCH CO STER ™ Go to for Instruction Updates...
- Seite 68 Building Idea TURBO BOOST CO STER ™ Bonus instructions at www.knex.com/thrill-rides Idée de construction Plans supplementaires á www.knex.com/thrill - rides Idea para la construcción Instrucciones de la prima en www.knex.com/thrill - rides Bauvorschlag Zusätzliche Bauanleitungen bei www.knex.com/thrill - rides Idea di costruzione Bonus Istruzioni a www.knex.com/thrill - rides Ideia de construção Instruções do bônus em www.knex.com/thrill - rides...
-
Seite 69: Solución De Problemas
K'NEX Limited Partnership Group. • Compartan la experiencia K'NEX con su niño y hagan que la construcción con K'NEX pouvant être nocives à l’environnement et à la santé. Veuillez utiliser les points Si los coches quedan atascados mientras van hacia abajo: sea una divertida aventura de toda la familia. -
Seite 70: Informationen Zu Den Batterien
• Helfen Sie Ihrem Kind beim Bauen mit K'NEX und machen Sie aus diesem Fehlerbehebung: (Pagina 3) Istruzioni di base per costruire con K’NEX Bauprojekt ein Abenteuer mit Spaß und guter Laune für die gesamte Familie. • Die motor sind ausschließlich zur Anwendung in die angezeigte Richtung bestimmt. -
Seite 71: Resolução De Problemas
Enquanto estás a montar as peças, tenta manter o teu modelo • Deel de K'NEX ondervinding met je kind en maak van het bouwen met K'NEX een spoor vast. Wanneer wagens vastlopen tijdens de daling: Verzeker je ervan dat na mesma direcção, conforme mostrado na ilustração, para assim ligares as peças...