Herunterladen Inhalt Inhalt Diese Seite drucken

Werbung

Verfügbare Sprachen
  • DE

Verfügbare Sprachen

  • DEUTSCH, seite 14
L854200179
05/2019 rev 0
CP.J3-SW
UNIONE NAZIONALE COSTRUTTORI
AUTOMATISMI PER CANCELLI, PORTE
SERRANDE ED AFFINI

Werbung

Inhaltsverzeichnis
loading

Inhaltszusammenfassung für Beninca CP.J3-SW

  • Seite 1 L854200179 05/2019 rev 0 CP.J3-SW UNIONE NAZIONALE COSTRUTTORI AUTOMATISMI PER CANCELLI, PORTE SERRANDE ED AFFINI...
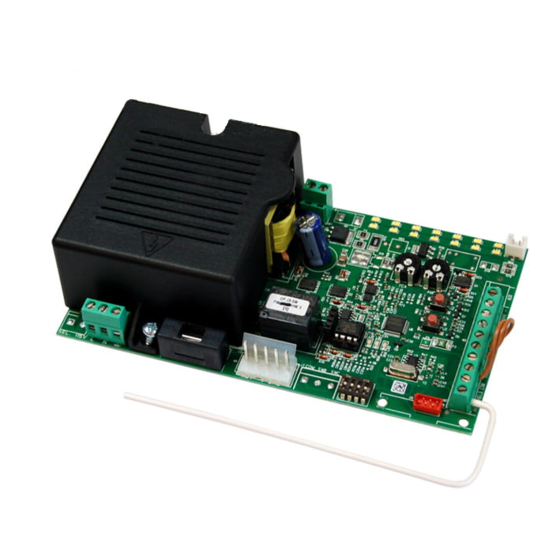
  • Seite 3 EXT. BOX 2x12V Battery Charger Battery (Optional) Service Light -24V 24Vdc / 500mA max +24V BLINK LAMP 24Vdc BLINK PHOT STOP P.P. SHIELD X.BE F1 T2A • ATTENZIONE! I diodi LED presenti sul circuito stampato possono provocare danni alla vista se guardati da distanza ravvicinata senza opportuna portezione.
  • Seite 4: Informazioni Generali

    AVVERTENZE INFORMAZIONI GENERALI E’ vietato l’utilizzo del prodotto per scopi o con modalità non previste nel presente manuale. Usi non corretti possono essere causa di danni al prodotto e mettere in pericolo persone e cose. Si declina ogni responsabilità dall’inosservanza della buona tecnica nella costruzione dei cancelli, nonché...
  • Seite 5: Collegamenti Elettrici

    CENTRALE DI COMANDO CP.J3-SW COLLEGAMENTI ELETTRICI Nella seguente tabella sono descritti i collegamenti elettrici rappresentati in Fig. 1: Morsetti Funzione Descrizione L/N/GND Alimentazione Ingresso 230Vac 50/60Hz (L-Fase/N-Neutro/GND) MOT/+ENC- Motore/Encoder Connettore rapido per il collegamento motore provvisto di Encoder Collegamento antenna scheda radioricevente incorporata...
  • Seite 6: Funzione Trimmer

    AUTOSET ATTENZIONE!: LA PROCEDURA DI AUTOSET DESCRITTA DI SEGUITO È OBBLIGATORIA! Durante la fase di AUTOSET la centrale effettua alcune manovre di apertura e chiusura durante le quali vengono impostati indispensabili parametri di funzionamento, tra i quali: - I punti di inizio e fine corsa. - L’inizio delle fasi di rallentamento.
  • Seite 7 DIP 2 Imposta le velocità di manovra di APERTURA e CHIUSURA. Dopo aver portato il DIP2 in ON con il tasto PU1 si seleziona la velocità CHIUSURA, segnalata da LED LD3. LD3 1 lampeggio 50% della velocità massima (Default) LD3 2 lampeggi 75% della velocità...
  • Seite 8: Diagnostica Led

    Memorizzazione di un pulsante trasmettitore con attivazione Luce cortesia “Service Light” bistabile - Premere 1 volta il pulsante PU2 per 1s il LED LD1 emette 1 lampeggio con 1s di pausa. - Premere nuovamente 3 volte il pulsante PU2, il LED LD1 emette 4 lampeggi con 1s di pausa - Premere entro 10s il pulsante del trasmettitore che si desidera memorizzare con funzione Luce di cortesia “Service Light”...
  • Seite 9: Technical Data

    WARNING GENERAL INFORMATIONS The product shall not be used for purposes or in ways other than those for which the product is intended for and as described in this manual. Incorrect uses can damage the product and cause injuries and damages. The company shall not be deemed responsible for the non-compliance with a good manufacture technique of gates as well as for any deformation, which might occur during use.
  • Seite 10 CP.J3-SW CONTROL UNIT ELECTRICAL CONNECTIONS The follows table shows the electrical connections in Fig. 1: Terminals Function Description L/N/GND Power supply 230Vac 50 / 60Hz input (L-Phase / N-Neutral / GND) MOT/+ENC- Motor/Encoder Quick connector for the connection of motors provided with Encoder...
  • Seite 11 AUTOSET CAUTION! THE AUTOSET PROCEDURE DESCRIBED BELOW IS MANDATORY! During the AUTOSET phase, the control unit performs a number of opening and closing movements during which essential operating parameters are set, including: - Start- and end-of-run positions. - Start of the slowdown phases. - Torque values applied during panel movement.
  • Seite 12: Belt Tensioning

    DIP 2 Set the OPENING and CLOSING movement speed. After switching DIP2 to ON, select the CLOSING speed indicated by LED LD3 using the PU1 key. LD3 1 flash 50% of maximum speed (Default) LD3 2 flashes 75% of maximum speed LD3 steady light maximum speed After switching DIP2 to ON, select the OPENING speed indicated by LED LD1.
  • Seite 13: Total Reset

    Storage of a transmitter key with enabling of a bistable “Service Light” - Press the PU2 key once for 1s, the LD1 LED emits 1 flash with 1s pause. - Press the PU2 key again 3 times, the LD1 LED will flash 4 times with 1s pause - Press the transmitter key to be stored with the bistable “Service Light”...
  • Seite 14 HINWEISE ALLGEMEINE INFORMATIONEN Das Produkt darf nicht für andere Zwecke oder auf andere Weise verwendet werden, als in der vorliegenden Anleitung be- schrieben. Ein ungeeigneter Gebrauch kann das Produkt beschädigen und eine Gefahr für Personen und Sachen darstellen. Wir übernehmen keinerlei Haftung für Schäden, die sich aus einer unsachgerechten Montage der Tore und aus daraus fol- genden Verformungen ergeben können.
  • Seite 15 STEUERGERÄT CP.J3-SW ELEKTRISCHE ANSCHLÜSSE Die folgende Tabelle beschreibt die elektrischen Anschlüsse, wie dargestellt in Abb. 1: Klemmen Funktion Beschreibung L/N/GND Stromversorgung Eingang 230Vac 50/60Hz (L-Phase/N-Neutral/GND) MOT/+ENC- Motor/Encoder Schnellverbinder für den Motoranschluss mit Encoder Antennenanschluss Karte integrierter Radioempfänger ANT/SHIELD Antenne ANT: Signal / SHIELD: Bildschirm ALLGEMEIN Gemein für alle Steuerungseingänge.
  • Seite 16 AUTOSET VORSICHT: DER UNTEN BESCHRIEBENE AUTOSET-VORGANG IST OBLIGATORISCH! Während der AUTOSET-Phase führt das Steuergerät einige Öffnungs- und Schließmanöver durch, bei denen wesentliche Betriebsparameter eingestellt werden, darunter: - Start- und Endpunkte. - Der Beginn der Verlangsamungsphasen. - Die Drehmomentwerte, die während der Bewegung der Tür angewendet werden. - Erkennung des an den PHOT-Eingang angeschlossenen Geräts.
  • Seite 17: Konfiguration Eingebauter Empfänger

    Die LED LD3 zeigt den Status der Funktion an: LED LD3 eingeschaltet= Ferngesteuertes Erfassen aktiviert (Standard) LED LD3 ausgeschaltet = Ferngesteuertes Erfassen deaktiviert ACHTUNG: Stellen Sie nach dem Programmieren DIP 1 wieder auf OFF. DIP 2 Stellt die Bewegungsgeschwindigkeiten der ÖFFNUNG und SCHLIESSUNG ein. Nachdem der DIP2 mit der Taste PU1 auf ON gestellt wurde, wird die Geschwindigkeit der SCHLIESSUNG, durch die LED LD3 angezeigt.
  • Seite 18: Gesamte Rücksetzung

    Speichern einer Sendertaste mit zeitgesteuerter Aktivierung der Funktion Servicelicht „Service Light“. - Drücken Sie die PU2-Taste einmal für 1s. Die LED LD1 sendet 1 Blinksignal mit 1s Pause. - Drücken Sie die PU2-Taste einmal ,. Die LED LD1 sendet 1 Blinksignal mit 1s Pause - Drücken Sie innerhalb von 10s die Taste des zu speichernden Senders mit zeitgesteuerter Funktion Servicelicht „Service Light“, die 3 roten LEDs leuchten 1s lang, nach dem Speichern verlässt der Empfänger automatisch die Programmierphase.
  • Seite 19: Données Techniques

    AVERTISSEMENTS INFORMATIONS GÉNÉRALES Il est interdit d’utiliser ce produit pour l’utilisation du produit ou avec des finalités ou modalités non prévues par le présent manuel. Toute autre utilisation pourrait compromettre l’intégrité du produit et présenter un danger pour les personnes ou pour les biens.
  • Seite 20: Branchements Électriques

    CENTRALE DE COMMANDE CP.J3-SW BRANCHEMENTS ÉLECTRIQUES Le tableau suivant décrit les branchements électriques représentés en Fig. 1: Bornes Fonction Description L/N/GND Alimentation Entrée 230Vac 50/60Hz (L-Phase/N-Neutre/GND) MOT/+ENC- Moteur/Encodeur Connecteur rapide pour le branchement du moteur équipé d’Encodeur Branchement antenne fiche radio réceptrice incorporée...
  • Seite 21 AUTOSET ATTENTION!: LA PROCÉDURE D’AUTOSET DÉCRITE CI-APRÈS EST OBLIGATOIRE! Durant la phase de AUTOSET, la centrale effectue certaines manœuvres d’ouverture et de fermeture durant lesquelles sont configurés des paramètres de fonctionnement indispensables, dont: - Les points de début et de butée. - Le début des phases de ralentissement.
  • Seite 22 Activation/désactivation Apprentissage à distance des émetteurs Après avoir placé le DIP1 sur On en appuyant simultanément sur PU1+PU2, on active ou on désactive l’apprentissage à distance, décrit dans le paragraphe “Apprentissage à distance d’un émetteur”. Remarque : La réception des émetteurs dupliqués de la série “AK” est activée ou désactivée simultanément. Le LED LD3 signale l’état de la fonction: LED LD3 allumé= Apprentissage à...
  • Seite 23: Reset Total

    La fermeture TCA n’a pas d’effet sur la fonction Ouverture Partielle. L’ouverture partielle peut se faire uniquement si le vantail est en fermeture complète. Pour sortir de la programmation, sans mémoriser l’émetteur, attendre 10s. Mémorisation d’une touche émettrice avec activation fonction Veilleuse “Service Light” temporisée - Appuyer 1 fois sur la touche PU2 pendant 1s, le LED LD1 émet 1 clignotement avec 1s de pause.
  • Seite 24: Datos Técnicos

    ADVERTENCIAS INFORMACIÓN GENERAL Está prohibido utilizar el producto para finalidades o con modalidades no previstas en el presente manual. Usos incorrectos pueden causar daños al producto y poner en peligro personas y cosas. Se rehúsa cualquier responsabilidad en caso de incumplimiento de la buena técnica en la construcción de las cancelas, así como en cuanto a las deformaciones que pudieran producirse durante el uso.
  • Seite 25: Conexiones Eléctricas

    CENTRAL DE MANDO CP.J3-SW CONEXIONES ELÉCTRICAS En la siguiente tabla se describen las conexiones eléctricas representadas en la Fig. 1: Bornes Función Descripción L/N/GND Alimentación Entrada 230Vac 50/60Hz (L-Fase/N-Neutro/GND) MOT/+ENC- Motor/Codificador Conector rápido para la conexión del motor provisto de Codificador...
  • Seite 26 AUTOCONFIGURACIÓN ¡ATENCIÓN!: ¡EL PROCEDIMIENTO DE AUTOCONFIGURACIÓN DESCRITO A CONTINUACIÓN ES OBLIGATORIO! Durante la fase de AUTOCONFIGURACIÓN la central realiza algunas maniobras de apertura y cierre durante las cuales se configuran los parámetros operativos de funcionamiento, entre los cuales: - Los puntos de inicio y final de carrera. - El inicio de las fases de ralentización.
  • Seite 27 DIP 2 Ajustar la velocidad de maniobra de APERTURA y CIERRE Después de haber llevado el DIP2 a ON con la tecla PU1 se selecciona la velocidad CIERRE, indicada por el LED LE3. LD3 1 parpadeo 50% de la velocidad máxima (por defecto) LD3 2 parpadeos 75% de la velocidad máxima LD3 encendido fijamente velocidad máxima...
  • Seite 28: Diagnóstico Led

    Memorización de un botón del transmisor con activación de la función Luz de cortesía “Luz de servicio” biestable - Apretar 1 vez el botón PU2 durante 1s, el LED LD1 emite 1 parpadeo con 1s de pausa. - Apretar otra vez 3 veces el botón PU2, el LED LD1 emite 4 parpadeos con 1s de pausa. - Apretar antes de 10s el botón del transmisor que se desea memorizar con función Luz de cortesía, “Luz de servicio”...
  • Seite 29: Dane Techniczne

    OSTRZEŻENIA INFORMACJE OGÓLNE Zabrania się używania produktu do celów i w sposób inny niż przewidziane w niniejszym podręczniku. Nieprawidłowe używanie może spowodować uszkodzenie produktu i stanowić zagrożenie dla osób i rzeczy. Nie bierze się na siebie żadnej odpowiedzialności za nieprzestrzeganie reguł dobrej techniki budowlanej przy realizacji bram, a także w przypadku odkształceń, które mogłyby powstać...
  • Seite 30 CENTRALKA STEROWNICZA CP.J3-SW PODŁĄCZENIA ELEKTRYCZNE W poniższej tabeli opisano podłączenia elektryczne przedstawione na Rys. 1: Zaciski Funkcja Opis L/N/GND Zasilanie Wejście 230Vac 50/60Hz (L-Faza/N-Neutro/GND) MOT/+ENC- Silnik/Koder Szybkozłączka do podłączenia silnika zaopatrzona w koder Podłączenie anteny z wbudowaną karta odbiorczą ANT/OSŁONA Antena ANT: Sygnał...
  • Seite 31 AUTOUSTAWIANIE UWAGA! OPISANA PONIŻEJ PROCEDURA AUTOUSTAWIANIA JEST OBOWIĄZKOWA! Podczas fazy AUTOUSTAWIANIA, centralka wykonuje kilka manewrów otwarcia i zamknięcia podczas, których są ustawianie wymagane parametry funkcjonowania, między innymi: - Punkty początku i końca biegu. - Początek faz zwalniania. - Wartości pary zastosowane podczas przebiegu trasy drzwi. - Rozpoznanie urządzenia podłączonego do wejścia PHOT.
  • Seite 32 DIP 2 Ustawia prędkość manewrową OTWIERANIA i ZAMYKANIA. Po ustawieniu DIP2 w pozycji ON, za pomocą klawisza PU1 wybiera się prędkość ZAMYKANIA, sygnalizowaną przez DIODĘ LD3. LD3 1 mignięcie 50% prędkości maksymalnej (Domyślnie) LD3 2 mignięcia 75% prędkości maksymalnej LD3 świeci na stałe prędkość...
  • Seite 33 Zapisywanie przycisku nadajnika z aktywowaniem funkcji dodatkowego opóźnionego światełka „Service Light” - Nacisnąć 1 raz przycisk PU2 przez 1sek. DIODA LD1 wyemituje 1 mignięcie z 1 sek.przerwą. - Nacisnąć ponownie 2 razy przycisk PU2, DIODA LD1 wyemituje 3 mignięcia z 1 sek.przerwą - Naciskając w ciągu 10sek.
  • Seite 34 Dichiara che il documento è rilasciato sotto la propria responsabilità e appartiene al seguente prodotto: Declare that the DOC is issued under our sole responsibility and belongs to the following product: Modello/Tipo: Model/Product: CP.J3-SW CP.J3-SW Tipo di prodotto: Type: Centrale di comando 24Vdc...
  • Seite 35 Declara que el documento ha sido emitido bajo la propia responsabilidad y pertenece al siguiente producto: Oświadcza, że dokument został wydany na własną odpowiedzialność i dotyczy produktu: Modelo/Tipo: Model/Typ: CP.J3-SW CP.J3-SW Tipo de producto: Rodzaj produktu: Central de mando 24Vdc...
  • Seite 36 AUTOMATISMI BENINCÀ SpA - Via Capitello, 45 - 36066 Sandrigo (VI) - Tel. 0444 751030 r.a. - Fax 0444 759728...

Inhaltsverzeichnis