Herunterladen Inhalt Inhalt Diese Seite drucken
Pioneer DDJ-SZ Bedienungsanleitung
Vorschau ausblenden Andere Handbücher für DDJ-SZ:
Inhaltsverzeichnis

Werbung

Verfügbare Sprachen
  • DE

Verfügbare Sprachen

  • DEUTSCH, seite 30
DDJ-SZ
http://pioneerdj.com/support/
http://serato.com/
The Pioneer DJ support site shown above offers FAQs, information on software and various other types of
information and services to allow you to use your product in greater comfort.
For the latest version of the Serato DJ software, access Serato.com and download the software from there.
Le site de support DJ de Pioneer indiqué ci-dessus propose une FAQ, des informations sur le logiciel et divers
types d'informations et de services qui permettent une utilisation plus confortable de ce produit.
Pour la toute dernière version du logiciel Serato DJ, accédez à Serato.com et téléchargez le logiciel de ce site.
Die oben gezeigte Pioneer DJ-Support-Website enthält häufig gestellte Fragen, Informationen über Software
und andere wichtige Informationen und Dienste, die Ihnen helfen, Ihr Produkt optimal zu verwenden.
Für die neueste Version der Serato DJ-Software gehen Sie zu Serato.com und laden die Software von dort
herunter.
Il sito di supporto DJ Pioneer indicato qui sopra offre una sezione FAQ, informazioni sul software ed
informazioni e servizi di vario tipo, per permettere un uso più confortevole dei nostri prodotti.
Per ottenere la più recente versione di Serato DJ, raggiungere Serato.com e scaricare il software di lì.
De bovengenoemde Pioneer DJ ondersteuningswebsite biedt een overzicht van de vaak gestelde vragen,
informatie over software en allerlei andere soorten informatie en diensten die u in staat stellen dit product met
meer gemak te gebruiken.
Ga voor de nieuwste versie van de Serato DJ-software naar Serato.com en download de software van deze site.
El sitio de asistencia Pioneer DJ mostrado arriba ofrece las preguntas frecuentes, información del software y
varios otros tipos de información y servicios que le permitirán usar su producto con mayor confort.
Para la versión más reciente del software Serato DJ, acceda a Serato.com y descargue el software desde allí.
O site de suporte da Pioneer DJ mostrado acima oferece FAQs, informações sobre o software e outros tipos
de informações e serviços para permitir utilizar o produto com um maior conforto.
Para obter a versão mais recente do software Serato DJ, aceda a Serato.com e transfira o software a partir daí.
На указанном выше сайте поддержки Pioneer DJ содержатся раздел часто задаваемых вопросов,
информация по программному обеспечению, а также различные другие типы информации и услуг,
позволяющие использовать ваше изделие более лучшим образом.
Относительно самой последней версии программного обеспечения Serato DJ зайдите на Serato.com и
загрузите оттуда программное обеспечение.
Operating Instructions (Basic Edition)
Mode d'emploi (Édition de base)
Bedienungsanleitung (Grundlegende Edition)
Istruzioni per l'uso (edizione base)
Handleiding (basiseditie)
Manual de instrucciones (Edición básica)
Manual de instruções (edição básica)
Инструкции по эксплуатации (Основное издание)
DJ Controller
Contrôleur pour DJ
DJ Controller
DJ Controller
DJ Controller
Controlador DJ
Controlador para DJ
DJ Контроллер

Werbung

Inhaltsverzeichnis
loading

Inhaltszusammenfassung für Pioneer DDJ-SZ

  • Seite 1 For the latest version of the Serato DJ software, access Serato.com and download the software from there. Le site de support DJ de Pioneer indiqué ci-dessus propose une FAQ, des informations sur le logiciel et divers types d’informations et de services qui permettent une utilisation plus confortable de ce produit.
  • Seite 2: Power-Cord Caution

    When you find it around the unit for ventilation to improve heat radiation damaged, ask your nearest PIONEER authorized (at least 5 cm at top, 5 cm at rear, and 5 cm at each service center or your dealer for a replacement.
  • Seite 3 (2) this device must accept any interference received, including interference that may cause undesired operation. Product Name: DJ Controller Model Number: DDJ-SZ Responsible Party Name: PIONEER ELECTRONICS (USA) INC. SERVICE SUPPORT DIVISION Address: 1925 E. DOMINGUEZ ST. LONG BEACH, CA 90810-1003, U.S.A. Phone: 1-800-421-1404 URL: http://www.pioneerelectronics.com...
  • Seite 4: Inhaltsverzeichnis

    Thank you for buying this Pioneer product. Be sure to read this booklet and the “Operating Instructions” pro- vided on the Pioneer DJ support site. Both include important infor- mation that should be fully understood before using this product. After you have finished reading the instructions, put them away in a safe place for future reference.
  • Seite 5: Before Start

    3 “An internet environment is required to access the Before start site. Connected to the internet?” is displayed. Click [Yes]. The web browser is launched and the Pioneer DJ support site is displayed. To close the CD-ROM menu, click [Exit].
  • Seite 6 Optical disc drive on which the CD-ROM can be read site. Connected to the internet?” is displayed. Click [Yes]. A USB 2.0 port is required to connect the computer USB port The web browser is launched and the Pioneer DJ support site is with this unit. displayed. Display resolution...
  • Seite 7 14 “An internet environment is required to access the site. Connected to the internet?” is displayed. Click [Yes]. The web browser is launched and the Pioneer DJ support site is displayed. 15 Click [Software Info] under [DDJ-SZ] on the Pioneer DJ The message of successful installation appears once installation is support site.
  • Seite 8: Browser Section

    21 Read the terms of the license agreement carefully, Browser section and if you agree, click [Agree]. 1 Rotary selector 2 BACK (VIEW) button If you do not agree to the contents of the usage agreement, click 3 LOAD PREPARE (AREA) button [Disagree] to cancel installation.
  • Seite 9: Mixer Section

    c LOOP IN button 6 MASTER CUE button d LOOP OUT button 7 Master level indicator e PARAMETER button, PARAMETER button 8 BOOTH MONITOR control f HOT CUE mode button 9 MASTER OUT COLOR control g ROLL mode button a OSCILLATOR SELECT button h SLICER mode button b OSCILLATOR VOLUME control i SAMPLER mode button...
  • Seite 10: Effect Section

    Effect section This section is used to control the two effect units (FX1 and FX2). Controls and buttons to operate the FX1 unit are located on the left side of the controller, those to operate the FX2 unit are located on the right side of the controller.
  • Seite 11: Operation

    5 Connect the power cord. Operation To power outlet Power cord (included) Connections 1 Connect headphones to one of the [PHONES] terminals. 6 Press the [ ] switch on this unit’s rear panel to turn this unit’s power on. 2 Connect powered speakers, a power amplifier, components, etc., to the [MASTER OUT 1] or [MASTER OUT 2] terminals.
  • Seite 12: Starting The System

    1 The [ACTIVATE/BUY Serato DJ] icon may appear on the right side of the screen that is displayed when Serato DJ is launched the first time, but there is no need to activate or purchase a license for those using DDJ-SZ.
  • Seite 13 Importing tracks The following describes the typical procedure for importing tracks. There are various ways to import tracks with the Serato DJ software. For details, see the Serato DJ software manual. If you are already using Serato DJ software (Scratch Live, ITCH or Serato DJ Intro) and have already created track libraries, the track libraries you have previously created can be used as such.
  • Seite 14: Quitting The System

    1 Set the positions of the controls, etc., as shown below. Playing tracks and outputting the sound Names of controls, etc. Position The following describes the procedure for outputting the channel 1 MASTER LEVEL control Turned fully counterclockwise sound as an example. CD, USB selector switch [USB] position Set the volume of the devices (power amplifier, powered speakers,...
  • Seite 15: Additional Information

    PHONO ................–52 dBu/47 k the items in the “Troubleshooting” section of this unit’s operating MIC1 ................–52 dBu/8.5 k instructions and the [FAQ] for the [DDJ-SZ] on the Pioneer DJ sup- MIC2 ................–52 dBu/8.5 k port site. Standard output level / Load impedance / Output impedance Sometimes the problem may lie in another component.
  • Seite 16: Milieu De Fonctionnement

    ATTENTION temps en temps. Contacter le service après-vente L’interrupteur de cet appareil ne coupe pas PIONEER le plus proche ou le revendeur pour un complètement celui-ci de sa prise secteur. Comme le remplacement. cordon d’alimentation fait office de dispositif de S002*_A1_Fr déconnexion du secteur, il devra être débranché...
  • Seite 17 Pour le détail, reportez-vous à Téléchargement du manuel du logiciel Serato DJ (p. 4). La version la plus récente du mode d’emploi peut être téléchargée depuis le site de support DJ de Pioneer. Pour plus de détails, reportez-vous à Téléchargement de ce mode d’emploi (p. 4). Informations préliminaires Contenu du carton d’emballage ...............
  • Seite 18: Informations Préliminaires

    [Oui]. Si vous ne possédez pas Adobe Reader, veuillez l’installer en utilisant Le navigateur web démarre et le site de support DJ de Pioneer apparaît. le lien de téléchargement sur le menu du CD-ROM. Pour fermer le menu du CD-ROM, cliquez sur [Quitter].
  • Seite 19 DJ de Pioneer. reportez-vous à “Software Info” dans “DDJ-SZ” sur le site de support DJ de Pioneer ci-dessous. 13 Cliquez sur le lien vers la page de téléchargement de http://pioneerdj.com/support/...
  • Seite 20 14 “Une connexion internet est nécessaire pour pouvoir accéder au site. Connecté à internet ?” apparaît. Cliquez sur [Oui]. Le navigateur web démarre et le site de support DJ de Pioneer apparaît. 15 Cliquez sur [Software Info] dans [DDJ-SZ] sur le site de support DJ de Pioneer.
  • Seite 21: Noms Des Éléments

    21 Lisez attentivement les termes du contrat de licence Section d’exploration et, si vous acceptez, cliquez sur [Agree]. 1 Sélecteur rotatif 2 Touche BACK (VIEW) Si vous n’acceptez pas le contenu du contrat d’utilisation, cliquez 3 Touche LOAD PREPARE (AREA) sur [Disagree] pour annuler l’installation.
  • Seite 22: Section Mixeur

    c Touche LOOP IN 6 Touche MASTER CUE d Touche LOOP OUT 7 Indicateur de niveau principal e Touche PARAMETER , touche PARAMETER 8 Commande BOOTH MONITOR f Touche de mode HOT CUE 9 Commande MASTER OUT COLOR g Touche de mode ROLL a Touche OSCILLATOR SELECT h Touche de mode SLICER b Commande OSCILLATOR VOLUME...
  • Seite 23: Section Des Effets

    Section des effets Cette section est utilisée pour contrôler les deux générateurs d’effets (FX1 et FX2). Les commandes et touches utilisées pour l’exploitation du générateur FX1 se trouvent sur le côté gauche de la console, celles pour l’exploitation du générateur FX2 se trouvent sur le côté droit de la console.
  • Seite 24: Fonctionnement

    5 Branchez le cordon d’alimentation. Fonctionnement À une prise d’ alimentation Cordon d’ alimentation (inclus) Raccordements 1 Raccordez un casque à l’une des prises [PHONES]. 6 Appuyez sur le commutateur [ ] sur le panneau arrière de cet appareil pour allumer l’appareil. 2 Raccordez des enceintes amplifiées, un amplificateur de puissance, des composants, etc.
  • Seite 25: Ouverture Du Système

    1 L’icône [ACTIVATE/BUY Serato DJ] peut apparaître sur le côté droit de l’écran affiché la première fois que Serato DJ est lancé, mais il n’est pas nécessaire de l’activer ou d’acheter une licence pour les personnes qui utilisent DDJ-SZ. 2 Cochez [DO NOT SHOW AGAIN] sur le côté inférieur droit de l’écran, puis cliquez sur [License] et continuez d’utiliser Serato DJ.
  • Seite 26 Importation de morceaux La marche à suivre pour l’importation de morceaux est la suivante. Il existe différentes manières d’importer des morceaux avec le logiciel Serato DJ. Pour le détail, reportez-vous au manuel du logiciel Serato DJ. Si vous utilisez déjà un logiciel Serato DJ (Scratch Live, ITCH ou Serato DJ Intro) et avez déjà créé des bibliothèques de morceaux, ces biblio- thèques pourront être utilisées en l’état.
  • Seite 27: Fermeture Du Système

    1 Réglez les positions des commandes, etc. de la façon Lecture de morceaux et restitution du suivante. Noms des commandes, etc. Position Tournée entièrement dans le La restitution du son du canal 1 par exemple s’effectue de la façon Commande MASTER LEVEL sens antihoraire suivante.
  • Seite 28: Informations Supplémentaires

    “En cas de panne” dans le mode d’emploi de cet appareil et MASTER OUT 2 ........+2 dBu/10 k /820 ou moins les [FAQ] du [DDJ-SZ] sur le site de support DJ de Pioneer. BOOTH ..........+6 dBu/10 k /390 ou moins Parfois, le problème peut provenir d’un autre composant.
  • Seite 30: Betriebsumgebung

    Prüfen Sie das Netzkabel von Zeit zu Zeit. Sollte es Langzeitgebrauch zu gewerblichen Zwecken in einem beschädigt sein, wenden Sie sich an Ihre nächste Restaurant oder Betrieb in einem Fahrzeug bzw. autorisierte PIONEER-Kundendienststelle oder Ihren Schiff) eine Funktionsstörung auftritt, die eine Händler, um es zu ersetzen. S002*_A1_De Reparatur des Gerätes erforderlich macht, werden...
  • Seite 31 Inhalt Zum Lesen dieser Anleitung Vielen Dank, dass Sie sich für dieses Pioneer-Produkt entschieden haben. Lesen Sie bitte diese Broschüre und die „Bedienungsanleitung“, die auf der Pioneer Support-Website zur Verfügung stehen. Beide ent- halten wichtige Informationen, mit denen Sie sich vor dem Gebrauch dieses Produktes vertraut machen sollten.
  • Seite 32: Vor Der Inbetriebnahme

    Website wird angezeigt. Software bitte vom Download-Link im Menübildschirm der CD-ROM. Zum Schließen des CD-ROM-Menüs klicken Sie auf [Verlassen]. 4 Klicken Sie auf [Software Info] unter [DDJ-SZ] auf der Pioneer DJ-Support-Website. Die Bedienungsanleitung dieses Geräts [Serato DJ Support Information] wird angezeigt.
  • Seite 33: Über Die Serato Dj-Software

    Der Betriebssystem-Support nimmt an, dass Sie die neueste Unterversion der betreffenden Version verwenden. Die richtige Funktion kann nicht auf allen Computern garantiert werden, auch 12 Klicken Sie auf [Software Info] unter [DDJ-SZ] auf der wenn diese mit den hier beschriebenen Betriebsbedingungen übereinstimmen. Pioneer DJ-Support-Website.
  • Seite 34: Installationsverfahren (Mac Os X)

    Der Webbrowser wird gestartet, und die globale Pioneer DJ-Support- Website wird angezeigt. 19 Klicken Sie auf [Close], um das Installationsprogramm Serato DJ zu beenden. 15 Klicken Sie auf [Software Info] unter [DDJ-SZ] auf der Pioneer DJ-Support-Website. 16 Klicken Sie auf den Link zur Serato DJ-Download-Seite.
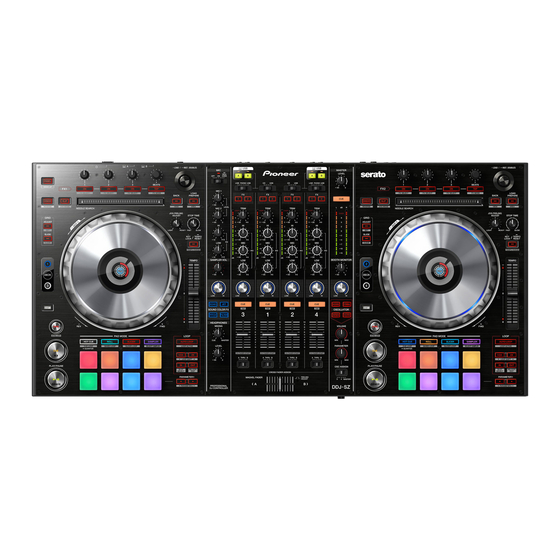
  • Seite 35: Bezeichnungen Der Teile

    18 Klicken Sie auf den Link in der von „Serato.com“ Bezeichnungen der Teile gesendeten E-Mail. Dies bringt Sie zur Serato DJ-Download-Seite. Gehen Sie zu Schritt 20 Einzelheiten zu den Funktionen der verschiedenen Tasten weiter. und Regler finden Sie unter Bezeichnungen der Teile in der Bedienungsanleitung.
  • Seite 36: Mixer-Sektion

    n SHIFT-Taste Deck-Sektion o DECK 3-Taste Diese Sektion dient zum Steuern der vier Decks. Die Tasten und Regler zur Bedienung von Deck 1 und 3 befinden sich an der linken Seite des p DECK 1-Taste Controllers, und die zur Bedienung von Deck 2 und 4 befinden sich an q GRID SLIDE-Taste der rechten Seite des Controllers.
  • Seite 37: Effekt-Sektion

    h SAMPLER, MIC COLOR Regler i SAMPLER VOL-Regler j EQ (HI, LOW)-Regler k MIC2-Regler l MIC1 Regler m LINE, PHONO, USB-Wahlschalter n CD, USB-Wahlschalter o FX 1-Zuweisungstaste p FX 2-Zuweisungstaste q Kanalpegelanzeige r TRIM Regler s ISO (HI, MID, LOW)-Regler t COLOR-Regler u CUE-Kopfhörertaste v Kanalfader...
  • Seite 38: Bedienung

    5 Schließen Sie das Netzkabel an. Bedienung Zur Netzsteckdose Netzkabel (mitgeliefert) Anschlüsse 1 Schließen Sie Kopfhörer an eine der Buchsen [PHONES] an. 6 Drücken Sie den [ ]-Schalter an der Rückseite dieses Geräts, um es einzuschalten. 2 Schließen Sie die Aktivlautsprecher, einen Endstufenverstärker, Komponenten usw.
  • Seite 39: Starten Des Systems

    1 Das [ACTIVATE/BUY Serato DJ]-Icon erscheint möglicherweise an der rechten Seite des Bildschirms, der erscheint, wenn Serato DJ zum ersten Mal gestartet wird, aber ist nicht nötig, eine Aktivierung auszuführen oder eine Lizenz zur Verwendung von DDJ-SZ zu erwerben. 2 Markieren Sie [DO NOT SHOW AGAIN] unten rechts im Bildschirm, und klicken Sie dann auf [License], um Serato DJ weiter zu verwenden.
  • Seite 40: Importieren Von Tracks

    Importieren von Tracks Im Folgenden wird das typische Verfahren zum Importieren von Tracks beschrieben. Es gibt verschiedene Möglichkeiten zum Importieren von Tracks mit der Serato DJ-Software. Einzelheiten siehe Anleitung für die Serato DJ-Software. Wenn Sie bereits Serato-DJ-Software (Scratch Live, ITCH oder Serato DJ Intro) verwenden und bereits Track-Bibliotheken angelegt haben können die vorher erstellten Bibliotheken wie vorhanden verwendet werden.
  • Seite 41: Abspielen Von Tracks Und Ausgabe Des Sounds

    1 Stellen Sie Die Positionen der Regler usw ein, wie Abspielen von Tracks und Ausgabe des unten gezeigt. Sounds Bezeichnungen von Reglern usw. Position Voll gegen den Uhrzeigersinn Das folgende Beispiel beschreibt das Verfahren zum Ausgaben des MASTER LEVEL Regler gedreht Sounds von Kanal 1 als Beispiel.
  • Seite 42: Zusätzliche Informationen

    Abschnitt „Störungssuche“ in der Bedienungsanleitung dieser MASTER OUT 1 ......+6 dBu/10 k /390 oder weniger Einheit und [FAQ] für [DDJ-SZ] auf der Pioneer DJ-Support-Website. MASTER OUT 2 ......+2 dBu/10 k /820 oder weniger Manchmal wird das Problem auch durch ein externes Gerät verur- BOOTH ..........
  • Seite 44: Condizioni Ambientali Di Funzionamento

    Dal momento rivolgetevi al più vicino centro assistenza autorizzato che il cavo di alimentazione costituisce l’unico della PIONEER oppure al vostro rivenditore per la dispositivo di distacco dell’apparecchio dalla sorgente sostituzione del filo di alimentazione.
  • Seite 45 Vi ringraziamo per avere acquistato questo prodotto Pioneer. Non mancare di leggere questo opuscolo e le “Istruzioni per l’uso” disponibili presso il sito di supporto DJ di Pioneer. I due documenti includono informazioni importanti che devono venire comprese prima di usare questo prodotto.
  • Seite 46: Prima Di Cominciare

    Internet. Siete collegati a Internet?”. Fare Contenuto della confezione clic su [Si]. Il Web browser si apre ed il sito di supporto DJ Pioneer appare. CD-ROM (disco d’installazione) Per chiudere il menu del CD-ROM fare clic su [Esci].
  • Seite 47 [Si]. Porta USB una porta USB 2.0. Il Web browser si apre ed il sito di supporto DJ Pioneer appare. Risoluzione del display Risoluzione da 1 280 x 720 pixel o più 12 Fare clic su [Software Info] in [DDJ-SZ] del sito di La registrazione dell’account utente di “Serato.com”...
  • Seite 48 14 Viene visualizzato “L’accesso al sito richiede una connessione a Internet. Siete collegati a Internet?”. Fare clic su [Si]. Il Web browser si apre ed il sito di supporto DJ Pioneer appare. 15 Fare clic su [Software Info] in [DDJ-SZ] del sito di supporto DJ Pioneer.
  • Seite 49: Sezione Browser

    21 Leggere attentamente i termini dell’accordo di licenza Sezione browser e, se li si accettano, fare clic su [Agree]. 1 Manopola selettrice 2 Pulsante BACK (VIEW) Se non si è d’accordo con l’accordo di licenza d’uso, fare clic su 3 Pulsante LOAD PREPARE (AREA) [Disagree] e fermare l’installazione.
  • Seite 50: Sezione Mixer

    d Pulsante LOOP OUT 7 Indicatore del livello principale e Pulsante PARAMETER , pulsante PARAMETER 8 Controllo BOOTH MONITOR f Pulsante della modalità HOT CUE 9 Controllo MASTER OUT COLOR g Pulsante della modalità ROLL a Pulsante OSCILLATOR SELECT h Pulsante della modalità SLICER b Controllo OSCILLATOR VOLUME i Pulsante della modalità...
  • Seite 51: Sezione Effetti

    Sezione effetti Questa sezione viene usata per controllare le due unità effetto (FX1 e FX2). I comandi e pulsanti di controllo dell’unità FX1 si trovano sulla sinistra del controller, quelli dell’unità FX2 sulla destra. I canali cui si deve applicare l’effetto sono impostati usando i pulsanti di assegnazione effetti.
  • Seite 52: Impiego

    5 Collegare il cavo di alimentazione. Impiego Ad una presa Cavo di alimentazione (accluso) Collegamenti 1 Collegare la cuffia ad uno dei terminali [PHONES]. 6 Premere l’interruttore [ ] del pannello posteriore di questa unità per farla accendere. 2 Collegare diffusori autoalimentati, amplificatori di potenza ed altri componenti ai terminali [MASTER OUT 1] o [MASTER OUT 2].
  • Seite 53: Avvio Del Sistema

    Schermata del computer subito dopo il lancio di Serato DJ 1 L’icona [ACTIVATE/BUY Serato DJ] può apparire sulla destra della schermata che appare al primo lancio di Serato DJ, ma chi usa DDJ-SZ non ha bisogno di attivare o acquistare licenze.
  • Seite 54 Importazione dei brani La seguente è la procedura normale di importazione di brani. Serato DJ consente di importare brani in vari modi. Per dettagli, vedere le istruzioni per l’uso di Serato DJ. Se si sta già usando il software per DJ Serato (Scratch Live, ITCH o Serato DJ Intro) e si sono già create library di brani, esse possono venire usate come sono.
  • Seite 55: Monitoraggio Audio In Cuffia

    1 Impostare i comandi, ecc. nel modo seguente. RIproduzione di brani e del relativo audio Nome dei comandi, ecc. Posizione Di seguito viene descritta come esempio la procedura di riproduzione Girata del tutto in senso Controllo MASTER LEVEL del canale 1. antiorario Impostare il volume dei dispositivi (amplificatori di potenza, diffu- Selettore CD, USB...
  • Seite 56: Informazioni Aggiuntive

    “Diagnostica” delle istruzioni per l’uso di questa unità e Livello di uscita/impedenza di carico/impedenza di uscita standard le [FAQ] del [DDJ-SZ] del sito di supporto per DJ di Pioneer. MASTER OUT 1 ........+6 dBu/10 k /390 o meno A volte il problema risiede in un altro componente.
  • Seite 58 Kontroleer het netsnoer af en toe. zijkanten van het apparaat). Wanneer u de indruk krijgt dat het beschadigd is, dient D3-4-2-1-7d*_A1_Nl u bij uw dichtstbijzijnde erkende PIONEER onderhoudscentrum of uw dealer een nieuw snoer te LET OP kopen.
  • Seite 59 Inhoud Opmerkingen over deze handleiding Hartelijk dank voor uw aankoop van dit Pioneer product. Lees dit boekwerkje en de “Handleiding” die beschikbaar is op de Pioneer DJ-ondersteuningssite goed door. Beide bevatten belang- rijke informatie die u volledig moet begrijpen voor u dit product gaat gebruiken.
  • Seite 60: Alvorens Te Beginnen

    Om het menu van de CD-ROM te sluiten, klikt u op [Afsluiten]. downloaden 4 Klik op [Software Info] onder [DDJ-SZ] op de Pioneer 1 Plaats de CD-ROM in het optische schijfstation van de DJ-ondersteuningssite. [Serato DJ Support Information] verschijnt.
  • Seite 61 “DDJ-SZ” op de Pioneer DJ-ondersteuningssite hieronder. http://pioneerdj.com/support/ 12 Klik op [Software Info] onder [DDJ-SZ] op de Pioneer De ondersteuning van besturingssystemen gaat ervan uit dat u de nieuwste DJ-ondersteuningssite. point-release (tussentijdse bijwerking) gebruikt voor de genoemde versie.
  • Seite 62 De webbrowser wordt opgestart en de Pioneer DJ-ondersteuningssite zal 19 Klik op [Close] om het Serato DJ installatieprogramma worden geopend. af te sluiten. 15 Klik op [Software Info] onder [DDJ-SZ] op de Pioneer DJ-ondersteuningssite. 16 Klik op de koppeling naar de downloadpagina voor Serato DJ.
  • Seite 63: Benaming Van De Onderdelen

    19 Meld uzelf aan. Benaming van de onderdelen Voer het e-mailadres en het wachtwoord in dat u hebt geregistreerd om uzelf aan te melden op “Serato.com”. Zie voor details over de functies van de toetsen en bedieningsele- 20 Download de Serato DJ-software van de menten het gedeelte Benaming van de onderdelen in de Handleiding.
  • Seite 64 n SHIFT-toets Deckgedeelte o DECK 3-toets Met dit gedeelte worden de vier decks bediend. De toetsen en instellin- gen voor het bedienen van deck 1 en 3 bevinden zich aan de linkerzijde p DECK 1-toets van de controller, en die voor het bedienen van deck 2 en 4 aan de rech- q GRID SLIDE-toets terzijde van de controller.
  • Seite 65: Voorpaneel

    h SAMPLER, MIC COLOR-instelling i SAMPLER VOL-instelling j EQ (HI, LOW) instellingen k MIC2-instelling l MIC1-instelling m LINE, PHONO, USB keuzeschakelaar n CD, USB-keuzeschakelaar o FX 1-toewijzingstoets p FX 2-toewijzingstoets q Kanaalniveau-aanduiding r TRIM instelling s ISO (HI, MID, LOW) instellingen t COLOR instelling u Hoofdtelefoon CUE knop v Kanaal-fader...
  • Seite 66: Bediening

    5 Sluit het netsnoer aan. Bediening Naar stopcontact Stroomsnoer (meegeleverd) Aansluitingen 1 Sluit een hoofdtelefoon aan op één van de [PHONES]-aansluitingen. 6 Druk op de [ ]-schakelaar op het achterpaneel van dit toestel om het toestel in te schakelen. 2 Sluit luidsprekers met eigen stroomvoorziening, een eindversterker, componenten enz.
  • Seite 67: Opstarten Van Het Systeem

    1 Het [ACTIVATE/BUY Serato DJ]-pictogram kan verschijnen aan de rechterkant van het scherm dat verschijnt wanneer Serato DJ voor het eerst wordt opgestart, maar voor diegenen die DDJ-SZ gebruiken is het niet nodig om te activeren of een licentie aan te schaffen.
  • Seite 68 Muziekstukken importeren Hier volgt een beschrijving van de typische procedure voor het importeren van muziekstukken. Er zijn verschillende manieren om muziekstukken te importeren met de Serato DJ-software. Zie de software handleiding van Serato DJ voor verdere informatie. Als u reeds DJ-software van Serato (Scratch Live, ITCH of Serato DJ Intro) gebruikt en al bibliotheken met muziekstukken heeft gecreëerd, kunnen deze als zodanig worden gebruikt.
  • Seite 69: Afsluiten Van Het Systeem

    1 Stel de instellingen enz. in zoals u hieronder kunt zien. Afspelen van muziekstukken en Namen van instellingen enz. Stand produceren van het geluid Helemaal tegen de klok in MASTER LEVEL instelling gedraaid Hieronder volgt een beschrijving van de procedure voor het produceren [USB]-positie van het geluid via kanaal 1 als voorbeeld.
  • Seite 70: Aanvullende Informatie

    Als u het probleem niet kunt verhel- Nominaal uitgangsniveau / Belastingsimpedantie pen, verzoekt u dan uw dichtstbijzijnde officiële Pioneer onderhouds- MASTER OUT 1 ..............24 dBu/10 k dienst of uw vakhandelaar om het apparaat te laten repareren.
  • Seite 72: Entorno De Funcionamiento

    Revise el cable de alimentación está dañado, D3-4-2-2-2a*_A1_Es solicite el reemplazo del mismo al centro de servicio autorizado PIONEER más cercano, o a su distribuidor. Para Europa S002*_A1_Es Si desea deshacerse de este producto, no lo mezcle con los residuos generales de su hogar. De conformidad con la legislación vigente, existe un sistema de recogida distinto para los productos electrónicos que requieren un procedimiento adecuado de...
  • Seite 73 Cómo leer este manual Gracias por haber adquirido este producto Pioneer. Asegúrese de leer este folleto y el “Manual de instrucciones” provisto en el sitio de asistencia Pioneer DJ. Ambos incluyen información importante que debería entenderse completamente antes de usar este producto.
  • Seite 74: Antes De Empezar A Usar La Unidad

    ¿Conectado a internet?” se visualiza. Haga clic Verificación de la información más reciente en el en [Si]. El navegador Web se inicia y se visualiza el sitio de asistencia Pioneer DJ. software controlador Para información detallada sobre el software controlador designado de 4 En el sitio de asistencia Pioneer DJ, haga clic en esta unidad, visite el sitio de asistencia Pioneer DJ siguiente.
  • Seite 75 [Si]. cargar el software se necesita una conexión a Internet. El navegador Web se inicia y se visualiza el sitio de asistencia Pioneer Para la información más reciente del ambiente de operación necesario y la compatibilidad así como para adquirir el último sistema operativo, consulte “Software Info”...
  • Seite 76 14 “Para acceder al sitio se requiere un entorno de internet. ¿Conectado a internet?” se visualiza. Haga clic en [Si]. El navegador Web se inicia y se visualiza el sitio de asistencia Pioneer El mensaje de instalación satisfactoria aparece una vez terminada la instalación.
  • Seite 77: Sección Del Navegador

    21 Lea con cuidado los términos del acuerdo de licencia Sección del navegador y, si está de acuerdo, haga clic en [Agree]. 1 Selector giratorio 2 Botón BACK (VIEW) Si no acepta el contenido del acuerdo de uso, haga clic en 3 Botón LOAD PREPARE (AREA) [Disagree] para cancelar la instalación.
  • Seite 78: Crossfader

    c Botón LOOP IN 1 Conmutador selector OFF, ON, MIC TALK OVER d Botón LOOP OUT 2 Indicador de conexión USB e Botón PARAMETER , botón PARAMETER 3 Botón USB (A) f Botón de modo HOT CUE 4 Botón USB (B) g Botón de modo ROLL 5 Control MASTER LEVEL h Botón de modo SLICER...
  • Seite 79: Panel Frontal

    Sección de efectos Esta sección se usa para controlar las dos unidades de efectos (FX1 y FX2). Los controles y botones para operar la unidad FX1 está situado en el lado izquierdo del controlador, los que se usan para operar la unidad FX2 están situado en el lado derecho del controlador.
  • Seite 80: Operación

    5 Conecte el cable de alimentación. Operación A la toma de corriente Cable de alimentación (incluido) Conexiones 1 Conecte auriculares a uno de los terminales [PHONES]. 6 Pulse el conmutador [ ] del panel trasero de esta unidad para conectar su alimentación. 2 Conecte altavoces activos, un amplificador de potencia, componentes, etc, a los terminales [MASTER OUT 1] o [MASTER OUT 2].
  • Seite 81: Inicio Del Sistema

    1 El icono [ACTIVATE/BUY Serato DJ] puede que aparezca en el lado derecho de la pantalla que se visualiza cuando se inicia Serato DJ por primera vez, pero no es necesario activar ni adquirir una licencia para aquellos que usan DDJ-SZ.
  • Seite 82 Importación de pistas A continuación se describe el procedimiento típico para importar pistas. Hay varias formas de importar pistas con el software Serato DJ. Para detalles, vea el manual del software Serato DJ. Si ya está usando el software DJ Serato (Scratch Live, ITCH o Serato DJ Intro) y ya ha creado librerías de pistas, las librerías de pistas que ha creado previamente podrán usarse como tal.
  • Seite 83: Salida Del Sistema

    1 Ponga los controles, etc. en las posiciones mostradas abajo. Reproducción de pistas y salida del Nombres de los controles, etc. Posición sonido Girado completamente a la Control MASTER LEVEL izquierda A continuación se describe como un ejemplo el procedimiento para dar Conmutador selector CD, USB Posición [USB] salida al sonido del canal 1.
  • Seite 84: Información Adicional

    [FAQ] MIC2 ................–52 dBu/8,5 k para el [DDJ-SZ] en el sitio de asistencia Pioneer DJ. Nivel de salida / Impedancia de carga / Impedancia de salida estándar Algunas veces, el problema puede estar en otro componente.
  • Seite 86: Ambiente De Funcionamento

    CUIDADOS COM A VENTILAÇÃO alimentação de substituição junto do seu revendedor Quando instalar esta unidade, certifique-se de que ou centro de assistência autorizado PIONEER. deixa espaço em torno da unidade para ventilação de S002*_A1_Pt modo a melhorar a radiação térmica (pelo menos 5 cm na parte superior, 5 cm na parte posterior e 5 cm em cada um dos lados).
  • Seite 87 Serato DJ (pág. 4). A versão mais recente do Manual de instruções pode ser trans- ferida a partir do site de suporte da Pioneer DJ. Para obter mais informações, consulte Transferir as instruções de funcionamento desta unidade (pág.4).
  • Seite 88: Antes De Começar

    PDF. Se não possuir o Adobe Reader, O browser Web é executado e o site de suporte da Pioneer DJ é exibido. instale-o a partir da hiperligação de transferência no ecrã do menu do Para fechar o menu do CD-ROM, clique em [Saida].
  • Seite 89 O Serato DJ é uma aplicação de software de DJ criada pela Serato. É O browser Web é executado e o site de suporte da Pioneer DJ é exibido. possível efectuar actuações de DJ ligando o computador no qual este software está...
  • Seite 90 14 “É necessário acesso à Internet para aceder ao site. Ligar à Internet?” é apresentado. Clique em [Sim]. O browser Web é executado e o site de suporte da Pioneer DJ é exibido. 15 Clique em [Software Info] em [DDJ-SZ] no site de O mensagem de instalação com sucesso é...
  • Seite 91: Secção Do Browser

    20 Transferir o software Serato DJ a partir da página de Secção do browser transferência. Descomprima o ficheiro transferido e, em seguida, clique duas vezes no ficheiro descomprimido para executar o programa de instalação. 21 Leia atentamente os termos do contrato de licenciamento e, caso concorde, clique em [Agree].
  • Seite 92: Secção Do Misturador

    c Botão LOOP IN 1 Interruptor selector OFF, ON, MIC TALK OVER d Botão LOOP OUT 2 Indicador de ligação USB e Botão PARAMETER , Botão PARAMETER 3 Botão USB (A) f Botão de modo HOT CUE 4 Botão USB (B) g Botão de modo ROLL 5 Controlo MASTER LEVEL h Botão de modo SLICER...
  • Seite 93: Painel Frontal

    Secção de efeitos Esta secção é utilizada para controlar as duas unidades de efeitos (FX1 e FX2). Os controlos e botões para operar a unidade FX1 estão localizados no lado esquerdo do controlador e os utilizados para operar a unidade FX2 estão localizados no lado direito do controlador.
  • Seite 94: Ligações

    5 Ligue o cabo de alimentação. Funcionamento Para a saída de alimentação Cabo de alimentação (incluído) Ligações 1 Ligue auscultadores a um dos terminais [PHONES]. 6 Prima o interruptor [ ] no painel posterior desta unidade para ligar a alimentação desta unidade. 2 Ligue altifalantes alimentados, um amplificador alimentado, componentes, etc., aos terminais [MASTER OUT 1] ou [MASTER OUT 2].
  • Seite 95: Iniciar O Sistema

    1 O ícone [ACTIVATE/BUY Serato DJ] pode surgir do lado direito do ecrã que aparece da primeira vez que se abre o Serato DJ, mas não é preciso activar ou comprar uma licença para quem utiliza o DDJ-SZ. 2 Seleccione [DO NOT SHOW AGAIN] no canto inferior direito do ecrã e depois clique em [License] e continue a utilizar o Serato DJ.
  • Seite 96 Importar faixas A seguir é descrito o procedimento típico para importar faixas. Existem várias formas para importar faixas com o software Serato DJ. Para obter mais informações, consulte o manual do software Serato DJ. Se já estiver a utilizar o software de DJ Serato (Scratch Live, ITCH ou Serato DJ Intro) e já tiver criado bibliotecas de ficheiros, as bibliotecas de faixas que criou previamente podem ser utilizadas como tal.
  • Seite 97: Encerrar O Sistema

    1 Defina as posições dos controlos, etc., conforme Reproduzir faixas e emitir o som apresentado abaixo. A seguir é descrito o procedimento para emitir o som do canal 1 como Nome dos controlos, etc. Posição exemplo. Rodado totalmente para a Controlo MASTER LEVEL Defina o volume dos dispositivos (amplificador alimentado, altifa- esquerda...
  • Seite 98: Informações Adicionais

    Problemas” das instruções de funcionamento desta unidade e as MASTER OUT 2 ........+2 dBu/10 k /820 ou menos [FAQ] para o [DDJ-SZ] no site de suporte da Pioneer DJ. BOOTH ..........+6 dBu/10 k /390 ou menos Algumas vezes o problema está relacionado com outro componente.
  • Seite 100 обнаружения повреждения обратитесь за заменой Выключатель данного устройства не в ближайший официальный сервисный центр полностью отключает его от электросети. Чтобы фирмы PIONEER или к Вашему дилеру. полностью отключить питание устройства, вытащите вилку кабеля питания из S002*_A1_Ru электророзетки. Поэтому устройство следует...
  • Seite 101 Files MIC1...
  • Seite 102 CD_menu.exe CD_menu.app ® ® DDJ-SZ CD_menu.exe More Downloads Serato DJ x.x User CD_menu.app Manual DDJ-SZ...
  • Seite 103 CD_menu.exe ® ™ ® ™ DDJ-SZ ® ™ ® ™ DDJ-SZ_X.XXX.exe DDJ-SZ DDJ-SZ...
  • Seite 104 Close — — E-mail me Serato newsletters — CD_menu.app DDJ-SZ I agree to the license terms and conditions Install DDJ-SZ_M_X.X.X.dmg DDJ-SZ_AudioDriver DDJ-SZ_AudioDriver.pkg Close...
  • Seite 105 Serato DJ Applications DDJ-SZ — — E-mail me Serato newsletters — Agree BACK (VIEW) LOAD PREPARE (AREA) Disagree...
  • Seite 106 SHIFT DECK 3 DECK 1 GRID SLIDE GRID ADJUST SLIP CENSOR PANEL NEEDLE SEARCH JOG FEELING ADJUST STOP TIME KEY LOCK OFF ON TEMPO MIC TALK OVER AUTO LOOP LOOP 1/2X USB (A) LOOP 2X USB (B) LOOP IN MASTER LEVEL LOOP OUT MASTER CUE PARAMETER...
  • Seite 107 SOUND COLOR FX SAMPLER, MIC COLOR SAMPLER VOL EQ HI LOW MIC2 MIC1 LINE, PHONO, USB CD, USB FX 1 FX 2 FX BEATS TRIM ISO HI MID LOW COLOR FEELING ADJUST PHONES CROSS FADER CURVE...
  • Seite 108 К розетке Силовой кабель (поставляется) PHONES MASTER OUT 1 MASTER OUT 2 Aктивные громкоговорители, др. BOOTH BOOTH USB кабель (входит в комплект поставки) Данное изделие соответствует стандартам по электромагнитному шуму, когда он подключен к другому оборудованию через экранированные кабели и коннекторы. Используйте...
  • Seite 109 Serato DJ Serato Serato DJ Serato DJ ACTIVATE/BUY Serato DJ DDJ-SZ DO NOT SHOW AGAIN License SYNC PREFERENCE Simple sync Smart sync SETUP—DJ Preference—SYNC PREFERENCE Library Vertical Horizontal...
  • Seite 110 Files Files Files Files Files BACK (VIEW) BACK (VIEW) DECK1...
  • Seite 111 CD, USB TRIM ISO HI MID LOW MASTER OUT 1 MASTER OUT HEADPHONES MIXING HEADPHONES LEVEL MASTER LEVEL MASTER CUE BOOTH MONITOR CROSS FADER CURVE MASTER LEVEL CD, USB USB] TRIM ISO (HI MID LOW THRU] TRIM TRIM MASTER LEVEL MASTER OUT 1 MASTER OUT 2...
  • Seite 112 HEADPHONES MIXING HEADPHONES LEVEL HEADPHONES LEVEL...
  • Seite 113 FAQ] MASTER OUT 1 DDJ-SZ MASTER OUT 2 MASTER OUT 1 MASTER OUT 2 CD/LINE CD/LINE PHONO/LINE MIC1 Ø MIC2 Ø MASTER OUT 1 MASTER OUT 2 BOOTH Ø PHONES Ø Ø — MASTER OUT 1 MASTER OUT 2 —...
  • Seite 114: Серийный Номер

    Примечание: В соответствии со статьей 5 Закона Российской Федерации “О защите прав потребителя” и Указанием Правительства Российской Федерации № 720 от 16 июня 1997 года корпорация Pioneer Europe NV устанавливает условие на следующую продолжительность срока службы официально поставляемых на Российский рынок товаров.
  • Seite 116 PIONEER GULF FZE Lob 11-017, Jebel Ali Free Zone P.O. Box 61226, Jebel Ali Dubai TEL: 971-4-8815756 PIONEER ELECTRONICS DE MEXICO S.A. DE C.V. Blvd.Manuel Avila Camacho 138 10 piso Col.Lomas de Chapultepec, Mexico, D.F. 11000 TEL: 55-9178-4270 PIONEER INTERNATIONAL LATIN AMERICA S.A.

Inhaltsverzeichnis