
Verwandte Anleitungen für Gutta Carport Premium


Inhaltszusammenfassung für Gutta Carport Premium
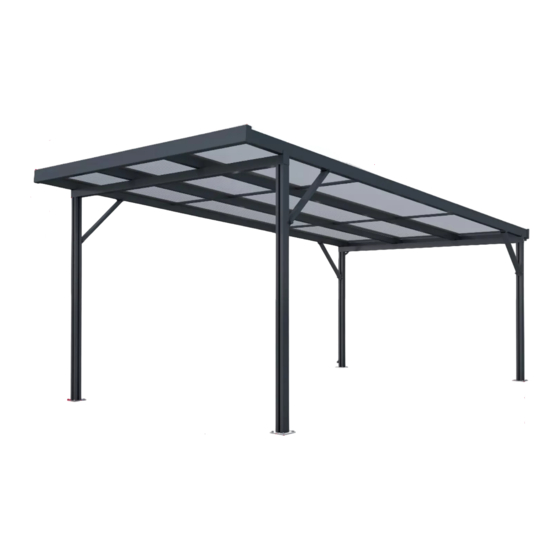
- Seite 1 Montageanleitung Artikel: 9219124 Assembly instructions Instructions de montage Premium Carport 5,62 x 3,09 m Art.-Nr. 4296203 - 4296215 4296303 - 4296315...
- Seite 2 Voraussetzungen | Montagehinweise | Pflegeinformationen • Beachten Sie die örtlichen Bauvorschriften sowie die Schneelastzonen in ihrer Region • Sortieren Sie die Teile vor der Montage und prüfen Sie die Inhaltsliste gemäß Montageanleitung • Zur Montage des Carport-Bausatzes werden mindestens 2 Personen benötigt •...
- Seite 3 Requirements | Assembly instructions | Care information • Observe the local building regulations and the snow load zones in your region. • Before the assembly sort the parts and check the contents list according to the assembly instructions. • At least 2 persons are required to assemble the carport kit. •...
- Seite 4 Prérequis | Instructions de montage | Conseils d‘entretien • Respecter les règlementations du batiment ainsi que les zones de contrainte de neige de votre région • Trier les pièces avant l´assemblage et vérifier le contenu de la liste des pièces conformément au mode d´emploi •...
- Seite 5 Anzahl / Number Bezeichnung Designation désignation / numéro Hohlkammerplatte 980 x Twinwall sheet 980 x 5500 Plaque alvéolaire 980 x 5500 mm 5500 mm Pfosten 2200 mm / 2500 Poteaux 2200 mm / 2500 Posts 2200 mm / 2500 mm 2x / 2x Vorderer Querträger / Pfette Front cross beam / purlin Poutre avant / panne...
- Seite 6 Anzahl / Number Bezeichnung Designation désignation / numéro Kantenverschlußband ohne Edge closing tape without Adhésif de fermeture sans Z.18 Membrane (optional) membrane (optional) membrane (option) Edelstahlschraube 6,3x32 Stainless steel screw 6,3x32 Z.19 Vis inox 6,3x32 avec joint inkl. Membrandichtung incl. membrane seal Z.20 Bodenplatte Floor slab...
- Seite 7 Fundamentmaße | Foundation dimensions | Dimensions des fondations 400 x 400 x 800 mm Z.21 8x 2300 mm Z.23 16x Z.20 4x Z.24 4x Z.26 4x 2000 mm...
- Seite 8 Z.14 2300 mm 2000 mm...
- Seite 9 Z.10 Z.11 Z.10 Z.11 Abstand | Distance | Distance hinten | At the rear | à L‘arrière 200 mm - 750 mm vorne | at the Front | à L‘avant 100 mm - 750 mm 1x links | left | á gauche 1x rechts | right | correctes 2x mitte | middle | milieu 100 - 750 mm...
- Seite 10 Z.14 12x Z.15 Z.12...
- Seite 11 Z.12 Z.12...
- Seite 12 Z.12...
- Seite 13 Z.16...
- Seite 14 (Nur bei Acrylplatten im Lieferumfang enthalten / Only for acrylic sheets in the Included in delivery / Uniquement pour les plaques acryliques de la Z.17 Z.18 gamme Inclus dans la livraison) Zum Schutz vor eindringendem Staub und Schmutz kle- ben Sie die Stirnseiten der Platten mit dem Kantenver- schlussband ab.
- Seite 15 Z.19 Legen Sie die erste Platte auf und richten Sie sie korrekt aus – beachten Sie auch hier die korrekte Ausrichtung der Schutzfolien. Profiloberteil alle 40 cm mittig vorbohren (Ø7 mm), die erste Bohrung erfolgt nach 6cm. Anschließend auflegen und mit dem Unterteil verschrauben. Place the first panel on top and align it correctly - also make sure that the protective foils are aligned correctly.
- Seite 16 Z.19 Montieren Sie in der gleichen Art und Weise die 2. Platte und verschrauben Sie diesen Deckel wie im Schritt 14. Ziehen Sie anschließend die Schutzfolien ab. Assemble the 2rd plates in the same way and screw this cover together as in step 14. Then remove the protective films. Monter les 2ème plaques de la même manière et visser ce couvercle ensemble comme à...
- Seite 17 Z.19 Montieren Sie in der gleichen Art und Weise die 3. Platte und verschrauben Sie diesen Deckel wie im Schritt 14. Ziehen Sie anschließend die Schutzfolien ab. Assemble the 3rd plates in the same way and screw this cover together as in step 14. Then remove the protective films. Monter les 3ème plaques de la même manière et visser ce couvercle ensemble comme à...
- Seite 18 Z.27 Z.12 M12x80...
- Seite 19 Z.22 16x Regenablauf kann wahlweise links, rechts oder vorne montiert werden. Rain drain can be either left, right or can be mounted at the front. L'évacuation de l'eau de pluie peut être montée à gauche, à droite ou à l'avant. hinten | At the rear | à...