Inhaltsverzeichnis
Werbung
Verfügbare Sprachen
Verfügbare Sprachen
Quicklinks
Your dealer /Votre revendeur/Su revendedor/Ihr Händler/Vostro rivenditore
Uw handelaar/ Seu revendedor/Ο έμπορός σας
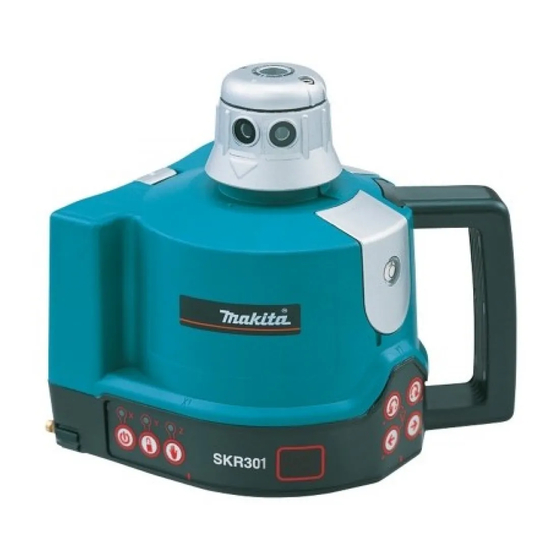
SKR301
AUTOMATIC LASER
LASER AUTOMATIQUE
Instruction manual / Manuel d'utilsation
English
1 - 18
Français
19 - 36
E s p a ñ o l
37 - 55
D e u t s c h
57 - 74
I t a l i a n o
75 - 93
N e d e r l a n d s
95 - 113
P o rt u g u ê s
115 - 133
ελληνικός
135 - 145
Werbung
Kapitel
Inhaltsverzeichnis

Verwandte Anleitungen für Makita SKR301


Inhaltszusammenfassung für Makita SKR301
- Seite 1 SKR301 AUTOMATIC LASER LASER AUTOMATIQUE English 1 - 18 Français 19 - 36 E s p a ñ o l 37 - 55 D e u t s c h 57 - 74 Your dealer /Votre revendeur/Su revendedor/Ihr Händler/Vostro rivenditore Uw handelaar/ Seu revendedor/Ο...
- Seite 3 SKR301 AUTOMATIC LASER Operating Manual...
-
Seite 4: Inhaltsverzeichnis
1.4 Overview of keypad 1.1 Description 2. Operating instructions The SKR301 is an automatic visible laser that can be used for level- 2.1 Auto/Man key ing, vertical alignment, plumbing and squaring. Applications include installing suspended ceilings, technical flooring, partitions and a 2.2 Tilt key... -
Seite 5: Technical Specifications
1. Rotating head • Man: Manual use 2. Plumb or square laser beam aperture The SKR301 laser is always in the automatic self-leveling mode 3. Laser beam aperture (auto) when turned on. Once the instrument has self-leveled, the laser 4. Laser chalk line aperture head will start rotating. -
Seite 6: Tilt Key
It is important to check while you’re using the laser that it has not 2.3 Horizontal setup been moved and that your setting is still accurate. 1. The SKR301 laser can be used directly on the ground, on a wall 2.6 Rotation speed mount or on a standard tripod (5/8 - 11). -
Seite 7: Manual Slope
Auto/Man key (20). The LED next to it (19) will blink, indicating you are in manual mode and you can set slope in the X axis. The head The SKR301 can be charged while working. If electricity is available will start rotating. -
Seite 8: Horizontal Checking And Calibration
be calibrated in the X axis. If you have not moved the laser, use the 3.1 Horizontal checking and calibration X marks made in Steps 3 and 4 of 3.1.1 (Horizontal Checking). (X and Y axis) 5. Mark the spot that's halfway between the two marks. X axis 6. -
Seite 9: Care And Handling
1. The SKR301 is a precision instrument which must be handled with care. Avoid shock and vibrations. Always store and transport the laser and accessories in the carrying case. -
Seite 10: Detector
LCD screen Turn to attach (rear) clamp to detector Bubble vial to plumb rod • Lower Keypad 9V battery Remote mode Scanning mode compartment Turn to tighten (follow polarity Increase rotation Increase or remove clamp indications inside) speed/move non- scanning angle from rod Use a coin to unscrew rotating point right... -
Seite 11: Remote Control
• Detection mode 6.2 Remote control 1. Press the On/Off key to turn on the detector. The Remote Control stops, starts, or changes direction of laser rota- 2. Press the middle key to select the accuracy (deadband). tion, and moves the square shot left or right. It also controls scan- 3. -
Seite 12: Mounts
The universal mount can be used as a wall mount and for vertical setups on a tripod. It features sturdy, all-metal construction, with a SKR301 springactivated mechanism that allows you to easily change height for quick set-ups. Also, it has a fine adjustment screw on the bottom for precise positionings. -
Seite 13: Description
S o m m a i r e Bien que le SKR301 soit très simple d’utilisation, il vous est vivement recommandé de lire ce manuel. 1 . Caracteristiques 1.1 Description 1. Caracteristiques 1.2 Spécifications techniques 1.3 Détails de l’instrument 1.1 Description 1.4 Description du clavier... - Seite 14 à niveau, la tête du laser se met en rota- 9. Batterie rechargeable ou alcaline tion. Vous pouvez choisir la rotation permanente en utilisant le mode 10. Prise pour alimentation (uniquement sur pack rechargeable) manuel ; de cette manière, la tête tournera même si le SKR301 n’est...
-
Seite 15: Vitesse De Rotation
2.3 Mise en place horizontale été déplacé et si vos réglages sont toujours corrects. 1. Le laser SKR301 peut-être posé directement sur le sol ou utilisé sur 2.6 Vitesse de rotation son support mural, sur un trépied standard ou trépied à crémaillère. -
Seite 16: Utilisation De La Batterie Rechargeable
Installation des piles SKR301. N’oubliez pas que le laser est un instrument de mesure 1. Pour installer les piles de votre SKR301, dévisser le socle batterie et qu’il est important d’effectuer comme tout professionnel les con- situé sous l’appareil à l’aide d’une pièce. - Seite 17 SKR301 est désormais prêt à être ajuster sur l'axe X. 3.1 Contrôle plan horizonatal et calibration Si vous n'avez pas déplacé le laser, utiliser les marques que vous 3.1.1 Contrôle plan horizontal avez précédemment définies lors des étapes 3 et 4 du paragraphe...
- Seite 18 Relachez alors (20). 4. L'indicateur de calibration Z clignotera rapidement, indiquant que Votre laser SKR301 est garanti 1 an contre tout défaut de fabrica- votre SKR301 est prêt à être réglé sur l'axe Z. tion. Les chocs, chutes et autres utilisations anormales annuleraient cette garantie.
- Seite 19 Ecran LCD Bouton de fixation (dos) de la bride à la cellule Niveau à bulle pour la mire • Partie inferieure du clavier Mode Compartiment télécommande Mode scanning pour la Bouton de Augmente la vitesse batterie 9V fixation de la de rotation / Augmente l'angle de (merci de respecter les...
-
Seite 20: Caractéristiques Techniques
6.2 Télécommande • Utiliser la cellule Elle est utilisable jusqu’à une distance de 30 mètres. Elle perm e t 1 . Presser le bouton On/Off pour mettre en marche la cellule. d’actionner et d’arrêter la rotation de la tête du laser et de déplac- 2 . -
Seite 21: Autres Accessoires
6.3.3. Trépieds Des trépieds plats ou à dôme sont conseillés. Il est également pos- sible de fixer le SKR301 sur un trépied à crémaillère, ce qui assure un réglage à la hauteur désirée. 6.4 Autres accessoires • Lunettes pour laser : Elles améliorent trés sensiblement la visi-... -
Seite 22: Información General
1.4 Te c l a d o 1.1 Descripción 2. Cómo utilizar el nivel láser S K R 3 0 1 El SKR301 es un nivel láser visible automático que se puede utilizar 2.1 Selector automático/manual (20) para nivelado, alineación vertical, para aplomar y para escuadrar. -
Seite 23: Especificaciones Técnicas
• Man: Uso manual 9. Pilas 10. Enchufe del cargador de pilas El nivel láser SKR301 se encuentra siempre en el modo de nivelado 11. Soporte 5/8” – 11 automático (auto) cuando se enciende. Una vez que el instrumento 12. Tapa superior... -
Seite 24: Instalación Horizontal
• Comience a girar el cabezal mediante la tecla (14) o la (15) para variar la velocidad o para utilizar el modo línea. 1. El nivel láser SKR301 se puede colocar directamente sobre el suelo, en montaje mural o sobre un trípode estándar (5/8” – 11). -
Seite 25: Utilización Del Modo Línea
(4). De esta manera se obtiene una línea de láser pre- cisa y estable para trabajar directamente sobre su plano de refer- 1. Para instalar las pilas alcalinas en su nivel láser SKR301 desen- encia. Esta línea se puede desplazar girando manualmente el rosque la tapa situada en la parte inferior del instrumento. -
Seite 26: Verificación Y Ajuste Del Nivel Láser S K R 3
La calibración se efectúa fácilmente con el teclado del instrumento, de su nivel láser SKR301. el mando a distancia o el detector. Recuerde que el nivel láser es un instrumento de precisión y que es importante mantenerlo calibrado y en buenas condiciones. -
Seite 27: Verificación Y Calibración Verticales (Eje Z)
3 m a una línea a plomo (con una plomada convencional con un hilo de al menos 2,4 m). Si tuviera 1. El nivel láser SKR301 es un instrumento de precisión que se debe necesidad de calibrar el instrumento, el haz se ve mejor en una manejar con cuidado. -
Seite 28: Detector
6. Accesorios • Botones superiores 6.1 Combinación de detector y control remoto láser Modo detector Modo remoto Modo escaneado (botones rojos) Elección del nivel Dirige el escaneo Mueve la Para aplicaciones manuales o con varilla graduada. También de sonido captura hacia la hacia la izquierda puede utilizar el montaje magnético para acoplar los espárragos izquierda... -
Seite 29: Mando A Distancia
activado, pulse cualquier botón (excepto el de encendido/apagado) • Pantalla LCD para utilizarlo como control remoto para el láser. El remoto puede utilizarse para detener o iniciar la rotación, aumentar o SATDO DE LA reducir la velocidad de rotación y mover el rayo o la captura. Ta m b i é n Batería baja BATERÍA Alto... -
Seite 30: Soportes
6.3.3 Trípodes Ventana infraroja El nivel láser se puede montar sobre un trípode de cabezal plano de 5/8"-11. El trípode puede te ner columna de elevación para ajustar la altura del nivel. 6.4 Otros accessorios Universal mount • Las lentes potenciadoras de láser mejoran la visibilidad 6 Pila del haz de láser en presencia de luz brillante. - Seite 31 SKR301 AUTOMATISCHER LASER Bedienungsanleitung...
- Seite 32 I n h a l t s v e rz e i c h n i s Obwohl der SKR301 sehr einfach zu bedienen ist, empfehlen wir, dieses Handbuch vor Inbetriebnahme des Lasers durchzulesen. 1. Allgemeine inform a t i o n e n 1.1 Beschreibung...
-
Seite 33: Technische Daten
• Man: Manuelle Einstellungen 6. 90° Indexmarkierung (eine von vier) 7. Einstellbarer Fuß für vertikale Aufstellung Nach dem Einschalten ist der SKR301 immer im Automatikmodus 8. Verstellbare Füße für vertikale Aufstellung (Auto). Nachdem die Horizontierung beendet ist, rotiert der Laserkopf. -
Seite 34: Tilt-Taste
(15) an die Umgebungshelligkeit anzupassen. Der Laserstrahl ist bei 2.4 Vertikale Aufstellung langsamerer Rotation besser sichtbar. Die Rotation kann gestoppt und der Laserstrahl manuell ausgerichtet werden, um den Laserstrahl auch Hierfür wird kein Zubehör benötigt. Der SKR301 kann direkt auf dem über lange Distanz besser sehen zu können. -
Seite 35: Benutzung Der Laserlinie
Um in den Scanmodus zu wechseln, benutzen Sie die Tasten (siehe unten), den Empfänger (Seite 17) oder die Fernbedienung (Seite 20). Wenn der SKR301 mit Akkus ausgestattet ist, muss der Akkupack vor der Erstinbetriebnahme min. 15 Stunden geladen werden. 1. Drücken Sie zum Scannen gleichzeitig die Tasten (14) und (17). Der 1. -
Seite 36: Prüfung Und Justage
Sie erneut. Ist der Abstand der Markierungen größer als 1/8'' in 100 F., sollte die Y-Achse neu kalibriert werden. DIESES KAPITEL IST SEHR WICHTIG: Hier ist eine einfache Anleitung zur Prüfung der Kalibrierung des SKR301 beschrieben. 3.1.2 Horizontale Kalibrierung Bedenken Sie, dass der Laser ein Präzisionsmessgerät ist, und es sehr wichtig ist, dieses kalibriert und in gutem Zustand zu halten. -
Seite 37: Speichern Der Kalibrierung
Sie die On/Off-Taste (24) am Laser. beschrieben kann zu gefährlicher Strahlenbelastung führen. 3.2 Vertikale Prüfung und Kalibrierung 1. Der SKR301 ist ein Präzisionsgerät, das vorsichtig behandelt wer- den muss. Vermeiden Sie Stöße und Erschütterungen. Lagern und (Z-Achse) t r a n s p o rtieren Sie den Laser und das Zubehör immer im... -
Seite 38: Zubehör
6. Zubehör • Obere Ta s t a t u r 6.1 Kombinierter Handempfänger Fernbedienungs- und Laser-Fernbedienung Empfänger-Modus Scanning-Modus Modus (rote Ta s t e n ) Scanner nach links Bewegen des Wahl der Handempfänger für Nivellierlatten oder Handmessungen. Mann 90°-Strahls nach Lautstärke kann auch die Magneteinfassung benutzen, um Metallbolzen für... -
Seite 39: Gebrauch Des Empfängers
Die Fernbedienung kann benutzt werden um die Rotation zu stoppen oder • LCD Anzeige zu starten, die Rotationsgeschwindigkeit zu vergrößern oder zu verklein- e rn, und um den 90°-Strahl zu bewegen. Auch der Scanner und die Batterie schwach ATTERIEANZEIGE Kalibrierung können mit ihr kontrolliert werden. Hoch •... -
Seite 40: Stativmontage
Wandmontage und für Ve rt i k a l - montage auf einem Stativ verw e n- det werden. Sie besteht aus einer stabilen Metallkonstruktion mit feder- SKR301 betätigtem Mechanismus, der zur schnellen Einstellung eine einfache 6 Batterie Höhenverstellung erlaubt. - Seite 41 I n d i c e Sebbene la livella laser SKR301 sia molto semplice da utilizzare, si raccomanda di leggere il presente manuale prima di attivare il laser. 1. Informazioni generali 1.1 Descrizione 1. Informazioni generali 1.2 Specifiche tecniche 1.3 Vista d’insieme 1.4 Vista d’insieme del tastierino...
-
Seite 42: Specifiche Tecniche
• Man : Modalità manuale. 7. Base estraibile per installazione verticale 8. Base regolabile per installazione verticale All’accensione, il laser SKR301 si imposta sempre sulla modalità a 9. Batterie (ricaricabili o alcaline) livellamento automatico (auto). Al termine del livellamento auto- 10. -
Seite 43: Installazione Orizzontale
Durante l’impiego del laser è importante verificare che non si sia 1. Il laser SKR301 può essere utilizzato direttamente sul terreno, su un mosso e che l’impostazione sia ancora precisa. s u p p o rt o da parete o su un cavalletto standard (5/8” - 11). -
Seite 44: Utilizzo Di Batterie Ricaricabili
3. Utilizzare i due tasti inferiori per regolare l’ampiezza della scan- sione. Utilizzare il tasto (17) per incrementare e il tasto (18) per Se la vostra livella laser SKR301 è dotata di batteria ricaricabile ridurre (da 3° a 34°). opzionale, questa deve essere caricata per 15 ore prima di poterla 4. - Seite 45 “Salvataggio della 3. Contrassegnare la posizione del raggio. calibrazione” di seguito. 4. Ruotare la livella laser SKR301 di 180°. Dopo 90 secondi, ruotare la testa di 180° e contrassegnare la posizione del raggio Calibrazione dell’asse Y accanto al primo contrassegno.
- Seite 46 è pronto per la calibrazione sull’asse Z. 5. Spostare il raggio finché non risulta verticale e parallelo alla linea Il laser SKR301 è garantito dai difetti di produzione per il periodo a piombo utilizzando i tasti (16) o (17) sul laser oppure (2) o (3) sul di un anno.
- Seite 47 6. Accessori • Tastiera superiore 6.1 Combinazione rilevatore Modalità Modalità e telecomando laser Modalità rilevatore telecomando scansione (simboli rossi) Scelta del Punta la scansione a Dirige l’inquad- Per aste graduate o applicazioni a presa manuale. Può essere sinistra volume ratura a sinistra utilizzato anche il supporto a magnete per aderire alle traver- (modalità...
- Seite 48 Il telecomando può essere impiegato per avviare o fermare la • Display LCD (Visualizzatore LCD) rotazione, aumentare o diminuire la velocità di rotazione e spostare il raggio o l’inquadratura. Esso controlla anche la scansione e la cal- TATO DELLA ibratura elettronica. Batteria scarica BATTERIA Superiore...
-
Seite 49: Altri Accessori
Il laser può esse re montato su un cavalletto a testa piana da 5/8”- 11. Inoltre, è possibile utilizzare un cavalletto con colonna sollev- abile per regolare l’altezza del laser. Consultate il Catalogo Makita per maggiori inform a z i o n i . 6.4 Altri accessori 6 Batteria •Gli occhiali laser migliorano la visibilità... - Seite 50 SKR301 AUTOMATISCHE LASER Gebruiksaanwijzing...
-
Seite 51: Algemene Informatie
1.4 Overzicht toetsenbord 1.1 Omschrijving 2. Bedieningsinstructies 2.1 Toets Auto/Man De SKR301 is een automatische, zichtbare laser die kan worden 2.2 Toets Kantelen gebruikt voor het waterpas stellen, verticaal en horizontaal uitlijnen 2.3 Horizontale instelling en uitvoeren van tweevlakmetingen. Het toestel is bijzonder praktisch 2.4 Verticale instelling... -
Seite 52: Technische Kenmerken
6. 90° index • Man: manueel gebruik 7. Neerklapbare voet voor verticale instelling 8. Klemvoet voor horizontale instelling De SKR301-laser staat altijd in automatisch zelfnivelleringsmodus 9. Batterijen (Auto) wanneer deze wordt ingeschakeld. Zodra het toestel zichzelf 10. Stekker voor batterijlader heeft genivelleerd, begint de laserkop te draaien. - Seite 53 (noodzakelijk wanneer het toes- Voor deze instelling hebt u geen extra hulpmiddelen nodig. De SKR301 kan direct op de vloer worden gebruikt. Voor een betere tel op een hellend vlak moet worden gebruikt). instelling kunt u er echter beter voor kiezen om het toestel op een voet te monteren.
-
Seite 54: Batterijen Vervangen
Eerste gebruik verkleinen (van 3° tot 34°). 4. Om het scannen uit te schakelen drukt u gelijktijdig opnieuw op Indien uw SKR301 is uitgerust met herlaadbare accu’s, moet u deze (14) en (17). voor het eerste gebruik minstens 15 uur opladen. - Seite 55 Volgende laadbeurten 5. Beide markeringen moeten identiek zijn. Op 30 m mogen beide DE SKR301 kan worden opgeladen terwijl deze in werking is. markeringen niet meer dan 6 mm uit elkaar staan. Op 15 m mogen beide markering niet meer dan 3 mm uit elkaar staan. Dit is een Wanneer er stroom is op de werkplek, sluit dan de lader aan terwi- nauwkeurigheid van +/- 0,010 %.
-
Seite 56: Onderhoud En Behandeling
3 m afstand van een loodrechte lijn (een schietlood van minstens 2,5 m lengte). Indien ijking nodig is, zal de straal beter zichtbaar zijn in 1. De SKR301 is een precisie-instrument dat met zorg moet worden een verduisterde kamer. behandeld. Vermijd schokken en trillingen. Vervoer en bewaar de 2. - Seite 57 6. To e b e h o r e n • Bovenste toetsenbord 6.1 Combinatiedetector en Afstandsbedienings- laserafstandsbediening Detectiemodus modus Scanmodus (rode toetsen) Geluidsnive Scan naar links Verplaats het Voor meetstok- of handheldtoepassingen. Kan met de magneetbevestig- auselectie vierkante glas naar gericht ing ook aan metalen staven aangebracht worden voor gelijkrichting van links (verticale modus)
- Seite 58 • Afstandsbedieningsmodus • L C D- s c h e r m Druk op de toets Aan/Af om de afstandsbedieningsfuncties in te schakelen als het apparaat nog in detectiemodus is. Batterij laag ATTERIJSTATUS Als de detector niet ingeschakeld is, druk dan op gelijk welke toets Hoog ELUID (behalve Aan/Af) om het apparaat als afstandsbediening voor de...
- Seite 59 • In de versie muursteun kan de steun aan een plafondraster Straal of krijtlijnmodus S c a n n i n g worden gemonteerd voor de instelling van een vals plafond. Scan Aan/Uit • De montagesteun kan eveneens op de zij worden gebruikt S t a rt minimale draaisnelheid Scanlengte verhogen en worden vastgemaakt op een driepoot (met een...
- Seite 60 SKR301 NÍVEL LASER AUTOMÁTICO Manual de instruçôes...
-
Seite 61: Tabela De Conteúdos
Tabela de conteúdos Embora o nível laser SKR301 seja muito fácil de usar, recomen - damos ler este manual antes de o pôr em funcionamento. 1. Informação geral 1.1 Descrição 1. Informação geral 1.2 Especificações técnicas 1.3 Descrição das vistas, geral 1.4 Teclado... -
Seite 62: Especificações Técnicas
• Man: Uso manual 7. Pé dobrável para instalação vertical 8. Pés reguláveis para instalação vertical O nível laser SKR301 está sempre no modo de nivelamento 9. Pilhas automático (auto) quando se acende. Quando o instrumento se 10. Tomada do carregador de pilhas nivelou, a cabeça do laser começa a rodar. - Seite 63 2.3 Instalação horizontal variar a velocidade ou para utilizar o modo linha. 1. O nível laser SKR301 pode-se colocar directamente sobre o Quando se utiliza o nível laser é importante verificar que não se chão, em montagem mural ou sobre um tripé normal (5/8” – 11).
-
Seite 64: Corrente Eléctrica
Esta linha pode-se deslocar rodando manualmente a cabeça ou com o comando à distância. 1. Para instalar as pilhas alcalinas no seu nível laser SKR301 O detector LDR180 não se pode utilizar com o modo linha. desenrosque a tampa situada na parte inferior do instrumento. - Seite 65 X necessita ser calibrado de novo (consultar as instruções que se dão mais abaixo). 3. Verificação e ajuste do nível laser SKR301 7. Para verificar o eixo Y, rode o laser 90º a partir do passo 4, de maneira que Y1 fique em frente à...
- Seite 66 1. Ajuste o nível laser em modo vertical, sobre uma superfície plana a uma distância de cerca de 3 m. a uma linha aprumada (com um 1. O nível laser SKR301 é um instrumento de precisão que se deve prumo convencional com um fio pelo menos de 2,4 m). Se tiver manipular com cuidado.
- Seite 67 Ecrã LCD ( p a rte posterior) Rode para unir a O seu nível laser SKR301 está garantido contra defeitos de fabri- braçadeira ao cação por um período de um ano. Esta garantia ficará anulada se detector fizer uma utilização indevida do instrumento ou se sofrer golpes.
-
Seite 68: Especificações
• Modo detecção 1. Carregue no botão de aceso/apagado para ligar o detector. 2. Carregue no botão central para seleccionar a precisão (faixa inactiva). 3. Carregue no botão superior para seleccionar o nível de som. 4. Rode a janela de detecção para o raio laser e mova o detec- tor para cima ou para baixo segundo a informação mostrada no ecrã... -
Seite 69: Comando À Distância
6.3 Suportes 6.2 Comando à distância 6.3.1 Suporte universal O comando à distância permite parar, começar ou variar o senti- do de rotação do feixe de laser, assim como mover o feixe vert i- cal para a esquerda e para a direita. Também serve para contro- O suporte universal pode-se utilizar para lar a exploração e a calibragem. - Seite 70 SKR301 ΑΥΤΟΜΑΤΟ ΑΛΦΑΔΙ ΛΕΙΖΕΡ Εγχειρίδιο χειρισμού...
-
Seite 71: Πίνακας Περιεχομένων
1.2 Τεχνικά χαρακτηριστικά 1.3 Συνοπτική περιγραφή 1.4 Συνοπτική περιγραφή πληκτρολογίου 1.1 Περιγραφή 2. Οδηγίες χειρισμού Το SKR301 είναι ένα αυτόματο ορατό λέιζερ που μπορεί να 2.1 Πλήκτρο Auto/Man χρησιμοποιηθεί για αλφάδιασμα, κατακόρυφη ευθυγράμμιση, 2.2 Πλήκτρο κλίσης κατακορύφωση και ορθογωνισμό. Μπορεί να χρησιμοποιηθεί σε εφαρμογές όπως τοποθέτηση... -
Seite 72: Τεχνικά Χαρακτηριστικά
Προεπιλεγμένη λειτουργία όταν ανάβει το λέιζερ 2. Κατακόρυφο ή οριζόντιο διάφραγμα δέσμης λέιζερ - Man: Χειροκίνητη χρήση 3. Διάφραγμα δέσμης λέιζερ Το λέιζερ SKR301 είναι πάντα εντός της λειτουργίας αυτόματης 4. Διάφραγμα γραμμής ίχνους λέιζερ οριζοντίωσης (auto) όταν ανάβει. 5. Βέλος... - Seite 73 2.4 Κατακόρυφη τοποθέτηση πλήκτρο Auto/Manual πληροφορώντας το χρήστη ότι το λέιζερ είναι σε χειροκίνητη θέση λειτουργίας. Δε χρειάζονται αξεσουάρ γι' αυτή τη θέση. Το SKR301 μπορεί να χρησιμοποιηθεί απευθείας στο έδαφος. Ωστόσο, μπορεί να 2.2 Πλήκτρο κλίσης (22) χρησιμοποιηθεί σε βάση για καλύτερη διαμόρφωση.
- Seite 74 λέιζερ είναι σε απόσταση. Για να χρησιμοποιήσετε το 1. Για να τοποθετήσετε αλκαλικές μπαταρίες στο δικό σας χαρακτηριστικά σάρωσης, ανάΨτε το λέιζερ. SKR301, ξεβιδώστε το κάλυμμα των μπαταριών που βρίσκεται Το λέιζερ δε θα πρέπει να είναι σε 'σημειακή' λειτουργία. στο κάτω μέρος του οργάνου.
- Seite 75 άξονας Y τις μπαταρίες άλλα απορρίμματα Επόμενες επαναφορτίσεις Το SKR301 μπορεί να φορτιστεί όταν είναι σε λειτουργία. 1. Τοποθετήστε το λέιζερ σε επίπεδη επιφάνεια 50 ή 100 ft. Εάν υπάρχει παροχή ρεύματος στο εργοτάξιο, απλά βάλτε τον (30m) από τοίχο.
- Seite 76 Βαθμονόμηση άξονα X επίπεδη επιφάνεια περίπου 10 ft. μακριά από νήμα στάθμης (αλφάδι κρεμασμένο από νήμα, με ύΨος τουλάχιστον 8 ft.). 1. Σβήστε το λέιζερ πριν από την επιλογή της θέσης λειτουργίας 2. Εάν χρειάζεται να γίνει βαθμονόμηση, η ακτίνα θα φαίνεται βαθμονόμησης.
- Seite 77 6. Παρελκόμενα 1. Το SKR301 είναι όργανο ακριβείας και σαν τέτοιο απαιτεί προσοχή κατά το χειρισμό του. 2. Αποφύγετε κρούσεις και κραδασμούς. 6.1 Πολλαπλός ανιχνευτής και 3. Πάντα να φυλάσσετε και να μεταφέρετε το λέιζερ και τα τηλεχειριστήριο αξεσουάρ του στη θήκη μεταφοράς.
- Seite 78 Επάνω πληκτρολόγιο LCD Display Θέση Θέση σάρωσης Θέση λειτουργίας ανιχνευτή Πεσμένη Κατασταση τηλεχειρισμού (κόκκινα πλήκτρα) μπαταρία μπαταριας ΥΨηλή Επιλογή Σκόπευση Μετακίνηση Ηχος επιπέδου σάρωσης τετραγωνικής δέσμης προς Αναβόσβημα: Κανονική ένταση ΥΨηλή ήχου αριστερά τα αριστερά (κατακόρυφη πλησίον Επιλογή οριζόντιας θέση λειτουργίας) Σταθερό...
- Seite 79 Θέση τηλεχειρισμού Θέση λειτουργίας ακτίνας ή γραμμής ίχνους Σάρωση Σάρωση On/Off Εάν είστε σε θέση ανίχνευσης, πατήστε το On/Off για να μεταβείτε Έναρξη ελάχιστης ταχύτητας περιστροφής Αύξηση μήκους στις λειτουργίες του τηλεχειρισμού. Εάν ο ανιχνευτής δεν είναι ενεργός, πατήστε οποιοδήποτε σ...
- Seite 80 Ακόμα, διαθέτει ρυθμιστική βίδα ακριβείας στο κάτω μέρος για ρύθμιση θέσης α κ ρ ι β ε ί α ς . - Σαν επίτοιχο στήριγμα, μπορεί να στερεωθεί σε πλέγμα για διαμόρφωση Ψ ε υ δ ο ρ ο φ ή ς . - Η...