Herunterladen Inhalt Inhalt Diese Seite drucken
Ilife V3s Pro Benutzerhandbuch

Ilife V3s Pro Benutzerhandbuch

Robotic vacuum cleaner
Inhaltsverzeichnis

Werbung

Verfügbare Sprachen
  • DE

Verfügbare Sprachen

  • DEUTSCH, seite 66
ILIFE
User Manual
Robotic vacuum cleaner
Model: V3s Pro
-
·· · ·· ­
l8i'1•1!!¥i
www.limex.ch

Werbung

Inhaltsverzeichnis
loading

Inhaltszusammenfassung für Ilife V3s Pro

  • Seite 1 ILIFE User Manual Robotic vacuum cleaner Model: V3s Pro ·· · ·· ­ l8i'1•1!!¥i www.limex.ch...
  • Seite 3 ILIFE • English...
  • Seite 4: Important Tips

    • Empty V3s Pro's dust bin and clean its filter after every use. • Filter could not be washed by water. • Replace new Filter when you notice V3s Pro vacuum gets weaker and pick up less than before. • Put charging home base against the wall and remove obstacles about 1 meter at two sides and about 2 meters forward.
  • Seite 5: Inhaltsverzeichnis

    Table of Contents ..............1 Safety Instructions ................2 Product Parts Main body and accessories ... uuu·············uuu············uuu·············uu Robot anatomy ........................Charging home base and Remote control CLEAN button status .. uuu·············uuu············uuu············uuu········ Remote control operating ............................. 7 Product Operating How to get started u .
  • Seite 6: Safety Instructions

    Safety Instructions Before using this product, please read the following safety instructions and follow all normal safety precautions. • Before using this product, ensure the power switch is ON. • If the product is not used for long time, please turn off the switch on the right side of the main body.
  • Seite 7: Product Parts

    Product Parts Main body and accessories Descrip t ion Q ' t y Main Body Charging Home Base Remote Control(battery not included) Adapter Cleaning Tool User Manual Extra Side Brushes Extra Filter �[_Q] CfilJUL 1 [Q] �� � r i lI I II J l ll ©...
  • Seite 8: Robot Anatomy

    Product Parts Robot anatomy Middle Cover Nose Wheel Auto Charging Pin Right Side Brush Left Side Brush Suck Passage Battery Cover Right Wheel Left Wheel Bottom Cover Primary Filter Dust Bin Filter Filter Frame For more detailed information, please visit: www.limex.ch...
  • Seite 9: Remote Control

    Product Parts Charging home base Signal Light Charge Connecting Points Power Supply Socket Charge Connecting Points Remote control Display screen Directional Buttons Plan --- ---11- Clock Spot --- -----11-. Edge Home For more detailed information, please visit: www.limex.ch...
  • Seite 10: Clean Button Status

    Product Parts CLEAN button status Robot status Lights Status Charging All lights flash gradually All lights turn off Charging finished In selected mode All lights flash slowly When robot in error All lights flash Low battery Middle lights flash Middle lights flash slowly In home mode In cleaning mode Middle lights turn solid...
  • Seite 11: Remote Control Operating

    Product Parts Remote control operating 1. "�II" Starting up/Pause • Press this button to start cleaning in selected mode • Press this button to make the robot stop when it's cleaning. • Press this button to exchange from sleeping mode to selected mode. 2.
  • Seite 12: How To Get Started

    Product Operating 1. How to get started 1>. Place charging home base, plug in adapter, signal light on charging home base will turn solid. Note: Put charging home base against the wall and remove obstacles about 1 meter at two sides and about 2 meters forward. 1>...
  • Seite 13: Product Operating

    Product Operating 2. Starting up/Pause/Sleeping Sleeping mode: Robot is not working, lights around CLEAN button are off and power switch is on; Selected mode: Robot is not working, lights around CLEAN button flash; Cleaning mode: Robot is working, lights around CLEAN button are on. 1 >.
  • Seite 14: Cleaning Mode

    Product Operating 4. Cleaning mode 1 >. Auto cleaning The robot will clean a room automatically and adjust its cleaning according to the situation. Note: Press CLEAN button on robot or on remote control lo starl auto cleaning. 2>. Spot cleaning A.Pross Spot on tho romoto toward tho robot whon tho robot is working.
  • Seite 15: Product Maintaining

    Product Maintaining 1. Cleaning side brushes Clean the side brushes when it gets dirty and replace if it's damaged. Note: Before replacing side brushes, check and match "L" "R" mark on both side brush and bottom of robot. 2. Cleaning dust bin and filter Clean and empty dust bin after each use, steps are as shown in below figures.
  • Seite 16: Front Wheel Cleanup

    Product Maintaining 4. Front wheel cleanup When there is foreign matter in front wheel, it will affect the cleaning performance, please clean it follow the way below: (1) Pull the wheel up vertically and clean it. Please note whether the gasket is off. (2) It should be noted that whether the gasket is installed well after clean the front wheel.
  • Seite 17: Trouble Shooting

    Trouble Shooting 1. Error code sheet When the robot meets with some routine troubles, it will remind you by beep. • Short tone Tone Cause Solution • Check wheels or side Wheels or side brushes brushes no work • • Clean cliff sensor and shake bum �...
  • Seite 18: Errors Appearance

    V3s Pro robot's side place wheel is stuck and confirm that they both turn freely. Start V3s Pro robot in a new location. Keep A cliff sensor is dirty or Inspect and clean V3s Pro robot's cliff moving back broken.
  • Seite 19: Product Specifications

    Product Specifications Classification Item Detail Diameter 306mm Mechanical Height 76mm Specifications Weight 2.05kg Voltage/Power 14.4V/20W Electrical Specifications Battery specifications Lithium ion 2600mAh 0.3L Dust bin capacity Auto Charging / Charging type Manual Charging Auto, Spot, Edge, Cleaning mode Cleaning Daily Schedule Specifications About 280min Charging time...
  • Seite 21 ILIFE Robot aspirateur Manuel de l'utilisateur Franc;ais...
  • Seite 23 ILIFE • Fram,ais...
  • Seite 24: Conseils Importants

    • Chargez la batterie du robot completement avant chaque cycle de nettoyage. Duree de vie de la batterie • Afin de prolonger la duree de vie de la batterie du V3s Pro et de le maintenir niveau de performances optimales •...
  • Seite 25 Table des matieres ..........Instructions de securite ............2 Pieces du produit Corps principal et accessoires ........................Anatomie du robot B ase de recharge ..............
  • Seite 26: Instructions De Securite

    Instructions de securite Avant d'utiliser ce produit, lisez les instructions de securite suivantes et suivez toutes les precautions de securite normale. • Avant d'utiliser ce produit, assurez-vous que l'interrupteur soil allume. • Si le produit n'esl pas utilise pendant une longue periode, eleigneL l'inlerrupteur sur le cola droit du corps principal.
  • Seite 27: Pieces Du Produit

    Pieces du produit Corps principal et accessoires Description Quantile Corps principal Base de recharge Telecommande (pile non fournie) Adaptateur Outil de nettoyage Manuel de l'utilisateur Brasses laterales supplementaires Filtre supplementaire �[_Q] CfilJUL 1 [Q] �� � r i lII IIJ lll ©...
  • Seite 28: Anatomie Du Robot

    Pieces du produit Anatomie du robot SR:s�--- Roue de nez Broche de recharge "'i;-,;i2��- Brosse laterale Brosse laterale ---�i!i!v�c..:� �U�Prt�- Conduit Couvercle de la batterie - - ---lfll!8,,,._�::==Jf-'-� Roue gauche ----II-\< ���==� ,._..,.,_ _______ Couvercle intermediaire Filtre primaire poussiere Filtre Cadre du Filtre Pour des informations plus detaillees, consu ltez: www.limex.ch...
  • Seite 29: Base De Recharge

    Pieces du produit Base de recharge m,it, -- Prise d'alimentation �F--,ff-i,..a:---- Barnes de recharge Telecommande Programme a-----1 �-- Horloge � �-- Bordure Tache ___ __,,..�---tt---- Base Pour des informations plus detaillees, consultez: www.limex.ch...
  • Seite 30: Etat Du Bouton Nettoyer

    Pieces du produit Etat du bouton NETTOYER Etat des voyants Etat du robot Tous les voyants clignotent En charge prog ressivement Charge terminee Toutes les lumieres se eteignent Tous les voyants clignotent lentement En mode selectionne Tous les voyants clignotent En cas d'erreur du robot Les voyants du milieu clignotent Batterie faible...
  • Seite 31: Fonctionnement De La Telecommande

    Pieces du produit Fonctionnement de la telecommande 1. " �II "Demarrage/Pause • Appuyez sur ce bouton pour commencer le nettoyage avec le mode selectionne • Appuyez sur ce bouton pour arreter le robot lorsqu'il nettoie. • Appuyez sur ce bouton pour passer du mode sommeil au mode selectionne. 2.
  • Seite 32: Fonctionnement Du Produit

    Fonctionnement du produit 1. Pour demarrer 1 >. Posez la base de recharge, branchez l'adaptateur, le voyant lumineux de la base de recharge tourner solides. Remarque : Mettez la base de recharge centre le mur et enlevez les 1> obstacles sur 1 metre sur deux cotes et sur 2 metres devant. 2>.
  • Seite 33: Mise En Marche/Pause/Sommeil

    Fonctionnement du produit 2.Mise en marche/Pause/Sommeil Mode sommeil . Le robot ne fonctionne pas, les voyants autour du bouton NETTOYER son! eteints et l'interrupteur est allume ; Mode selectionne : Le robot ne fonctionne pas, les voyants autour du bouton NETTOYER clignotent ; Mode nettoyage Le robot ne fonclionne pas, les voyants autour du boulon NETTOYER sont allumes.
  • Seite 34: Programmation

    Fonctionnement du produit 3.Programmation Vous pouvez programmer le robot pour qu'il commence nettoyer partir d'une certaine heure. Remarque : Pensez regler l'horloge et la programmation apres remplacement des piles de la telecommande. Una fois l'horloge reglee, le robot ronclionnera salon les programmalions qua vous avez realisees.
  • Seite 35: Mode Nettoyage

    Fonctionnement du produit 4.Mode nettoyage 1>. Nettoyage automatique Le robot nettoiera une piece automatiquement et ajustera son nettoyage selon la situation. Remarque: Appuye,: sur le bouton NETTOYER sur le robot ou sur la lelecommande pour demarrer le nettoyage automatique. 2>. Nettoyage des taches A.
  • Seite 36: Entretien Du Produit

    Entretien du produit 1.Nettoyage des brosses laterales Nettoyez les brasses laterales lorsqu'elles sont sales et remplacez-les si elles sont endommagees. Remarque : Avant de remplacer les brasses laterales, verifiez et alignez les marques « L » et « R » sur les brasses laterales et le bas du robot.
  • Seite 37: Nettoyage De La Roue Avant

    Entretien du produit 4. Nettoyage de la Roue Avant Quand ii y'a des corps etangers dans la roue avant, cela affectera la performance de nettoyage, veuillez done la nettoyer de la maniere suivante (1) Tirer la roue verticalement and la nettoyer. Veuillez verifier que le joint est enleve. (2) Veuillez verifier que le joint est installe correctement apres nettoyage de la roue avant.
  • Seite 38: Liste Des Codes D'erreur

    Depannage 1.Liste des codes d'erreur Lorsque le robot rencontre des problemes de routine, un bip vous le rappellera. • Signal sonore bref Signal Cause Solution sonore • Les roues ou les brasses Verifiez les roues ou les laterales ne fonctionnent pas brasses laterales Nettoyez le capteur •...
  • Seite 39: Depannage

    Poussez-les vers l'interieur et vers V3s Pro est bloquee lui-meme l'exterieur pour verifier qu'elles lournent librement. Allumez le robot V3s Pro dans un nouvel endroit II recule Un capteur d'evitement lnspectez et nettoyez les capteurs sans GOSSO est encrasse ou casse.
  • Seite 40: Specifications Du Produit

    Specifications du produit Article Detail Classification Diametre 306mm Specifications 76mm Hauteur mecaniques 2.05kg Poids 14.4V/20W Tension/puissance Specifications electriques Specifications de Lithium ion 2600mAh la batterie Capacite du sac 0.3 L poussiere Charge automatique Type de charge / charge manuelle Automatique, Tache, Specifications Mode nettoyage Bordure, Programme...
  • Seite 42 ILIFE Aspiradora Rob6tica Manual del Usuario Espanol...
  • Seite 44 ILIFE • Espanol...
  • Seite 45 Duraci6n de la Bateria Para prolongar la vida util de la bateria de V3s Pro y para mantener su limpieza al maxima renaimiento: • Cargue el robot durante la noche antes de usarlo par primera vez.
  • Seite 46 indice de contenidos - - - - - - - - - - - - - - - - - - - - - - - - - - - - - - - - - - - - - - - - - - - - - - 1 l ns t ru cci o n e s d e segur i dad - - - - - - - - - - - - - - - - - - - - - - - - - - - - - - - - - - - - - - - - - - - - - - - - - - - - - - - - 2 P a r t es d e l p rod u c to...
  • Seite 47 lnstrucciones de seguridad Antes de usar este producto, por favor, lea las siguientes instrucciones de seguridad y siga todas las precauciones habituales de seguridad. , Antes de usar este producto, asegurese de que el interruptor de encendido esta en la posici6n ON , Si no se va a utilizar el producto durante un largo periodo de tiempo apague el interruptor que se encuentra en el lado derecho del cuerpo principal.
  • Seite 48: Partes Del Producto

    Partes del producto Cuerpo principal y accesorios Cant. Descripci6n Cuerpo principal Base de carga Manda a distancia{baterfas no incluidas) Adaptador Herramienta de limpieza Manual de usuario Cepillos laterales adicionales Filtro adicional �[_Q] CfilJUL 1 [Q] �� � r i lI III Jl ll ©...
  • Seite 49 Partes del producto Anatomia del robot Pin de Auto carg a -- -- �� �� �� �� - - Rue da dela ntera Cepillo Lateral Izquierdo Cepillo Lateral Derecho =LJ_ ��aL� �� �- Pas aje de Suc ci6n � _____..: Cub ierta de bat eria - - ---M•...
  • Seite 50: Base De Carga

    Partes del producto Base de carga Puntos de conexi6n de carga �___,_,.. r � t � ,--- Conector de carga Puntos de conexi6n de carga Mando a distancia Programar a-----1 �-- Reloj � �-- Borde Mancha ___ __,,..�---tt----- Casa Para mas lnformaci6n detallada, por favor visite: www.limex.ch...
  • Seite 51 Partes del producto Estado bot6n CLEAN Estado del led Estados Todas las luces parpadeando Cargando paulatinamente Carga finalizada Todas las luces se apagan Todas las luces parpadeando despacio Modo Selecci6n Todas las luces parpadeando Cuando hay error Luces centrales parpadeando Bateria baja Luces centrales parpadeando despacio...
  • Seite 52 Partes del producto Funci6n del mando a distancia 1. " �II " lnicio/Pausa • Pulsa este bot6n para empezar la limpieza en el modo seleccionado • Pulsa este bot6n para parar el robot cuando este limpiando • Pulsa este bot6n para cambiar del modo de reposo al modo seleccionado. 2.
  • Seite 53: C6Mo Empezar

    Modo de 1. C6mo empezar 1>. Coloque la base de carga y conecte el adaptador,La luz en la base de carga girar s61ido. Aviso: Deje la base de carga contra la pared y despeje el suelo de 1> Obstaculos un metro a cada lado y dos metros hacia delante. 2>.
  • Seite 54: Puesta En Marcha

    Modo de 2.Puesta en marcha/Pausar/Modo reposo Modo reposo: El robot no esta funcionado, las luces alrededor del bot6n CLEAN estan apagadas el interruptor esta encendido. Modo selecci6n: El robot no esta funcionado, las luces alrededor del bot6n CLEAN parpadean. Modo limpieza: El robot esta funcionado, las luces alrededor del bot6n CLEAN estan encendidas.
  • Seite 55 Modo de uuo 3.Programaci6n Puedes programarlo para hacer que empiece a limpiar a una hora concreta. Aviso: Recuerde ajustar el reloj y volver a programar el robot cuando reemplace las pilas del mando a distancia. Una vez este la hora ajustada, funcionaran todas las programaciones configuradas.
  • Seite 56: Modo De Limpieza

    Modo de 4.Modo de limpieza 1>. Suto limpieza El robot limpiara la habitaci6n automaticamente y ajustara a limpieza a la situaci6n. Nota: Pulsa el bot6n CLEAN en el robot o en el mando a distancia para empezar la auto limpieza. 2>.
  • Seite 57: Limpieza De Los Cepillos Laterales

    Mantenimiento 1. Limpieza de los cepillos laterales Limpie los cepillos laterales cuando esten sucios y sustituyalos cuando esten danados. Nota: Antes de remplazar los cepillos laterales, compruebe las letras "L" -"R" coinciden en los cepillos y en la parte inferior del robot. 2.
  • Seite 58 Mantenimiento 4. Front wheel cleanup When there is foreign matter in front wheel, it will affect the cleaning performance, please clean it follow the way below: (1) Pull the wheel up vertically and clean it. Please note whether the gasket is off. (2) It should be noted that whether the gasket is installed well after clean the front wheel.
  • Seite 59: Resoluci6N De Problemas

    Resoluci6n de problemas 1.C6digos de error Cuando el robot se encuentre con alg(m problema rutinario, te lo hara saber mediante "beeps". • Tono corto. Tono Motivo Soluci6n • Ruedas o cepillos laterales Compruebe las ruedas no funcionan Limpie el sensor de •...
  • Seite 60: Soluci6N De Problemas

    Circula en el lugar La rueda lateral del robot Limpie las ruedas laterales del V3s Pro esta atorada robot V3s Pro de pelo y escombros. Empujelas hacia dentro y hacia afuera para confirman que ambas giran libremente. lnicie el robot V3s Pro en una nueva ubicaci6n.
  • Seite 61: Especificaciones Del Producto

    Especificaciones del producto Clasificaci6n Caracterf stica Detalle 306mm Diametro Especificaciones 76mm Altura mecanicas Peso 2.05kg 14.4V/20W Voltaje Especificaciones electricas Baterfa Litio ion 2600mAH Capacidad balsa 0.3 L Auto Carga / Tipo de carga Carga Manual Auto, Mancha, Borde, Modo de limpieza Diaria, Programada Especificaciones de limpieza...
  • Seite 63 ILIFE Saugroboter Benutzerhandbuch Deutsch...
  • Seite 65 ILIFE • Deutsch...
  • Seite 66: Wichtige Hinweise

    Warnton gibt. FOr die optimale Leistung • Leeren Sie den Staubbehalter und den Filter des V3s Pro nach jedem Gebrauch . • Der Filter darf nicht mit Wasser gesaubert werden. • Ersetzen Sie den Filter, wenn die Saugleistung des V3s Pro geringer wird und er weniger Schmutz als vorher entfernt.
  • Seite 67 lnhaltsverzeichnis S i ch e r h eit sh i n w ei s e ............··········································· ··· ··· ··· ··· ··· ··· ··· ·· 2 Be s t a ndtei l e B est a ndtei l e und Zubeho r e ............. R o b o te r - Ko nst r u k ti o n ·...
  • Seite 68: Sicherheitsh I Nweise

    Sicherheitsh i nweise Bitte lesen Sie die folgenden Sicherheitshinweise und befolgen Sie alle allgemeinen Sicherheitsregelungen, bevor Sie das Gerat in Betrieb nehmen. • Bitte steilen Sie sicher vor der lnbetriebnahme, dass das Gerat eingeschaltet ist. • Bitte schalten Sie den Schaller auf der rechten Seite des Gerates aus, wenn das Gerat fOr langere Zeit nicht verwendet wird.
  • Seite 69: Bestandteile

    Bestandteile Bestandteile und Zubehore Menge Beschreibung Hauptteil Ladestation Fernbedienung (Batterie nicht enthalten) Adapter Reinigungswerkzeug Bedienungsanleitung Zusatzliche seitliche Biirsten Zusatzlicher Filter �[_Q] CfilJUL 1 [Q] �� � r i lI I II J l ll © �� For weitere detailliertere Information finden Sie bitte: www.limex.ch...
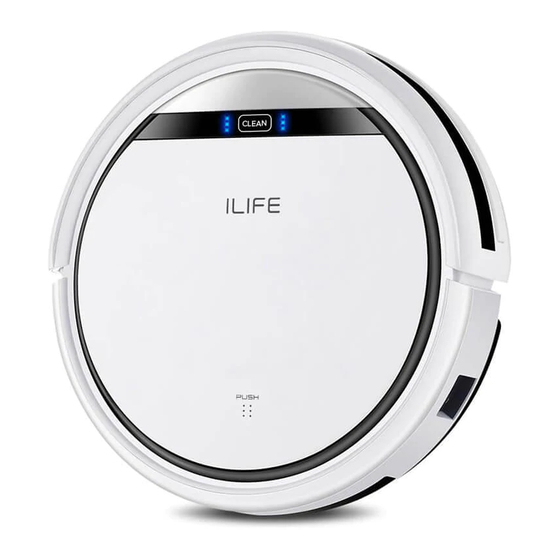
  • Seite 70: Roboter-Konstruktion

    Bestandteile Roboter-Konstruktion CLEAN-Taste Deckel Mitten Bug rad Lad e kon takte - - - --2t �!'IIJ 1"� .-.1::¼. r::!ih� ik-- -- Seitenburste links Seitenburste rechts Saugdurchgang Rad rechts Filter--- ----, � Filter Rahmen ---------..1 1 Fur weitere detailliertere Information finden Sie bitte: www.limex.ch...
  • Seite 71: Ladestation

    Bestandteile Ladestation ,._..::::=---- Signalanzeige Ladekontakte Netzsteckdose Ladekontakte Fernbedienung Start/Pause a-----1 �-- Uhr Plan ------11-----a � �-- Ecke Spot ___ __,,..�---tt---- Home For weitere detailliertere Information finden Sie bitte: www.limex.ch...
  • Seite 72: Clean-Taste-Status

    Bestandteile CLEAN-Taste-Status Anzeigenstatus Robot-Status Laden Alie Anzeigen blinken alimahlich Laden beendet Alie Anzeigen erloschen Im eingestellten Modus Alie Anzeigen blinken langsam Wenn der Roboter Fehler hat Alle Anzeigen blinken Schwache Batterie Mittlere Anzeigen blinken Mittlere Anzeigen blinken langsam Im Home-Modus Mittlere Anzeigen beleuchten fest Im Reinigung-Modus Mittlere Anzeigen beleuchten fest,...
  • Seite 73: Handhabung Der Fernbedienung

    Bestandteile Handhabung der Fernbedienung 1. " �II " Start/Pause • Driicken Sie diese Taste um das Reinigen im ausgewahlten Modus zu starten. • Driicken Sie diese Taste um den Roboter zu stoppen, wenn er mit dem Reinigen arbeitet. • Driicken Sie diese Taste um den Robotor von Schlafmodus in gewahlten Modus zu wechseln 2.
  • Seite 74 Bestandteile Handhabung der Fernbedienung 7. "9" Spot DrOcken Sie diese Taste , um den Roboter mit dem Spot-Reinigen zu betatigen. 8. ®::; / 2=DD zeigt die eingestellte Planungszeit. 9. 0 ;: 12=DD zeigt die Uhrzeit. Hinweis: 1.Setzen Sie bitte zwei AAA Ty p Batterien in die Fernbedienung ein. 2.Entnehmen Sie die Batterien , wenn die Fernbedienung fOr lange Zeit nicht verwendet wird Fur weitere detailliertere Information finden Sie bitte: www.limex.ch...
  • Seite 75: Bedienung

    Bedienung 1.So starten Sie die Reinigung 1>. Ladestation aufbauen und Adapter einschalten, dann wird die Signallampe auf der Ladestation blinken. Hinweis: Ladestation an die Wand stellen und Hindernisse ea. 1 M an 1> beiden Seiten und ea. 2 M naeh vorne zu befreien. 2>.
  • Seite 76: I P A Use / S C H L A F En

    Bedienung 2. Start Pause / Schlafen Schlaf-Modus: Roboter arbeitet nicht, Anzeigen rund um der CLEAN-Taste ausgeschaltet und Netzschalter eingeschaltet; Ausgewahlter Modus: Roboter arbeitet nicht, Anzeigen rund um der CLEAN-Taste blinken; Reinigungsmodus: Roboter arbeitet, Anzeigen rund um der CLEAN-Taste leuchten auf. 1>.
  • Seite 77: Einstellung Eines Zeitplans

    Bedienung Einstellung eines Zeitplans Der Roboter wird immer zum geplanten Zeitpunkt in Betrieb gesetzt, es sei denn, dal1 der Netzschalter des Roboters ausgeschaltet ist. 1. Richten Sie die Fernbedienung auf den Roboter. 2. DrOcken Sie Taste PLAN und dann die Richtungstasten , um den Zeitplan einzustellen. 3.
  • Seite 78: Reinigungsmodus

    Bedienung 4.Reinigungsmodus 1>. Auto Reinigung Der Roboter wird automatisch ein Zimmer reinigen und die Reinigung je nach Situation anpassen. Hinweis: Driicken Sie die CLEAN-Taste am Roboter oder auf der Fernbedienung, um die automatische Reinigung zu starten. 2>. Spot Reinigung A. Driicken Sie die Taste Spot auf der Fernbedienung in Richtung des Roboters, wenn der Roboter arbeitet.
  • Seite 79: Wartung Und Pflegung

    Wartung und Pflegung 1.Reinigung der seitlichen Bursten Reinigen Sie die Seitenbursten, wenn sie verschmutzt sind und ersetzen Sie, wenn es beschadigt is!. Hinweis: Vor dem Austausch der seitlichen Bursten, uberprufen und die "L","R" Markierung auf beiden seitlichen Bursten und der Unterseite des Roboters uberstimmen. 2.Reinigung des Staubbehalters und des Filters Der Staubbehalter soil nach jedem Gebrauch gereinigt und entleert warden.
  • Seite 80: Vorderradreinigung

    Wartung und Pflegung 4. Vorderradreinigung Wenn Fremdkorper im Vorderrad vorhanden sind, wird dies die Reinigungsleistung beeinflussen, bitte reinigen Sie es, indem Sie Folgendes beachten: (1) Ziehen Sie das Rad vertikal ab und reinigen Sie es. Beachten Sie bitte, ob die Dichtung in Ordnung ist. (2) Es ist zu beachten, dass die Dichtung nach dem Reinigen des Vorderrades gut eingebaut ist.
  • Seite 81: Storungsbehebung

    Storungsbehebung 1. Fehlerkodeliste Wenn der Roboter auf einige routinemal1ige Probleme trifft, wird es Ihnen durch akustisches Signal aufmerksam machen. • KurzerTon Losung Ursache • Rader oder SeitebOrsten Rader oder SeitenbOrsten arbeiten nicht OberprOfen Cliff-Sensor reinigen und • • Stor.idampfer leicht schOtteln, Fehler bei Cliff-Sensor oder und OberprOfen, ob es Stor.idampfersensor...
  • Seite 82: Fehlermeldung

    O berprOfen und reinigen Sie ggf. V3s Pro In ROckbewegung verschmutzt oder defekt. bleiben Roboter Cliff Sensoren. V3s Pro Roboter Stol1stange 10 - 20 Mai zOgig Stol1en an das tippen, um alle Ablagerungen zu verdrangen, Der Stol1dampfer wird Hindernis die unter der Stp!1stange gefangen werden komprimiert.
  • Seite 83: Spezifikationen

    Spezifikationen Klassifikation Artikel Details Durchmesser 306mm Mechanische Hohe 76mm Spezifikationen 2.05kg Gewicht 14.4V/20W Spannung/Leistung Elektrische Spezifikationen Lithium ion 2600mAh Batterie Spezifikation Fassungsvermogen des 0.3 L Stau bbehalters Auto Laden/ Ladenverfahren manualles Laden Auto, Spot, Ecke, Reinigungsmodus tagliche Plannung Reinigung Spezifikationen Ladezeit Ca.
  • Seite 85 ILIFE Aspirapolvere robotico lstruzioni d'uso Italiano...
  • Seite 87 ILIFE • Italiano...
  • Seite 88: Consigli Importanti

    Per una prestazione ideale • Svuota la vaschetta raccoglipolvere del V3s Pro e dopo ogni utilizzo pulisci i suoi filtri. • II Filtro non pu6 essere lavato con acqua. • Quando noterai che l'aspirapolvere V3s Pro non pulisce correttamente, sostituisci ii Filtro.
  • Seite 89 Table des matieres lstruzioni di sicurezza ..........P arti del prodotto ............2 C orpo principale e accessori ........... 2 A nato m ia del r o b ot ·...
  • Seite 90: Lstruzioni Di Sicurezza

    lstruzioni di sicurezzz Prima di utilizzare questo prodotto, leggere le seguenti istruzioni di sicurezza e seguire tutte le eormoli precauzioni relative alla sicurezza. Prima di utilizzare questo prodotto, assicurati che l'interruttore di alimentazione sia posizionato su on. • Se ii prodotto non viene utilizzato per lungo tempo, spegnere l'apparecchio attraverso l'intorruttoro situato sul lato dostro dol corpo principalo.
  • Seite 91: Parti Del Prodotto

    Parti del prodotto Corpo principale e accessori a.ta Descrizione Corpo principale Base di alimentazione Telecomando {batteria non inclusa) Adattatore Strumento di pulizia lstruzioni d'uso Spazzole laterali extra Filtro extra �[_Q] CfilJUL 1 [Q] �� � r i lII IIJ lll ©...
  • Seite 92: Anatomia Del Robot

    Parti del prodotto Anatomia del robot Paraurti Pulsante CLEAN Copertura centrale Pin del con nettore - -- -----,<� �� �� �� � - - Ruo tino Spazzola sinistra Spazzola destra 'ff-____..: � =4_,��:l!, � ,"n'R-- l,J... Condotto di Copertura batteria -- --lff-i Ruota sinistra -- -+1a1 Ruota destra ,._..,.,...
  • Seite 93: Base Di Alimentazione

    Parti del prodotto Base di alimentazione Punti di connessione per ii caricamento Spina di alimentazione Punti di connessione per ii caricamento Telecomando a-----1 �-- Clock (orologio) � �-- Edge (contorno) Per informazioni piu dettagliate, si prega di visitare: www.limex.ch...
  • Seite 94: Status Pulsante Clean

    Parti del prodotto Status pulsante CLEAN Luci di status Status robot Tutte le luci lampeggiano In carica gradualmente Garica terminata Tutte le luci si spengono Tutte le luci lampeggiano lentamente Nella modalita selezionata Quando si verifica un Tutte le luci lampeggiano errore nel robot Le luci centrali lampeggiano Batteria scarica...
  • Seite 95: Utilizzo Del Telecomando

    Parti del prodotto Utilizzo del telecomando 1." �II" lnizio/Pausa • Premi questo pulsante per avviare la pulizia nella modalita selezionata. • Premi nuovamente ii pulsante in modo da fermare ii robot una volta che la pulizia sia giunta al termine. •...
  • Seite 96 Parti del prodotto Utilizzo del telecomando "e "(in loco) Premi questo pulsante per far si che ii robot cominci a pulire in loco. 8. @ '.� /2:0[] Mostra ii tempo di programmazione. 9. 0 :� /2:[l[l Mostra l'ora dell'orologio. Nota: 1.lnserisci nel telecomando due batterie di tipo AAA.
  • Seite 97: Utilizzo Del Prodotto

    Utilizzo del prodotto 1.Come iniziare 1>. Posiziona la base di alimentazione e inserisci la spina. La luce della base di alimentazione girare solido. Nola: Posiziona contra ii muro la base di caricamento e rimuovi 1> gli ostacoli a circa un metro dai lati e circa 2 metri in fronte. 2>.
  • Seite 98: Avvio/Pausa/Sospensione/Pausa/Sospensione

    Utilizzo del prodotto 2.Avvio/Pausa/Sospensione/Pausa/Sospensione Modalita di sospensione: ii robot non funziona, le luci attorno al pulsante CLEAN sono spente e l'interruttore di alimentazione su on; ii robot non funziona, le luci attorno al pulsante CLEAN lampeggiano; Modalita selezionata: Modalita di pulizia: ii robot non funziona, le luci attorno al pulsante CLEAN sono accese.
  • Seite 99 Utilizzo del prodotto lmpostare una programmazione II robot funzionera sempre secondo l'orario programmato, almeno che l'interruttore di alimentazione venga posizionato su off. 1.Punta ii telecomando verso ii robot. 2.Premi PLAN e successivamente utilizza i pulsanti direzionali per impostare la programmazione. 3.Premi PLAN per salvare l'impostazione.
  • Seite 100: Modalita Di Pulizia

    Utilizzo del prodotto 4.Modalita di pulizia 1>. Pulizia automatica II robot pulira automaticamente una stanza e regolera la pulizia in accordo alla situazione. Nota: Premi ii pulsante CLEAN sul robot o sul telecomando per awiare la pulizia automatica. 2>. Pulizia in loco (spot) A.
  • Seite 101: Manutenzione Del Prodotto

    Manutenzione del prodotto 1.Pulizia delle spazzole laterali pulisci la spazzole laterali quando diventano sporche e cambiale se danneggiate. Nola: Prima di sostituire le spazzole laterali, controlla a fai combaciare i segni "L" e "R" sulle spazzole laterali e su quella nella parte inferiore del robot. 2.Pulizia della vaschetta raccoglipolvere e del filtro Pulisci e la vaschetta raccoglipolvere dopa ogni uso, i passi per farlo sono mostrati nelle figure sottostanti.
  • Seite 102: Pulizia Della Ruota Anteriore

    Manutenzione del prodotto 4. Pulizia della ruota anteriore La presenza di materie estranee nella ruota anteriore, influisce sulle prestazioni, si prega di procedere alla pulizia come segue: (1) Mettere la ruota in verticale e procedere con la pulizia. Controllare che la guarnizione non sia caduta. (2) Dopa aver pulito la ruota anteriore, controllare che la guarnizione sia installata correttamente.
  • Seite 103: Risoluzione Dei Problemi

    Risoluzione dei problemi 1.Tabella con i codici di errore Quando ii robot affronta dei problemi durante una routine, lo segnalera con un bip. • Tona breve Soluzione Causa • Le ruote o le spazzole laterali Controlla le ruote o le non funzionano spazzole laterali Pulire con cautela ii sensore...
  • Seite 104: Segnalazione Degli Errori

    Errori Causa probabile Soluzione Segnalazione Pulisc _ i la ruota _ laterals del robot V3s Pro da peli o delnt1. Sp1nglle denlro e ruori per La ruota laterals del robot Gira su se confermare che entrambe girino senza stesso in loco V3s Pro 6 incastrata problemi.
  • Seite 105: Specifiche Tecniche Del Prodotto

    Specifiche tecniche del prodotto Oggetto Dettaglio Classificazione Diametro 306mm Meccanico Altezza 76mm Specifiche tecniche Peso 2.05kg Voltaggio/ 14.4V/20W alimentazione Elettrico Specifiche tecniche Specifiche tecniche loni di litio 2600mAh della batteria Capacita del contenitore raccogli 0.3 L polvere Auto caricam ento / Tipo di caricamento caricamento manual e Auto, spot, edge,...
  • Seite 107: Manual De Utilizador

    ILIFE Limpador a Vacua Rob6tico Manual de Utilizador Portugues...
  • Seite 109 ILIFE • Portugues...
  • Seite 110: Como Utilizar

    • Carregue completamente a bateria do rob6 a cada ciclo de limpeza. Vida util da bateria • Para aumentar o tempo de vida util da bateria do V3s Pro e manter a limpeza no topo do desempenho: • Carregue o rob6 durante a noite antes da primeira utilizar;:ao.
  • Seite 111 Table des matieres ..........lnstru�oes de seguran�a ..
  • Seite 112: Lnstru�Oes De Seguran�A

    lnstru�oes de seguran�a Antes de utilizar este produto, leia as seguintes instruc;oes de seguranc;a e siga todas as precauc;oes de seguranc;a normais. • Antes da utiliza9ao deste produto, garanta que o botao Power esta ON. • Se o produto nao e utilizado durante muito tempo, desligue o botao do lado direito do corpo principal.
  • Seite 113: Pe�As Do Produto

    Pe�as do produto Corps principal et accessoires Descriyao Q td . Corps principal Base domestica de carregamento Controlo remoto (bateria nao incluida) Adaptador Ferramenta de limpeza Manual de Utilizador Escovas laterais extra Filtro extra 8@ 8 �[_Q] CfilJUL 1 [Q] ��...
  • Seite 114: Anatomia Do Ro B 6

    Pe�as do produto Anatomia do robe Para-choques Roda do nariz Pino de Escova lateral Escova lateral Passagem de Tampa da bateria Roda direita Roda esquerda Tampa do fundo ,._..,.,_ _______ Tampa media ��� Filtro ------------l'!!lk',,­ Estrutura do Filtro --------�\\ Para mais informa<;:oes detalhadas, visite: www.limex.ch...
  • Seite 115: Base Domestica De Carregamento

    Pe�as do produto Base domestica de carregamento Carregue os pontos de conexao Tomada da fonte de Carregue os pontos de conexao Controlo remote Comec;o/Pause a-----1 �-- Rel6gio � �-- Ponta Para mais informac;oes detalhadas, visite: www.limex.ch...
  • Seite 116 Pec;as do produto Estado do botao CLEAN Estado das luzes Estado do robo Carregamento Todas as luzes piscam gradualmente Carregamento Todas as luzes se apagam terminado No modo selecionado Todas as luzes piscam lentamente Quando o robe esta em Todas as luzes piscam erro As luzes medias piscam Bateria baixa...
  • Seite 117: Funcionamento Do Controlo Remoto

    Pe�as do prod uto Funcionamento do controlo remoto 1. ·· ..,.II ·· Comec;o/Pause • Prima este botao para iniciar a limpeza no modo selecionado. • Prima este botao para fazer o robo parar quando esta em limpeza. • Prima este botao para trocar do modo hibernar para o modo selecionado. 2.
  • Seite 118: Funcionamento Do Produto

    Funcionamento do Produto 1.Como iniciar 1>. Coloque a base domestica de carregamento, ligue o adaptador a tomada, a luz do sinal na base domestica de carregamento virar s61ido. Nota: Coloque a base domestica de carregamento na dire9ao da 1> parede e remova os obstaculos cerca de 1 metro nos dais lados e em cerca de 2 metros para a frente.
  • Seite 119: Lniciar/Pausa/Hibernar

    Funcionamento do Produto 2.lniciar/Pausa/Hibernar Modo Hibernar: 0 robo nao esta em funcionamento, as luzes em volta do botao CLEAN estao desligadas e o botao Power esta ligado, modo Selecionado: 0 robo nao esta em funcionamento, as luzes em volta do botao CLEAN piscam; Modo Limpeza: 0 robo esta em funcionamento, as luzes em volta do botao CLEAN estao ligadas.
  • Seite 120: Agendamento

    Funcionamento do Produto 3.Agendamento Pode agendar para deixar que o robo inicie a limpeza desde um determinado tempo. Nota: Lembre-se de ajustar a hara do rel6gio e agende assim que substituir a bateria do controlo remoto. Assim que a hara do rel6gio ajustada, qualquer agendamento que tenha definido fara o robo funcionar no tempo agendado.
  • Seite 121 Funcionamento do Produto 4.Modo Limpeza 1>. Limpeza automatica 0 rob6 limpara o espa90 automaticamente e ajustara a limpeza de acordo corn a situa9ao. Nota: Prima o botao CLEAN no rob6 ou no controlo remoto para iniciar a limpeza automatica. 2>. Limpeza local A.
  • Seite 122: Manuten�Ao Do Produto

    Manuten�ao do Produto 1.Limpeza das escovas laterais Limpe as escovas laterais quando ficarem sujas e substitua se estiverem danificadas. Nota: Antes de substituir as escovas laterais, verifique e combine a marca "L" "R" em ambos as lados da escova e no fundo do robe. 2.Limpeza do caixote do lixo e do filtro Limpe e esvazie o caixote do lixo depois de cada utilizac;ao, os passos sao apresentados nas imagens abaixo.
  • Seite 123: Limpeza Da Roda Frontal

    Manuten�ao do Produto 4. Limpeza da roda frontal Se houver lixo na roda frontal isso ira afectar a performance da limpeza, par favor efectue a limpeza de acordo corn as instrU<;oes em baixo: (1) Puxe a r o da pa ra cima ver i cal ment e e l i mpe. Ver i f i qu e sea junt a es t a cor r et a ment e r e t i r a da. (2) Deve ver i f i car sea junt a se encont r a cor r e t a ment e ins t a l a da de po is da l i mpeza.
  • Seite 124: Resolu�Ao De Problemas

    Resolu�ao de Problemas 1.Folha dos c6digos de erro Quando o robo cumpre corn alguns problemas de rotina, ele ira recorda-lo par bip. • Tom curto Solu�ao Causa • Rodas ou escovas laterais Verifique as rodas ou as sem funcionamento escovas laterais Limpe o sensor de queda e •...
  • Seite 125: Aparencia Dos Erros

    2.Aparencia dos erree Aparencia Causa provavel Solm;ao dos erros Limpo as rodas latorais do robe V3s Pro do cabelos ou sujidade. Empurre-as para dentro A roda lateral do robe Andar em e para forma , e confirme que elas giram...
  • Seite 126 Especificac;oes do Produto Item Detalhe Classificac;ao Diametro 306mm Mecanica Altura 76mm Especificac;oes 2.05kg Peso 14.4V/20W Voltagem/Potencia Eletrica Especificac;oes Especifica96es lao de litio 2600mAh da bateria Capacidade do 0.3 L caixote do lixo Carregamento automatico Tipo de carregamento Carregamento manual Automatico, Lugar, Ponta, Limpeza Modo Limpeza Agendamento Diario...

Inhaltsverzeichnis