TC Electronic DRIP SPRING REVERB Schnellstartanleitung
Retro spring reverb with adjustable dwell, mix and tone for sparkling reverb sound
Quicklinks
TC ELECTRONIC
DRIP SPRING REVERB
Retro Spring Reverb with Adjustable Dwell, Mix
and Tone for Sparkling Reverb Sound
Quick Start Guide
(4)
(3)
(1)
(2)
(EN)
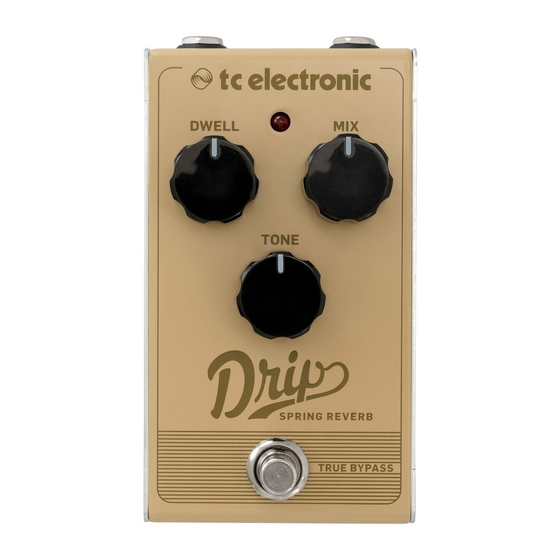
Controls
(1)
Input/Output jacks – Connect a ¼ " cable from your
guitar to the INPUT jack, and connect a cable from the
OUTPUT jack to your amplifi er.
(2)
9 V DC – Connect a 9 V power supply (not included).
(3)
Footswitch – Turns the eff ect on and off . The LED will
light when the pedal is engaged. The pedal operates in
true bypass when disengaged.
(4)
DWELL – Sets the decay length of the reverb.
(5)
MIX – Adjusts how much reverb is mixed with the
dry signal.
(6)
TONE – Adjusts the brightness of the reverb.
(ES)
Controles y conectores
(1)
Tomas de entrada/salida (Input/Output) – Conecte
un cable con clavijas de 6,3 mm desde su guitarra a la
toma INPUT y otro cable desde la toma OUTPUT
al amplifi cador.
(2)
9 V DC – Conecte un adaptador de corriente de
9 V (opcional).
(3)
Pedal (Footswitch) – Esto activa y desactiva el efecto.
El piloto se iluminará cuando el pedal esté activo.
Cuando no esté activo, este pedal ofrece un bypass real.
(4)
DWELL – Esto ajusta la longitud del decaimiento de
la reverb.
(5)
MIX – Este mando ajusta la cantidad de reverb que es
(5)
mezclada con la señal seca.
(6)
TONE – Esto ajusta el brillo de la reverb.
(6)
(FR)
Réglages et connecteurs
(1)
Entrée et sortie – Connectez un câble Jack 6,35 mm
entre votre guitare et l'entrée de la pédale. Connectez
également un câble entre la sortie de la pédale et
l'entrée de votre ampli.
(2)
9 V DC – Permet de connecter un adaptateur secteur
9 V (non fourni).
(3)
Contacteur au pied – Permet d'activer/de désactiver
l'eff et. La LED s'allume lorsque la pédale est activée.
Lorsque l'eff et est désactivé, la pédale fonctionne en
true bypass.
(4)
DWELL – Permet de régler la durée du déclin de
la reverb.
(5)
MIX – Permet de régler la quantité de reverb mélangée
au signal non traité.
(6)
TONE – Réglage de la brillance de la reverb.
(DE)
Regler und Anschlüsse
(1)
Eingangs-/Ausgangsbuchsen – Schließen Sie das
6,3 mm-Kabel Ihrer Gitarre an die INPUT-Buchse an und
verbinden Sie die OUTPUT-Buchse über ein weiteres
Kabel mit Ihrem Verstärker.
(2)
9 V DC – Schließen Sie hier einen optionalen
9 V Netzadapter an.
(3)
Fußschalter – Schaltet den Eff ekt ein und aus. Bei
aktiviertem Pedal leuchtet die LED. Bei deaktiviertem
Pedal wird das Signal vollständig am Pedal
vorbeigeführt (echter Bypass).
(4)
DWELL – Regelt die Decay-Länge des Reverbs.
(5)
MIX – Regelt, wieviel Reverb dem trockenen Signal
beigemischt wird.
(6)
TONE – Regelt die Helligkeit des Reverbs.
(PT)
Controles e Conectores
(1)
Jacks Input/Output – Conecte um cabo de ¼ " da
sua guitarra ao jack INPUT, e conecte um cabo do jack
OUTPUT ao seu amplifi cador.
(2)
9 V DC – Conecte uma fonte de alimentação de
9 V (não inclusa).
(3)
Footswitch – Liga e desliga o efeito. O LED acenderá
quando o pedal estiver ativado. O pedal opera em true
bypass quando desativado.
(4)
DWELL – Ajusta a duração do decaimento da
reverberação.
(5)
MIX – Ajusta o quanto da reverberação é mixada ao
sinal seco.
(6)
TONE – Ajusta o brilho da reverberação.
(JP)
コントロール類およびコネクター類
(1)
Input/Output
(入力/出力) ジャック
ケーブルを使って、 ギターを入力
(OUTPUT)
クに接続し、 出力
ジャックとお使いの
アンプリファーを接続します。
(2)
9 V DC ‒ 9 V
パワーサプライ (別売) を接続し
ます。
(3)
Footswitch
(フットスイッチ) ‒ エフェクトのオ
ン / オフをおこないます。 ペダルの有効時は
LED
が点灯します。 ペダルの無効時はトゥルー
バイパスとなります。
(4)
DWELL
(ドウェル) ‒ リバーブの減衰時間の長さ
を設定します。
(5)
MIX
(ミックス) ‒ ドライ信号にミックスするリバ
ーブの量を調節します。
(6)
TONE
(トーン) ‒リバーブのブライトネスを調
節します。
(CN)
(1)
Input/Output
–
OUTPUT
(2)
9 V DC –
9 V
(3)
Footswitch
–
LED
(4)
DWELL –
(5)
MIX –
(6)
TONE –
–
¼ インチ
(INPUT)
ジャッ
¼ "
INPUT

Verwandte Anleitungen für TC Electronic DRIP SPRING REVERB


Inhaltszusammenfassung für TC Electronic DRIP SPRING REVERB
- Seite 1 (ES) (PT) Controles y conectores Controles e Conectores DRIP SPRING REVERB Tomas de entrada/salida (Input/Output) – Conecte Jacks Input/Output – Conecte um cabo de ¼ " da un cable con clavijas de 6,3 mm desde su guitarra a la sua guitarra ao jack INPUT, e conecte um cabo do jack...
- Seite 2 KLARK TEKNIK, LAB GRUPPEN, LAKE, TANNOY, TURBOSOUND, persona por confi ar total o parcialmente en la descripciones, TC ELECTRONIC, TC HELICON, BEHRINGER, BUGERA, COOLAUDIO e fotografías o afi rmaciones contenidas en este documento. EUROCOM são marcas ou marcas registradas do MUSIC Group IP Ltd.