Herunterladen Diese Seite drucken

Werbung

Verfügbare Sprachen
  • DE

Verfügbare Sprachen

  • DEUTSCH, seite 1
TFA_No. 35.1126_Anleit_08_16
08.08.2016
14:22 Uhr
Seite 1
Bedienungsanleitung
Instruction manual
Mode d'emploi
Istruzioni per l'uso
Gebruiksaanwijzing
Instrucciones de uso
RoHS
Kat. Nr. 35.1126

Werbung

loading

Inhaltszusammenfassung für TFA 35.1126

  • Seite 1 TFA_No. 35.1126_Anleit_08_16 08.08.2016 14:22 Uhr Seite 1 Bedienungsanleitung Instruction manual Mode d'emploi Istruzioni per l'uso Gebruiksaanwijzing Instrucciones de uso RoHS Kat. Nr. 35.1126...
  • Seite 2 TFA_No. 35.1126_Anleit_08_16 08.08.2016 14:22 Uhr Seite 2 Fig. 1 Fig. 2 B 11 B 10...
  • Seite 3 Seite 3 GALLERY – Funk-Wetterstation GALLERY – Funk-Wetterstation Vielen Dank, dass Sie sich für dieses Gerät aus dem Hause TFA entschieden haben. • Verbinden Sie erst das Kabel mit dem Basisgerät und stecken Sie dann den Netzstecker in die Steckdose.
  • Seite 4 TFA_No. 35.1126_Anleit_08_16 08.08.2016 14:22 Uhr Seite 4 GALLERY – Funk-Wetterstation GALLERY – Funk-Wetterstation C: Gehäuse (Fig. 2): • Drücken Sie die TX Taste im Batteriefach des Außensenders. • Sobald die Basisstation die Außenwerte empfangen hat, werden die Werte dauerhaft ange- C 1: Wandaufhängung zeigt.
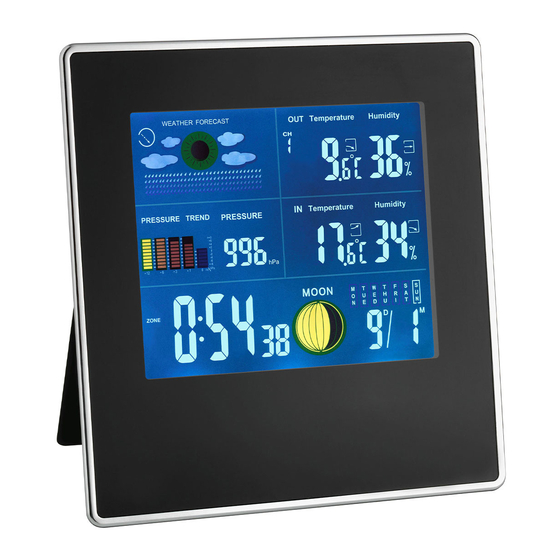
  • Seite 5 TFA_No. 35.1126_Anleit_08_16 08.08.2016 14:22 Uhr Seite 5 GALLERY – Funk-Wetterstation GALLERY – Funk-Wetterstation 7.4 Aktivieren/Beenden der Weckalarme • Die Vorhersage über die Symbolanzeige bezieht sich auf einen Zeitraum von 6 – 12 Stunden und gibt lediglich einen Wettertrend an. Ist es zum Beispiel im Moment wolkig und es wird Regen •...
  • Seite 6: Fehlerbeseitigung

    Batterien und Akkus dürfen keinesfalls in den Hausmüll! Als Verbraucher sind Sie gesetzlich verpflichtet, gebrauchte Batterien und Akkus zur Diese Anleitung oder Auszüge daraus dürfen nur mit Zustimmung von TFA Dostmann veröffentlicht werden. Die technischen Daten entsprechen dem Stand bei Drucklegung und können ohne vorherige Benachrichtigung geän- umweltgerechten Entsorgung beim Handel oder entsprechenden Sammelstellen dert werden.
  • Seite 7 GALLERY – Wireless weather station GALLERY – Wireless weather station Thank you for choosing this instrument from TFA. • First connect the lead to the instrument and then insert the mains plug into the socket. • Do not pull the plug out of the socket by its lead.
  • Seite 8 TFA_No. 35.1126_Anleit_08_16 08.08.2016 14:22 Uhr Seite 8 GALLERY – Wireless weather station GALLERY – Wireless weather station D: Outdoor transmitter (Fig. 1): 6.4 Backlight Buttons (in the battery compartment): • Attention: The display light in continuous operation only works with power adapter. •...
  • Seite 9 TFA_No. 35.1126_Anleit_08_16 08.08.2016 14:22 Uhr Seite 9 GALLERY – Wireless weather station GALLERY – Wireless weather station 8. Temperature and humidity 10. Moon phase 8.1 Temperature display • The moon phase of each day is shown on the LCD: • Press and hold the MAX/MIN button to change between °C (Celsius) or °F (Fahrenheit) as tem- perature unit.
  • Seite 10: Troubleshooting

    Resolution: Tolerance: ±5 % No part of this manual may be reproduced without written consent of TFA Dostmann. The technical data are cor- rect at the time of going to print and may change without prior notice. Atmospheric pressure: 800 … 1100 hPa The latest technical data and information about your product can be found by entering your product number on our homepage.
  • Seite 11 GALLERY – Station météo radio-pilotée GALLERY – Station météo radio-pilotée Nous vous remercions d'avoir choisi l'appareil de la Société TFA. • Commencez par brancher le câble à l'unité de base, puis le cordon d'alimentation dans la prise. • Pour débrancher, tirez sur la fiche et non sur le cordon de la prise.
  • Seite 12 TFA_No. 35.1126_Anleit_08_16 08.08.2016 14:22 Uhr Seite 12 GALLERY – Station météo radio-pilotée GALLERY – Station météo radio-pilotée C: Boîtier (Fig. 2): 6.3 Insertion des piles dans la station de base C 1: Œillet de suspension • Ouvrez le compartiment à piles au revers de la station de base. C 2: Compartiment à...
  • Seite 13 TFA_No. 35.1126_Anleit_08_16 08.08.2016 14:22 Uhr Seite 13 GALLERY – Station météo radio-pilotée GALLERY – Station météo radio-pilotée • Appuyez sur une touche de votre choix pour déclencher la fonction d’alarme. 9.3 Pression atmosphérique relative (voir: Ajustement de la pression atmosphérique relative) •...
  • Seite 14: Dépannage

    Déclaration UE de conformité Température: -10 °C…+50 °C (+14 °F…+122 °F) Le soussigné, TFA Dostmann, déclare que l'équipement radioélectrique du type 35.1126 est conforme à la directive Résolution: 0,1 °C 2014/53/UE. Le texte complet de la déclaration UE de conformité est disponible à l'adresse internet suivante: Humidité:...
  • Seite 15 Seite 15 GALLERY – Stazione meteo radiocontrollata GALLERY – Stazione meteo radiocontrollata Vi ringraziamo per aver scelto l'apparecchio della TFA. • Collegare prima il cavo all’unità centrale e successivamente inserire la spina nella presa di cor- rente. 1. Prima di utilizzare l'apparecchio •...
  • Seite 16 TFA_No. 35.1126_Anleit_08_16 08.08.2016 14:22 Uhr Seite 16 GALLERY – Stazione meteo radiocontrollata GALLERY – Stazione meteo radiocontrollata C: Struttura esterna (Fig. 2): • Sul display dei valori esterni lampeggia “---”. • Premete il tasto TX nel vano batteria del trasmettitore. C 1: Montaggio a parete •...
  • Seite 17 TFA_No. 35.1126_Anleit_08_16 08.08.2016 14:22 Uhr Seite 17 GALLERY – Stazione meteo radiocontrollata GALLERY – Stazione meteo radiocontrollata 7.4 Attivare/disattivare i allarmi • La previsione tramite l'indicazione del simbolo si riferisce ad un periodo di tempo di 6 – 12 ore e indica solo una tendenza atmosferica.
  • Seite 18 È vietata la pubblicazione delle presenti istruzioni o di parti di esse senza una precedente autorizzazione della TFA nazionali o locali, ai fini di uno smaltimento ecologico.
  • Seite 19 GALLERY – Radiografisch weerstation GALLERY – Radiografisch weerstation Hartelijk dank dat u voor dit apparaat van de firma TFA hebt gekozen. • Gebruik uitsluitend de bijbehorende netvoeding. • Sluit eerst de kabel op het basisapparaat aan, steek daarna de stekker in het stopcontact.
  • Seite 20 TFA_No. 35.1126_Anleit_08_16 08.08.2016 14:22 Uhr Seite 20 GALLERY – Radiografisch weerstation GALLERY – Radiografisch weerstation D: Buitenzender (Fig. 1): 6.3 Plaatsen van de batterijen in het basisapparaat • Open het batterijvak aan de achterkant van het basisapparaat. Toetsen (in het batterijvak): •...
  • Seite 21 TFA_No. 35.1126_Anleit_08_16 08.08.2016 14:22 Uhr Seite 21 GALLERY – Radiografisch weerstation GALLERY – Radiografisch weerstation • Het alarm kunt u met een willekeurige toets beëindigen. 9.2 Trendpijl • Om de snooze functie te activeren drukt u op de SNZ toets. •...
  • Seite 22 16. Technische gegevens EU-conformiteitsverklaring Basisapparaat: Hierbij verklaar ik, TFA Dostmann, dat het type radioapparatuur 35.1126 conform is met Richtlijn 2014/53/EU. De volledige tekst van de EU-conformiteitsverklaring kan worden geraadpleegd op het volgende internetadres: Meetbereik binnen www.tfa-dostmann.de Temperatuur: -10 °C…+50 °C (+14 °F…+122 °F)
  • Seite 23 GALLERY – Estación meteorológica radiocontrolada GALLERY – Estación meteorológica radiocontrolada Muchas gracias por haber adquirido este dispositivo de TFA. • Utilice únicamente la fuente de alimentación suministrada. • Conecte primero el enchufe de alimentación de red con el dispositivo base y inserte después el 1.
  • Seite 24 TFA_No. 35.1126_Anleit_08_16 08.08.2016 14:22 Uhr Seite 24 GALLERY – Estación meteorológica radiocontrolada GALLERY – Estación meteorológica radiocontrolada C: Cuerpo (Fig. 2): 6.3 Introducir las pilas de la estación básica C 1: Colgador para pared • Abra el compartimiento de las pilas en la parte posterior de la estación básica. •...
  • Seite 25 TFA_No. 35.1126_Anleit_08_16 08.08.2016 14:22 Uhr Seite 25 GALLERY – Estación meteorológica radiocontrolada GALLERY – Estación meteorológica radiocontrolada • Cuando se consigue la hora de la alarma, suena un tono de alarma y la frecuencia y volumen se 9.3 Atmosférica relativa (vea: Confirmación de la presión atmosférica relativa) aumentan lentamente.
  • Seite 26 Estas instrucciones o extractos de las mismas no pueden ser publicados sin la autorización de la TFA Dostmann. Los 16. Datos técnicos datos técnicos de este producto corresponden al estado en el momento de la impresión y pueden ser modificados...