Herunterladen Inhalt Inhalt Diese Seite drucken

Werbung

Verfügbare Sprachen
  • DE

Verfügbare Sprachen

  • DEUTSCH, seite 15
Multilink
User Guide
使用说明
使用說明
Bedienungsanleitung
Guía de usuario
Guide de l'utilisateur
Guida dell'utente
Gebruiksaanwijzing
Manual do utilizador
V1.0
2018.08

Werbung

Inhaltsverzeichnis
loading

Inhaltszusammenfassung für DJI Multilink

  • Seite 1 Multilink User Guide 使用说明 使用說明 Bedienungsanleitung Guía de usuario Guide de l'utilisateur Guida dell'utente Gebruiksaanwijzing Manual do utilizador V1.0 2018.08...
  • Seite 2 Contents User Guide 使用说明 使用說明 Bedienungsanleitung Guía de usuario Guide de l'utilisateur Guida dell'utente Gebruiksaanwijzing PT-PT Manual do utilizador Compliance Information...
  • Seite 3: Disclaimer And Warning

    Failure to read and follow instructions and warnings in this document may result in serious injury to yourself or others, damage to your DJI product, or damage to other objects in the vicinity. This document and all other collateral documents are subject to change at the sole discretion of DJI.
  • Seite 4: Installation And Connection

    The steps provided below use the Cendence as an example. 1. Mount the Multilink module onto the back of the remote controller and tighten the locking knob to secure it. 2. Connect the CAN cable to the remote controller’s CAN port.
  • Seite 5 2. Set the Multilink as slave remote controller using the Remote Controller Setting page in DJI GO 4 app. Determine which role you would like to assign to the slave, and then select the desired role in DJI GO 4 app. At this time, the Status Indicator of the Multilink will light up steady purple.
  • Seite 6: Status Indicator

    2.5 ms (5.8 GHz) / 3.7 ms (2.4 GHz) (From Master to Slave 1) Operation Environment Temperature -22° to 104° F (-30° to 40° C) DJI Focus Inspire 2 GPS module for the Compatible DJI Devices remote controller Patch Antenna Status Indicator Indicator Description Disconnected;...
  • Seite 7 即使存在上述规定,消费者权益依然受当地法律法规所保障,并不受本免责声明 影响。 DJI 是深圳市大疆创新科技有限公司及其关联公司的商标。 本文出现的产品名称、 品牌等,均为其所属公司的商标或注册商标。本产品及手册为大疆创新版权所有。 未经许可,不得以任何形式复制翻印。 产品说明 简  介 Multilink 可配合 INSPIRE 2 普通遥控器与专业遥控器 CENDENCE 使用,组 成一主三从的多从机网络。多从机采用星形网络形式,使用主机做传输中枢,将 各从机的指令再发到飞行器,各从机的图像信号直接从飞行器天空端获取。 特  性 • 一主三从:主机 - 飞控手 (Pilot) , 从机三个机位分别为从机 1- 云台手 (Gimbal Operator)、从机 2- 助理 A(Assistant A)和从机 3- 助理 B(Assistant B)。...
  • Seite 8 CAN 线 天线 普通遥控器安装孔 旋紧旋钮 锁紧扣 专业遥控器安装孔 使  用 安装连线 Multilink 可安装到 Inspire 2 普通遥控器与专业遥控器 Cendence,需要通过不同 的安装孔来固定,安装步骤相似,下面以 Cendence 为例进行示意。 1. 安装 Multilink 锁紧扣到遥控器提手上,拧紧旋紧旋钮固定。 2. 连接 CAN 线到遥控器 CAN 口。 如果使用平板天线,则可以连到平板天线的 CAN 口,并确保平板天线已 正确连接专业遥控器。 设  置 请根据以下步骤分别设置各个 Multilink 模块为主机或者从机,从机分为云台手 / 助理 A/ 助理 B 三个机位。...
  • Seite 9 。 5. 若已连接的某个从机位置想要切换到另一个位置,可以进入遥控器主从机设置 中点击切换。 使用说明 1. 主机拥有云台控制权,相机控制,飞行和视觉等功能的控制权。 2. 云台手拥有云台控制权和相机控制权。 3. 助理 A 和助理 B 只有相机控制权(可以通过遥控器设置禁用相机控制权)。 升级只需要将 Multilink 连接上遥控器及 DJI GO 4 App,根据 DJI GO 4 • App 的提示进行升级即可。 Multilink 上的 CAN 口可以用于连接其它 DJI CAN 口的设备。 • • 配合平板天线使用可发挥最大工作效益。 插拔 Multilink 都会伴随“嘀嘀”的提示音。...
  • Seite 10 状态指示灯 指示灯 描述 红灯常亮 主机状态下,未连接 紫灯常亮 从机状态下,未连接 绿灯常亮 已连接 白灯常亮 进入升级状态 蓝灯闪烁 通信状态错误 当前遥控器版本不匹配 / 遥控器未初始化 / 硬件故障 灯灭...
  • Seite 11 免責聲明 感謝您購買 DJI 產品。本文所提及的內容關係到您的安全及合法權益與責任。 使用本產品之前,請仔細閱讀本文以確保已對產品進行正確的設定。若未遵循及 未按照本文的說明與警告來操作,可能會對您和周圍的人造成傷害,損壞本產品 或其它鄰近的物品。本文件及本產品所有相關文件的最終解釋權歸大疆 創新 (DJI) 所有。如有更新,恕不另行通知。請前往 www.dji.com 官方網站以獲取最 新的產品資訊。 一旦使用本產品,即視為您已經仔細閱讀免責聲明與警告,理解、認可和接受本 聲明全部條款和內容。您承諾對使用本產品及可能帶來的後果負全部責任。您承 諾僅出於正當目的使用本產品,並且同意本條款以及大疆創新 (DJI) 制定的任何 相關條例、政策和指南。 大疆創新 (DJI) 對於直接或間接使用本產品而造成的損壞、傷害及任何法律責任 概不負責。使用者應遵循包括但不限於本文提及的所有安全指南。 即使存在上述規定,消費者權益依然受當地法律法規所保障,並不受本免責聲明 影響。 DJI 是深圳市大疆創新科技有限公司及其附屬公司的商標。本文出現的產品名稱、 品牌等,均為其所屬公司的商標或註冊商標。本產品及手冊之版權為大疆創新所 有。未經許可,不得以任何形式複製翻印。 産品說明 簡介 Multilink 可配合 INSPIRE 2 普通遙控器與專業遙控器 CENDENCE 使用,組 成一主三從的多從機網路。多從機採用星形網路形式,以主機做為傳輸中樞,將 各從機的指令再發到航拍機,各從機的影像訊號直接從航拍機天空端獲取。...
  • Seite 12 CAN 纜線 天線 普通遙控器安裝孔 旋緊旋鈕 鎖緊扣 專業遙控器安裝孔 使用 安裝連線 Multilink 可安裝到 Inspire 2 普通遙控器與專業遙控器 Cendence,需要透過不同 的安裝孔來進行固定,安裝步驟相似,下面以 Cendence 為例進行示範。 1. 安裝 Multilink,將其鎖緊扣到遙控器把手上,擰緊旋緊旋鈕加以固定。 2. 連接 CAN 纜線到遙控器 CAN 連接埠。 如果使用平板天線,則可以連到平板天線的 CAN 連接埠,並確保平板天 線已正確連接至專業遙控器。 設定 請根據以下步驟分別設定各個 Multilink 模組為主機或從機,從機分為雲台手 / 助 理 A/ 助理 B 三個機位。...
  • Seite 13 5. 若已連接的某個從機位置想要切換為另一個位置,可以進入遙控器主從機設定 中點選切換。 使用說明 1. 主機擁有雲台控制權、相機控制、飛行和視覺等功能的控制權。 2. 雲台手擁有雲台控制權和相機控制權。 3. 助理 A 和助理 B 只有相機控制權 ( 可以通過遙控器設定禁用相機控制權 )。 若要升級,只需將 Multilink 連接上遙控器及 DJI GO 4 App,根據 DJI • GO 4 App 的提示即可進行升級。 Multilink 上的 CAN 連接埠可以用於連接其它 DJI CAN 連接埠的裝置。 • • 配合平板天線使用可發揮最大工作效益。...
  • Seite 14 狀態指示燈 指示燈 說明 恆亮紅燈 處於主機狀態,未連接 恆亮紫燈 處於從機狀態,未連接 恆亮綠燈 已連接 恆亮白燈 進入升級狀態 閃爍藍燈 通訊狀態錯誤 目前的遙控器版本不相符 / 遙控器未初始化 / 硬體故障 燈號熄滅...
  • Seite 15: Haftungsausschluss Und Warnhinweis

    Unbeschadet des weiter oben gesagten werden ihre gesetzlichen Rechte unter der anwendbaren nationalen Gesetzgebung nicht durch diesen Haftungsausschluss berührt. DJI ist eine Marke der SZ DJI TECHNOLOGY CO., LTD. (kurz DJI) und seiner verbundenen Unternehmen. Namen von Produkten, Marken, usw., die in diesem Dokument enthalten sind, sind Warenzeichen oder eingetragene Warenzeichen der jeweiligen Besitzer.
  • Seite 16: Eigenschaften

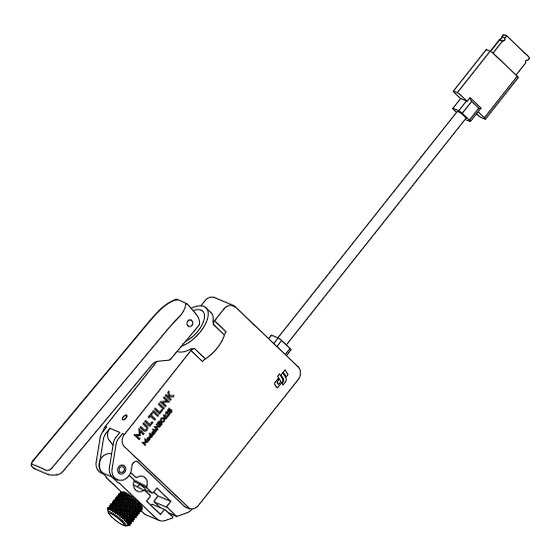
    Cendence – Halterung für Fernsteuerung Verwendung Montage und Anschluss Multilink kann auf Fernsteuerungen der Serien Inspire 2 und Cendence montiert werden, da am Befestigungsarm verschiedene Bohrungen vorhanden sind. Die Installationsschritte sind ansonsten ähnlich. Die nachstehend aufgeführten Schritte gelten für die Cendence.
  • Seite 17: Zuweisen Von Rollen

    1. Schalten Sie die Fernsteuerung ein. Stellen Sie sicher, dass Multilink richtig angeschlossen ist. 2. Legen Sie über die Einstellungsseite für die Fernsteuerung in der „DJI GO 4“-App Multilink als Slave-Fernsteuerung fest. Bestimmen Sie, welche Rolle Sie der Slave zuweisen möchten, und wählen Sie dann die gewünschte Rolle in der „DJI GO 4“- App.
  • Seite 18: Anhang

    7,5 ms (5,8 GHz)/11,1 ms (2,4 GHz) (von Master zu Slave 3) Minimale Verzögerung 2,5 ms (5,8 GHz)/3,7 ms (2,4 GHz) (von Master zu Slave 1) Umgebungstemperatur im Betrieb -30 ° bis 40 °C DJI Focus Inspire 2-GPS-Modul für die Kompatible DJI-Geräte Fernsteuerung Zusatzantenne Statusleuchte Anzeige...
  • Seite 19: Renuncia De Responsabilidad Y Advertencia

    DJI u otros objetos en las proximidades. Este documento y el resto de documentos colaterales están sujetos a cambios a entera discreción de DJI.
  • Seite 20: Descripción General

    Puerto para el control remoto Cendence Instalación y conexión El dispositivo Multilink se puede instalar en el control remoto del Inspire 2 y en el modelo Cendence mediante los distintos puertos del brazo de montaje. Los pasos de instalación son similares. En los pasos que se indican a continuación se usa el control remoto Cendence como ejemplo.
  • Seite 21 DJI GO 3. Establezca una contraseña de acceso. Control remoto esclavo 1. Encienda el control remoto. Asegúrese de que el dispositivo Multilink se ha conectado correctamente. 2. Establezca el dispositivo Multilink como control remoto esclavo mediante las instrucciones de la página de configuración del control remoto de la aplicación DJI GO 4.
  • Seite 22: Indicador De Estado

    2,5 ms (5,8 GHz) / 3,7 ms (2,4 GHz) (de maestro a esclavo 1) Temperatura de funcionamiento De -30 °C a 40 °C (de -22 °F a 104 °F) Módulo GPS DJI Focus Dispositivos DJI compatibles para el control remoto del Inspire 2 Antena auxiliar...
  • Seite 23: Clause D'exclusion De Responsabilité Et Mise En Garde

    DJI est une marque commerciale de SZ DJI TECHNOLOGY CO., LTD. (abrégée en « DJI ») et de ses sociétés affiliées. Les noms de produits, de marques, etc., apparaissant dans le présent document sont des marques commerciales ou des marques déposées de leurs détenteurs respectifs.
  • Seite 24: Vue D'ensemble

    Les étapes indiquées ci-dessous prennent la radiocommande Cendence comme exemple. 1. Fixez le module Multilink sur l'arrière de la radiocommande et serrez le bouton de verrouillage pour le fixer. 2. Connectez le câble CAN au port CAN de la radiocommande.
  • Seite 25 • Le port CAN du dispositif Multilink peut être connecté à d'autres dispositifs DJI intégrant un port CAN. • Pour de meilleurs résultats, utilisez le dispositif Multilink avec une antenne patch. • Le dispositif Multilink émet un bip sonore à chaque fois qu'il est connecté ou déconnecté.
  • Seite 26: Caractéristiques Techniques

    2,5 ms (5,8 GHz) / 3,7 ms (2,4 GHz) secondaire 1) Température de l'environnement de -30 à 40 °C (-22 à 104 °F) fonctionnement DJI Focus Module GPS Inspire 2 pour la Produits DJI compatibles radiocommande Antenne patch Voyant d'état Indicateur Description Rouge fixe Déconnecté.
  • Seite 27: Profilo Del Prodotto

    DJI o causare danni a oggetti che si trovano in prossimità. Il presente documento e tutti i documenti complementari sono soggetti a modifiche a esclusiva discrezione di DJI.
  • Seite 28: Installazione E Collegamento

    Le fasi riportate di seguito utilizzare come esempio il dispositivo di controllo Cendence. 1. Montare il modulo Multilink sul retro del dispositivo di controllo remoto e serrare la manopola di bloccaggio per fissarlo.
  • Seite 29 DJI GO4. Determinare il ruolo che si desidera assegnare allo Slave, quindi scegliere il ruolo desiderato nell'app DJI GO4. A questo punto, la spia di stato del Multilink si accenderà di colore viola fisso.
  • Seite 30: Caratteristiche Tecniche

    (Da Master a Slave 1) Temperatura ambiente di funzionamento Da -30 °C a 40 °C (da -22 °F a 104 °F) DJI Focus Modulo GPS Inspire 2 per il Dispositivi DJI compatibili dispositivo di controllo remoto Antenna a microstriscia Indicatore di stato Indicatore Descrizione Scollegato;...
  • Seite 31: Disclaimer En Waarschuwing

    DJI-product of schade aan andere objecten in de omgeving. Dit document en alle overige documentatie zijn onderhevig aan veranderingen naar goeddunken van DJI.
  • Seite 32: Overzicht

    De montage-instructies zijn voor beide gelijk. In de onderstaande stappen wordt de Cendence als voorbeeld gebruikt. 1. Bevestig de Multilink-module op de achterkant van de afstandsbediening en draai de vergrendelknop vast. 2. Sluit de CAN-kabel aan op de CAN-poort van de afstandsbediening.
  • Seite 33 3. Met slave 2 en 3 kun je alleen de camera bedienen (kan worden uitgeschakeld op de instellingenpagina Remote (afstandsbediening). • Firmware kan worden bijgewerkt met de DJI GO 4-app door de Multilink aan te sluiten op de afstandsbediening. • De CAN-poort op de Multilink kan op de CAN-poort van andere DJI- apparaten worden aangesloten.
  • Seite 34 (Van master naar slave 3) Minimale vertraging 2,5 ms (5,8 GHz) / 3,7 ms (2,4 GHz) (Van master naar slave 1) Omgevingstemperatuur bij bedrijf -30° tot 40°C (-22° tot 104°F) DJI Focus Inspire 2 GPS-module voor de Compatibele DJI-apparaten afstandsbediening Patch-antenne Statusindicator...
  • Seite 35 DJI ou em danos noutros objetos que se encontrem nas proximidades. Este e todos os outros documentos de garantia estão sujeitos a alteração ao critério exclusivo da DJI TECHNOLOGY CO., LTD.
  • Seite 36: Visão Geral

    Os passos de instalação são semelhantes. Os passos apresentados abaixo utilizam o telecomando Cendence como exemplo. 1. Monte o módulo Multilink na parte traseira do telecomando e aperte o manípulo de bloqueio para fixá-lo.
  • Seite 37 • As atualizações de firmware podem ser geridas na aplicação DJI GO 4 ao ligar o Multilink ao telecomando. • A porta CAN do Multilink pode ser ligada a outros dispositivos DJI com uma porta CAN. • Para obter os melhores resultados, utilize o Multilink juntamente com uma antena de correção.
  • Seite 38: Especificações

    2,5 ms (5,8 GHz) / 3,7 ms (2,4 GHz) secundário 1) Temperatura ambiente de funcionamento -30° a 40 °C (-22° a 104 °F) DJI Focus Módulo GPS Inspire 2 para o Dispositivos DJI compatíveis telecomando Antena de correção Indicador de estado Indicador Descrição Vermelho fixo Desligado;...
  • Seite 39: Compliance Information

    Compliance Information FCC Compliance Notice Changes or modifications not expressly approved by the party responsible for compliance could void the user’s authority to operate the equipment. This device complies with Part 15 of the FCC Rules. Operation is subject to the following two conditions: (1) this device may not cause harmful interference, and (2) this device must accept any interference received, including interference that may cause undesired operation.
  • Seite 40 Directive 2014/53/EU. A copy of the EU Declaration of Conformity is available online at www.dji.com/euro- compliance EU contact address: DJI GmbH, Industriestrasse 12, 97618, Niederlauer, Germany Declaración de cumplimiento UE: SZ DJI TECHNOLOGY CO., LTD.
  • Seite 41: Environmentally-Friendly Disposal

    2014/53/EU. Une copie de la déclaration de conformité UE est disponible sur le site www.dji.com/ euro-compliance Adresse de contact pour l'UE : DJI GmbH, Industriestrasse. 12, 97618, Niederlauer, Germany EU-Compliance: Hiermit erklärt SZ DJI TECHNOLOGY CO., LTD., dass dieses Gerät...
  • Seite 42 Mexico Warning message “La operación de este equipo está sujeta a las siguientes dos condiciones: (1) es posible que este equipo o dispositivo no cause interferencia perjudicial y (2) este equipo o dispositivo debe aceptar cualquier interferencia, incluyendo la que pueda causar su operación no deseada.”...
  • Seite 43 Servicio de asistencia de DJI Service client DJI Assistenza DJI DJI-ondersteuning Assistência da DJI http://www.dji.com/support If you have any questions about this document, please contact DJI by sending a message to DocSupport@dji.com. 如果您对说明书有任何疑问或建议,请通过以下电子邮箱联系 我们:DocSupport@dji.com。 Designed by DJI. Printed in China. YC.BZ.SS000387.02...

Inhaltsverzeichnis