Herunterladen Inhalt Inhalt Diese Seite drucken

Werbung

Verfügbare Sprachen
  • DE

Verfügbare Sprachen

  • DEUTSCH, seite 1
WT546 Bedienungsanleitung
Produktaufbau
DE1

Werbung

Inhaltsverzeichnis
loading

Inhaltszusammenfassung für Technoline WT546

  • Seite 1 WT546 Bedienungsanleitung Produktaufbau...
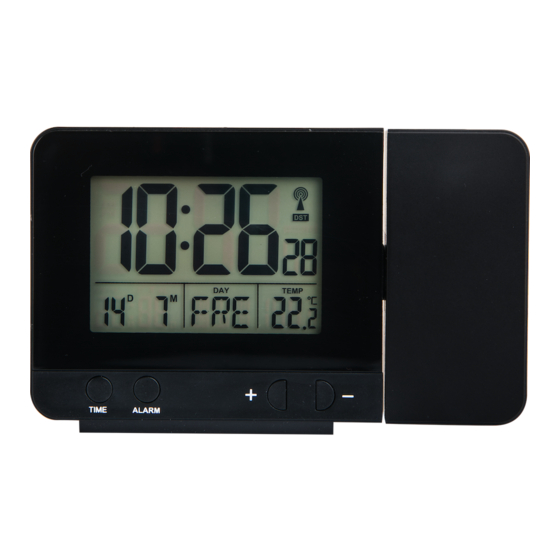
  • Seite 2 Teil A – LCD-Anzeige und vordere Tasten A1: Uhrzeit A2: Datum A3: Wochentag A4: “Time” Taste A5: “Alarm” Taste A6: “+” Taste A7: “-“ Taste A8: Innentemperatur A9: Innenluftfeuchte A10: Funksignalsymbol...
  • Seite 3 Teil B – Hintere Tasten und Stromversorgung B1: Projektionsschalter (ON/OFF) B2: Projektionsrotationstaste B3: “Wave” Taste B4: Stromanschluss B5: Batteriefach Teil C – Obere Taste C1: Snooze/light-Taste C2: Projektionsfenster Teil D – seitliche Taste D1: Alarm 1 On/Off Schalter D2: Alarm 2 On/Off Schalter Funktionen: ...
  • Seite 4  Projektion der Uhrzeit  Datums- und Wochentagsanzeige (7 Sprachen)  Temperatur alternativ in °C oder °F  Alarm und automatische Snooze-Funktion  Innenmessbereich: -9.9°C ~ 49.9°C  Stromversorgung: DC-Netzteil (enthalten), 2 x Batterie 1.5V “AAA” LR03 (nicht enthalten) Umwelteinflüsse auf Funkempfang Die Uhr empfängt kabellos die genaue Uhrzeit.
  • Seite 5: Vorsichtsmaßnahmen

    Platzieren Sie die Uhr an einem Ort mit optimalem Empfang, z.B. in der Nähe von Fenstern und entfernt zu metallischen oder elektrischen Gegenständen. Vorsichtsmaßnahmen  Dieses Gerät ist ausschließlich für den Gebrauch in Innenräumen gedacht.  Setzen Sie das Gerät nicht extremer Gewalteinwirkung oder Stößen aus.
  • Seite 6  Legen Sie die Batterien unter Beachtung der Polarität (+/-) richtig ein.  Ersetzen Sie stets einen vollständigen Batteriesatz.  Mischen Sie niemals alte und neue Batterien.  Entfernen Sie erschöpfte Batterien sofort.  Entfernen Sie die Batterien bei Nichtnutzung. ...
  • Seite 7 Hinweispflicht nach dem Batteriegesetz Altbatterien gehören nicht in den Hausmüll. Wenn Batterien in die Umwelt gelangen, können diese Umwelt- und Gesundheitsschäden zur Folge haben. Sie können gebrauchte Batterien unentgeltlich bei ihrem Händler und Sammelstellen zurückgeben. Sie sind als Verbraucher zur Rückgabe von Altbatterien gesetzlich verpflichtet! Hinweispflicht nach dem Elektronikgerätegesetz Laut Elektro- und Elektronikgerätegesetz...
  • Seite 8  Legen Sie 2 x AAA Batterien unter Berücksichtigung der richtigen Polarität [ “+” und “ –“ Markierungen] ein.  Beim Einlegen der Batterien blinken alle Symbole für 3 Sekunden auf der Anzeige auf, ein Klingelton ist zu hören und die Uhr zeigt die Innentemperatur an. ...
  • Seite 9 Hintergrundbeleuchtung und Projektionsfunktion Batteriebetrieb  Drücken Sie die “SNOOZE/LIGHT” Taste um die Hintergrundbeleuchtung und die Projektion für 8 Sekunden zu aktivieren (mit Projektionsschalter auf der “ON” Position) DC-Netzbetrieb  Drücken Sie während des Netzbetriebs die “SNOOZE/LIGHT” Taste um zwischen hoher, geringer oder keiner Helligkeit der Hintergrundbeleuchtung zu wählen.
  • Seite 10: Empfang Des Funksignals

    Hinweis:  Die Projektionsreichweite beträgt 2 Meter. Empfang des Funksignals  Nach dem Einlegen der Batterien oder nach einem Neustart beginnt die Uhr automatisch nach dem DCF77-Funksignal zu suchen. Das Funkmast-Symbol blinkt auf.  Um 1:00, 2:00 und 3:00 Uhr beginnt die Uhr automatisch das DCF77-Funksignal zu suchen und die Uhrzeit zu synchronisieren.
  • Seite 11 Funkmast-Symbol verschwindet), wird die Uhr automatisch zur nächsten vollen Stunde eine weitere Synchronisation starten. Dieser Prozess wird automatisch bis zu 5 Mal wiederholt.  Halten Sie die “WAVE” Taste für 2 Sekunden gedrückt um die manuelle Signalsuche zu beginnen. Die Signalsuche wird nach 7 Minuten ohne Signalempfang beendet (das Funkmast-Symbol verschwindet) und ein weiterer Versuch wird zur nächsten vollen Stunde durchgeführt.
  • Seite 12: Manuelle Zeiteinstellung

     Der Funkempfang ist schwächer in Innenräumen mit Betonwänden. In solchen Umgebungen sollte die Uhr in der Nähe eines Fensters aufgestellt werden.  Während des Empfangs des Funksignals sind nur die "SNOOZE" und die "WAVE" Taste nutzbar, und andere Tasten sind funktionslos. Drücken Sie die “WAVE”...
  • Seite 13 sie die “+” und die “-” Tasten um die Stunde einzustellen.  Drücken Sie die “ TIME ” Taste um die Einstellung zu bestätigen und die Minutenanzeige blinkt. Drücken Sie die “+” und die “-” Tasten um die Minuten einzustellen. ...
  • Seite 14 einzustellen.  Drücken Sie die “ TIME” Taste um die Einstellung zu bestätigen und die Sprache für den Wochentag blinkt. Drücken Sie die “+” und die “-” Tasten um eine Sprache auszuwählen: Deutsch, Englisch, Französisch, Italienisch, Spanisch, Niederländisch, Dänisch  Drücken Sie die “TIME” Taste um die Einstellung zu bestätigen und zu beenden.
  • Seite 15 diesen Alarm ist eingeschaltet. Schieben Sie den Alarmschalter wieder auf die OFF Position. Das entsprechende Alarmsymbol wird nicht länger angezeigt und die Alarmfunktion ist ausgeschaltet.  Drücken Sie die “ALARM” Taste um die Alarmzeit anzuzeigen.  Halten Sie die “ALARM” Taste für 2 Sekunden gedrückt und die Stunde der Alarmzeit blinkt.
  • Seite 16: Alarmton Ausschalten

    blinkt. Drücken Sie die “+” und die “-” Taste um die Alarmminute einzustellen.  Drücken Sie die “ALARM” Taste um die Einstellung zu bestätigen und zu beenden. Hinweis:  Die Uhr beendet automatisch den Einstellungsmodus und wechselt in den normalen Zeitanzeigemodus, wenn innerhalb von 20 Sekunden keine Taste gedrückt wird.
  • Seite 17: Wechsel Zwischen °C Und °F

    Schlummerfunktion  Drücken Sie die “SNOOZE” Taste und der Alarmton wechselt in die Schlummerfunktion. Die Schlummerfunktion ist nun eingeschaltet und das oder blinkt entsprechend Alarmsymbol auf der Anzeige. Der Alarmton ist erneut zu hören, wenn die eingestellte Schlummerzeit abgelaufen ist. Wechsel zwischen °C und °F ...
  • Seite 18 Temperaturauflösung: 0.1℃/℉ Temperaturgenauigkeit: 0℃~40℃: ±1℃ –9.9℃~-0℃, 40℃~50℃: ±2℃ DE18...
  • Seite 19 WT546 Manual Product Appearance...
  • Seite 20 Part A-Positive LCD A1: Time A2: Date A3: Weekday A4: “Time” button A5: “Alarm” button A6: “+” button A7: “-“button A8: Indoor temperature...
  • Seite 21 A9: Indoor humidity A10: Radio Controlled Icon Part B – Back button and power B1: Projection switch (ON/OFF) B2: Projection rotation button B3: “Wave” button B4: Power connection B5: Battery compartment Part C – TOP Touch button C1: Snooze/light touch button C2: Projection window Part D –...
  • Seite 22  Manual time setting  Projection of the time  Date and weekday display (7 languages)  Temperature alternatively in °C or °F  Alarm and automatic snooze function  Indoor measurement range: -9.9°C ~ 49.9°C  Power: DC-adapter (included), battery 1.5V “AAA” size x 2 pcs (not included) LR03 Environmental reception effects...
  • Seite 23 near electrical appliances (computers, TV’s, etc)  and metallic structures  inside moving vehicles Place the clock at a location with optimal signal, i.e. close to a window and away from metal surfaces or electrical appliances. Precautions  This main unit is intended to be used only indoors. ...
  • Seite 24 (+/-).  Always replace a complete set of batteries.  Never mix used and new batteries.  Remove exhausted batteries immediately.  Remove batteries when not in use.  Do not recharge and do not dispose of batteries in fire as the batteries may explode. ...
  • Seite 25: Initial Operation

    by law to bring back needed batteries to distributors and other collecting points! Consideration of duty according to the law of electrical devices This symbol means that you must dispose of electrical devices separated from the General household waste when it reaches the end of its useful life.
  • Seite 26 display will light up for 3 seconds, you will hear a beep tone and the clock detects indoor temperature.  Then the clock will enter the radio controlled time signal reception mode. Projection function:  Continuous projection is only possible by using the power adapter ...
  • Seite 27 DC-adapter Mode  When using the DC-adapter supply, touch the “SNOOZE/LIGHT” button can choose high brightness / low brightness / no backlight brightness. The projection will always work unless the projection switch is placed in the “OFF” position. Please note: ...
  • Seite 28 mast icon starts to flash.  At 1:00 /2:00 / 3:00 am, the clock automatically carries out the synchronization procedure with the DCF signal to correct any deviations to the exact time. If this synchronization attempt is unsuccessful (the radio mast icon disappears from the display), the system will automatically attempt another synchronization at the next full hour.
  • Seite 29: Manual Time Setting

     We recommend a minimum distance of 2.5 meters to all sources of interference, such as televisions or computer monitors  Radio reception is weaker in rooms with concrete walls. In such circumstances, place the clock close to the window. ...
  • Seite 30 display starts to flash. Use “+” and “-” buttons to set the hour.  Press “TIME” to confirm your setting, the minute displays starts to flash. Now use “+” and “-” buttons to set the minute.  Press “TIME” button to confirm your setting, the month and date icon display starts to flash.
  • Seite 31 German, English, French, Italian, Spanish, Dutch, Danish  Press “TIME” to confirm your setting and to end the setting procedures. Please note:  After 20 seconds without pressing any button, the clock switches automatically from Set Mode to Normal Time Mode. Setting the daily alarms: ...
  • Seite 32 buttons to set the alarm hour.  Press “ALARM” button to confirm your setting, the starts to flash. Use the “+” and minute of alarm “-” buttons to set the alarm minute.  Press “ALARM” button to confirm your setting, the starts to flash.
  • Seite 33: Switching Off The Alarm Signal

     Rising alarm sound (crescendo, duration: 2 minutes) changes the volume 4 times whilst the alarm signal is heard. Switching off the alarm signal  Press any button except the “SNOOZE” button to stop the alarm signal. It is not necessary to reactivate the alarm.
  • Seite 34: Specifications

    SPECIFICATIONS Supply voltage: 2.5~3.3V Battery: 2x 1,5V AAA LR03 (not incl.) Adapter: DC 4.5V Calendar range: 2000-1-1~2099-12-31 Time zone: -12~12Hr Projection distance: 1.0~2.0meter IN Temperature measuring range: -9°C~50℃/14.2~122℉ (calibration time: 30sec.) Temperature resolution: 0.1℃/℉ Temperature accuracy: 0℃~40℃: ±1℃ –9.9℃~-0℃, 40℃~50℃: ±2℃ EN16...
  • Seite 35 WT546 - Guide d'utilisation Aspect du produit...
  • Seite 36 Partie A - Écran LCD positif Heure Date Jour de la semaine Touche « Heure » Touche « Alarme » Touche « + » Touche « - » Température intérieure Humidité intérieure Icône de signal horaire radio-pilotée A10:...
  • Seite 37 Partie B – Touches du panneau arrière B1: Commutateur de projection (ACTIVER/DÉSACTIVER) B2: Touche rotation de la projection B3: Touche « Onde » B4: Prise d'entrée de l'alimentation B5: Batterie Partie C - Touches tactiles du panneau supérieur C1: Touche Rappel d'alarme/Rétroéclairage C2: Fente de projection Partie D - Touches latérales...
  • Seite 38: Caractéristiques

    Caractéristiques :  Horloge radio-pilotée DCF-77  Format de l'heure 12/24 heures  Choix du fuseau horaire (± 12h)  Réglage manuel de l'heure  Projection de l'heure  Affichage de la date et du jour de semaine (7 langues) ...
  • Seite 39  Distance de transmission longue.  Montagnes et vallées toutes proches  Près d'autoroutes, chemins de fer, aéroports, câbles à haute tension, etc.  À proximité d'un chantier de construction  Entouré de bâtiments élevés.  À l'intérieur de bâtiments en béton. ...
  • Seite 40  Ne plongez pas l'appareil dans l'eau.  Évitez de le mettre en contact avec des matériaux corrosifs.  Ne jetez pas cet appareil au feu, il risque d'exploser.  N'ouvrez pas le panneau arrière et n'apportez aucune modification aux composants de cette unité.
  • Seite 41  N'essayez pas de recharger des piles qui ne sont pas rechargeables et ne jetez aucune pile au feu, elle risque d'exploser.  Rangez vos piles de façon à ce qu'aucun objet métallique ne puisse causer de court-circuit.  Évitez d'exposer les piles à des températures extrêmes, à...
  • Seite 42: Première Utilisation

    ramener les piles usagées aux revendeurs et aux points de collecte ! Respect de l'obligation de la loi sur les appareils électriques Ce symbole signifie que les appareils électriques ne doivent pas être jetés aux ordures ménagères à la fin de leur vie utile. Ramenez votre appareil à...
  • Seite 43 l'écran LCD s'allument pendant 3 secondes, un bip est émis et l'horloge détecte la température intérieure.  Ensuite, l'horloge passe en mode réception du signal horaire radio-pilotée. Projection :  La projection continue n'est possible qu'en utilisant l'adaptateur secteur  Pendant l'utilisation avec l'adaptateur secteur, appuyez sur la touche «...
  • Seite 44 rétroéclairage et la projection pendant 8 secondes (le commutateur de projection doit être positionné sur « ON ») Mode adaptateur secteur  Pendant l'utilisation avec l'adaptateur secteur, appuyez sur la touche « RAPPEL D'ALARME/RÉTROÉCLAIRAGE » pour choisir un Rétroéclairage élevé/faible/pas de rétroéclairage.
  • Seite 45: Réception Du Signal Radio

    Remarque :  La distance de projection est d'environ 2 mètres. Réception du signal radio  L'horloge se met automatiquement à rechercher le signal horaire DCF à chaque mise en marche ou changement de piles. L'icône d'antenne radio se met à clignoter. ...
  • Seite 46 recommencer après une heure.  Appuyez sur la touche « WAVE » pendant la réception du signal radio-pilotée pour arrêter la recherche du signal radio. Remarque :  Un icône d'antenne radio clignotant indique que la réception du signal DCF a démarré ...
  • Seite 47: Réglage Manuel De L'heure

    Réglage manuel de l'heure  Maintenez appuyée la touche « » pendant TIME 2 secondes, le format de l'heure 12/24 se met à clignoter. Utilisez les touches « + » et « - » pour choisir entre le format 12 ou 24 heures. ...
  • Seite 48 choisir entre Mois/Jour ou Jour/Mois.  Appuyez sur la touche « TIME » pour confirmer le Utilisez réglage, l'année 2015 se met à clignoter. les touches « + » et « - » pour régler l'année.  Appuyez sur la touche « TIME » pour confirmer Utilisez votre réglage, le mois se met à...
  • Seite 49 Prière de noter :  Au bout de 20 secondes d'inactivité, l'horloge passe automatiquement du mode réglage au mode affichage normal de l'heure. Réglage de l'alarme quotidienne :  Veuillez basculer l'interrupteur d'alarme sur la position ON, l'écran LCD affichera l'icône en conséquence, la fonction d'alarme est activée.
  • Seite 50 le réglage, les minutes de l'alarme se mettent à clignoter. Utilisez les touches « + » et « - » pour régler les minutes de l'alarme.  Appuyez sur la touche « ALARM » pour confirmer le réglage, les heures de l'alarme se mettent à...
  • Seite 51 quelconque. Dans ce cas, l'alarme sera déclenchée automatiquement après 24 heures.  Augmentation du volume de l'alarme (crescendo, durée : 2 minutes) 4 fois durant la sonnerie de l'alarme. Arrêter le signal d'alarme  Appuyez sur une touche quelconque à l'exception de la touche «...
  • Seite 52 écoulé. Choix entre °C et °F  Utilisez la touche « - » pour afficher la température en °C ou °F. CARACTÉRISTIQUES Tension d'alimentation : 2,5~3,3V Piles : 2 x AAA LR03 1,5V (non incluses) Adaptateur : 4,5 VCC Plage du calendrier : 1/1/2000~31/12/2099 Fuseau horaire : -12~12 Heures Distance de projection : 1~2 mètres Plage de mesure de la température intérieure : -9°C ~...
  • Seite 53 Manual de WT546 Aspecto del producto...
  • Seite 54 Parte A-LCD positiva Hora Día Día laborable Botón “Hora” Botón “Alarma” Botón “+” Botón “-” Temperatura interior Humedad interior Icono de radio controlada A10:...
  • Seite 55 Elementos B - Botones traseros y encendido B1: Interruptor de proyección (CONWCTADA/DESCONECTADA) B2: Botón de rotación de la proyección B3: Botón “Onda” B4: Conexión de alimentación B5: Batería Elementos C - Botón táctil SUPERIOR C1: Botón táctil Retardo alarma/luz C2: Ventana de proyección Parte D –...
  • Seite 56 Funciones:  Reloj radio-controlado DCF-77  Formato horario 12/24  Ajuste de zona horaria (± 12h)  Ajuste manual de la hora  Proyección de la hora  Presentación de la fecha y del día de la semana (7 idiomas) ...
  • Seite 57 afectada por las circunstancias siguientes:  largas distancias de transmisión  proximidad de montañas y valles  proximidad de autopistas, vías de tren, aeropuertos, cables de alta tensión, etc.  proximidad de edificios en construcción  encontrarse entre edificios altos ...
  • Seite 58  No la sumerja en el agua.  Evite que entre en contacto con materiales corrosivos.  No se deshaga de la unidad arrojándola al fuego, ya que podría explotar.  No abra la carcasa posterior interna ni altere ningún componente de la unidad. Advertencias de seguridad sobre las pilas ...
  • Seite 59  Evite exponer las pilas a temperaturas extremas, a la humedad o a los rayos directos del sol.  Mantenga todas las pilas lejos del alcance de los niños. Constituyen peligro de asfixia. ¡Use el producto únicamente para la finalidad prevista! Consideración de obligaciones según la ley sobre pilas Las pilas antiguas no pertenecen a los...
  • Seite 60: Puesta En Funcionamiento

    residuos domésticos generales cuando alcancen el final de su vida útil. Lleve su unidad a su punto de recogida selectiva de basura o al centro de reciclaje de su localidad. Esto es de aplicación en todos los países de la Unión Europea, y en otros países no europeos con sistema de recogida selectiva de basuras.
  • Seite 61 Función de proyección:  Solo es posible proyectar de modo continuo con el adaptador eléctrico conectado.  Cuando use la alimentación del adaptador eléctrico, toque sobre el botón “RETARDO DE ALARMA/LUZ” para poder seleccionar la intensidad de luz de la pantalla: alta/baja/sin luz de fondo.
  • Seite 62 eléctrico, toque sobre el botón “RETARDO DE ALARMA/LUZ” para poder seleccionar la intensidad de luz de la pantalla: alta/baja/sin luz de fondo. La proyección siempre estará funcionando a menos que el interruptor de proyección esté en la posición “OFF”. Por favor tenga en cuenta: ...
  • Seite 63 parpadear.  A las 1:00/2:00/3:00 AM, el reloj realiza automáticamente el procedimiento de sincronización con la señal DCF para corregir cualquier desviación de la hora exacta. Si este intento de sincronización no tiene éxito (el icono de la señal de radio desaparece de la pantalla), el sistema intentará...
  • Seite 64: Ajuste Manual De La Hora

    que la recepción de la señal DCF se ha iniciado.  Un icono del mástil de la radio que se muestra continuamente indica que la señal DCF se recibe con éxito.  Recomendamos una distancia mínima de 2,5 metros a todas las fuentes de interferencia, como televisores o monitores de ordenadores.
  • Seite 65 12/24.  Pulse el botón “ ” para confirmar la TIME configuración; la zona horaria empieza a parpadear. Use los botones “+” y “-” para configurar la zona horaria (-12 hasta +12). Para la zona horaria alemana, es 0 y para el Reino Unido es -1.
  • Seite 66  Pulse el botón “TIME” para confirmar el ajuste y los Ahora dígitos del mes empezarán a parpadear. use los botones “+” y “-” para configurar el mes.  Pulse el botón “TIME” para confirmar el ajuste y los Ahora use dígitos del día empezarán a parpadear.
  • Seite 67 Configurar las alarma diarias:  Ponga el interruptor de la alarma en la posición de ON, la pantalla LCD muestra el icono en consecuencia, la función de alarma está encendida. Mueva el conmutador de alarma a la posición OFF, el ícono respectivo desaparecerá de la pantalla, la función de alarma se desactivará.
  • Seite 68 a parpadear. Use los botones “+” y “-” para configurar la hora de la alarma.  Pulse el botón “ALARM” para confirmar su configuración. Los minutos de la alarma empiezan a parpadear. Use los botones “+” y “-” para configurar los minutos de la alarma. ...
  • Seite 69 Apagar la señal de alarma  Pulse cualquier botón excepto el botón de “RETARDO DE ALARMA” para que la alarma deje de sonar. No es necesario volver a activar la alarma. Se cambia automáticamente a la hora de la alarma que ya se ha fijado. Función retardo ...
  • Seite 70: Especificaciones

    ESPECIFICACIONES Tensión de alimentación: 2,5~3,3V Pilas: 2x 1,5V AAA LR03 (no incluido) Adaptador eléctrico: CC 4.5V Alcance del calendario: 2000-1-1~2099-12-31 Zona horaria: -12~12Hr Distancia de proyección: 1.0~2.0 metros Alcance de medición de la temperatura INTERIOR: -9°C~50°C/14.2~122°F (tiempo de calibración: 30 seg.) Resolución de la temperatura: 0.1°C/°F Exactitud de la temperatura: 0°C~40°C: ±1°C...
  • Seite 71 WT546 Handleiding Uiterlijk van het product...
  • Seite 72 Deel A - Positief LCD-scherm Tijd Datum Dag van de week “Tijd”-toets “Alarm”-toets “+” toets “-”-toets Binnentemperatuur Binnenvochtigheid “Radiogestuurd”-icoontje A10:...
  • Seite 73 Deel B – Toetsen op de achterkant en stroomvoorziening B1: Projectieschakelaar (AAN/UIT) B2: Rotatietoets voor projectie B3: “Golf”-toets B4: Voedingsingang B5: Batterij Deel C – Aanraaktoetsen bovenkant C1: Aanraaktoets sluimerstand/verlichting C2: Projectievenster Deel D – zijtoetsen Aan-/uitschakelaar alarm 1 Aan-/uitschakelaar alarm 2 Eigenschappen: ...
  • Seite 74  Tijdzone-instelling (± 12 u)  Handmatige tijdinstelling  Projectie van de tijd  Aanduiding datum- en weekdag (7 talen)  Temperatuuraanduiding instelbaar op °C of °F  Alarm en automatisch sluimerfunctie  Meetbereik binnenshuis: -9,9°C ~ 49,9°C  Vermogen: Lichtnetadapter (inbegrepen), 2 batterijen 1,5 V maat ”AAA”...
  • Seite 75: Voorzorgsmaatregelen

     Binnenin betonnen gebouwen.  Nabij elektrische apparatuur (computers, TV's, enz.) en metalen structuren  Binnenin bewegende voertuigen. Plaats de klok op een plek met optimale signaalontvangst, d.w.z. dicht in de buurt van een raam en uit de buurt van metalen oppervlaktes of elektrische apparatuur.
  • Seite 76 modificeer geen enkele onderdelen van dit apparaat. Veiligheidswaarschuwingen batterijen  Gebruik uitsluitend alkaline batterijen, geen herlaadbare batterijen.  Neem bij het plaatsen van de batterijen de juiste polariteit in acht (+/-).  Vervang altijd alle batterijen tegelijk.  Gebruik nooit nieuwe en gebruikte batterijen door elkaar.
  • Seite 77 bestaat gevaar van verstikking. Gebruik dit product uitsluitend voor het doel waarvoor het is bedoeld! Neem wettelijke heffingen in verband met de afvoer van batterijen in aanmerking Oude batterijen horen niet bij huishoudelijk afval, omdat deze de volksgezondheid en het milieu kunnen aantasten.
  • Seite 78: Eerste Gebruik

    wanneer deze het einde van hun levensduur hebben bereikt. Lever uw apparaat in bij een plaatselijk inzamelpunt voor afvalverwerking of bij een recyclingcentrum. Dit geldt voor alle landen in de Europese Unie, en voor andere Europese landen met inzamelsystemen voor gescheiden afval.
  • Seite 79 Projectiefunctie:  Doorlopend projectie is alleen mogelijk bij gebruik van de lichtnetadapter.  Druk bij gebruik van de lichtnetadapter op de toets “SLUIMERSTAND/VERLICHTING” om te kiezen uit hoge helderheid/lage helderheid/geen achterverlichting. De projectie werkt altijd, tenzij de projectieschakelaar in de stand “OFF” wordt gezet. ...
  • Seite 80 toets “SLUIMERSTAND/VERLICHTING” om te kiezen uit hoge helderheid/lage helderheid/geen achterverlichting. De projectie werkt altijd, tenzij de projectieschakelaar in de stand “OFF” wordt gezet. Opgelet a.u.b.:  De projectieafstand is ongeveer 2 meter. Ontvangst van het radiosignaal  De klok start automatisch de ontvangst van het DCF-signaal na een herstart of na vervanging van de batterijen.
  • Seite 81  De klok voert om 1:00/2:00/3:00 AM automatisch een synchronisatieprocedure uit met het DCF-signaal om eventuele afwijkingen van de exacte tijd te corrigeren. Als het synchroniseren niet lukt, (het pictogram met de radiomast verdwijnt van het scherm) probeert het systeem automatisch op het volgende hele uur weer om te synchroniseren.
  • Seite 82: Handmatige Tijdinstelling

    DCF-signaalontvangst is gestart.  Een continu weergegeven radiomasticoontje betekent dat de DCF-signaalontvangst is geslaagd.  Wij raden een minimale afstand van 2,5 meter aan tot enigerlei interferentiebronnen zoals televisies of computermonitors.  De radio-ontvangst is zwakker in kamers met betonnen muren. Plaats de klok in dergelijke gevallen dicht bij een raam.
  • Seite 83  Druk op de toets “ ” om uw instelling te TIME bevestigen en de tijdzone begint te knipperen. Gebruik de toetsen “+” en “-” om de tijdzone in te stellen (-12 tot +12). Dit is voor de Duitse tijdzone 0 en voor het Verenigd Koninkrijk -1. ...
  • Seite 84  Druk op de toets “TIME” om uw instelling te bevestigen, de maandweergave begint nu te Gebruik vervolgens de toetsen “+” en knipperen. “-” om de maand in te stellen.  Druk op de toets “TIME” om uw instelling te bevestigen en de datumweergave zal beginnen te Gebruik nu de toetsen “+”...
  • Seite 85 De dagelijkse alarmen instellen:  Schakel de schakelaar voor alarm de stand ON, op het LCD-scherm verschijnt het pictogram , de alarmfunctie is ingeschakeld. Zet een alarmschakelaar in de OFF-stand, het betreffende pictogram verdwijnt van het display, de alarmfunctie is uit. ...
  • Seite 86 bevestigen en de uren voor de alarmtijd beginnen te knipperen. Gebruik de toetsen “+” en “-” om de uren voor de alarmtijd in te stellen.  Druk op de toets “ALARM” om uw instelling te bevestigen en de minuten voor de alarmtijd beginnen te knipperen.
  • Seite 87 terwijl het alarm klinkt. Het alarmsignaal uitschakelen  Druk op iedere willekeurige toets behalve de toets “SLUIMERSTAND” om het weksignaal te stoppen. Het is niet nodig het alarm opnieuw te activeren. Het schakelt zichzelf automatisch weer op de eerder ingestelde alarmtijd. Sluimerfunctie ...
  • Seite 88 SPECIFICATIES Voeding: 2,5~3,3V Batterij: 2x 1,5V AAA LR03 (niet inbegr.) Adapter: DC 4,5V Kalenderbereik: 2000-1-1~2099-12-31 Tijdzone: -12~12 uur Projectieafstand: 1,0~2,0 meter Meetbereik binnentemperatuur: -9°C~50°C/14,2~122°F (kalibratietijd: 30sec.) Temperatuurresolutie: 0,1°C/°F Temperatuur-nauwkeurigheid: 0°C~40°C: ±1°C -9,9°C~-0°C, 40°C~50°C: ±2°C NL18...
  • Seite 89 Manuale WT546 Aspetto del prodotto...
  • Seite 90 Parte A - LCD positivo Dati Giorni settimana Pulsante “Ora” Pulsante “Sveglia” Pulsante “+” Pulsante “-” Temperatura interna Umidità interna Icona radiocontrollo A10:...
  • Seite 91 Parte B – Tasto posteriore e alimentazione B1: Interruttore proiezione (ACCENSIONE/SPEGNIMENTO) B2: Pulsante rotazione proiezione B3: Pulsante “Onda” B4: Connessione alimentazione B5: Batteria Parte C – Tasto SUPERIORE touch C1: Tasto ritarda/luce C2: Finestra di proiezione Parte D – pulsanti laterali Interruttore accensione/spegnimento Sveglia 1 Interruttore accensione/spegnimento...
  • Seite 92 Funzioni:  Orologio DCF-77 radio controllato  Formato 12/24 ore  Regolazione zona oraria (± 12h)  Impostazione manuale dell’ora  Proiezione ora  Mostra data e giorno della settimana (7 lingue)  Temperatura alternativamente in °C o °F  Funzione sveglia e ritardo automatico ...
  • Seite 93  Prossimità di autostrade, stazioni, aeroporti, cavi di alta tensione e così via.  Prossimità di cantieri  Collocazione tra edifici alti  Collocazione all'interno di edifici in cemento  Prossimità di apparecchiature elettriche (computer, TV e altro) e strutture metalliche ...
  • Seite 94  Non aprire l'alloggiamento posteriore interno o alterare componenti di questa unità. Avvisi di sicurezza delle batterie  Utilizzare solo batterie alcaline, non batterie ricaricabili.  Installare le batterie correttamente rispettando la polarità (+/-).  Sostituire sempre un set completo di batterie. ...
  • Seite 95 soffocamento. Utilizzare il prodotto solo per lo scopo previsto. Obblighi in base alla normativa sulle batterie Le batterie vecchie non appartengono ai rifiuti domestici in quanto possono causare danni alla salute e all'ambiente. È possibile consegnare le batterie usate gratuitamente al proprio rivenditore e punti di raccolta.
  • Seite 96 applica a tutti i paesi dell’Unione europea e agli altri paesi europei in cui viene praticata la raccolta differenziata. Funzionamento iniziale  Collegare il cavo di alimentazione in dotazione con la spina posteriore.  In alternativa è possibile usare delle batterie. Aprire lo sportello dello scomparto batterie dell’orologio.
  • Seite 97 luminosità/bassa luminosità/nessuna luminosità posteriore. La proiezione funziona sempre a meno che il tasto proiezione non sia posizionato su “OFF”.  Premere il pulsante rotazione proiettore “ ” (sul retro) per ruotare la proiezione. Funzione retroilluminazione e proiezione Modalità batteria  Toccare una volta il pulsante “RITARDA/LUCE”...
  • Seite 98 Nota:  La distanza di proiezione è di circa 2 metri. Ricezione del segnale radio  L'orologio avvia automaticamente la ricerca del segnale DCF dopo il riavvio o quando si inseriscono batterie nuove. L'icona dell'antenna radio inizia a lampeggiare.  Alle 1:00/2:00/3:00, l'orologio effettua automaticamente la procedura di sincronizzazione con il segnale DCF per correggere qualsiasi...
  • Seite 99 scompare dal display), il sistema effettuerà automaticamente un secondo tentativo di sincronizzazione all’ora successiva. Questa procedura viene ripetuta automaticamente fino a 5 volte.  Per avviare la ricezione manuale del segnale DCF tener premuto il tasto “WAVE” per due secondi. Se non viene ricevuto alcun segnale per 7 minuti, la ricerca del segnale DCF si interrompe (l’icona dell’antenna radio scompare) e riprende all’ora...
  • Seite 100: Impostazione Manuale Dell'ora

    monitor di computer  La ricezione radio è più debole in ambienti con pareti in cemento. In tali circostanze, porre l'orologio vicino alla finestra.  Durante la modalità di ricezione del segnale orario radiocontrollato, solo i pulsanti “RITARDA” e “WAVE” funzionano, gli altri pulsanti non Se si voglio usare le altre funzioni, funzionano.
  • Seite 101  Premere “TIME” per confermare la scelta, il display dell’ora inizia a lampeggiare. Usare i pulsanti “+” e “-” per impostare l’ora.  Premere “TIME” per confermare l'impostazione, l'indicazione dei minuti inizia a lampeggiare. Usare ora i tasti “+” e “-” per regolare i minuti. ...
  • Seite 102  Premere il pulsante “TIME” per confermare l'impostazione, la selezione della lingua per le indicazioni del giorno della settimana iniziano a lampeggiare. Ora utilizzare i pulsanti “+” e “-” per selezionare una lingua: German, English, French, Italian, Spanish, Dutch, Danish ...
  • Seite 103 posizione OFF, l'icona corrispondente scompare dal display, la funzione di allarme viene disattivata.  Premere una volta il tasto “ALARM” per andare all’orario della sveglia.  Premere e tenere premuto il pulsante “ALARM” per 2 secondi fino a quando l'ora della sveglia inizia a lampeggiare.
  • Seite 104  Premere il tasto “ALARM” per confermare la scelta e terminare la procedura. Nota:  Dopo 20 secondi di inattività l’orologio passa automaticamente dalla modalità imposta alla modalità orologio normale.  La sveglia suonerà per 2 minuti se non viene disattivata premendo qualsiasi pulsante.
  • Seite 105: Funzione Di Ripetizione

    Funzione di ripetizione  Toccare il tasto “RITARDA” affinché il segnale sonoro entri in modalità RIPETI. Quindi la funzione di ripetizione è attiva e l'icona lampeggia sul display. Il segnale della sveglia suona di nuovo trascorso il tempo impostato per la funzione ritardo. Modifica °C o °F ...
  • Seite 106 -9°C~50°C/14.2~122°F (tempo di calibrazione: 30 sec.) Risoluzione della temperatura: 0.1°C/°F Precisione della temperatura: 0°C~40°C: ±1°C -9,9°C~-0°C, 40°C~50°C: ±2°C IT18...
  • Seite 107 Návod – model WT546 Vzhled budíku...
  • Seite 108 Část A – přední část s displejem LCD Čas Datum Den v týdnu Tlačítko „Čas“ Tlačítko „Budík“ Tlačítko „+“ Tlačítko „−“ Vnitřní teplota Vnitřní vlhkost Ikona rádiového příjmu A10:...
  • Seite 109 Část B – zadní tlačítka a napájení B1: Přepínač projekce (zapnuto/vypnuto) B2: Tlačítko rotace projekce B3: Tlačítko „Vlna“ B4: Napájecí zdířka B5: Baterie Část C – horní dotykové tlačítko C1: Dotykové tlačítko funkce opakovaného buzení / podsvícení C2: Okno projekce Část D –...
  • Seite 110 Funkce:  Hodiny řízené rádiovým signálem DCF-77  12- a 24hodinový formát času  Nastavení časového pásma (±12 h)  Ruční nastavení času  Projekce času  Zobrazení data a dne (7 jazyků)  Zobrazení teploty ve °C nebo °F ...
  • Seite 111: Bezpečnostní Opatření

     Blízkost hor a údolí Blízkost dálnic, železnic, letišť, vedení vysokého  napětí apod. Blízkost staveniště  Umístění mezi vysokými stavbami  Umístění uvnitř betonových staveb  Blízkost elektrických zařízení (počítačů, televizorů  apod.) a kovových předmětů Umístění uvnitř jedoucích vozidel ...
  • Seite 112 materiálem. Nevhazujte jednotku do ohně, hrozí nebezpečí  exploze. Neotevírejte vnitřní kryt a nemanipulujte s žádnými  součástkami této jednotky. Bezpečnostní opatření týkající se baterií Používejte pouze alkalické baterie, nikdy ne  dobíjecí baterie. Vložte baterie se správnou polaritou (+/−). ...
  • Seite 113 Veškeré baterie skladujte mimo dosah dětí. Hrozí  riziko udušení. Výrobek používejte pouze k zamýšlenému účelu! Likvidace baterií podle předpisů Staré baterie nepatří do domovního odpadu, protože mohou způsobit škody na zdraví a životním prostředí. Použité baterie můžete zdarma vrátit prodejci a do sběrných míst. Jako koncoví...
  • Seite 114 evropské země se samostatným systémem shromažďování odpadu. První použití  Připojte dodaný napájecí adaptér do zdířky na zadní straně.  Lze také použít baterie. Otevřete kryt prostoru pro baterie budíku.  Vložte 2 baterie AAA a dbejte přitom na správnou polaritu (označení...
  • Seite 115 žádný jas podsvícení. Pokud nebude přepínač projekce přepnut do polohy „OFF“, bude projekce stále spuštěna.  Projekci natočíte stisknutím tlačítka rotace “ ” (na zadní straně). Podsvícení a funkce projekce Režim napájení pomocí baterií  Jedním stisknutím tlačítka „OPAKOVANÉ BUZENÍ / PODSVÍCENÍ“ aktivujete podsvícení a projekci na dobu 8 sekund (je-li přepínač...
  • Seite 116 Upozornění:  Vzdálenost projekce je přibližně 2 metry. Příjem radiového signálu  Po každém restartování nebo po výměně baterií budík automaticky spustí vyhledávání signálu DCF. Začne blikat ikona rádiového příjmu.  Budík v 1:00, ve 2:00 nebo ve 3:00 provádí proces automatické...
  • Seite 117 celou hodinu. Tento proces se opakuje automaticky až pětkrát.  Chcete-li spustit příjem signálu DCF ručně, stiskněte tlačítko „WAVE“ a držte jej stisknuté po dobu dvou sekund. Není-li signál DCF přijat během 7 minut, hledání signálu se zastaví (ikona rádiového příjmu zmizí) a znovu se spustí v příští celou hodinu.
  • Seite 118: Ruční Nastavení Času

    umístěte budík do blízkosti okna.  Během přijímání rádiově řízeného časového signálu je funkční pouze tlačítko „ OPAKOVANÉ “ a tlačítko „WAVE“. Ostatní tlačítka BUZENÍ Chcete-li použít jiné funkce, ukončete nefungují. stisknutím tlačítka „WAVE“ režim příjímání. Ruční nastavení času  Stiskněte tlačítko „TIME“...
  • Seite 119 pomocí tlačítek „+“ a „−“.  Stisknutím tlačítka „TIME“ potvrďte nastavení. Začne blikat zobrazení měsíce a data. Nyní můžete tlačítky „+“ a „−“ nastavit zobrazení data ve formátu měsíc/den nebo den/měsíc.  Stisknutím tlačítka „TIME“ potvrďte nastavení. Začne blikat zobrazení roku 2015. Nyní...
  • Seite 120 Upozornění:  Po 20 sekundách bez stisknutí jakéhokoli tlačítka se budík automaticky přepne z režimu nastavení do režimu normálního zobrazení času. Nastavení každodenního buzení:  Přepněte přepínač poplachu nebo polohy ON (zapnuto), na LCD displeji se zobrazí ikona nebo , je aktivována funkce alarmu. Přepněte přepínač...
  • Seite 121 Začne blikat zobrazení minuty budíku . Pomocí tlačítek „+“ a „−“ nastavte minuty budíku.  Stisknutím tlačítka „ALARM“ potvrďte nastavení. Začne blikat zobrazení hodinu budíku . Pomocí tlačítek „+“ a „−“ nastavte hodinu budíku.  Stisknutím tlačítka „ALARM“ potvrďte nastavení. Začne blikat zobrazení...
  • Seite 122 trvání: 2 minuty) během přehrávání signálu buzení čtyřikrát změní hlasitost. Vypnutí signálu budíku  Signál buzení vypnete stisknutím jakéhokoli tlačítka kromě tlačítka „OPAKOVANÉ BUZENÍ“. Buzení není nutné znovu aktivovat. Automaticky se nastaví na dříve zadaný čas budíku. Funkce opakovaného buzení ...
  • Seite 123: Technické Údaje

    TECHNICKÉ ÚDAJE Napájecí napětí: 2,5–3,3 V Baterie: 2× 1,5 V AAA LR03 (nejsou součástí balení) Adaptér: 4,5 V stejnosm. Rozsah kalendáře: 1. 1. 2000 až 31. 12. 2099 Časové pásmo: −12 až +12 hodin Vzdálenost projekce: 1,0–2,0 m Rozsah měření vnitřní teploty: −9 až 50 °C (doba kalibrace: 30 s) Teplotní...
  • Seite 124 WT546 Instrukcja Wygląd produktu...
  • Seite 125 Część A – wyświetlacz LCD z białym tłem i czarnymi numerami Godzina Data Dzień tygodnia Przycisk „Czas” Przycisk „Alarm” Przycisk „+” Przycisk „-” Temperatura wewnątrz...
  • Seite 126 Wilgotność wewnątrz Ikona sterowania radiowego A10: Część B – przycisk tylny i zasilanie B1: Przełącznik wyświetlania (WŁ/WYŁ) B2: Przycisk obrotu wyświetlania B3: Przycisk „Fala” B4: Przyłącze zasilania B5: Bateria Część C – górny przycisk dotykowy C1: Przycisk dotykowy drzemki/oświetlenia C2: Okno wyświetlania Część...
  • Seite 127 Właściwości:  Zegar sterowany radiowo DCF-77  Format czasu 12/24 godz.  Ustawianie strefy czasowej (± 12 godz.)  Ręczne ustawianie czasu  Wyświetlanie czasu  Wyświetlacz daty i dnia tygodnia (7 języków)  Wyświetlanie temperatury na zmianę w °C lub °F ...
  • Seite 128: Środki Ostrożności

    góry i doliny znajdujące się w pobliżu   autostrada, kolej, porty lotnicze, kable wysokiego napięcia itd. znajdujące się w pobliżu. teren budowy znajdujący się w pobliżu  usytuowanie pomiędzy wysokimi budynkami;  usytuowanie wewnątrz betonowych budynków;  znajdujące się w pobliżu urządzenia elektryczne ...
  • Seite 129 Unikać kontaktu z materiałami korodującymi.  Urządzenia nie wolno utylizować w ogniu,  ponieważ może wybuchnąć. Nie otwierać tylnej obudowy wewnętrznej ani nie  ingerować w żadne komponenty urządzenia. Ostrzeżenia bezpieczeństwa dotyczące baterii Używać wyłącznie baterii alkalicznych, a nie baterii ...
  • Seite 130 Unikać wystawiania baterii na działanie  ekstremalnych temperatur, na wilgoć czy światło słoneczne. Baterie należy trzymać w miejscu niedostępnym  dla dzieci. Stwarzają one zagrożenie udławienia się. Produkt należy używać tylko zgodnie z przeznaczeniem! Zobowiązania według przepisów prawa dotyczących baterii Stare baterie nie należą...
  • Seite 131 Zobowiązania według przepisów prawa dotyczących urządzeń elektrycznych Ten symbol oznacza, że użytkownik musi utylizować urządzenia elektryczne z dala od ogólnych odpadów domowych, kiedy osiągną one koniec okresu eksploatacji. Swoje urządzenie najlepiej jest oddać w lokalnym punkcie zbiórki odpadów lub centrum recyklingu. Dotyczy to wszystkich państw Unii Europejskiej oraz innych państw europejskich, w których obowiązuje system zbierania odpadów...
  • Seite 132: Funkcja Wyświetlania

    wykryta zostanie temperatura w pomieszczeniu.  Następnie zegar przejdzie do trybu odbioru sygnału czasu sterowanego radiowo. Funkcja wyświetlania:  wyświetlanie ciągłe jest możliwe tylko przy użyciu zasilacza  Podczas korzystania z zasilacza DC po dotknięciu przycisku „DRZEMKA/OŚWIETLENIE” można wybrać dużą jasność/małą jasność/brak podświetlenia.
  • Seite 133 Tryb zasilacza DC  Podczas korzystania z zasilacza DC po dotknięciu przycisku „DRZEMKA/OŚWIETLENIE” można wybrać dużą jasność/małą jasność/brak podświetlenia. Wyświetlanie będzie działać, dopóki przełącznik wyświetlania nie zostanie ustawiony w pozycji „OFF”. Uwaga:  Odległość wyświetlania wynosi około 2 metrów. PL10...
  • Seite 134 Odbiór sygnału radiowego  Zegar automatycznie uruchamia wyszukiwanie sygnału DCF zawsze po ponownym uruchomieniu lub wymianie baterii. Ikona masztu radiowego zacznie migać.  O godz. 1:00/2:00/3:00 zegar automatycznie wykonuje procedurę synchronizacji z sygnałem DCF, aby skorygować dokładny czas. Jeśli próba synchronizacji się...
  • Seite 135 sygnału radiowego można zatrzymać, naciskając jeden raz przycisk „WAVE”. Uwaga:  Migająca ikona masztu radiowego oznacza, że rozpoczął się odbiór sygnału DCF.  Stale wyświetlana ikona masztu radiowego wskazuje, że sygnał DCF został odebrany pomyślnie  Zalecamy minimalną odległość 2,5 metra od wszystkich źródeł...
  • Seite 136 Ręczne ustawianie czasu  Nacisnąć i przytrzymać przycisk „TIME” przez 2 sekundy, wyświetlanie w trybie 12/24-godzinnym zacznie migać. Przyciskami „+” i „-” należy ustawić właściwy tryb godzin 12/24.  Nacisnąć przycisk „ ”, aby potwierdzić TIME ustawienia, strefa czasu zacznie migać. Przyciskami „+”...
  • Seite 137 ustawienia, widok roku 2015 zaczyna migać. Teraz użyć przycisków „+” oraz „-”, aby ustawić rok.  Nacisnąć przycisk „TIME”, aby potwierdzić swoje ustawienie, zacznie migać wyświetlacz miesiąca. Teraz użyć przycisków „+” oraz „-”, aby ustawić miesiąc.  Nacisnąć przycisk „TIME”, aby potwierdzić ustawienia, widok daty zaczyna migać.
  • Seite 138 Ustawianie alarmów codziennych:  Przełącz przełącznik w pozycję ON, wyświetlacz LCD odpowiednio funkcja alarmu jest włączona. Ustaw przełącznik alarmu w pozycji OFF, odpowiednia ikona zniknie z wyświetlacza, funkcja alarmu zostanie wyłączona.  Nacisnąć przycisk „ALARM” jeden raz, aby przełączyć wyświetlanie na czas alarmu. ...
  • Seite 139 minutę alarmu zacznie migać. Przyciskami „+” i „-” ustawić minutę alarmu.  Nacisnąć przycisk „ALARM”, aby potwierdzić ustawienia i zakończyć procedurę ustawiania. Uwaga:  Po 20 sekundach bez naciskania żadnego przycisku zegar automatycznie przełączy się z trybu ustawiania to trybu zwykłego zegara. ...
  • Seite 140 się on automatycznie w czasie alarmu, który został już ustawiony. Funkcja drzemki  Po dotknięciu przycisku „DRZEMKA” rozlegnie się sygnał alarmu i nastąpi przejście do trybu DRZEMKI. Następnie funkcja drzemki jest aktywna, a na wyświetlaczu pulsuje ikona 1 lub 2. Sygnał alarmu rozlegnie się ponownie po upływie czasu ustawionego dla drzemki.
  • Seite 141 Zakres pomiaru temperatury wewnątrz: -9°C~50°C/14.2~122°F (czas kalibracji: 30 sek.) Stopniowanie temperatury: 0.1°C/°F Dokładność temperatury: 0°C~40°C: ±1°C -9,9°C~-0°C, 40°C~50°C: ±2°C PL18...

Inhaltsverzeichnis