Clearaudio Smart Matrix Professional Bedienungsanleitung
Plattenwaschmaschine
Vorschau ausblenden
Andere Handbücher für Smart Matrix Professional:
- Bedienungsanleitung (28 Seiten) ,
- Bedienungsanleitung (26 Seiten)
Inhaltsverzeichnis
Verfügbare Sprachen
Verfügbare Sprachen
Smart Matrix
Record cleaning machine
Plattenwaschmaschine
Hi-Fi Components
Spardorfer Str. 150 D-91054 Erlangen Tel. +49 9131/40300100 FAX +49 9131/51683
www.clearaudio.de
www.analogshop.de
Professional
®
clearaudio
info@clearaudio.de clearaudio electronic GmbH 2013
User manual
Bedienungsanleitung
Made in Germany
electronic
GmbH
Version 1.6_131114_E+D
Kapitel
Inhaltsverzeichnis

Verwandte Anleitungen für Clearaudio Smart Matrix Professional


Inhaltszusammenfassung für Clearaudio Smart Matrix Professional
-
Seite 14: Bedienungsanleitung
Smart Matrix Professional User manual / Bedienungsanleitung Inhaltsverzeichnis Lieferumfang Smart Matrix Professional im Überblick Aufstellung und Inbetriebnahme Wichtige Bedienhinweise Zubehör Garantie - Informationen Technische Daten Weitere Garantie – Informationen clearaudio electronic GmbH 2013 Page / Seite 13... - Seite 15 Smart Matrix Professional User manual / Bedienungsanleitung Sehr geehrte clearaudio - Kundin, sehr geehrter clearaudio - Kunde, Smart Matrix Professional Sie haben sich für die Plattenwaschmaschine, ein hochwertiges Qualitätsprodukt aus deutscher Fertigung der Firma clearaudio entschieden. Wir danken Ihnen für das uns entgegengebrachte Vertrauen.
-
Seite 16: Lieferumfang
Klemmpuck zum Befestigen der Auftragen der Reinigungsflüssigkeit und Schallplatte auf dem Teller Reinigen der Platten Zubehör 1 Set Ersatz-Mikrofaser-Reinigungsstreifen Netzanschlusskabel Karton (nicht abgebildet) Optional: Acryl - Abdeckhaube (nicht Bedienungsanleitung (nicht abgebildet) abgebildet) Page / Seite 15 clearaudio electronic GmbH 2013... -
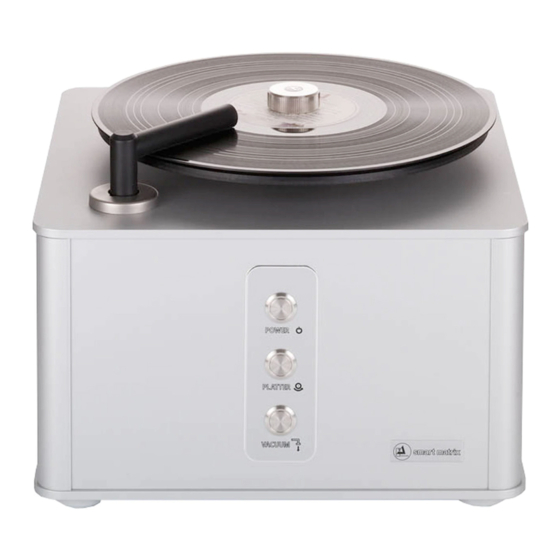
Seite 17: Smart Matrix Professional Im Überblick
Wird das Gerät über längere Zeit nicht benutzt, so sollten Sie es am Steckeranschluss an der Rückwand abschalten, um unnötigen Standby - Verbrauch zu vermeiden. Abb. 2 a: Steckeranschluss auf der Rückseite Page / Seite 16 clearaudio electronic GmbH 2013... -
Seite 18: Aufstellung Und Inbetriebnahme
Stecken Sie den kurzen Schenkel des Absaugarmes von oben in die vorhergesehene Öffnung in der linken, vorderen Ecke der Maschine neben dem Plattenteller (siehe Abb. 4) und drücken sie ihn nach unten. Abb. 4: Installation des Vakuum-Arms clearaudio electronic GmbH 2013 Page / Seite 17... - Seite 19 Vorderfront der Maschine angebracht sind. „POWER“ versetzt den Plattenteller in Rechtslauf „PLATTER“ versetzt den Plattenteller in Linkslauf „VACUUM“ setzt den Vakuum – Prozess in Gang und stoppt diesen. Smart Matrix Professional Abb. 6: Vorderfront der Page / Seite 18 clearaudio electronic GmbH 2013...
- Seite 20 Umdrehungen jeweils nach rechts und links zu empfehlen. Betätigen Sie hierzu den mittleren Druckknopf "Platter". Bitte beachten: Bei zu reichlicher Flüssigkeitsauftragung könnte das Papierlabel Ihrer Schallplatte beschädigt werden oder Flüssigkeit auf das Gehäuse abtropfen. Überschüssige Flüssigkeit bitte mit einem saugfähigen Tuch abtrocknen. clearaudio electronic GmbH 2013 Page / Seite 19...
-
Seite 21: Reinigen Des Auffangbehälters
Wenn Sie die Maschine in Betrieb nehmen, muss der Ablaufschlauch immer mit dem Stopfen blockiert sein, damit keine Flüssigkeit unkontrolliert austreten kann und die Vakuum-Pumpe den erforderlichen Unterdruck für die Absaugung erzeugen kann. clearaudio electronic GmbH 2013 Page / Seite 20... -
Seite 22: Wichtige Bedienhinweise
Verwenden Sie niemals schäumende Reinigungsflüssigkeiten sowie aggressive Reinigungsmittel wie Laugen und Säuren! clearaudio empfiehlt zur schonenden Reinigung die Reinigungsflüssigkeit „Pure Groove“ (Art. Nr. AC048). Verwenden Sie nur ungebrauchte Reinigungsflüssigkeit. Bereits gebrauchte, abgeleitete Reinigungsflüssigkeit kann für eine erneute Reinigung nicht mehr verwendet werden. -
Seite 23: Zubehör
User manual / Bedienungsanleitung 5. Zubehör Smart Matrix Professional Nachfolgend möchten wir Sie über das für Ihre erhältliche Zubehör informieren. Sie können das Zubehör bei Ihrem Fachhändler oder direkt bei clearaudio unter www.analogshop.de nachbestellen. Absaugarme (Art. Nr. AC102 / SH oder SI):... -
Seite 24: Garantie - Informationen
Smart Matrix Professional Die Garantiezeit der beträgt zwei (2) Jahre. Sie können die volle clearaudio - Garantie von drei (3) Jahren in Anspruch nehmen, wenn Sie die beigelegte Garantiekarte innerhalb von zwei Wochen vollständig ausgefüllt an unten aufgeführte Firmenanschrift einsenden: clearaudio electronic GmbH Spardorfer Str. -
Seite 25: Technische Daten
Änderungen bleiben vorbehalten. Lieferbar solange Vorrat reicht. Für Druckfehler keine Haftung. Irrtümer vorbehalten- Kopien und Abdrucke – auch nur auszugsweise – bedürfen der schriftlichen Genehmigung durch die clearaudio electronic GmbH. clearaudio electronic GmbH 2013 Stand: November 2013 clearaudio electronic GmbH 2013... - Seite 26 RETAIN YOUR PURCHASE RECEIPT Your purchase receipt is your permanent record of a valuable purchase. It should be kept in a safe place to be referred to as necessary for insurance purposes or when corresponding with Clearaudio. IMPORTANT When seeking warranty service, it is the responsibility of the consumer to establish proof and date of purchase. Your purchase receipt or invoice is adequate for such proof.