Herunterladen Inhalt Inhalt Diese Seite drucken

Werbung

Verfügbare Sprachen

Verfügbare Sprachen

1 1
NASS-/ TROCKENSAUGER
ASPIRATEUR EAU ET POUSSIÈRE
ASPIRATORE A UMIDO/SECCO
GEBRAUCHSANWEISUNG I MANUEL D'UTILISATION I
MANUALE DI ISTRUZIONI I OPERATOR'S MANUAL

Werbung

Inhaltsverzeichnis
loading

Inhaltszusammenfassung für Ayce MWW305-20L-1250WA

  • Seite 1 NASS-/ TROCKENSAUGER ASPIRATEUR EAU ET POUSSIÈRE ASPIRATORE A UMIDO/SECCO GEBRAUCHSANWEISUNG I MANUEL D’UTILISATION I MANUALE DI ISTRUZIONI I OPERATOR’S MANUAL...
  • Seite 2: Erläuterung Der Symbole

    02 03 ERLÄUTERUNG DER SYMBOLE In dieser Anleitung werden verschiedene Symbole verwendet, die Sie auf mögliche Risiken hinweisen sollen. Es ist wichtig, dass Sie die Sicherheitssymbole kennen und die zugehörigen Erklärungen verstanden haben. Der Das Symbol der durchgestrichenen Mülltonne auf Rädern Warnhinweis selbst vermeidet noch keine Risiken und kann weist daraufhin, dass das Produkt getrennt von den angemessene Verfahren zur Unfallverhütung nicht ersetzen.
  • Seite 3: Staubsauger Auspacken

    04 05 3. Verwenden Sie nur Verlängerungskabel, die für den STAUBSAUGER AUSPACKEN Gebrauch, im Freien geeignet sind (wenn Sie den Staubsauger Überprüfen Sie den Staubsauger beim Auspacken auf im Freien verwenden) und halten Sie diese in einem guten mögliche Schäden. Nehmen Sie den Staubsauger aus Zustand.
  • Seite 4 06 07 könnten sich in den beweglichen Teilen verfangen. Wir 22. Weder die Sicherheitsvorrichtungen noch das Netzkabel empfehlen Latex Handschuhe und rutschfeste Schuhe dürfen modifiziert oder vom Gerät entfernt werden. für Arbeiten im Freien. Tragen Sie eine Kopfbedeckung 23. Wenn Sie das Gerät verwenden, halten Sie es in einer zum Schutz der Haare.
  • Seite 5 08 09 herumliegen. Es besteht Stolpergefahr. 32. Vorsicht ist beim Entleeren extrem schwerer Tanks geboten. 33. Leeren Sie den Tank nach jedem Gebrauch um Selbst- VORSICHT! entzündungen zu vermeiden. Schützen Sie das Gerät vor Regen, um einen Stromschlag 34. Saugen Sie mit diesem Gerät keine brennbaren oder zu vermeiden.
  • Seite 6: Technische Daten

    10 11 Hersteller – haftet für sämtliche Schäden oder Verletzungen, TECHNISCHE DATEN die infolgedessen entstehen. Modell MWW305-20L-1250WA 3. Beachten Sie bitte, dass unser Gerät nicht für den Einsatz in Spannung 220-240 V~ 50/60 Hz kommerziellen, gewerblichen oder industriellen Anwendungen Stromversorgung 1250 W vorgesehen ist.
  • Seite 7 12 13...
  • Seite 8: Montage

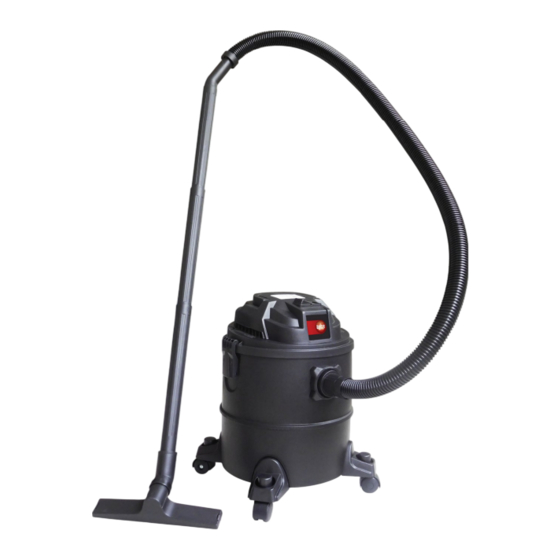
    14 15 MONTAGE Anbringen der Räder (Abb. 5) Stecken Sie die Räder (13) in die entsprechenden Aufhängungen an der Unterseite des Tanks (7). Drücken Sie die Räder (13) fest in die Aufhängungen, bis sie aneinander einrasten und befestigen Sie sie mit den vier Schrauben (18) aus dem Lieferumfang (Abb. 5). WARNHINWEIS! Um schwere Verletzungen durch versehentliches Einschalten zu vermeiden, schalten Sie den Ein-/Ausschalter des Saugers aus und ziehen Sie den Gerätestecker aus der...
  • Seite 9 16 17 Anbringen des Ansaugschlauchs (Abb. 8, 9a) Verbinden Sie den Ansaugschlauch (10) mit dem entsprechenden Anschluss am Nass- und Trockensauger, passend zum erforderlichen Einsatzzweck. Abb. 8 Abb. 9a Abb. 6 Fugendüse (Abb. 9b) Einbauen des Schmutzbeutels (Abb. 7) Die Fugendüse (16) wurde speziell zum Säubern von Spalten und Kanten konstruiert. Stecken Sie zum Trockensaugen den Schmutzbeutel (14) über die Saugöffnung.
  • Seite 10 18 19 Kombinationsdüse (Abb. 9c) Die Kombinationsdüse (12) mit Aufsätzen dient zum Aufsaugen von Festkörpern und Flüssigkeiten auf mittelgrossen bis grossen Flächen. Abb. 9c Abb. 1 Betrieb Saugbetrieb Verbinden Sie den Ansaugschlauch (10) mit dem Sauganschluss (8). Wichtig! Blasbetrieb Schalten Sie das Gerät aus, falls beim Nasssaugen Flüssigkeit oder Schaum Verbinden Sie den Ansaugschlauch (10) mit dem Blasanschluss (9).
  • Seite 11 20 21 Wichtig! Beim Nasssaugen schliesst sich der Sicherheits-Schwimmerschalter (5), sobald der maximale Tankpegel erreicht wurde. Dabei ändert sich das Sauggeräusch des Geräts und wird lauter. Anschliessend müssen Sie das Gerät ausschalten und den Tank leeren. Wichtig! Der Nass- und Trockensauger ist nicht zum Aufsaugen brennbarer Flüssigkeiten geeignet. Abb.
  • Seite 12: Reinigung Und Wartung

    22 23 REINIGUNG UND WARTUNG Wichtig! Ziehen Sie stets den Netzstecker heraus, bevor Sie irgendwelche Reinigungsarbeiten durchführen. Halten Sie alle Sicherheitsvorrichtungen, Luftgitter und das Motorgehäuse möglichst frei von Schmutz und Staub. Wir empfehlen, das Gerät sofort nach dem Gebrauch zu reinigen. Reinigen des Gerätekopfs (Abb.
  • Seite 13 Fällen von Ihnen zu bezahlen. Zusatzhinweis Servicestelle: Während der Garantiezeit können mängelaufweisende Geräte in jeder Jumbo Filiale zurückgebracht werden. Nach Ablauf der Garantiefrist werden die ayce Produkte in jeder Jumbo Filiale angenommen, damit das Produkt entsprechend geprüft werden kann. CH-Import & Distribution exklusiv durch:...
  • Seite 14: Technische Zeichnung

    26 27 TECHNISCHE ZEICHNUNG ERSATZTEILLISTE Teilebezeichnung Teilebezeichnung Tragegriff Schaum am Luftauslass Luftauslassplatte Druckschalter Schalter Schraube Stromkabelplatte Oberer Motordeckel Motor Stromkabel Netzkabelummantelung Unterer Motordeckel Schraube Schraube Ansaugschlauch- Unterlegscheibe Anschlussplatte Buchse Ansaugschlauch-Anschluss Lüfter Klemmen-Anschlussplatte Unterlegscheibe Klemme 2 Mutter Reinigungstank Lufteinlassgitter Castors Schraube Schraube Verlängerungsrohre Gleitender Block...
  • Seite 15: Description Des Symboles

    28 29 DESCRIPTION DES SYMBOLES IL’utilisation de symboles dans cette notice a pour but d’attirer l’attention sur les risques possibles. Les symboles de sécurité et les explications qui les accompagnent doivent être parfaitement compris. Les avertissements en Le pictogramme de la poubelle barrée indique que le produit eux-mêmes ne suppriment pas les risques et ne peuvent doit faire l’objet d’un tri.
  • Seite 16 30 31 utilization extérieure (lorsque l’aspirateur est utilisé à DÉBALLAGE DE L’ASPIRATEUR l’extérieur) et assurezvous qu’elles soient toujours en bon Lorsque vous ouvrez l’emballage, assurez-vous que état. l’aspirateur n’est pas endommagé. Retirez l’appareil de 4. Protégez les câbles électriques et, en particulier, assurez- son emballage.
  • Seite 17 32 33 travail en plein air. Portez un bonnet ou une casquette pour 24. Travaillez uniquement en plein jour ou avec un éclairage protéger les cheveux longs. artificial approprié. 12. Ne pas tirer l’appareil par le cordon. 25. Nous recommandons d’utiliser une protection auditive. 13.
  • Seite 18: Utilisation Prevue

    34 35 inflammables ou combustibles, tels que l’essence, la poudre de photocopieur ou les substances volatiles ; n’utilisez pas l’appareil dans les zones où ces liquides sont présents. VORSICHT! N’aspirez pas d’acides. Afin d’éviter tout risque d’électrocution, n’exposez pas 35. N’aspirez pas de matériaux toxiques, cancérigènes, l’appareil à...
  • Seite 19: Spécifications Techniques

    Notre garantie sera annulée si l’appareil est utilisé à des fins commerciales, industrielles ou marchandes, ou à des finalités équivalentes. SPÉCIFICATIONS TECHNIQUES Modèle MWW305-20L-1250WA Tension nominale 220-240 V~ 50/60 Hz Puissance 1250 W Protection IPX4 Capacité...
  • Seite 20 38 39 ASSEMBLE ASSEMBLAGE AVERTISSEMENT ! Pour éviter des blessures graves dues à un fonctionnement accidentel, positionnez l’interrupteur marche/arrêt sur la position arrêt et débranchez l’appareil de la prise électrique avant d’effectuer l’une des procédures de ce chapitre. Avant de brancher l’appareil dans une prise secteur, vérifiez que les spécifications du courant du secteur sont identiques à...
  • Seite 21 40 41 Assembler les roulettes (Image. 5) Insérez les roulettes (13) dans les supports adéquats sur la face inférieure du réservoir (7). Poussez fermement les roulettes (13) dans les supports jusqu’à ce qu’elles s’enclenchent dedans et fixez-les à l’aide des quatre vis fournies (18) (Image. 5). Image.
  • Seite 22 42 43 Assembler le tuyau Brosse multiusage (Image. 8 , 9a ) (Image. 9c ) Raccordez le tuyau (10) dans le raccord correspondant de l’aspirateur eau et poussières en La brosse multiusage (12) avec accessoires est conçue pour aspirer les solides et les fonction de l’application requise.
  • Seite 23 44 45 Image. 7 Assembler le filtre en mousse Pour aspirer les liquides, utilisez le filtre en mousse (15) Image. 1 Veillez à ce que le filtre soit solidement assemblé en permanence. Aspirer Raccordez le tuyau (10) sur l’orifice d’aspiration (8). Souffler Raccordez le tuyau (10) sur l’orifice de soufflage (9).
  • Seite 24: Nettoyage Et Entretien

    46 47 Débranchez toujours la fiche électrique avant de commencer une opération de nettoyage sur l’appareil. Veillez à ce que tous les dispositifs de sécurité, les orifices de ventilations et le carter Important! moteur soient, autant que possible, exempts de poussières et de saletés. Lors de l’aspiration de liquide, la vanne de sécurité...
  • Seite 25 Indications complémentaires : Pendant la période de garantie, les appareils défectueux peuvent être rapportés dans chaque magasin jumbo. A l’expiration de la période de garantie, les produits ayce seront repris dans chaque magasin Jumbo pour contrôle. CH-Import & Distribution exklusiv durch:...
  • Seite 26: Vue Éclatée

    50 51 VUE ÉCLATÉE LISTE DES PIÈCES N° Dénomination des pièces Qté N° Dénomination des pièces Qté Poignée Mousse de sortie d’air Plaque de sortie d’air Bouton poussoir Interrupteur Plaque du cordon d’alimentation Couvercle supérieur du moteur Moteur Cordon d'alimentation Gaine du cordon d’alimentation Couvercle de la base du moteur Plaque du raccord...
  • Seite 27: Descrizione Dei Simboli

    52 53 DESCRIZIONE DEI SIMBOLI ambientali locali per lo smaltimento dei rifiuti. Separando un prodotto contrassegnato da questo simbolo dai rifiuti domestici, aiuterai a ridurre il volume dei rifiuti destinati agli inceneritori o alle discariche, minimizzando così qualsiasi possibile impatto negativo sulla salute umana e sull’ambiente.
  • Seite 28 54 55 sempre che queste siano in buone condizioni. Estrarre l’aspiratore dalla confezione. Verificare che tutti gli 4. Proteggere i cavi elettrici e, in particolare, accertarsi che accessori standard siano inclusi. Non gettare l’imballaggio non siano schiacciati, tirati o danneggiati da spigoli, oggetti protettivo.
  • Seite 29 56 57 scollegato dalla presa di corrente o dal cavo di prolunga. 25. Si raccomanda l’uso di una qualche protezione per l’udito. 14. Prima di lasciare l’apparecchio incustodito (anche se solo 26. Se l’apparecchio vibra in modo anomalo, spegnere il per poco tempo) spegnerlo e staccare la spina dalla presa motore e cercare di individuare immediatamente la causa.
  • Seite 30: Uso Previsto

    58 59 ATTENZIONE! aspirare acidi. 35. Non aspirare materiali tossici, cancerogeni, combustibili Per evitare scosse elettriche non esporre il dispositivo alla o altri materiali pericolosi, come l’amianto, la polvere di pioggia. Conservarlo al chiuso. amianto, l’arsenico, il bario, il berillio, il piombo, pesticidi Leggere il manuale dell’utente e le istruzioni di sicurezza o qualsiasi altra sostanza nociva per la salute.
  • Seite 31: Specifiche Tecniche

    60 61 in applicazioni tecniche, industriali e commerciali renderà nulla la garanzia. SPECIFICHE TECNICHE Model MWW305-20L-1250WA Tensione di alimentazione 220-240 V~ 50/60 Hz Potenza 1250 W Protezione IPX4 Tensione di alimentazione 20 L Materiale costruzione serbatoio Polipropilene Pressione di aspirazione (kPa) 4.1 kg...
  • Seite 32 62 63 MONTAGGIO AVVERTENZA! Per evitare il rischio di lesioni gravi causate da un'accensione accidentale, spegnere l'apparecchio e scollegarlo dalla presa di corrente prima di effettuare le operazioni descritte in questa sezione. Prima di collegare l'apparecchio alla presa di corrente, assicurarsi che i dati riportati sulla targa dell'apparecchio siano identici ai dati della rete elettrica.
  • Seite 33 64 65 Installazione delle rotelle (Fig. 5) Montare le ruote (13) nei rispettivi alloggiamenti presenti sulla parte inferiore del serbatoio (7). Spingere saldamente le ruote (13) all’interno del supporto fino a farle scattare in posizione e fissarle con le quattro viti (18) fornite in dotazione (fig. 5). Fig .6 Montaggio del sacchetto di raccolta della polvere (fig.
  • Seite 34: Funzionamento

    66 67 Installazione del tubo di aspirazione Bocchetta combinata (Fig. 8, 9a ) (Fig. 9c) Collegare il tubo di aspirazione (10) al connettore corrispondente sull'apparecchio, a La bocchetta combinata (12) con accessori è progettata per l'aspirazione di solidi e liquidi da seconda dell'applicazione richiesta.
  • Seite 35 68 69 Fig. 7 Aspirazione di sostanze umide (Fig. 6 ) Per l'aspirazione di sostanze umide, utilizzare il filtro in schiuma (15). Fig. 1 Verificare che il filtro sia installato saldamente. Aspirazione Collegare il tubo di aspirazione (10) al connettore del tubo di aspirazione (8). Soffiaggio Collegare il tubo di aspirazione (10) al connettore di soffiaggio (9).
  • Seite 36: Manutenzione

    70 71 MANUTENZIONE Pulizia Importante! Durante l'aspirazione di sostanze umide, la valvola di sicurezza (5) si chiuderà al raggiungimento del livello massimo di riempimento. Di conseguenza, il rumore di Importante! aspirazione dell'apparecchio aumenterà di volume. Spegnere l'apparecchio e svuotare il contenitore. Prima di iniziare qualsiasi operazione di pulizia, scollegare la spina dalla presa di corrente.
  • Seite 37: Certificato Di Garanzia

    Durante il periodo di garanzia, gli apparecchi difettosi possono essere restituiti presso qualsiasi punto vendita jumbo. Dopo la scandenza del periodo di garanzia i prodotti ayce vengono accettati presso tutte le filiali jumbo, affinché il prodotto ayce possa essere di nuovo adeguatamente esaminato.
  • Seite 38 74 75 SCHEMI TECNICI ELENCO DEI PEZZI DI RICAMBIO Nomepezzo QTÀ Nomepezzo QTÀ Materiale in espanso Maniglia di trasporto per uscita dell’aria Piastra di uscita dell’aria Pulsante interruttore Interruttore Vite Piastra cavo di alimentazione Copertura superiore motore Motore Cavo di alimentazione Rivestimento cavo di alimentazione Copertura base motore Vite...
  • Seite 39: Description Of The Symbols

    76 77 DESCRIPTION OF THE SYMBOLS The symbols are used in this manual to attract your attention to possible risks. The safety symbols and the explication which accompany them must be perfectly understood. The warning themselves do not prevent the risks and cannot be a The crossed-out wheeled bin symbol indicates that the item substitute for proper methods of avoiding accidents.
  • Seite 40 78 79 3. Use only extension cords approved for outdoor use (when Read the operating instructions before assembling the vacuum is used outside) and make sure that they are and using the appliance for the first time. always in good condition. 4.
  • Seite 41 80 81 14. Before leaving the device unsupervised (even for a brief 27. The vacuum cleaner should be properly checked before time) turn it off and unplug it from the electrical outlet. This each use. should also be done if there is a loss of power. Do not use a machine that is not in perfect condition.
  • Seite 42: Intended Use

    82 83 dust. These particles are extremely fine and can pass through the filters affecting the motor’s performance or be CAUTION ! blown into the air. If necessary, you may need a more efficient filter. In order to avoid electric shock, do not expose the device to 37.
  • Seite 43: Technical Specifications

    84 85 TECHNICAL SPECIFICATIONS Model MWW305-20L-1250WA Supply Voltage 220-240 V~ 50/60 Hz Power 1250 W Protection IPX4 Tank capacity 20 L Tank construction material Polypropylene Vacuum Pressure (kPa) 4.1 kg Unit weight LIST OF MAIN PART 1. Handle 2. ON/OFF switch 3.
  • Seite 44 86 87 ASSEMBLE WARNING! To prevent serious injury from accidental operation, turn the power switch of the vacuum off and unplug the appliance from its electrical outlet before performing any procedure in this section. Before you connect the appliance to the mains supply make sure that the data on the rating plate are identical to the mains data.
  • Seite 45 88 89 Assembling the wheels (Fig. 5) Fit the wheels (13) into the appropriate mountings on the underside of the tank (7). Push the wheels (13) firmly into the mounting until they engage with each other and fix by four screws (18) supplied (Fig.
  • Seite 46 90 91 Fitting the suction hose Combination nozzle (Fig. 8, 9a ) (Fig. 9c) Connect the suction hose (10) to the corresponding connector on the wet and dry vacuum The combination nozzle (12) with attachments is for vacuuming solids and liquids over cleaner, depending on the application required.
  • Seite 47 92 93 Fig. 7 Wet vacuuming For wet-vacuuming, use the foam filter (15) Fig. 1 Check that the filter is securely fitted at all times. Vacuuming Connect the suction hose (10) to the suction hose connector (8). Blowing Connect the suction hose (10) to the blow connector (9). The 3-part suction tube (11) can be attached to the suction hose (10) to extend it.
  • Seite 48: Cleaning And Maintenace

    94 95 CLEANING AND MAINTENACE Important! When wet vacuuming, the floating safety switch (5) closes when the maximum tank level is Important! reached. In doing so, the suction noise of the equipment will change and become louder. Always pull out the mains power plug before starting any cleaning work. You must then switch off the equipment and empty the tank.
  • Seite 49: Warranty Certificate

    Additional note service center: Defect products can be returned to every jumbo store during the warranty period. After the warranty period, the ayce products are accepted in any jumbo store, so the product may be tested in accordance. CH-Import & Distribution exklusiv durch:...
  • Seite 50: Technical Drawing

    98 99 TECHNICAL DRAWING SPARE PARTS LIST Part name Part name Air outlet foam Handle Switch push bottom Air outlet plate Screw Switch Motor top cover Power cord plate Power cord Motor Power cord sheathing Motor base cover Screw Screw Washer Suction connection plate Bushing...
  • Seite 51 CH-Import & Distribution exklusiv durch: Jumbo-Markt AG Industriestrasse 34 8305 Dietlikon WWW.AYCE.CH...

Inhaltsverzeichnis