Herunterladen Inhalt Inhalt Diese Seite drucken

Werbung

Verfügbare Sprachen

Verfügbare Sprachen

10-285 / 10-385
1

Werbung

Inhaltsverzeichnis
loading

Inhaltszusammenfassung für Niko 10-285

  • Seite 1 10-285 / 10-385...
  • Seite 2 10-285 / 10-385...
  • Seite 3 De modulaire inbouwposten tot 1.000 appartementen maken deel uit van het toegangscontrolegamma. De buitenposten zijn bestemd voor deutelefonie. Deze inbouwbuitenposten zijn verkrijgbaar in twee modellen: zonder camera (10-285) en met kleurencamera (10-385). Beide buitenposten zijn voorzien van een klavier, lcd-display, microfoon en luidspreker.
  • Seite 4 10-285 / 10-385 2.4. Omschrijving basisonderdelen 2.4.1. Luidsprekermodule Microfoon Afdekking PS/2-aansluiting (zie programmatiehandleiding PH010-28500) Maak de afdekking los met een inbussleutel van 3 mm (niet meegeleverd) Verbindingskabel microfoon Verbindingskabel PS/2-toetsenbord Verbindingskabel luidsprekers Technische data: Behuizing Geanodiseerd aluminium H x B x D...
  • Seite 5 10-285 / 10-385 Korte omschrijving: • Voor max. 1.000 appartementen • Lcd-display, 160 x 160 pixels met wit-blauwe achtergrondverlichting • 3 verschillende toegangscodes mogelijk • Mogelijkheid om een oproepnummer te zoeken in een alfabetische bewonerslijst, of een bewoner op te roepen via het flatnummer •...
  • Seite 6 Welk type kabel gebruik ik? De audiobuitenpost 10-285 wordt 3-draads bekabeld, met een getwiste kabel voor een optimale werking. De diameter van de aders bepaalt de maximale afstand van de voeding tot de binnen- of buitenpost. Onderstaande tabel geeft een overzicht van de maximale afstand per type kabel.
  • Seite 7 • Monteer de inbouwdoos gelijk met de muur. buitenposten te bedraden. • Plaats de camera op een hoogte van 160 à 170 cm. Schroef de opbouwdoos met 4 (10-285) of 6 (10-385) (Niet bijgeleverd: schroeven om de inbouwdoos te schroeven vast (fig. 3).
  • Seite 8: Inbedrijfstelling

    10-285 / 10-385 4. INBEDRIJFSTELLING Installeer de binnenpost niet onder spanning. Sluit het toestel pas na volledige installatie aan op het net. -Bij het aansluiten van het videosignaal, V1(+) en V2(-), moet je rekening houden met de polariteit. -Controleer op kortsluitingen tussen a-,b- en P voor je de installatie op het net aansluit.
  • Seite 9 10-285 / 10-385 Bel de bewoner op • Druk op om de bewoner te bellen. Je hoort een bevestigingstoon (of gesproken oproep bezig ... boodschap) en krijgt een melding op het scherm. Als de oproep niet beantwoord wordt (en de buitenpost dus geen reactie krijgt), krijg je een foutmelding.
  • Seite 10 10-285 / 10-385 5.3. Een bewoner bellen ... door het flatnummer in te geven Toetsenbordmodule Display Start • Geef het flatnummer in met de cijfertoetsen (toetsen 0 tot 9). Voer Geef het flatnummer in Westvleugel 1 nummer in: bevestig met OK Bel de bewoner op •...
  • Seite 11: Probleemoplossing

    10-285 / 10-385 5.5. Deur openen met toegangscode Toetsenbordmodule Display Geef de juiste code in • Druk op C. Het volgende scherm verschijnt: Voer toegangscode in Bevestig met OK De code is juist • Geef de 4-cijferige code in. • Druk op Voer Er klinkt een bevestigingstoon (of gesproken boodschap).
  • Seite 12: Technische Gegevens

    • Deze handleiding moet aan de gebruiker worden overhandigd. Het moet bij het dossier van de elektrische installatie worden gevoegd en worden overgedragen aan eventuele nieuwe eigenaars. Bijkomende exemplaren zijn verkrijgbaar via de website of supportdienst van Niko. Op de Niko website is altijd de meest recente handleiding van het product terug te vinden.
  • Seite 13: Garantiebepalingen

    10-285 / 10-385 10. NIKO SUPPORT Heb je twijfel? Of wil je het product omruilen in geval van een eventueel defect? Neem dan contact op met je groothandel of de Niko supportdienst: • België: +32 3 778 90 80 • Nederland: +31 183 64 06 60 Contactgegevens en meer informatie vind je op www.niko.eu onder de rubriek “Hulp en advies”.
  • Seite 14 Les postes modulaires encastrables jusqu’à 1 000 appartements font partie de la gamme contrôle d’accès. Les postes extérieurs sont destinés à la parlophonie. Ces postes extérieurs encastrables sont disponibles en deux modèles : sans caméra (10-285) et avec caméra couleur (10-385). Les deux postes extérieurs sont équipés d’un clavier, d’un écran LCD, d’un microphone et d’un haut-parleur.
  • Seite 15 10-285 / 10-385 2.4. Description des éléments de base 2.4.1. Module haut-parleur Microphone Cache interface PS/2 Détachez le cache à l'aide d'une clé Allen de 3 mm (non fournie) Câble de raccordement microphone Câble de raccordement clavier PS/2 Câble de raccordement haut-parleurs Données techniques :...
  • Seite 16 10-285 / 10-385 Brève description : • Pour max. 1 000 appartements • Écran LCD, 160 x 160 pixels avec rétroéclairage blanc-bleu • 3 codes d'accès différents possible • Possibilité de rechercher un numéro d'appel dans une liste de résidents par ordre alphabétique, ou d'appeler un résident via le numéro d'appartement •...
  • Seite 17: Installation

    Quel type de câble dois-je utiliser ? Le poste extérieur audio 10-285 est raccordé au moyen d’un câble torsadé à 3 fils en vue d’un fonctionnement optimal. Le diamètre des conducteurs détermine la distance maximale entre l’alimentation et le poste intérieur ou extérieur. Le tableau ci-dessous donne un aperçu de la distance maximale par type de câble.
  • Seite 18 1. Si les postes extérieurs sont appelés en même temps, veuillez alors tenir compte du fait qu'il faut régler l'adresse des postes extérieurs (voir manuel de programmation PH010-285). 2. Veuillez prendre contact avec Niko pour de plus grandes installations ! Alimentation...
  • Seite 19: Mise En Service

    10-285 / 10-385 4. MISE EN SERVICE N’installez pas le poste intérieur sous tension. Ne raccordez l’appareil au réseau qu’une fois l’installation terminée. - Lors du raccordement du signal vidéo, V1(+) et V2(-), tenez compte de la polarité. - Vérifiez qu’il n’y a pas de court-circuit entre a-,b- et P avant de raccorder l’installation au réseau.
  • Seite 20 10-285 / 10-385 Appelez le résident • Appuyez sur afin d'appeler le résident. Une tonalité de confirmation retentit (ou un Appel... message vocal) et un message s'affiche à l'écran. Jean Si personne ne répond à l’appel (et que le poste extérieur ne reçoit donc aucune réaction), le système retourne un message d’erreur.
  • Seite 21 10-285 / 10-385 5.3. Appeler un résident...en introduisant le numéro d’appartement Module clavier Écran Démarrage • Introduisez le numéro d'appartement à l'aide des touches numériques (touches 0 à 9). Entrez le Introduisez le numéro d’appartement numéro AILE OUEST1: confirmez avec OK Appelez le résident...
  • Seite 22: Résolution Des Problèmes

    10-285 / 10-385 5.5. Ouvrir la porte à l’aide du code d’accès Module clavier Écran Introduisez le code correct • Appuyez sur C. L’écran suivant apparaît : Entrez le code d’accès: confirmez avec OK Le code est correct • Introduisez le code à 4 chiffres.
  • Seite 23: Entretien

    • Ce mode d’emploi doit être remis à l’utilisateur. Il doit être joint au dossier de l’installation électrique et être remis aux nouveaux propriétaires éventuels. Des exemplaires supplémentaires peuvent être obtenus sur le site web ou auprès du service support de Niko.
  • Seite 24: Dispositions De Garantie

    10. SUPPORT DE NIKO En cas de doute ou si vous voulez échanger le produit en cas de défaut éventuel, veuillez prendre contact avec votre grossiste ou avec le service support de Niko: • Belgique: +32 3 778 90 80 •...
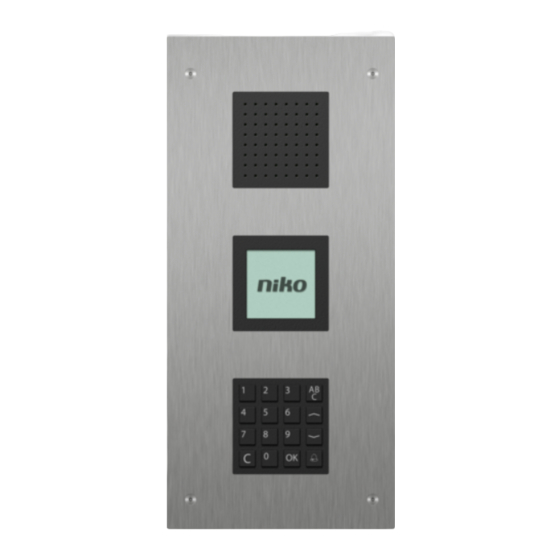
  • Seite 25 Die modularen Unterputzsprechstellen bis 1.000 Wohnungen sind Bestandteil des Zugangskontrollsortiments. Die Außensprechstellen sind für die Türkommunikation bestimmt. Diese Unterputzaußensprechstellen sind in zwei Modellen erhältlich: ohne Kamera (10-285) und mit Farbkamera (10-385). Beide Außensprechstellen sind mit Tastatur, LCD-Bildschirm, Mikrofon und Lautsprecher ausgestattet.
  • Seite 26 10-285 / 10-385 2.4. Beschreibung der Basisteile 2.4.1. Lautsprechermodul Mikrofon Abdeckung PS/2-Anschluss Lösen Sie die Abdeckung mit einem Inbusschlüssel (3 mm) (nicht im Lieferumfang enthalten). Verbindungskabel des Mikrofons Verbindungskabel PS/2-Tastatur Verbindungskabel Lautsprecher Technische Daten: Gehäuse Eloxiertes Aluminium H x B x T...
  • Seite 27 10-285 / 10-385 Kurzbeschreibung: • Für max. 1.000 Wohnungen • LCD-Bildschirm, 160 x 160 Pixel mit weiß-blauer Hintergrundbeleuchtung • 3 verschiedene Zugangscodes möglich • Möglichkeit, eine Rufnummer in einer alphabetischen Bewohnerliste zu suchen oder einen Bewohner über die Wohnungsnummer anzurufen •...
  • Seite 28 Welchen Kabeltyp benötige ich? Der Anschluss der Audioaußensprechstelle 10-285 erfolgt 3-drahtig mit einem getwisteten Kabel für eine optimale Funktion. Der Aderndurchmesser bestimmt den maximalen Abstand zwischen Netzteil und Innen- bzw. Außensprechstelle. Untenstehende Tabelle bietet eine Übersicht über die maximalen Abstandswerte bezogen auf den Kabeltyp.
  • Seite 29 10-802 + 10-805-01 Hinweis: 1. Wenn die Außensprechstelle gleichzeitig angerufen wird, berücksichtigen Sie, dass die Adresse der Außensprechstelle eingestellt werden muss (siehe Programmieranleitung PH010-285). 2. Nehmen Sie für größere Installationen Kontakt zu Niko auf! Voeding Max # 10-575 Max #10-570 Max #10-571 Max # Außensprechstelle...
  • Seite 30: Funktionsweise Und Betrieb

    10-285 / 10-385 Innensprechstelle niemals unter Spannung installieren. Schließen Sie das Gerät erst nach abgeschlossener Installation an Netzspannung an. -Beim Anschluss des Videosignals, V1(+) und V2(-), müssen Sie die Polarität berücksichtigen. -Überprüfen Sie auf Kurzschlüsse zwischen a-,b- und P, bevor Sie die Installation ans Stromnetz anschließen.
  • Seite 31 10-285 / 10-385 Bewohner anrufen • Drücken Sie auf , um den Bewohner anzurufen. Sie hören ein Bestätigungssignal Klingeln bei... (oder eine Sprachmitteilung) und erhalten einen Hinweis auf dem Bildschirm. Klaus Wenn der Anruf nicht entgegengenommen wird (und die Außensprechstelle keine Reaktion erhält), erhalten Sie eine Fehlermeldung.
  • Seite 32 10-285 / 10-385 5.3. Einen Bewohner anrufen ... indem Sie die Wohnungsnummer eingeben Tastaturmodul Bildschirm Start • Geben Sie die Wohnungsnummer über die Nummerntasten (Tasten 0 bis 9) ein. Bitte Eingabe der Wohnungsnummer WESTFLÜGEL 1-Nr eingeben: Eingabe mit OK bestätigen Bewohner anrufen •...
  • Seite 33: Störungsabhilfe

    10-285 / 10-385 5.5. Tür öffnen mit dem Zugangscode Tastaturmodul Bildschirm Den richtigen Code eingeben • Drücken Sie auf C. Es erscheint folgendes Anzeigebild: Bitte Kode eingeben: Eingabe mit OK bestätigen Der Code ist richtig • Geben Sie den vierstelligen Code ein.
  • Seite 34: Technische Daten

    • Diese Gebrauchsanleitung muss dem Benutzer ausgehändigt werden. Die Gebrauchsanleitung ist den Unterlagen der elektrischen Anlage beizufügen und muss auch eventuellen neuen Besitzern ausgehändigt werden. Zusätzliche Exemplare erhalten Sie über die Internetseiten von Niko oder über den Kundendienst von Niko.
  • Seite 35: Niko Unterstützung

    Bei Zweifel oder falls Sie bei einem eventuellen Defekt des Produkts noch Fragen bezüglich des Umtausches haben, dann nehmen Sie bitte Kontakt auf mit dem Kundendienst von Niko (Belgien: +32 3 778 90 80) oder wenden Sie sich an Ihren Großhändler. Kontaktdaten und weitere Informationen erhalten Sie im Internet unter www.niko.eu in der Rubrik “Unterstützung und Beratung”.
  • Seite 36 The modular flush-mounting units for up to 1,000 apartments are part of the access control range. The external units are designed for door intercom systems. The external flush-mounting units are available in two models: without camera (10-285) and with colour camera (10-385). Both external units are equipped with a keypad, LCD display, microphone and loudspeaker.
  • Seite 37 10-285 / 10-385 2.4. Description basic components 2.4.1. Loudspeaker module Microphone Cover PS/2 socket Loosen the cover with an Allen key of 3 mm (not included) Connection cable microphone Connection cable PS/2 keypad Connection cable loudspeakers Technical data: Housing Anodized aluminium...
  • Seite 38 10-285 / 10-385 Short description: • For max. 1,000 apartments • LCD display, 160 x 160 pixels with white-blue backlight • Possibility for 3 different access codes • Possibility to search for a call number in an alphabetized tenants list, or to call a resident using the apartment number •...
  • Seite 39 Which type of cable should I use? The external audio unit 10-285 is wired with a 3-wire twisted cable for optimal quality. The diameter of the wires will determine the maximum distance between the power supply and the internal or external unit. The table below provides an overview of the maximum distance per type of cable.
  • Seite 40 • Mount the flush-mounting box completely level with the wall. box to wire the external units. • Place the camera at a 160 to 170 cm height. Tighten the surface-mounting box using 4 (10-285) or 6 (Not included: screws to mount the flush-mounting box) (10-385) screws (fig. 3).
  • Seite 41: Starting The Device

    10-285 / 10-385 4. STARTING THE DEVICE Disconnect all power before installing the internal unit. Do not connect the device to the mains voltage until installation has been completed. - When connecting the video signal, V1(+) and V2(-), keep in mind the polarity.
  • Seite 42 10-285 / 10-385 Call the resident • Press to call the resident. You will hear a confirmation tone (or voice message) and calling ... see a notification on the screen. James If the call is unanswered (and the external unit does not receive a response), you will see an error message.
  • Seite 43 10-285 / 10-385 5.3. Call a resident ... by typing the flat number Keypad module Display Type the flat number • Type the flat number using the number keys (numbers 0 to 9). Enter West Wing 1 number: confirm with OK Call the resident •...
  • Seite 44: Troubleshooting

    10-285 / 10-385 5.5. Deur openen met toegangscode Keypad module Display Enter the correct code • Press C. The following screen will appear: Enter access code: confirm with OK The code is correct • Enter the 4-digit code. • Press Enter You will hear a confirmation tone (or voice message).
  • Seite 45: Technical Data

    • This user manual should be presented to the user. It should be included in the electrical installation file, and it should be passed on to any new owners. Additional copies are available on the Niko website or via the Niko support service.
  • Seite 46: Guarantee Provisions

    10. NIKO SUPPORT In case of doubt or for the specific exchange procedure in case of a possible defect, contact the Niko support service in Belgium at +32 3 778 90 80 or your wholesaler/installer. Contact details and more information can be found at www.niko.eu under the “Help and advice” section.
  • Seite 47 13 14 15 16 17 230V~ 230V~ 10-285 Fig. 1 Installatieschema: 10-285 * verwijder het lampje Fig. 1 Schéma d’installation : 10-285 * retirez la lampe Fig. 1 Installationsschema: 10-285 * Lampe entfernen Fig. 1 Wiring diagram: 10-285 * remove lamp...
  • Seite 48 10-285 / 10-385 10-575 12V 1A max 10-575 12V 1A max 8-24 V 10-806 10-805-01 25 26 27 28 29 30 31 32 33 34 35 36 37 38 39 40 41 42 – 26V DC / 2,5A 10-805-01 (Fonts)
  • Seite 49 10-285 / 10-385 Fig. 3 Montage inbouwdoos Fig. 3 Montage du boîtier encastrable Fig. 3 Montage der Unterputzdose Fig. 3 Mounting the flush-mounting box...
  • Seite 50 10-285 / 10-385 10-285 Toetsenbordmodule - Module clavier Tastaturmodul - Keypad module Displaymodule - Module écran Bildschirmmodul - Display module Luidsprekermodule - Module haut-parleur Lautsprechermodul - Loudspeaker module Cameramodule - Module caméra Kameramodul - Camera module 10-385 Fig. 4a Bekabeling tussen de modules Fig.
  • Seite 51 10-285 / 10-385 0 , 5 Fig. 5 Montage afdichting op frontplaat Fig. 5 Montage de la plaque frontale Fig. 5 Montage der Frontplatte Fig. 5 Mounting the front plate...
  • Seite 52 10-285 / 10-385 nv Niko sa Industriepark West 40, BE-9100 Sint-Niklaas, Belgium tel. +32 3 778 90 00 — fax +32 3 777 71 20 — e-mail: support@niko.be — www.niko.eu PM010-28500R16082...

Diese Anleitung auch für:

10-385

Inhaltsverzeichnis